Catatan
Akses ke halaman ini memerlukan otorisasi. Anda dapat mencoba masuk atau mengubah direktori.
Akses ke halaman ini memerlukan otorisasi. Anda dapat mencoba mengubah direktori.
Pekerjaan Apache Airflow di Microsoft Fabric memberikan pengalaman berbasis cloud secara alami untuk teknisi data dan ilmuwan data, dengan fitur seperti penyediaan runtime instan, penulisan yang berbasis cloud, penskalaan otomatis dinamis, jeda otomatis yang cerdas, dan keamanan yang ditingkatkan. Ini adalah layanan terkelola penuh yang memungkinkan Anda membuat, menjadwalkan, dan memantau alur kerja Apache Airflow di cloud tanpa khawatir tentang infrastruktur yang mendasar.
Sekarang, dengan model AI gpt-4o di Azure, kami mendorong batasan dari apa yang dapat Anda lakukan dengan Apache Airflow Jobs dan memungkinkan Anda membuat Apache Airflow DAGs hanya dari sekadar ide sketsa papan tulis Anda. Fitur ini berguna untuk teknisi data dan ilmuwan data yang ingin dengan cepat membuat prototipe dan memvisualisasikan alur kerja data mereka.
Dalam artikel ini, Anda membuat alur kerja end to end yang mengunduh sketsa yang disimpan di Lakehouse Anda, gunakan gpt-4o untuk mengubahnya menjadi APACHE Airflow DAG dan memuatnya ke apache Airflow Jobs untuk eksekusi.
Prasyarat
Sebelum Anda membuat solusi, pastikan prasyarat berikut disiapkan di Azure dan Fabric:
- Sebuah akun Azure OpenAI dengan kunci API dan model gpt-4o yang dideploy.
- Buat aplikasi ID Microsoft Entra jika Anda tidak memilikinya.
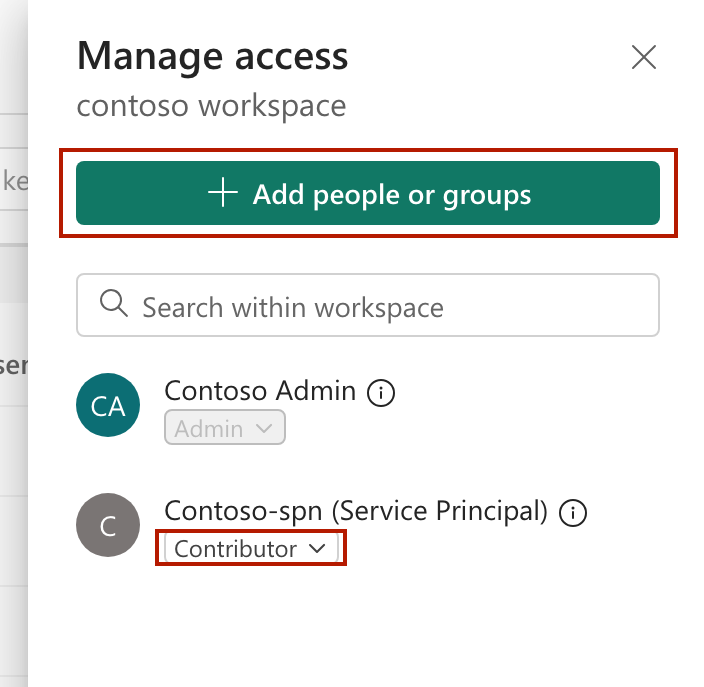
- Tambahkan perwakilan Layanan Anda sebagai "Kontributor" di ruang kerja Microsoft Fabric Anda.
- Buat "Tugas Apache Airflow" di ruang kerja.
- Buat diagram dari tampilan DAG Apache Airflow yang Anda inginkan, atau simpan gambar yang diberikan pada langkah 1 di ke komputer lokal Anda.
- Tambahkan paket Python berikut di
requirements.txtyang ada di lingkungan Apache Airflow Job Anda.azure-storage-file-datalake Pillow

Langkah 1: Unggah gambar ke Fabric Lakehouse
Sebelum dapat menganalisis gambar, Anda perlu mengunggahnya ke Lakehouse Anda.

Unggah file dari komputer lokal Anda ke folder
FilesLakehouse.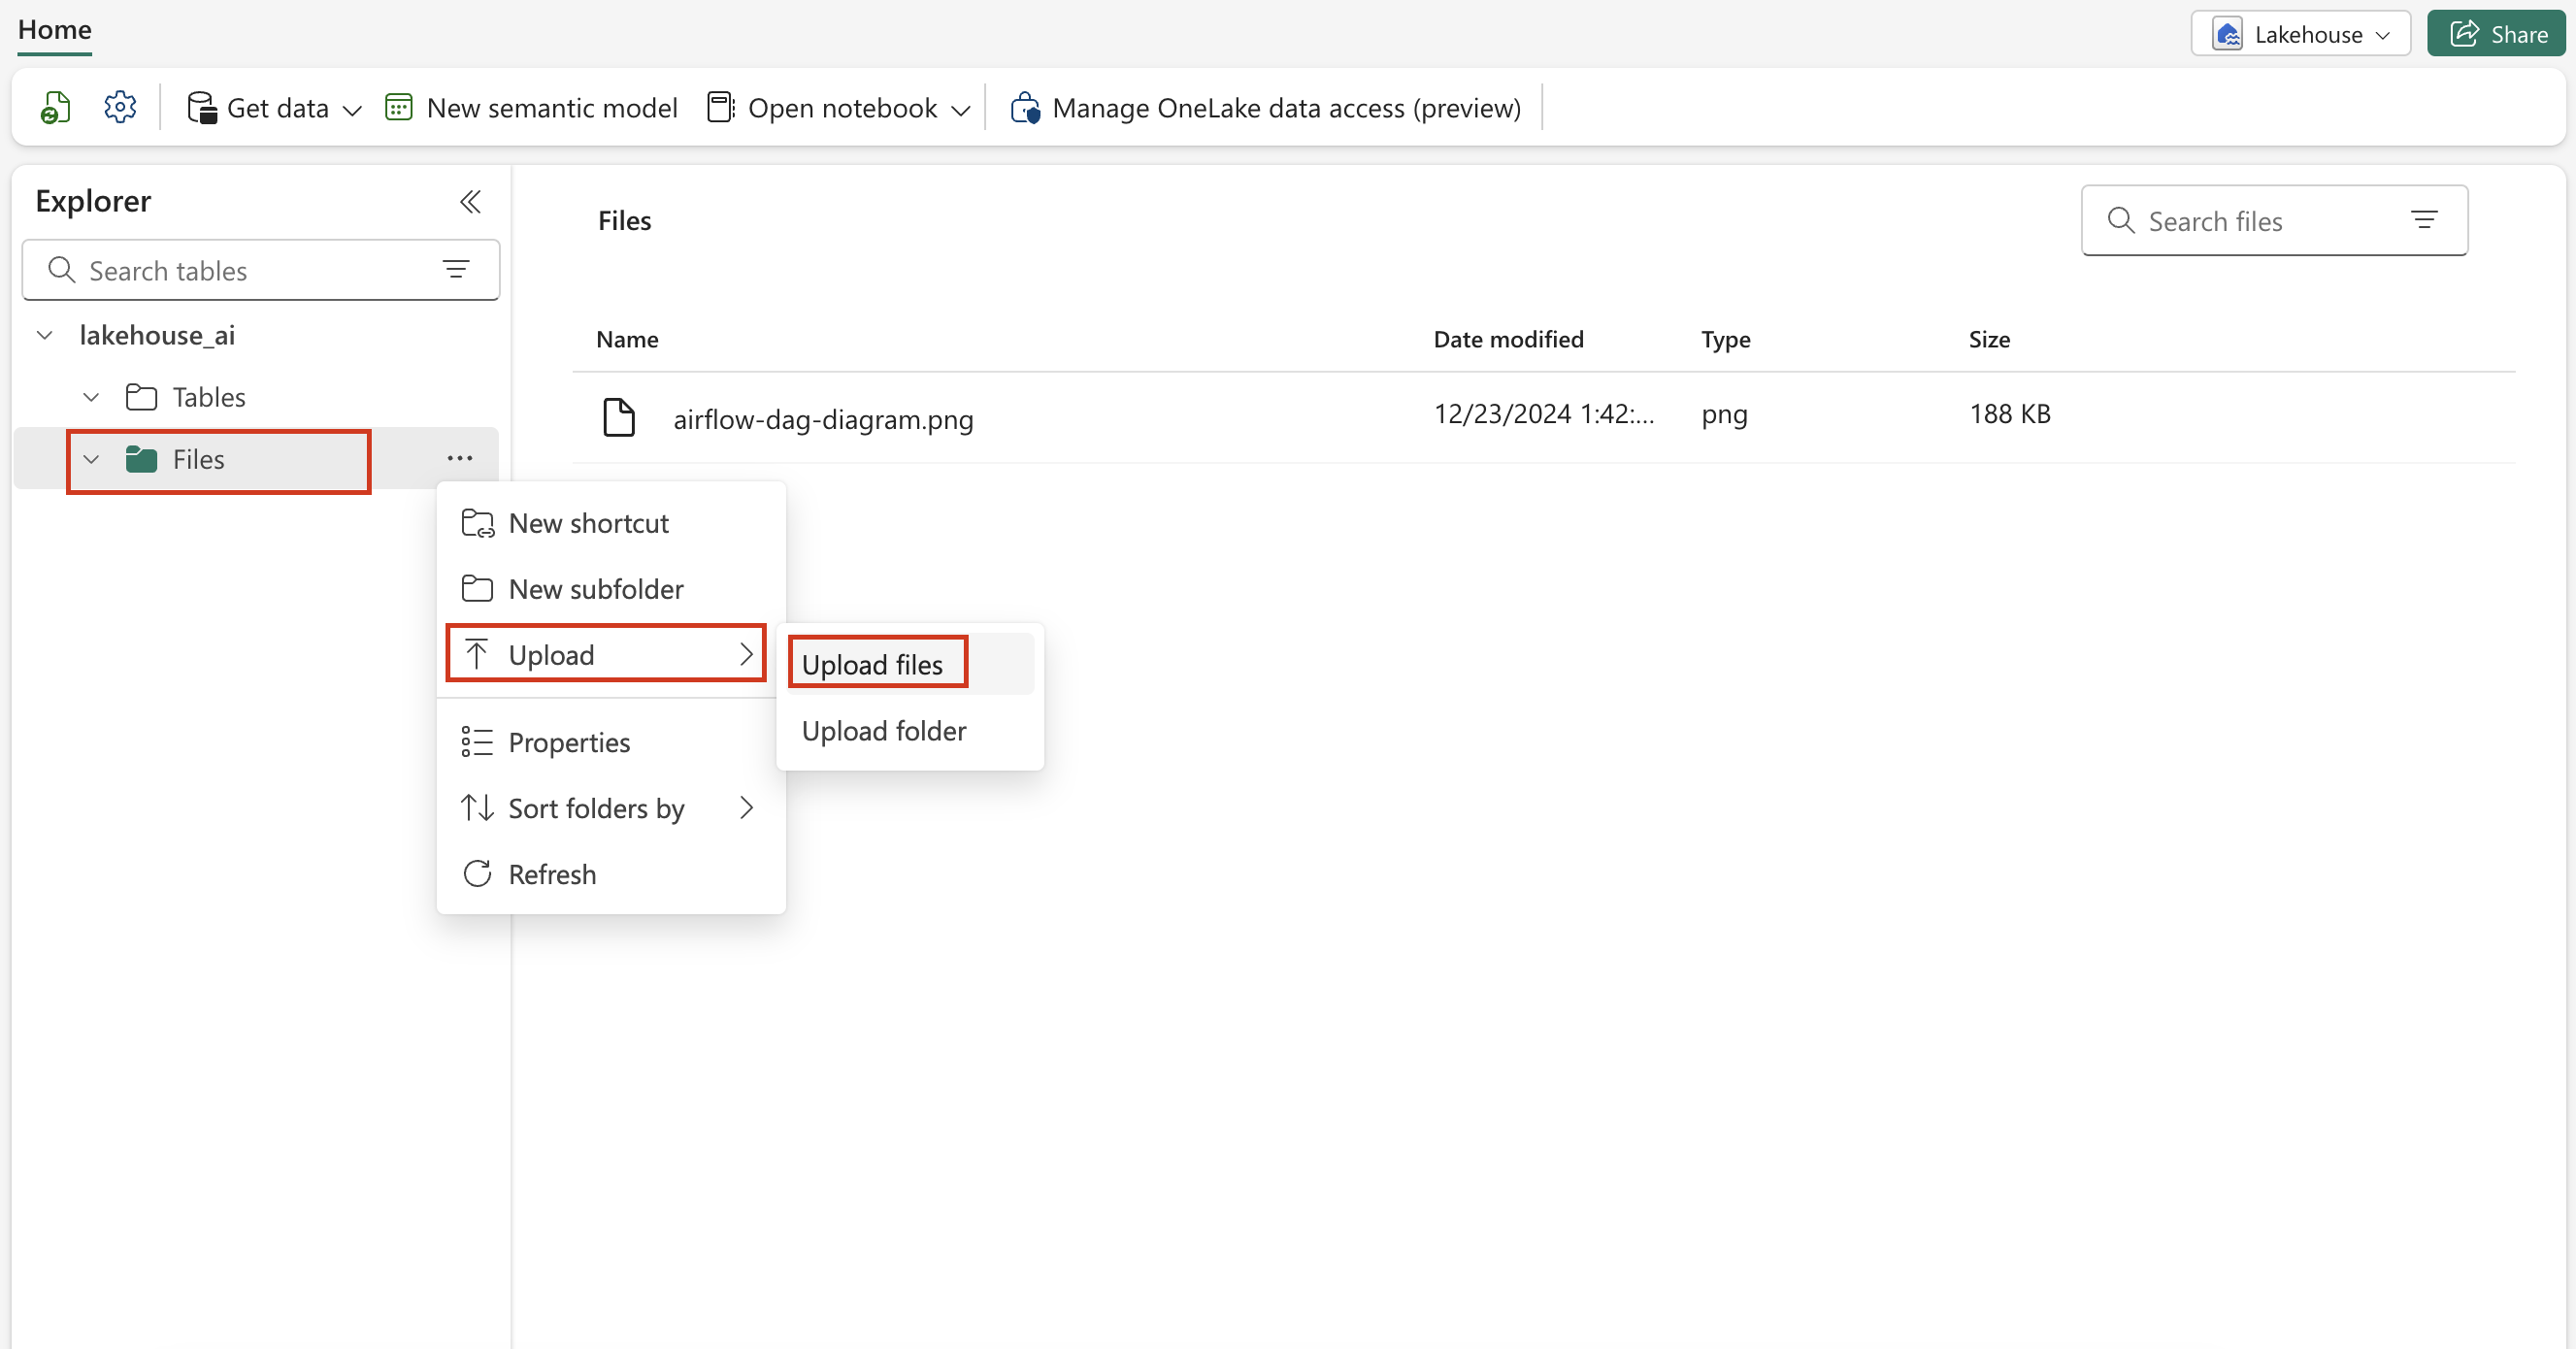
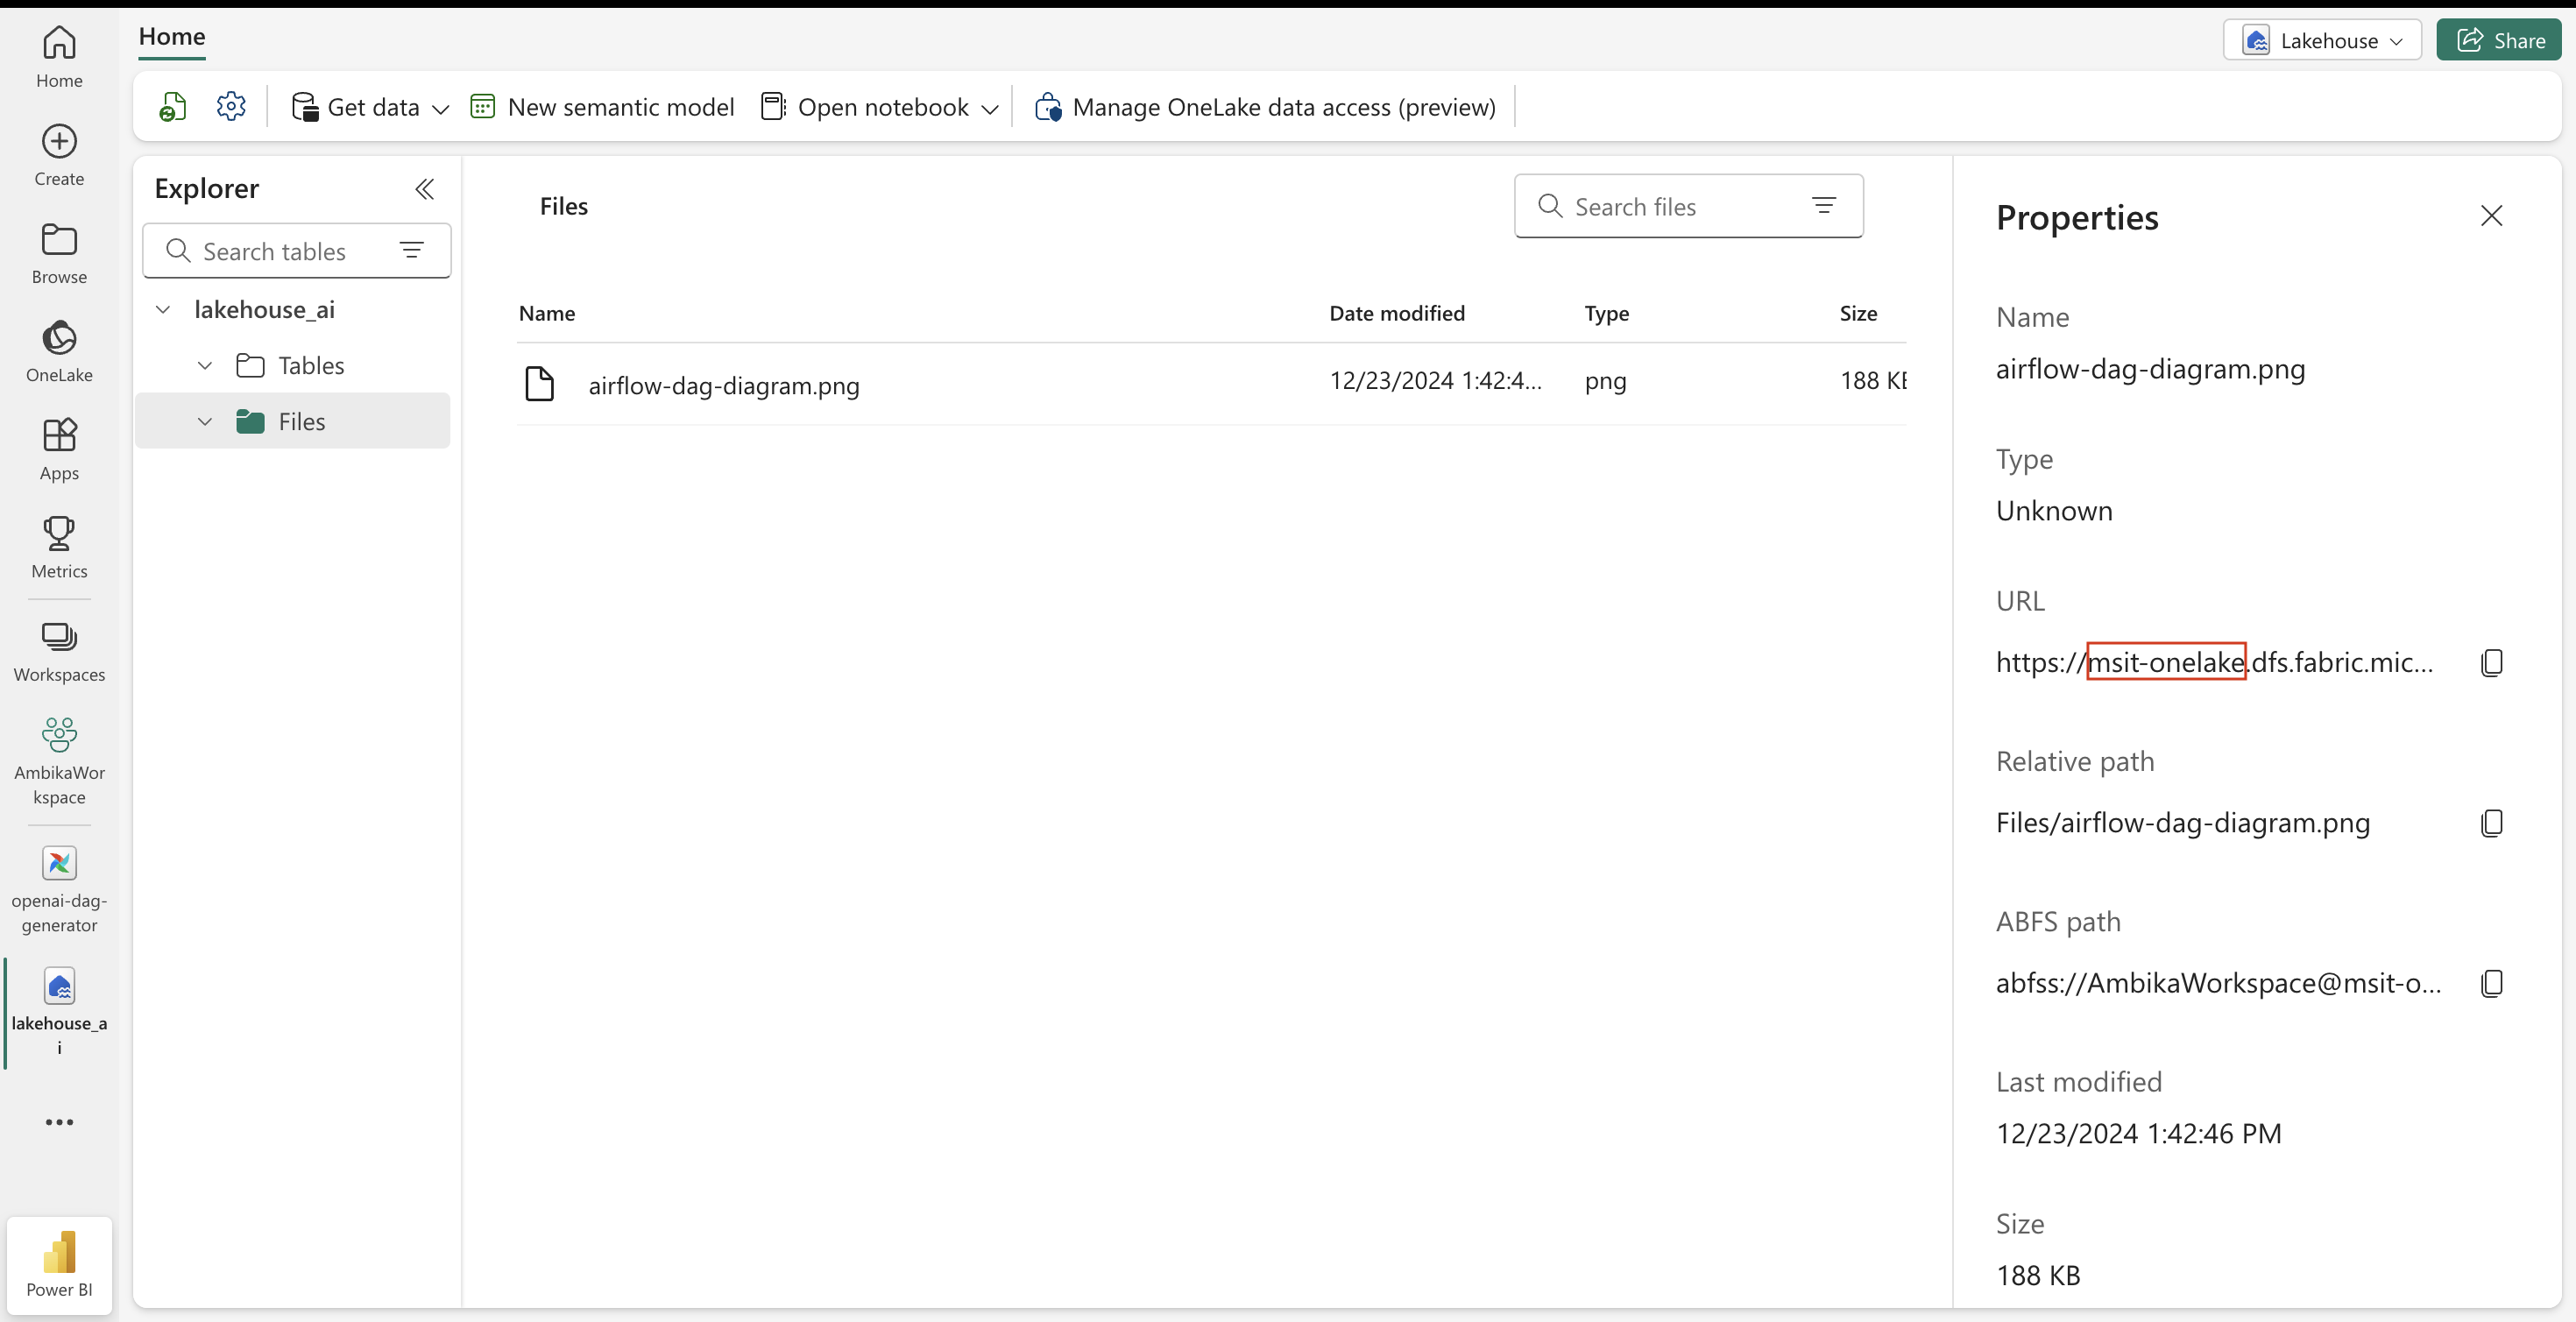
Salin nama akun penyimpanan Fabric Lakehouse Anda, nama tersebut digunakan dalam koneksi Apache Airflow untuk mengautentikasi dengan Lakehouse.


Langkah 2: Siapkan Variabel Lingkungan untuk mengautentikasi dengan Lakehouse dan Azure OpenAI.
Catatan: Tutorial ini didasarkan pada Airflow versi 2.6.3.

Kredensial untuk REST API Lakehouse.
Kita akan menggunakan Lakehouse Rest API untuk mengunduh gambar dari Lakehouse. Untuk mengautentikasi dengan Rest API Lakehouse, Anda perlu mengatur variabel lingkungan berikut di Apache Airflow Job.
-
FABRIC_CLIENT_ID: ID klien aplikasi ID Microsoft Entra. -
FABRIC_CLIENT_SECRET: Rahasia klien aplikasi ID Microsoft Entra. -
FABRIC_TENANT_ID: ID penyewa aplikasi ID Microsoft Entra.
Kredensial untuk Azure OpenAI
Kami menggunakan penyebaran model gpt-4o di Azure OpenAI untuk menganalisis sketsa papan tulis dari pipeline dan mengonversinya menjadi Apache Airflow DAG. Untuk menyambungkan ke Azure OpenAI API, simpan kunci API dan titik akhir dalam variabel lingkungan:
-
OPENAI_API_KEY: Masukkan kunci Azure OpenAI API Anda. -
OPENAI_API_ENDPOINT: Masukkan URL titik akhir untuk modelgpt-4oyang Anda sebarkan. Misalnya,https://ai-contosoai6211465843515213.openai.azure.com/openai/deployments/gpt-4o/chat/completions?api-version=2024-02-15-preview.
Langkah 3: Membuat DAG Apache Airflow untuk menghasilkan DAG dari sketsa
Dengan semua prasyarat selesai, Anda siap untuk menyiapkan alur kerja Azure OpenAI DAG Generator.
Cara kerja Generator DAG Azure OpenAI
- Unduh sketsa dari Lakehouse Anda: Gambar dikodekan dalam format base64 dan dikirim ke Azure OpenAI.
- Hasilkan Kode DAG menggunakan Azure OpenAI: Alur kerja menggunakan model
gpt-4ountuk menghasilkan kode DAG dari sketsa dan permintaan sistem yang diberikan. - Azure OpenAI menginterpretasikan gambar input dan prompt sistem, menghasilkan kode python yang mewakili APACHE Airflow DAG. Respons mencakup kode ini sebagai bagian dari output API.
- Kode DAG yang dihasilkan diambil dari respons API dan ditulis ke file Python di direktori
dags. Sebelum Anda menggunakan file, konfigurasikan koneksi yang diperlukan oleh operator di Apache Airflow dan file segera siap digunakan di antarmuka Apache Airflow Jobs.
Kode untuk Azure OpenAI DAG Generator
Sekarang, ikuti langkah-langkah untuk mengimplementasikan alur kerja:
- Buat file bernama openapi_dag_generator.py di direktori dags proyek Apache Airflow Anda.
- Tambahkan kode berikut ke file. Ganti
yourStorageAccountName,workspace_namedanfile_pathdengan nilai aktual dan simpan file.import io import os import json import base64 import requests from PIL import Image from pendulum import datetime from airflow.models import Variable from airflow.models.param import Param from airflow.decorators import dag, task from airflow.models.baseoperator import chain from azure.storage.filedatalake import DataLakeServiceClient from azure.identity import ClientSecretCredential @dag( start_date=datetime(2023, 11, 1), schedule=None, catchup=False, params={ "system_prompt": Param( 'You are an AI assistant that helps to write an Apache Airflow DAG code by understanding an image that shows an Apache Airflow DAG containing airflow tasks, task descriptions, parameters, trigger rules and edge labels.\ You have to priortize the Apache Airflow provider operators over Apache Airflow core operators if they resonates more with task description.\ Use the most appropriate Apache Airflow operators as per the task description\ To give the label to the DAG edge use the Label from the airflow.utils.edgemodifier class\ You can use Dummy operators for start and end tasks. \ Return apache airflow dag code in a valid json format following the format:```json{ "dag": "value should be Apache Airflow DAG code"}```', type="string", title="Give a prompt to the Airflow Expert.", description="Enter what you would like to ask Apache Airflow Expert.", min_length=1, max_length=500, ), "seed": Param(42, type="integer"), "temperature": Param(0.1, type="number"), "top_p": Param(0.95, type="number"), "max_tokens": Param(800, type="integer"), }, ) def OpenAI_Dag_Generator(): """ A DAG that generates an Apache Airflow DAG code using `gpt-4o` OpenAI model based on a diagram image stored in Azure Blob Storage. The generated DAG is saved in the `dags` folder for execution. """ @task def fetch_image_from_lakehouse(workspace_name: str, file_path: str): """ Downloads an image from Fabric Lakehouse and encodes it as a Base64 string. :param workspace_name: Name of the workspace where your Lakehouse is located. :param file_path: Relative file path stored in the Fabric Lakehouse. :return: Dictionary containing the encoded image as a Base64 string. """ account_url = f"https://{yourStorageAccountName}.dfs.fabric.microsoft.com" client_id = os.getenv("FABRIC_CLIENT_ID") client_secret = os.getenv("FABRIC_CLIENT_SECRET") tenant_id = os.getenv("FABRIC_TENANT_ID") tokenCredential = ClientSecretCredential( tenant_id=tenant_id, client_id=client_id, client_secret=client_secret ) lakehouse_client = DataLakeServiceClient( account_url, credential=tokenCredential ) blob_data = lakehouse_client.get_file_client(workspace_name, file_path).download_file().readall() image = Image.open(io.BytesIO(blob_data)) # Encode image as Base64 buffered = io.BytesIO() image.save(buffered, format="PNG") encoded_image = base64.b64encode(buffered.getvalue()).decode('ascii') return {"encoded_image": encoded_image} @task def generate_dag_code_from_openai(image_from_blob: dict, system_prompt: str, **context): """ Sends the encoded image to the OpenAI gpt-4o model to generate an Apache Airflow DAG code. :param encoded_image: Dictionary containing the Base64-encoded image. :param system_prompt: Prompt to ask the OpenAI model to generate the DAG code. :return: Dictionary containing the generated DAG code as a string. """ azureAI_api_key = os.getenv("OPENAI_API_KEY") azureAI_endpoint = os.getenv("OPENAI_API_ENDPOINT") image = image_from_blob["encoded_image"] headers = { "Content-Type": "application/json", "api-key": azureAI_api_key, } payload = { "messages": [ { "role": "system", "content": [ { "type": "text", "text": system_prompt } ] }, { "role": "user", "content": [ { "type": "image_url", "image_url": { "url": f"data:image/jpeg;base64,{image}" } } ] } ], "seed": context["params"]["seed"], "temperature": context["params"]["temperature"], "top_p": context["params"]["top_p"], "max_tokens": context["params"]["max_tokens"] } response = requests.post(azureAI_endpoint, headers=headers, json=payload) response.raise_for_status() # Get JSON from request and show response_json = response.json() # Check if 'choices' and 'message' are present in the response if 'choices' in response_json and len(response_json['choices']) > 0: content = response_json['choices'][0]['message']['content'] start_index = content.find('```json') end_index = content.rfind("```") # Validate JSON block delimiters if start_index == -1 or end_index == -1: raise ValueError("JSON block delimiters (```json ... ```) not found in the content.") # Extract and parse the JSON string extracted_json_str = content[start_index + 7:end_index].strip() if not extracted_json_str: raise ValueError("Extracted JSON string is empty.") # Convert to a Python dictionary dag_json = json.loads(extracted_json_str) dag_code = dag_json.get("dag") if not dag_code: raise ValueError("'dag' key not found in the extracted JSON.") return {"dag_code": dag_code} return response_json @task def save_dag(xcom_dag_code: dict): """ Saves the generated DAG code to a Python file in the `dags` directory. """ try: with open("dags/openai_dag.py", "w") as f: f.write(xcom_dag_code["dag_code"]) print("DAG code saved successfully.") except Exception as e: raise ValueError(f"Error saving DAG code: {str(e)}") chain( save_dag( generate_dag_code_from_openai( fetch_image_from_lakehouse( workspace_name="airflow-dag-images", # Your Fabric Workspace file_path="lakehouse_ai.Lakehouse/Files/airflow-dag-diagram.png" # Path to the image file located in the Lakehouse ), "{{ params.system_prompt }}" ) ) ) OpenAI_Dag_Generator()
Langkah 4: Memicu DAG dari Apache Airflow UI
- Klik pada
Monitor Airflow. - Navigasikan ke tab DAG dan temukan DAG
OpenAI_Dag_Generator. Klik pada itu. - Klik tombol putar dan Pilih
Trigger DAG w/ config.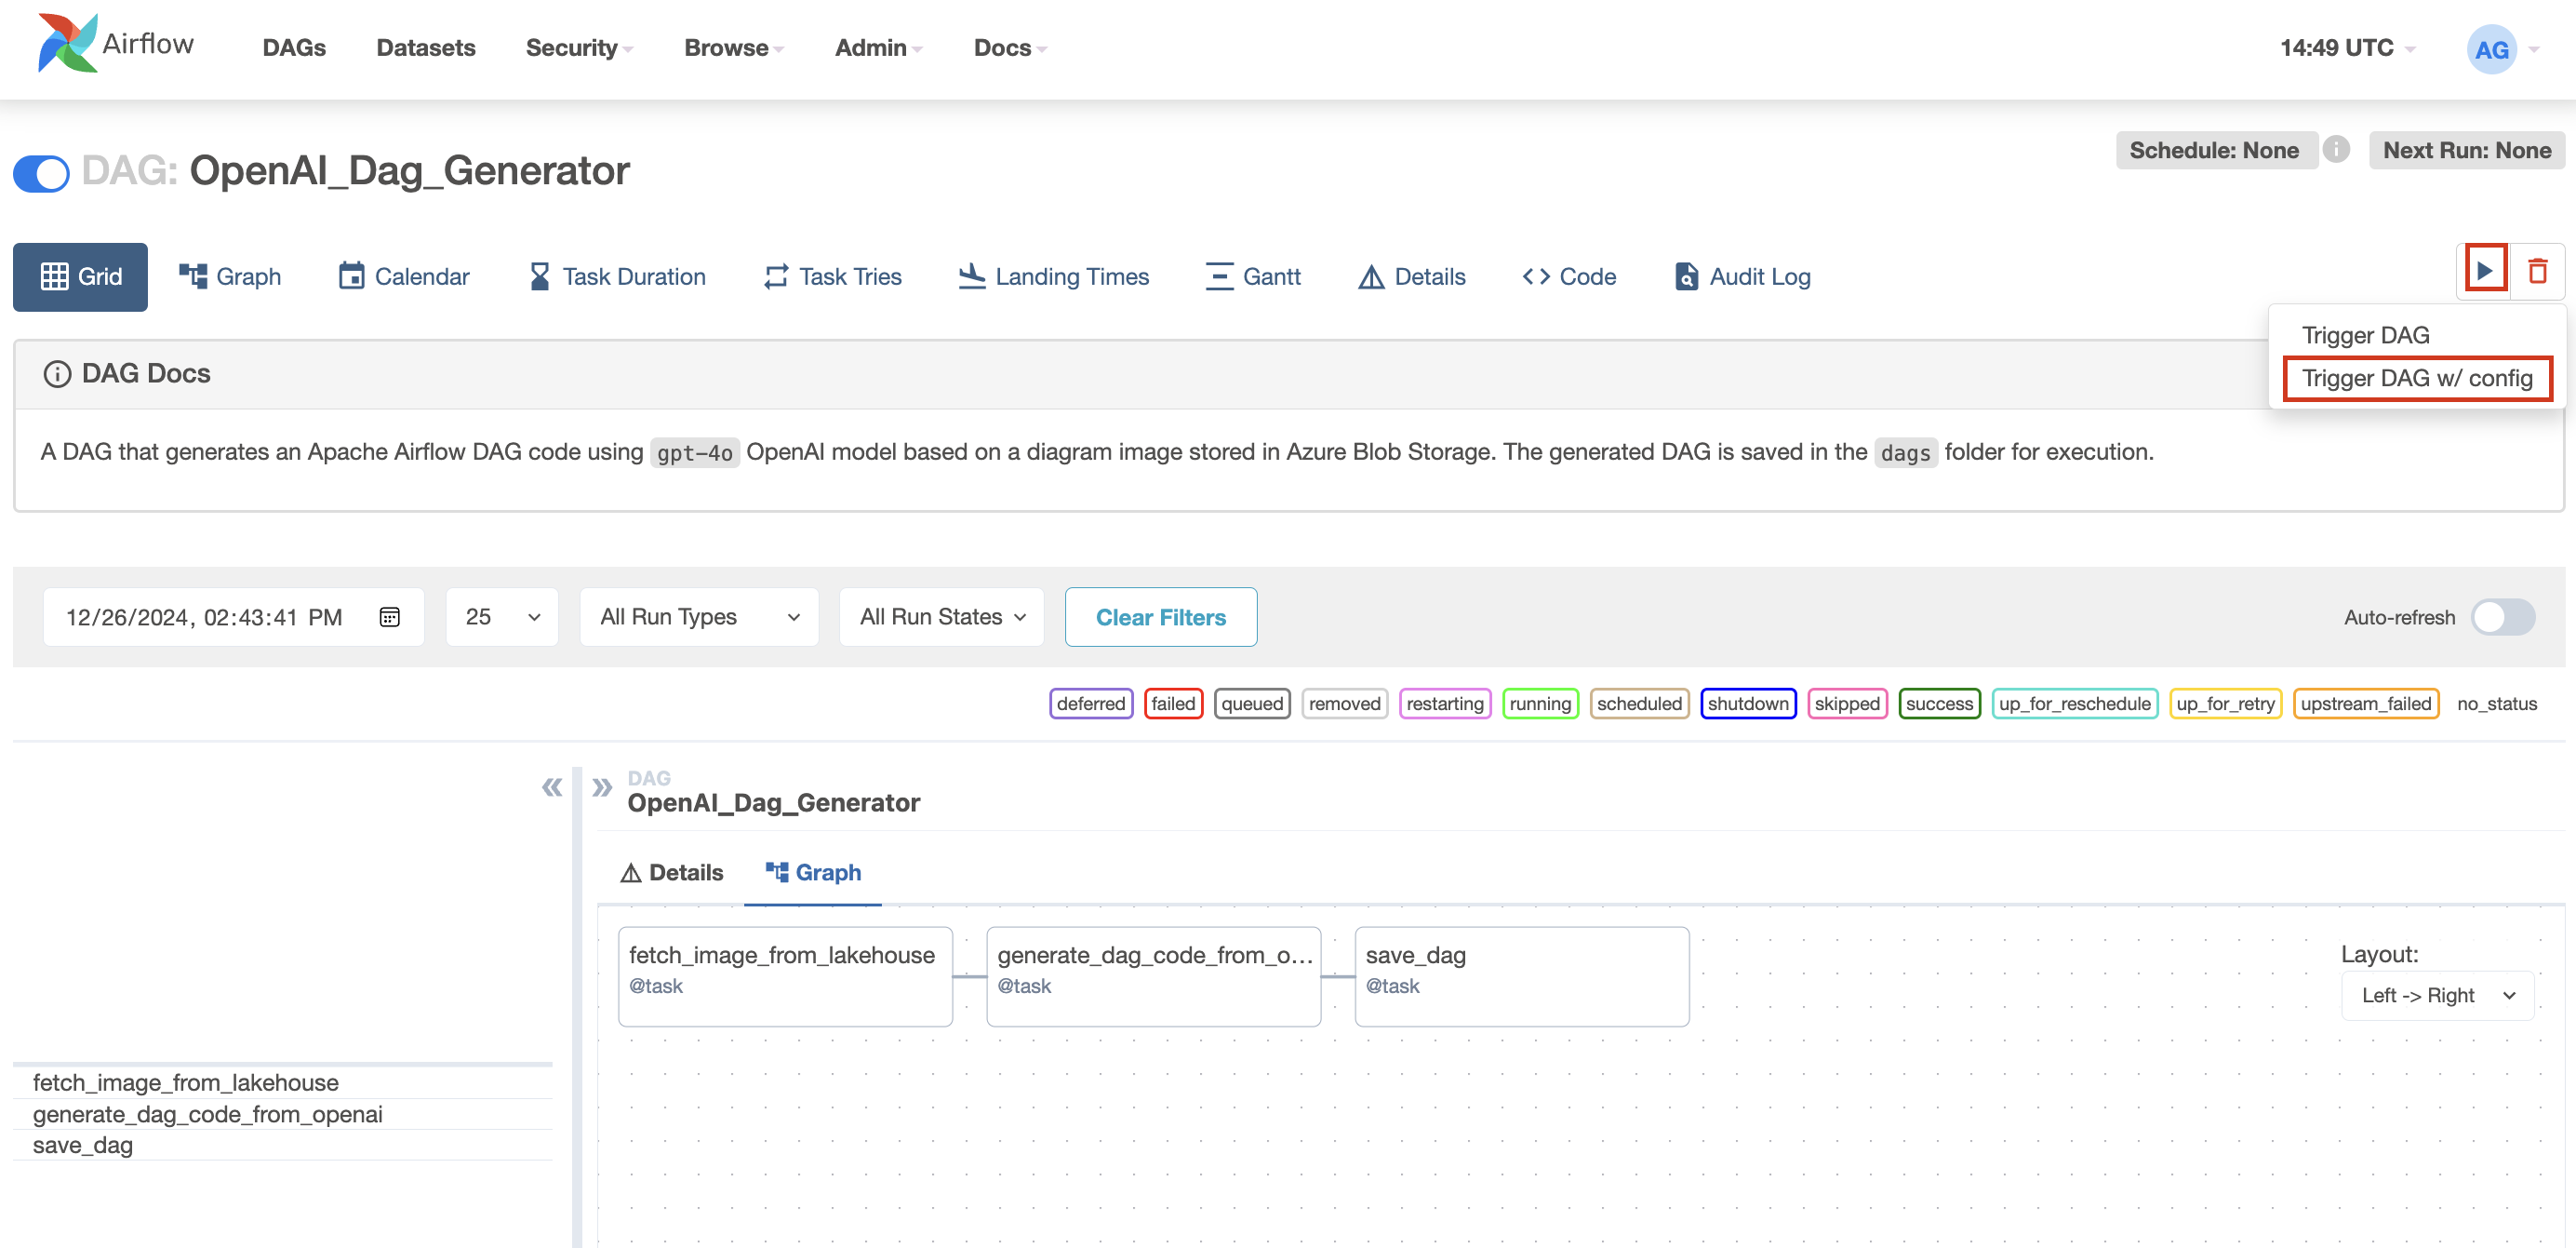
- Anda disajikan dengan formulir yang menunjukkan parameter DAG. Kami menyediakan perintah sistem default, nilai awal, suhu, top_p, dan maksimal_token. Anda dapat mengubah nilai-nilai ini sesuai kebutuhan.
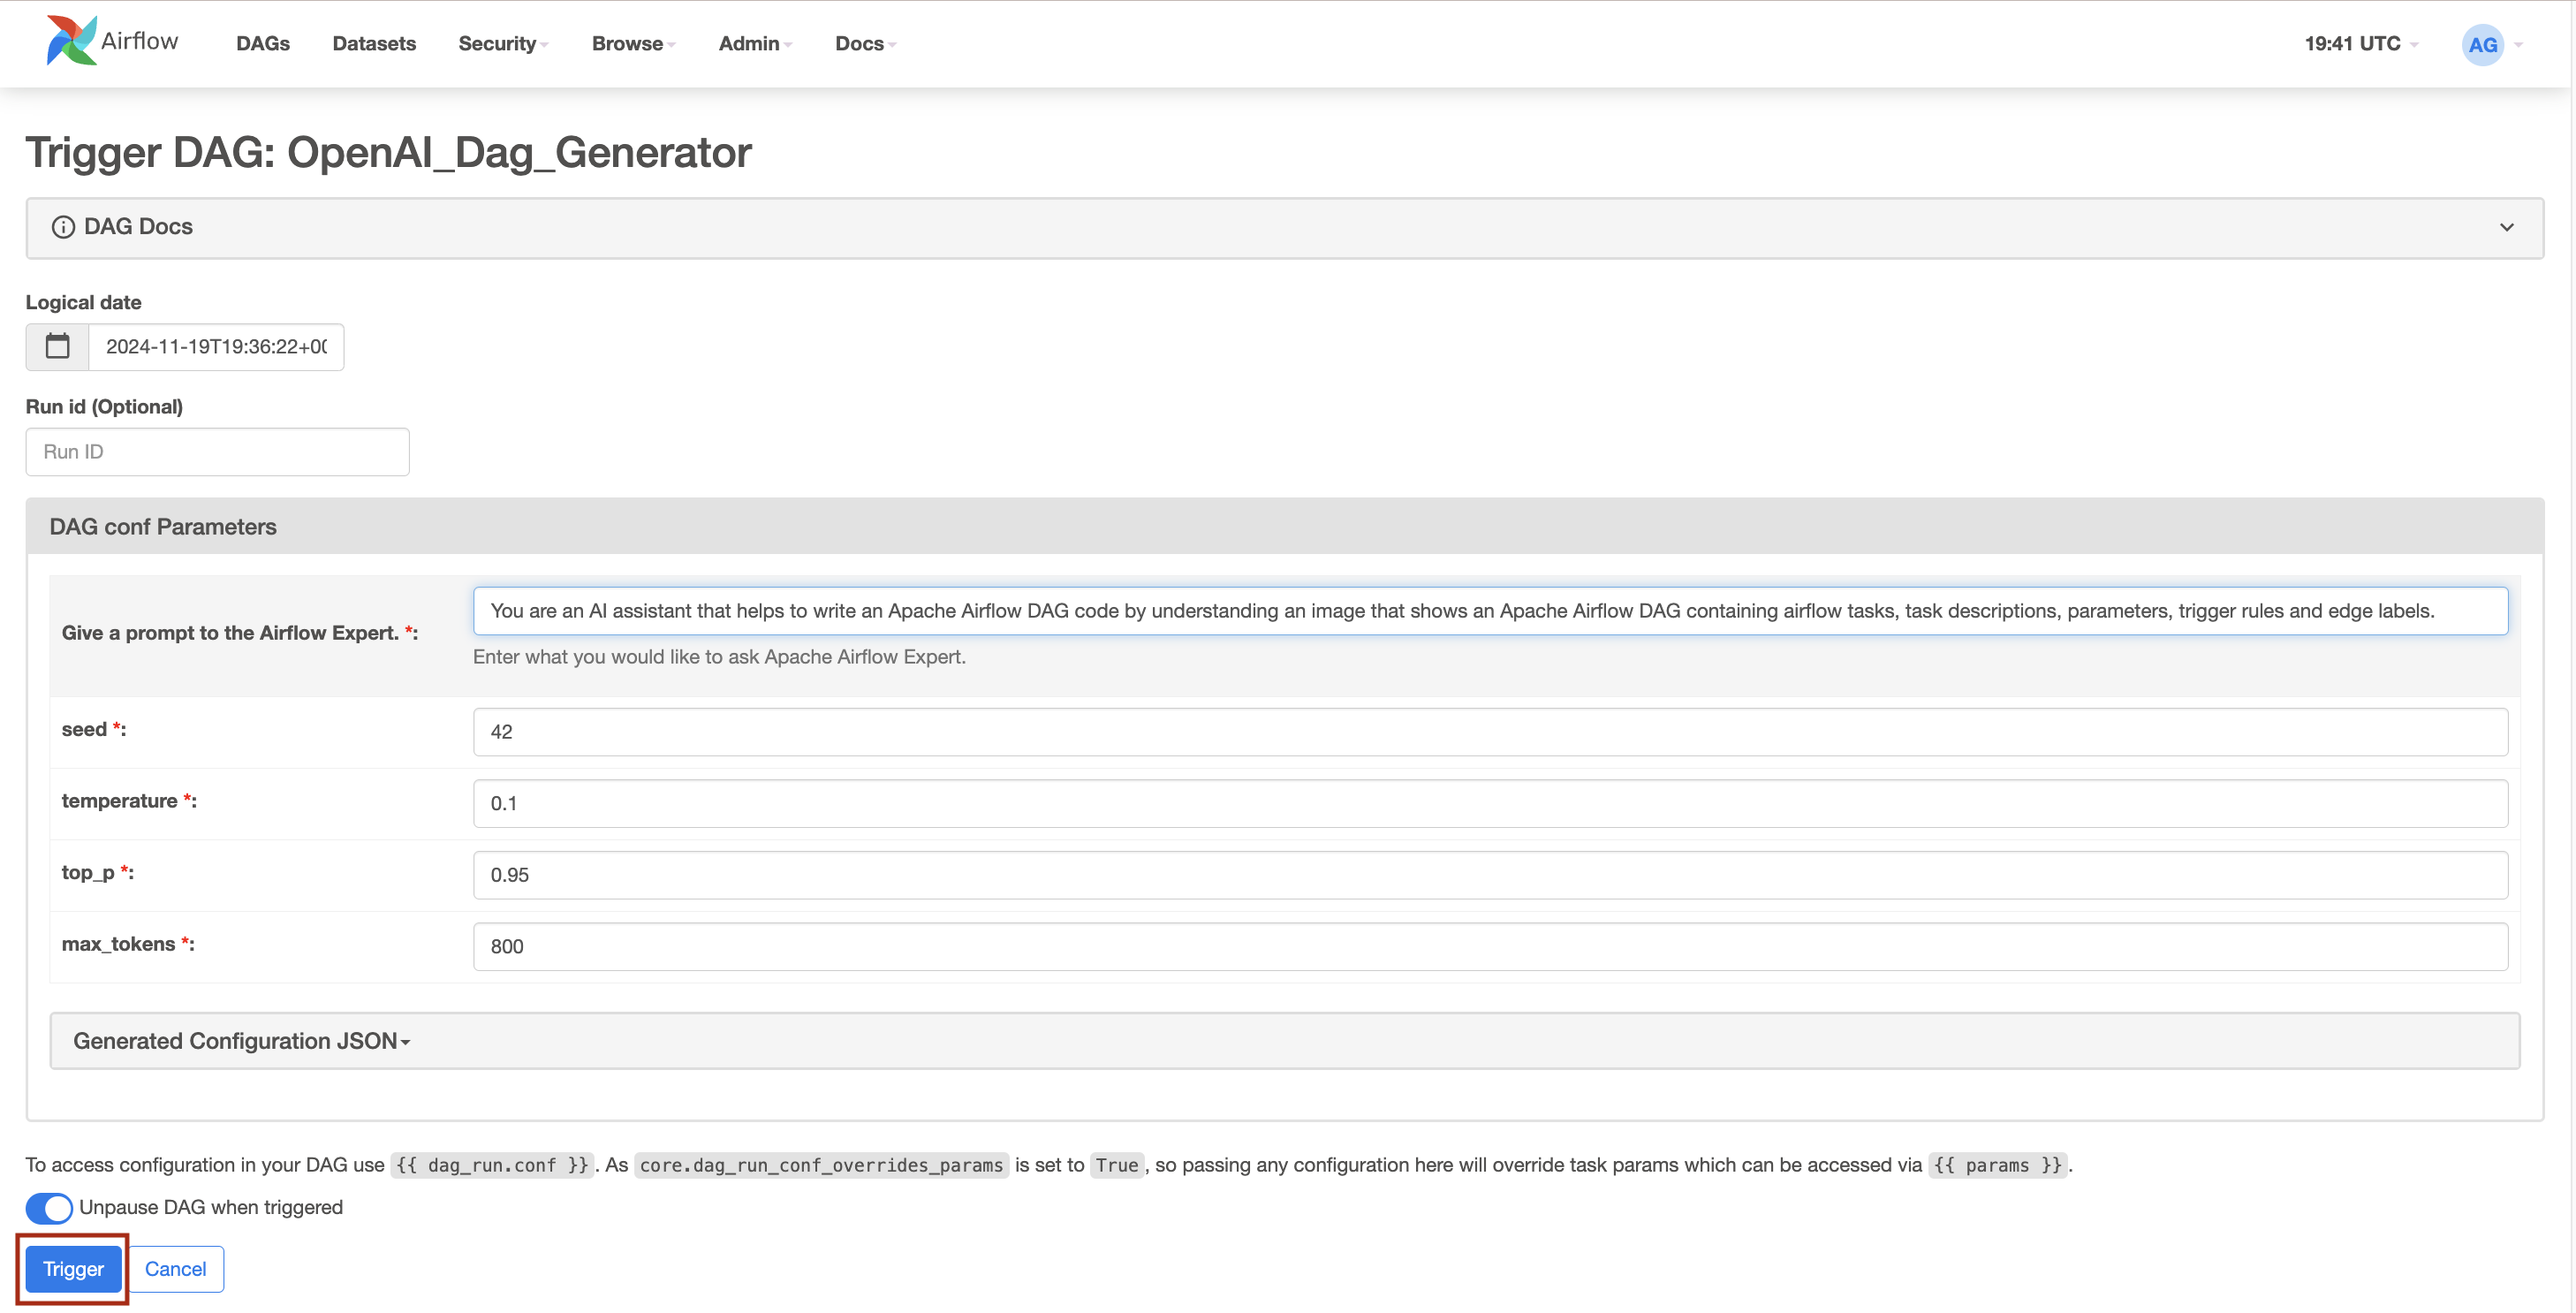
- Klik tombol
Triggeruntuk memulai. - Setelah eksekusi DAG berhasil, Anda akan melihat DAG baru yang dihasilkan dengan nama file
openai_dag.pydi folderdagsApache Airflow Job.


Langkah 5: Bersiaplah untuk menjalankan DAG yang baru dibuat
- Buka Antarmuka Pekerjaan Apache Airflow.
- DAG yang baru dibuat disimpan di folder DAG sebagai
openai_dag.py.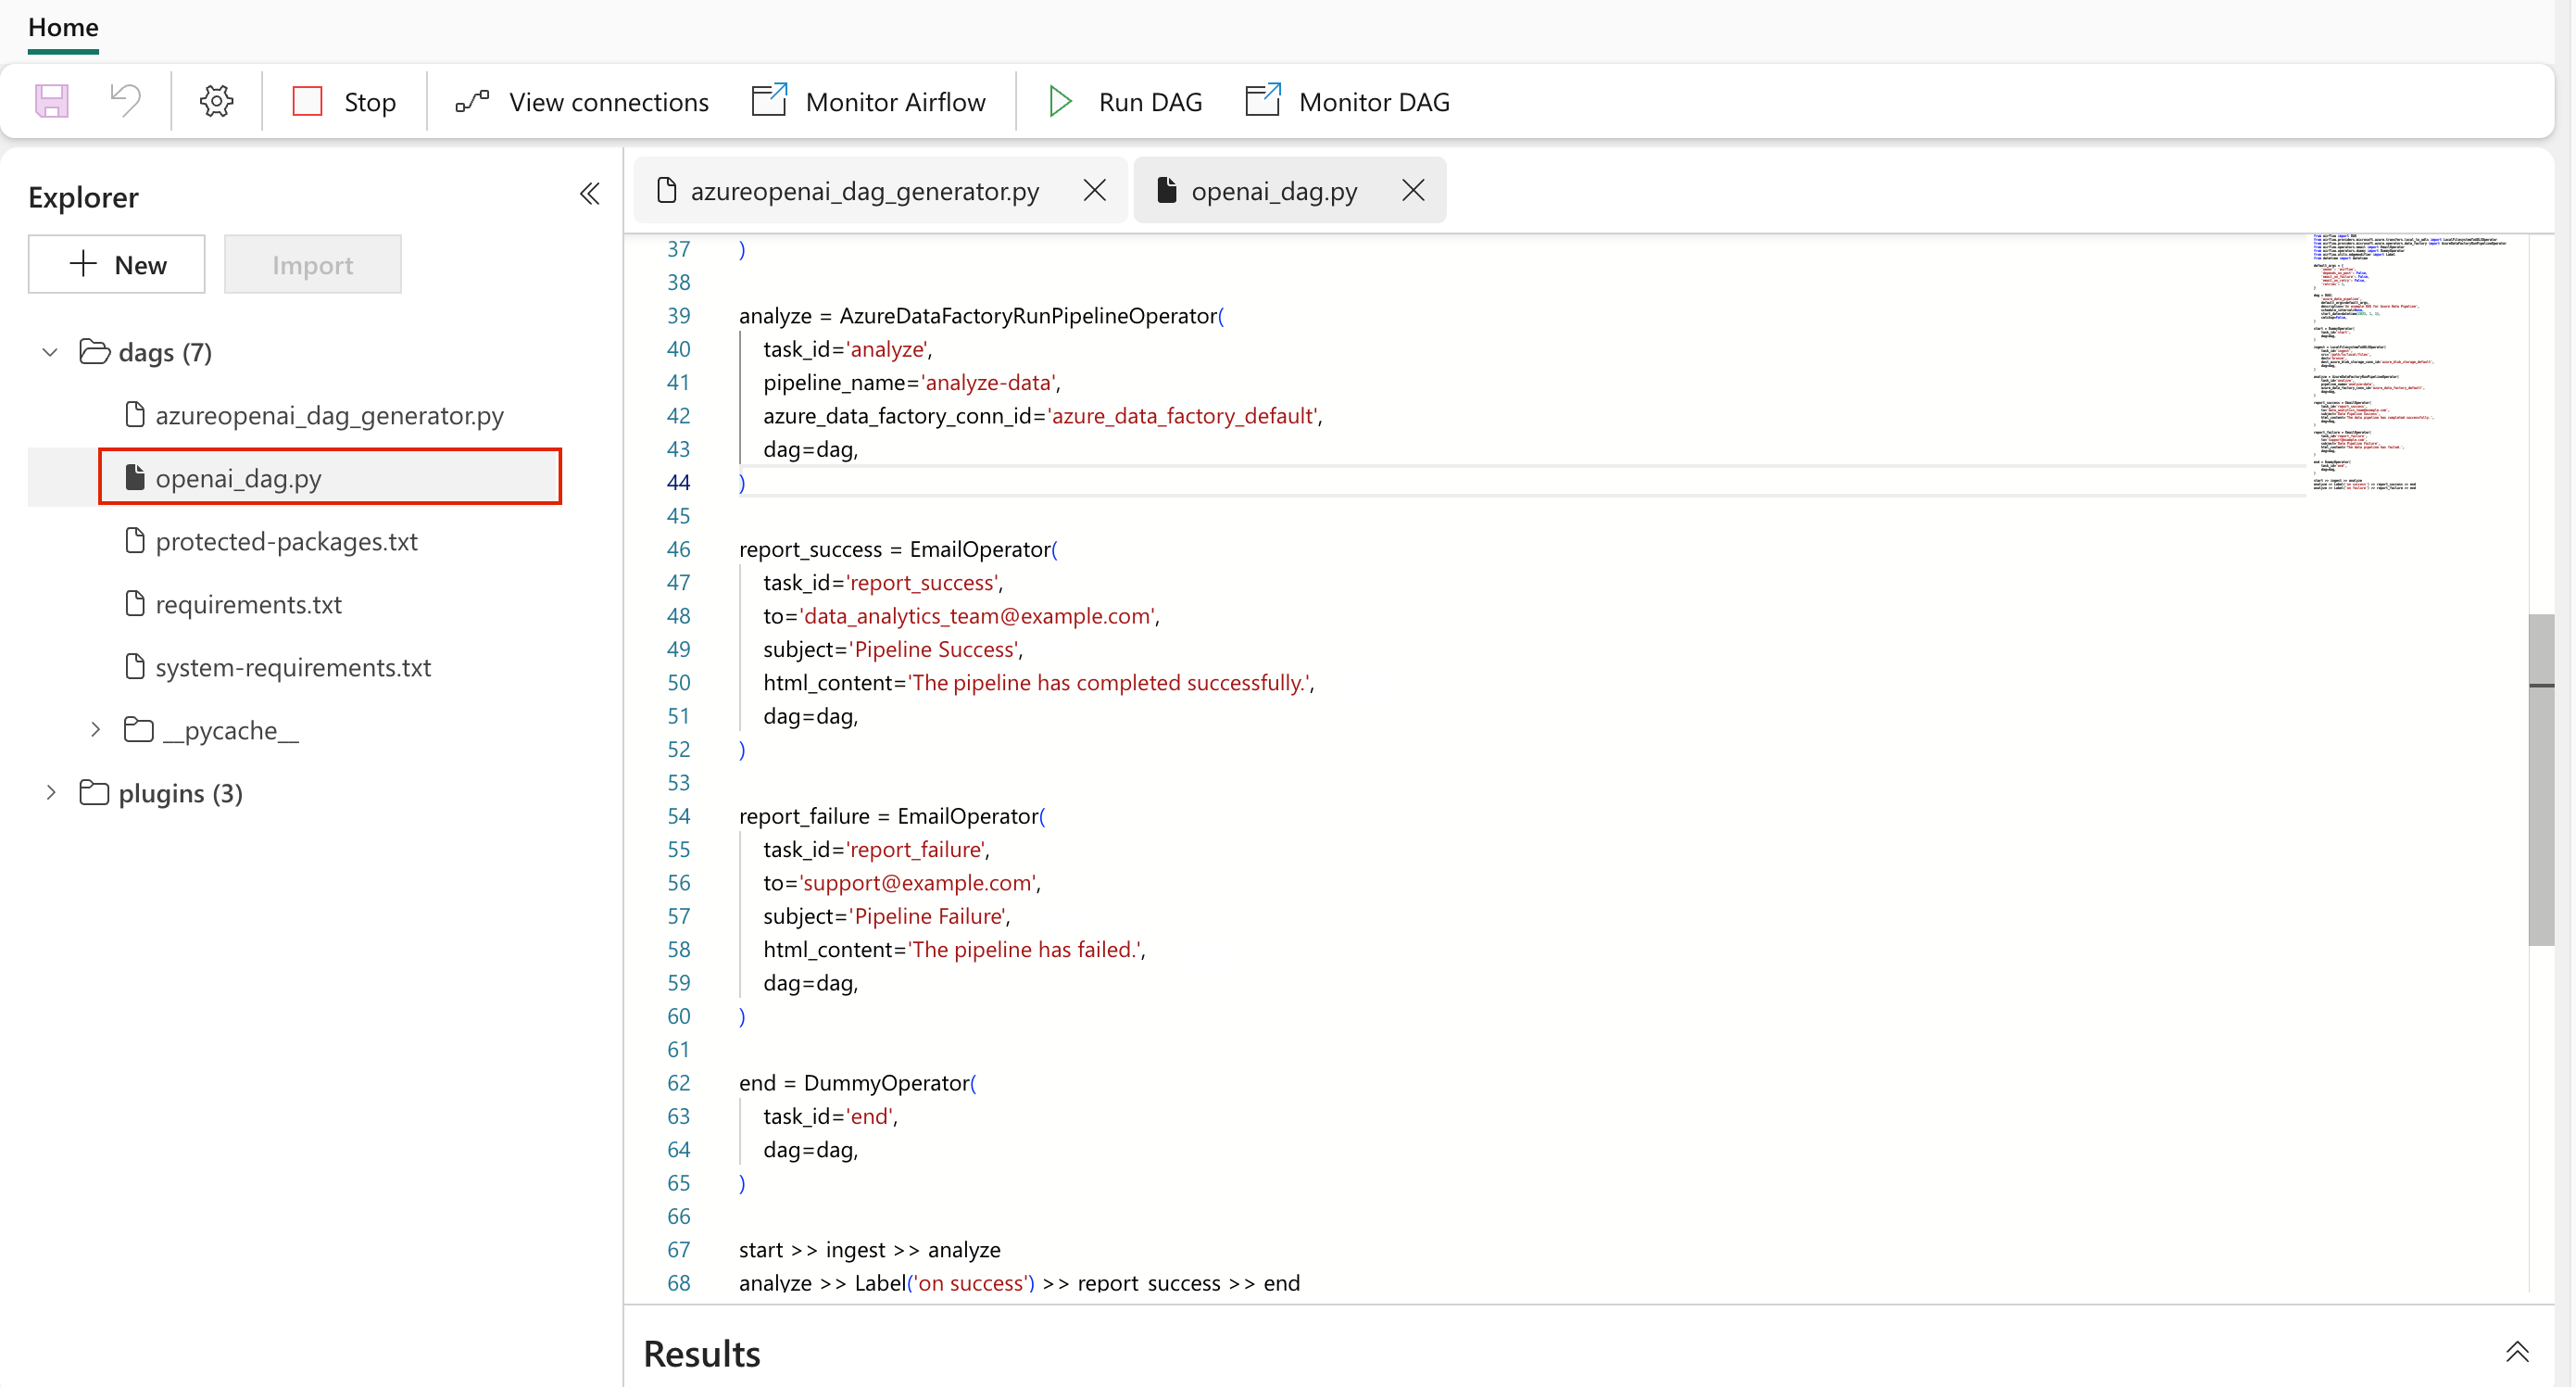
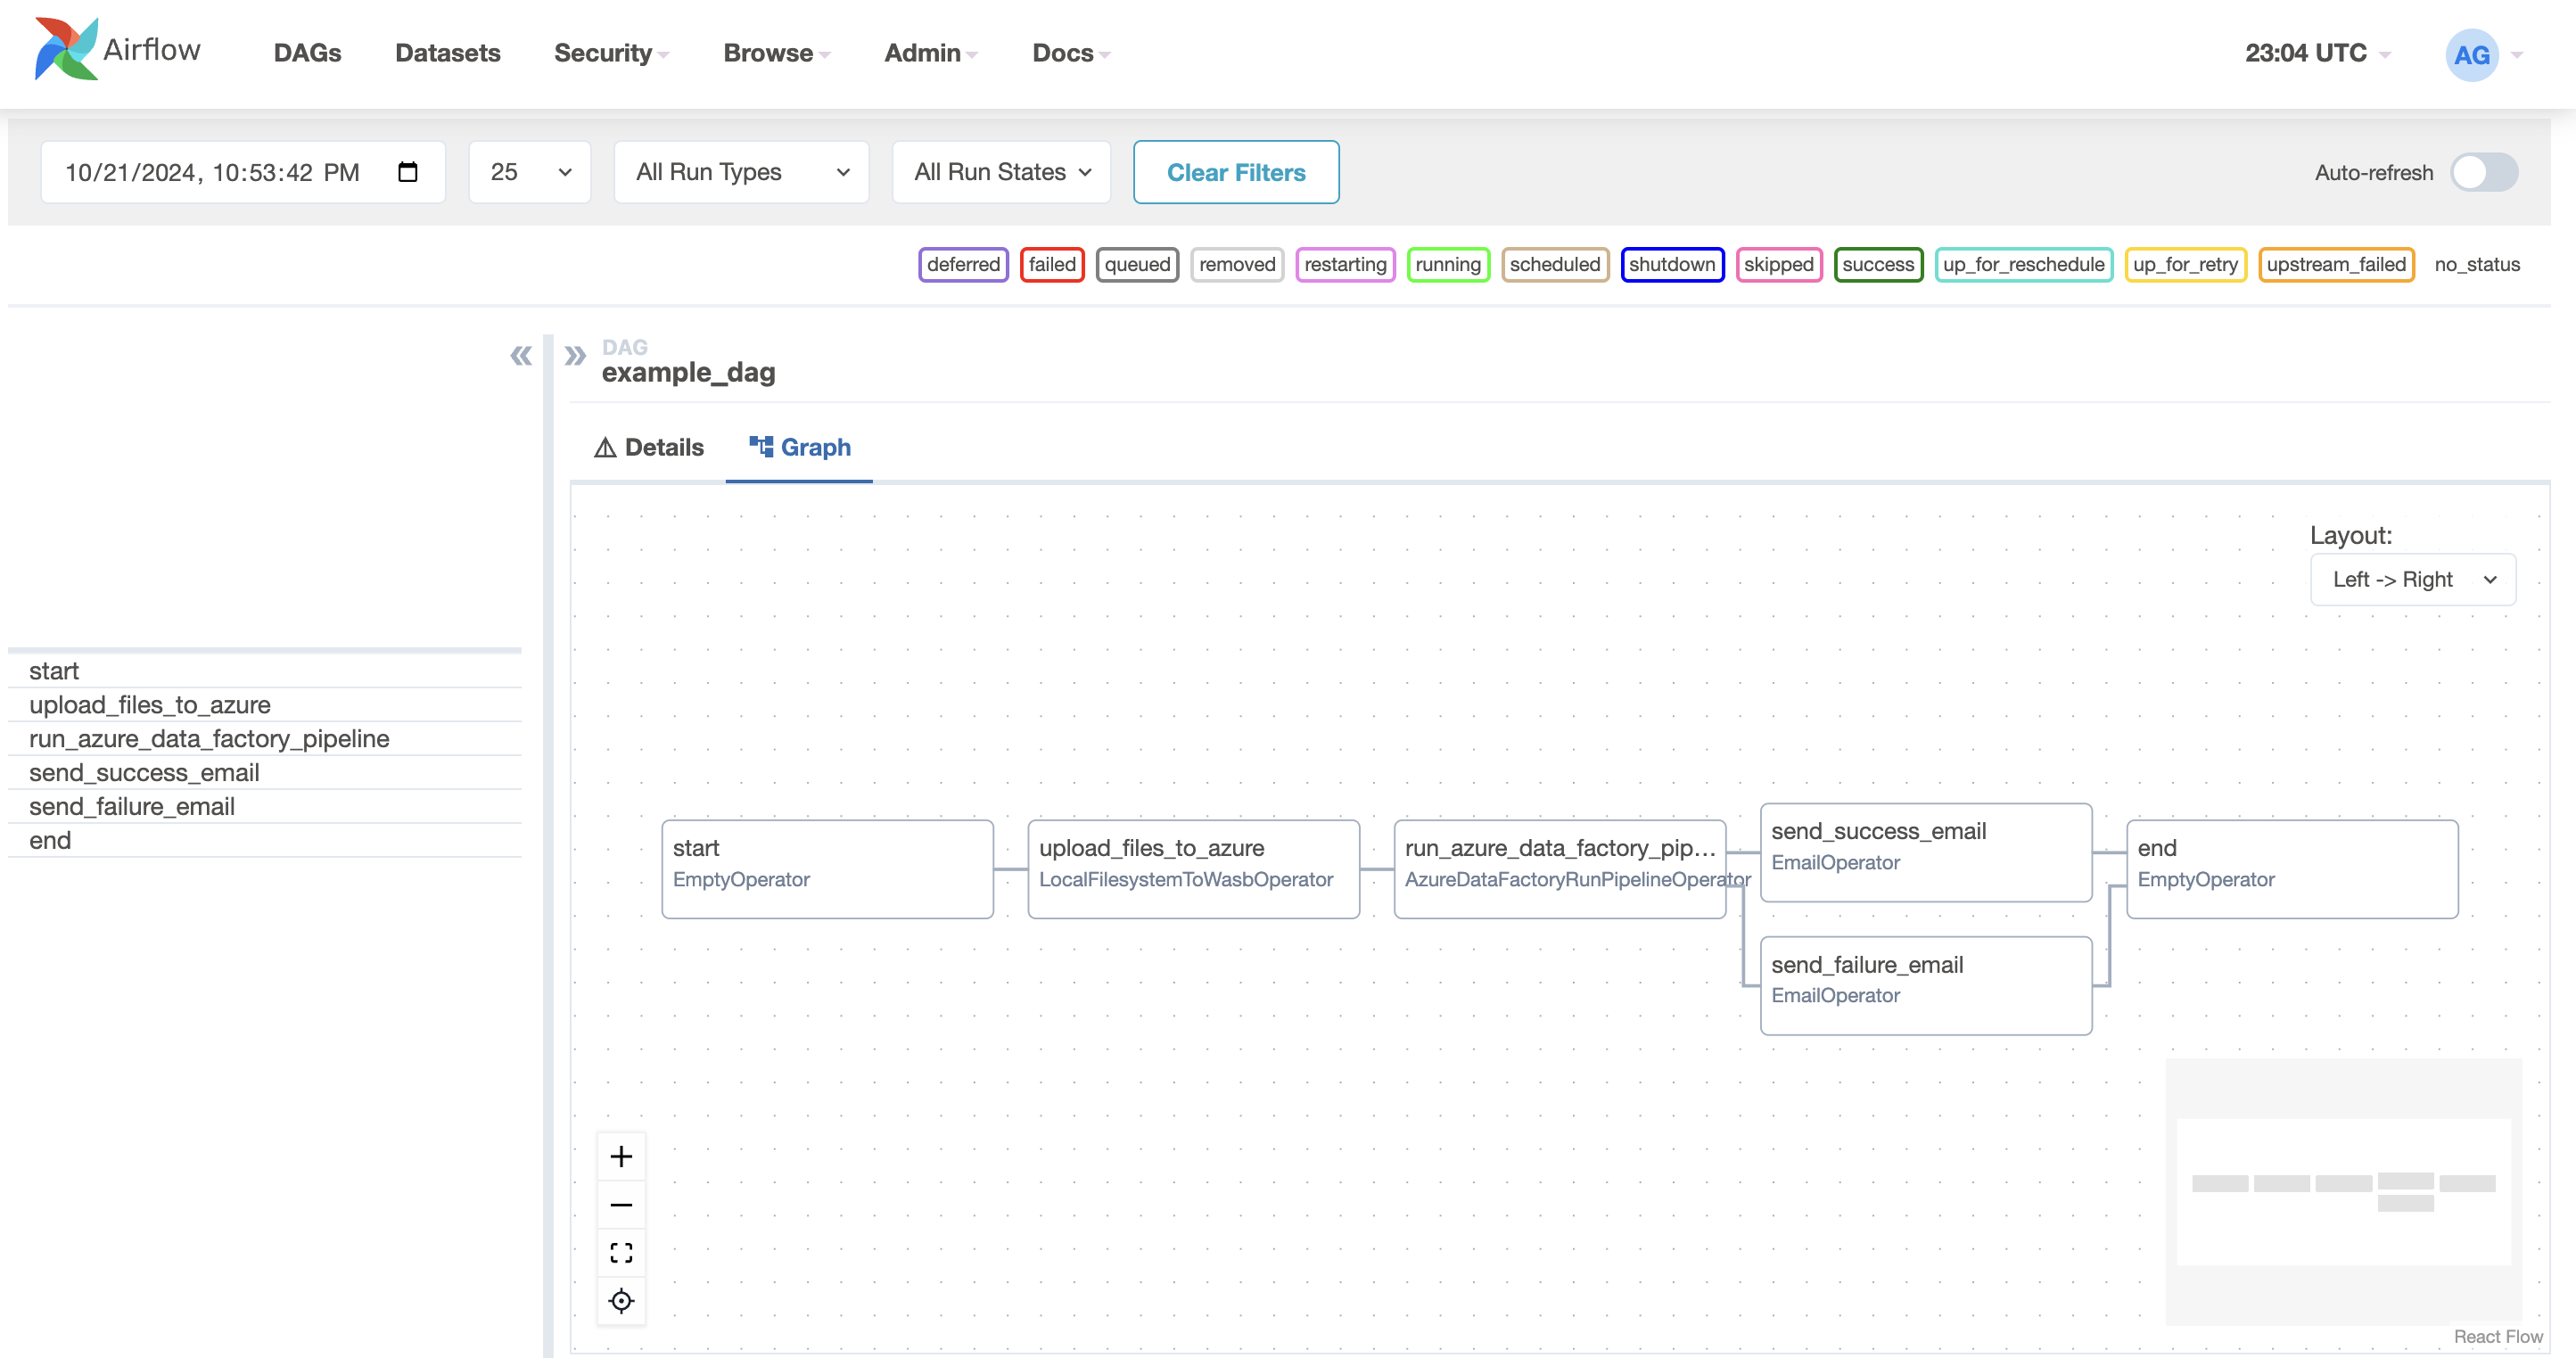
- Buka file DAG untuk meninjau kode. Anda dapat mengeditnya sesuai kebutuhan dan mengonfigurasi koneksi yang diperlukan untuk operator.
- Setelah koneksi diatur, Anda dapat memicu DAG untuk menjalankan alur kerja.


Kesimpulan
Jelajahi lebih banyak kasus penggunaan dengan memodifikasi permintaan sistem atau sketsa input. Solusi ini menunjukkan integrasi Azure OpenAI dan Apache Airflow Jobs yang lancar untuk mengonversi ide menjadi alur kerja fungsional dengan cepat. Dengan mengotomatiskan proses pembuatan DAG, Anda dapat menghemat waktu yang signifikan dan fokus pada tugas bernilai lebih tinggi.
Konten terkait
Mulai Cepat : Cara Membuat Tugas Apache AirflowMengaktifkan Azure Key Vault sebagai Backend Rahasia