Masuk dengan Apple di Xamarin.iOS
Masuk dengan Apple adalah layanan baru yang memberikan perlindungan identitas untuk pengguna layanan autentikasi pihak ketiga. Dimulai dengan iOS 13, Apple mengharuskan app baru apa pun yang menggunakan layanan autentikasi pihak ketiga juga harus menyediakan Masuk dengan Apple. App yang sudah ada yang diperbarui tidak perlu menambahkan Masuk dengan Apple hingga April 2020.
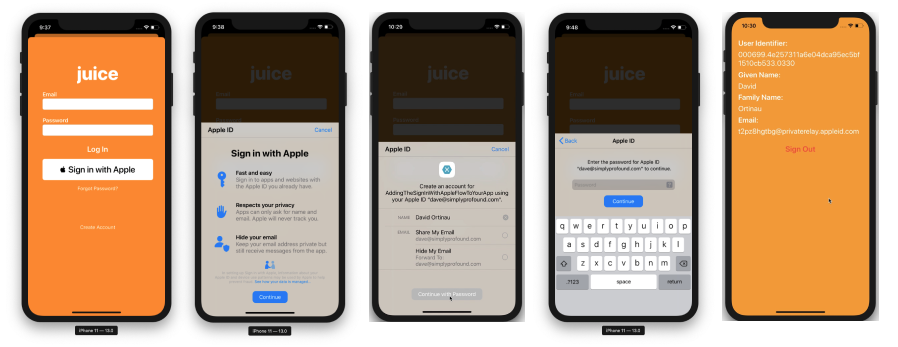
Dokumen ini memperkenalkan bagaimana Anda dapat menambahkan Masuk dengan Apple ke aplikasi iOS 13.
Penyiapan pengembang Apple
Sebelum membuat dan menjalankan aplikasi menggunakan Masuk dengan Apple, Anda harus menyelesaikan langkah-langkah ini. Pada Apple Developer Certificates, Identifiers & Profiles portal:
- Buat Pengidentifikasi Id Aplikasi baru.
- Atur deskripsi di bidang Deskripsi .
- Pilih ID Bundel Eksplisit dan atur
com.xamarin.AddingTheSignInWithAppleFlowToYourAppdi bidang . - Aktifkan Masuk dengan kemampuan Apple dan daftarkan Identitas baru.
- Buat Profil Provisi baru dengan Identitas baru.
- Unduh dan instal di perangkat Anda.
- Di Visual Studio, aktifkan Masuk dengan kemampuan Apple dalam file Entitlements.plist .
Periksa status masuk
Saat aplikasi dimulai, atau saat pertama kali Anda perlu memeriksa status autentikasi pengguna, buat instans ASAuthorizationAppleIdProvider dan periksa status saat ini:
var appleIdProvider = new ASAuthorizationAppleIdProvider ();
appleIdProvider.GetCredentialState (KeychainItem.CurrentUserIdentifier, (credentialState, error) => {
    switch (credentialState) {
    case ASAuthorizationAppleIdProviderCredentialState.Authorized:
        // The Apple ID credential is valid.
        break;
    case ASAuthorizationAppleIdProviderCredentialState.Revoked:
        // The Apple ID credential is revoked.
        break;
    case ASAuthorizationAppleIdProviderCredentialState.NotFound:
        // No credential was found, so show the sign-in UI.
        InvokeOnMainThread (() => {
            var storyboard = UIStoryboard.FromName ("Main", null);

            if (!(storyboard.InstantiateViewController (nameof (LoginViewController)) is LoginViewController viewController))
                return;

            viewController.ModalPresentationStyle = UIModalPresentationStyle.FormSheet;
            viewController.ModalInPresentation = true;
            Window?.RootViewController?.PresentViewController (viewController, true, null);
        });
        break;
    }
});
Dalam kode ini, yang dipanggil selama FinishedLaunching di AppDelegate.cs, aplikasi akan menangani ketika status adalah NotFound dan menyajikan LoginViewController kepada pengguna. Jika status telah mengembalikan Authorized atau Revoked, tindakan yang berbeda dapat disajikan kepada pengguna.
LoginViewController untuk Masuk dengan Apple
UIViewController Yang menerapkan logika masuk dan menawarkan Masuk dengan Apple perlu diterapkan IASAuthorizationControllerDelegate dan IASAuthorizationControllerPresentationContextProviding seperti dalam contoh di LoginViewController bawah ini.
public partial class LoginViewController : UIViewController, IASAuthorizationControllerDelegate, IASAuthorizationControllerPresentationContextProviding {
    public LoginViewController (IntPtr handle) : base (handle)
    {
    }

    public override void ViewDidLoad ()
    {
        base.ViewDidLoad ();
        // Perform any additional setup after loading the view, typically from a nib.

        SetupProviderLoginView ();
    }

    public override void ViewDidAppear (bool animated)
    {
        base.ViewDidAppear (animated);

        PerformExistingAccountSetupFlows ();
    }

    void SetupProviderLoginView ()
    {
        var authorizationButton = new ASAuthorizationAppleIdButton (ASAuthorizationAppleIdButtonType.Default, ASAuthorizationAppleIdButtonStyle.White);
        authorizationButton.TouchUpInside += HandleAuthorizationAppleIDButtonPress;
        loginProviderStackView.AddArrangedSubview (authorizationButton);
    }

    // Prompts the user if an existing iCloud Keychain credential or Apple ID credential is found.
    void PerformExistingAccountSetupFlows ()
    {
        // Prepare requests for both Apple ID and password providers.
        ASAuthorizationRequest [] requests = {
            new ASAuthorizationAppleIdProvider ().CreateRequest (),
            new ASAuthorizationPasswordProvider ().CreateRequest ()
        };

        // Create an authorization controller with the given requests.
        var authorizationController = new ASAuthorizationController (requests);
        authorizationController.Delegate = this;
        authorizationController.PresentationContextProvider = this;
        authorizationController.PerformRequests ();
    }

    private void HandleAuthorizationAppleIDButtonPress (object sender, EventArgs e)
    {
        var appleIdProvider = new ASAuthorizationAppleIdProvider ();
        var request = appleIdProvider.CreateRequest ();
        request.RequestedScopes = new [] { ASAuthorizationScope.Email, ASAuthorizationScope.FullName };

        var authorizationController = new ASAuthorizationController (new [] { request });
        authorizationController.Delegate = this;
        authorizationController.PresentationContextProvider = this;
        authorizationController.PerformRequests ();
    }
}
Contoh kode ini memeriksa status masuk saat ini dan PerformExistingAccountSetupFlows tersambung ke tampilan saat ini sebagai delegasi. Jika kredensial Rantai Kunci iCloud atau kredensial ID Apple yang ada ditemukan, pengguna akan diminta untuk menggunakannya.
Apple menyediakan ASAuthorizationAppleIdButton, tombol khusus untuk tujuan ini. Ketika disentuh, tombol akan memicu alur kerja yang ditangani dalam metode HandleAuthorizationAppleIDButtonPress.
Menangani otorisasi
Dalam menerapkan IASAuthorizationController logika kustom apa pun untuk menyimpan akun pengguna. Contoh di bawah ini menyimpan akun pengguna di Rantai Kunci, layanan penyimpanan Apple sendiri.
#region IASAuthorizationController Delegate

[Export ("authorizationController:didCompleteWithAuthorization:")]
public void DidComplete (ASAuthorizationController controller, ASAuthorization authorization)
{
    if (authorization.GetCredential<ASAuthorizationAppleIdCredential> () is ASAuthorizationAppleIdCredential appleIdCredential) {
        var userIdentifier = appleIdCredential.User;
        var fullName = appleIdCredential.FullName;
        var email = appleIdCredential.Email;

        // Create an account in your system.
        // For the purpose of this demo app, store the userIdentifier in the keychain.
        try {
            new KeychainItem ("com.example.apple-samplecode.juice", "userIdentifier").SaveItem (userIdentifier);
        } catch (Exception) {
            Console.WriteLine ("Unable to save userIdentifier to keychain.");
        }

        // For the purpose of this demo app, show the Apple ID credential information in the ResultViewController.
        if (!(PresentingViewController is ResultViewController viewController))
            return;

        InvokeOnMainThread (() => {
            viewController.UserIdentifierText = userIdentifier;
            viewController.GivenNameText = fullName?.GivenName ?? "";
            viewController.FamilyNameText = fullName?.FamilyName ?? "";
            viewController.EmailText = email ?? "";

            DismissViewController (true, null);
        });
    } else if (authorization.GetCredential<ASPasswordCredential> () is ASPasswordCredential passwordCredential) {
        // Sign in using an existing iCloud Keychain credential.
        var username = passwordCredential.User;
        var password = passwordCredential.Password;

        // For the purpose of this demo app, show the password credential as an alert.
        InvokeOnMainThread (() => {
            var message = $"The app has received your selected credential from the keychain. \n\n Username: {username}\n Password: {password}";
            var alertController = UIAlertController.Create ("Keychain Credential Received", message, UIAlertControllerStyle.Alert);
            alertController.AddAction (UIAlertAction.Create ("Dismiss", UIAlertActionStyle.Cancel, null));

            PresentViewController (alertController, true, null);
        });
    }
}

[Export ("authorizationController:didCompleteWithError:")]
public void DidComplete (ASAuthorizationController controller, NSError error)
{
    Console.WriteLine (error);
}

#endregion
Pengontrol Otorisasi
Bagian terakhir dalam implementasi ini adalah ASAuthorizationController yang mengelola permintaan otorisasi untuk penyedia.
#region IASAuthorizationControllerPresentation Context Providing

public UIWindow GetPresentationAnchor (ASAuthorizationController controller) => View.Window;

#endregion