Create a marketing form
A marketing form is an input form that is added to a marketing page. Marketing forms allow visitors to submit their information to interact with marketing initiatives, manage their mailing-list subscriptions, and more. All information that is submitted through a marketing form is automatically captured by Dynamics 365 and immediately applied to your contact and lead records.
Marketing forms can be added to Dynamics 365 Customer Insights - Journeys pages or an external webpages.
The four types of marketing forms are:
Landing page - This is a general-purpose form for collecting contact information on marketing pages that are neither subscription centers nor forwarding forms.
Subscription - Provides fields where contacts can view and edit their contact details and shows a collection of mailing lists (with check boxes) where the contact can add or remove subscriptions.
Forward to a friend - Provides a short collection of fields, each of which will accept an email address that is entered by contacts when they are forwarding a marketing message to other colleagues.
Event registration - This is a form that can be used to create event registration records on Dynamics 365 events. Event registration forms can be added to Dynamics 365 Customer Insights - Journeys pages, your website, or used directly on the event record in lieu of the out-of-the-box event registration fields.
For more information, see Create, view, and manage marketing forms and Use marketing forms for event registration.
Define your form needs
To get started on creating a marketing form, define what information you want to include on your form. Each field included in your form must be set up in Dynamics 365 Customer Insights - Journeys as a marketing form field, which establishes options for how that field is presented in forms where it appears, and which lead or contact fields it maps to in the database. When you're designing a form, the Toolbox tab of the Designer shows a list of fields that are already set up, so you can add that field by dragging the matching field element to your form. The most commonly used fields (for example, first name, last name, address, and email) are set up by default. If you want to use additional fields, you must configure those before creating the form.
To review the preconfigured fields, go to Outbound marketing > Templates > Marketing form fields.
Each field included in your form must be set up in Dynamics 365 Customer Insights - Journeys as a marketing form field, which establishes options for how that field is presented in forms where it appears, and which lead or contact fields it maps to in the database. Depending on where you want to map marketing form field data, you will need to:
Create a lead form field. For more information, see Create and edit fields (attributes).
Create a contact form field. For more information, see Create and edit fields (attributes).
Create a marketing form field and map it to the corresponding lead and contact fields. For more information, see Create or edit a marketing-form field.
Make sure to avoid mapping more than one marketing-form field to the same field in the database. If you do map more than one field, you might experience issues such as empty drop-down lists for the double-mapped field. If you are having issues that are related to redundant field mappings, delete all the redundant fields, create a new one to replace them, and then update your forms as needed.
Design a form
To view, edit, delete, or create a new marketing form, go to Marketing > Internet marketing > Marketing forms.
To create a new marketing form, select + New in the command bar.
Select a template. Select Skip to start from scratch.
In Dynamics 365 Customer Insights - Journeys, you can choose from a collection of sample templates, create your own templates, or create a new form. If you choose to start from a template, it will establish the form type, column layout, and sample content for you.
Note
When you create a new form from a template, the template content is copied into your new form. The form and template aren't linked, so when you edit the form, the template won't change; likewise, any future changes that you make to a template won't affect any existing forms that were created by using it.
Tip
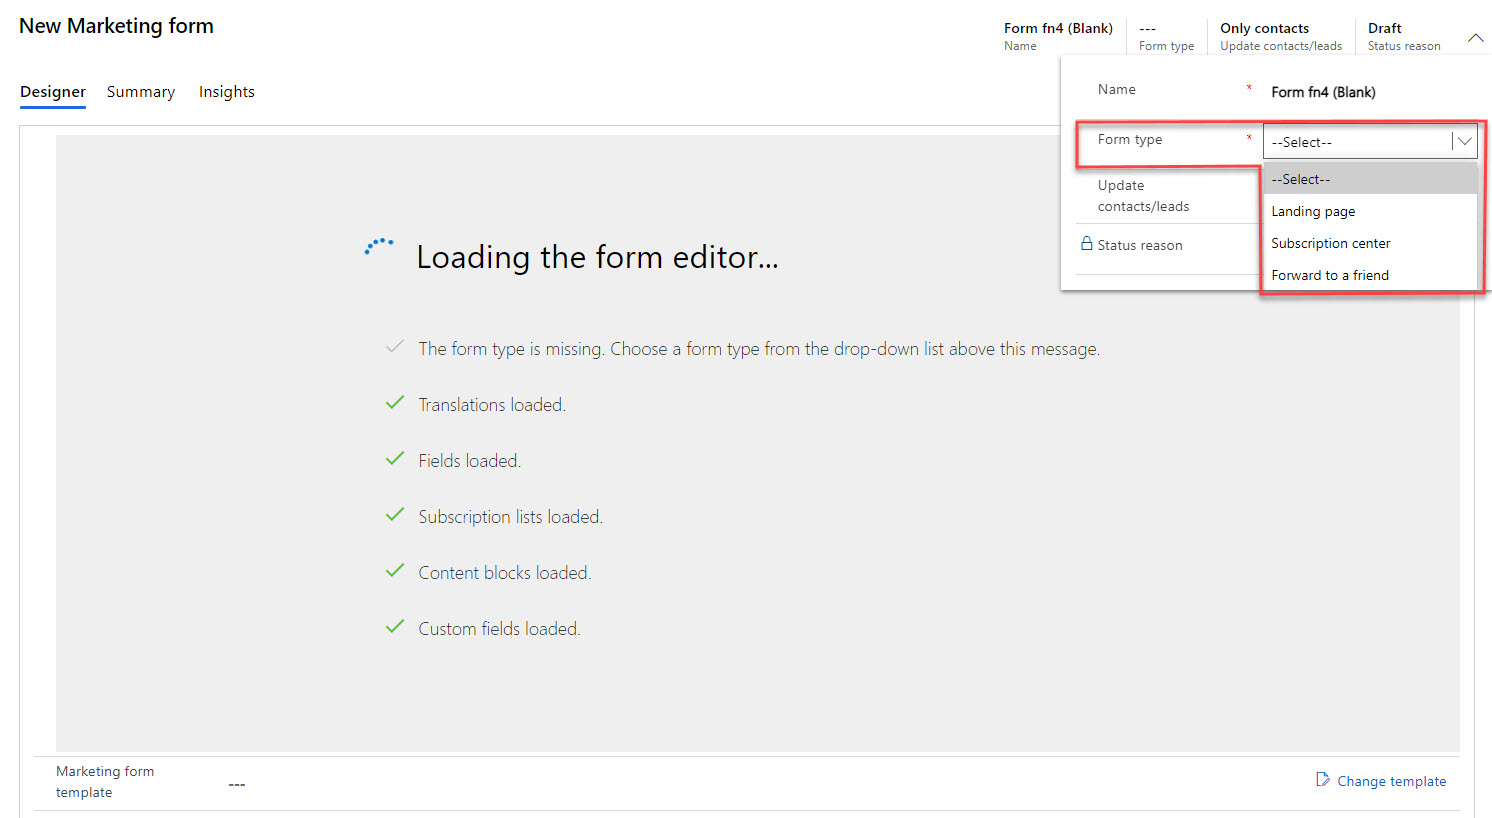
When starting from scratch, you'll need to select the Form type before you can begin building the form. Select the More header fields button at the side of the header to expose the Form type field. Once you select a type, the designer will load and some elements (such as email and submit) will be added to the form for you.
Fill out key information about the form.
Click the More header fields button at the side of the header to expose the following fields:
Name - Enter a descriptive name for your form. This is used to identify the form in list views and for selection on marketing pages.
Form type - Determines whether the form will function as a landing page, subscription center, forward to a friend, or event registration.
Tip
The event management application now allows you to use marketing forms for event registrations. You can create forms with a variety of fields, embed forms on your website, and use the forms for event registration. You will only see Event registration as an option in this field if the Event registration forms feature switch has been turned on. For more information, see Use marketing forms for event registration.
Before you can create event registration forms, your admin must enable it. If you don't see this option in the Form type field, ask your admin to enable event registration forms for your site. For more information, see Use feature switches to enable or disable optional and preview features.
Update contacts/leads - This field establishes which types of records can be created or updated in response to a form submission.
This field is only available for Landing page and Subscription center forms. This field will be locked for Forward to a friend forms and won't appear for Event registration forms.
There are four options to choose from: Contacts and leads, Only contacts, Only leads, and No update. The first three options are visible by default. The No update option must be enabled by an admin. It's important to understand how form updates impact contact generation, lead generation, record updates, lead scoring, and interaction records. Review the How form settings affect lead scoring and interaction records article to determine which option to choose for each of your marketing forms.
For more information, see Settings in the header.
Design your form.
After you have filled out key information about your form, you can begin to add, configure, and arrange the various fields, buttons, and graphical elements that your form requires. The form designer is similar to other types of digital content designers in Dynamics 365 Customer Insights - Journeys, but only provides design elements and settings that are appropriate for marketing forms.
For more information, see Create and edit marketing forms.
Update additional settings.
From the Summary tab, review and update a few key settings, which include:
Contact matching strategies and Lead matching strategies - Set these options to control which incoming form-field values are matched against existing contact and lead records. These settings default to the strategies that are selected as the default, but if additional strategies have been configured, you'll be able to change these settings as needed.
Generate leads without matching - Controls whether the form will attempt to match an existing lead or not.
Prefill fields - Set this option to Yes to enable prefilling for the form; set it to No to disable it. You can only change this option for landing-page forms. Subscription-center forms always use prefilling, while forward-to-a-friend forms never use it. The steps that are involved to enable prefilling will be discussed later in this module.
Form purpose and Visual style - These settings don't affect the actual layout or functionality of the form in any way. These values affect how the form can be found in the template gallery. If you create a form template, we suggest filling out these fields to help your users search for a form template in the template gallery.
For more information, see Settings on the Summary tab.
Determine the submission behavior for the form.
On the Summary tab, the settings within the Submission behavior section establish how the form interacts with people who submit it. These are the default settings for when you place the form in a marketing page using a form element, you can override these by editing the form element properties on the marketing page.
These settings also establish the behavior for when the form is embedded on an external website.
Marketing forms are designed to submit values for all mandatory fields and fields used in contact matching, lead matching, and duplicate detection. Occasionally, errors in form design or changes to system settings can cause form submissions to fail. When a submission fails, the system will store what it can of the erroneous submission so you can examine it later and possibly recover key information from it. For more information, see Why submissions can fail.
Optionally, you can configure the system to also keep all incoming form submissions, including submissions that were successful and have already been processed and applied to your database. If you want to store all form submissions, set the Store form submission field to Yes. For more information, see Choose whether to keep all incoming submissions or just failures.
Save your changes.
Preview your form.
After you have finished designing the form, you can use the built-in review features to see how your form looks.
Go to the Preview tab. Switch between Desktop, Tablet, and Mobile to see how your form will appear on various devices.
If you want to make any changes, go back to the Designer tab.
Save any additional changes.

For more information, see Design and validate your form content.
Enable prefilling for forms
Marketers can enable their marketing forms to have prefill features that provide their returning contacts with a form that already shows the contacts' previously entered information such as their name and email address. Contacts often find prefilled forms to be more convenient, which will likely improve the submission rate and the quality of your data.
Important
When enabling a prefilling feature on your forms, you must also consider your contacts' privacy so that you can control which fields on which forms will allow prefilling. Additionally, each contact can choose for themselves whether they want to allow prefilled landing-page forms or not. However, subscription center forms always support prefilling due to the role that they play in the system.
Dynamics 365 Customer Insights - Journeys supports three different marketing form types: landing pages, subscription centers, and forward-to-a-friend. Because each form is different, each of them treats prefilling differently. To view how each form treats prefilling, see How prefilling works for different types of forms.
Enabling a form is a two-step process. To create a form with prefilling enabled, follow these steps:
Go to Outbound marketing > Internet marketing > Marketing forms and then open an existing form. Go to the Summary tab and find the Content section. Make sure that the Prefill fields setting is set to Yes. (If this setting is set to No, then the form won't support prefilling for any fields).
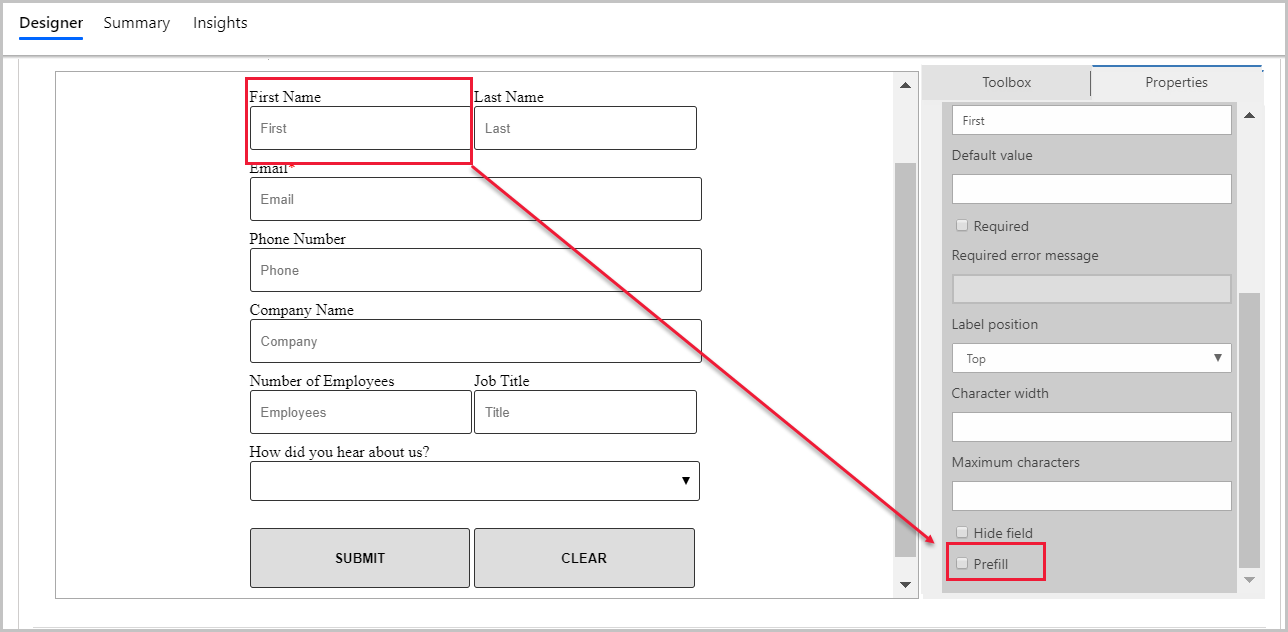
None of the fields that are added to the form allow prefilling by default. After you enable prefilling for a form, go to the Designer tab of a form, select the field element on the canvas that you want to enable prefilling for, open the Properties tab on the side panel, and then select the Prefill check box.
Be sure that your form includes a Remember me element. This selection creates the check box that contacts can use to control the prefill feature. (Typically, this field is added automatically when you enable prefilling for the form.)
For more information, see Enable prefilling for forms.
Check for errors and go live
While you are building a marketing form, it remains in draft status and is therefore editable in Dynamics 365 Customer Insights - Journeys but is unavailable for use on marketing pages. When your form is ready for use, you must publish it by selecting Go live from the command bar. Your design will be checked for errors and then, provided it passes, moved to the live state, thereby making it available for use on a marketing page or to be embedded on an external site. If a problem is found, read the error message on the top of the form page, address the issue, and try again.
For more information, see Go live to make your marketing form available for use and Marketing forms go-live operations and status.
Make edits to a live form
You can edit a live form by selecting Edit in the command bar. While you are editing the form, it remains functional on all live pages where it is already being used and available for use on new pages. After you have edited the form, select Save. Your design will be checked for errors and then, provided it passes, your updates will be published.
For more information, see Go live to make your marketing form available for use.