Menggunakan Brushes
Anda dapat menggunakan kuas untuk melukis interior hampir semua bentuk dengan menggunakan fungsi antarmuka perangkat grafis (GDI). Ini termasuk interior persegi panjang, elipsis, poligon, dan jalur. Tergantung pada persyaratan aplikasi Anda, Anda dapat menggunakan kuas solid dengan warna tertentu, sikat stok, sikat menetas, atau sikat pola.
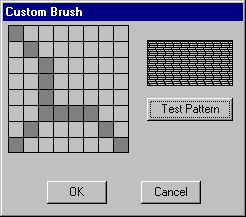
Bagian ini berisi sampel kode yang menunjukkan pembuatan kotak dialog kuas kustom. Kotak dialog berisi kisi yang mewakili bitmap yang digunakan sistem sebagai kuas. Pengguna dapat menggunakan kisi ini untuk membuat bitmap pattern-brush lalu melihat pola kustom dengan mengklik tombol Uji Pola .
Ilustrasi berikut menunjukkan pola yang dibuat dengan menggunakan kotak dialog Kuas Kustom .
Untuk menampilkan kotak dialog, Anda harus terlebih dahulu membuat templat kotak dialog. Templat kotak dialog berikut menentukan kotak dialog Kuas Kustom .
CustBrush DIALOG 6, 18, 160, 118
STYLE WS_DLGFRAME | WS_POPUP | WS_VISIBLE | WS_CAPTION
CAPTION "Custom Brush"
FONT 8, "MS Sans Serif"
BEGIN
    CONTROL         "", IDD_GRID, "Static", SS_BLACKFRAME |
                    WS_CHILD, 3, 2, 83, 79
    CONTROL         "", IDD_RECT, "Static", SS_BLACKFRAME |
                    WS_CHILD, 96, 11, 57, 28
    PUSHBUTTON      "Test Pattern", IDD_PAINTRECT, 96, 47, 57, 14
    PUSHBUTTON      "OK", IDD_OK, 29, 98, 40, 14
    PUSHBUTTON      "Cancel", IDD_CANCEL, 92, 98, 40, 14
END
Kotak dialog Kuas Kustom berisi lima kontrol: jendela bitmap-grid, jendela tampilan pola, dan tiga tombol dorong, berlabel Pola Uji, OK, dan Batal. Tombol dorong Pola Uji memungkinkan pengguna untuk melihat pola. Templat kotak dialog menentukan dimensi keseluruhan jendela kotak dialog, menetapkan nilai untuk setiap kontrol, menentukan lokasi setiap kontrol, dan sebagainya. Untuk informasi selengkapnya, lihat Kotak Dialog.
Nilai kontrol dalam templat kotak dialog adalah konstanta yang telah didefinisikan sebagai berikut dalam file header aplikasi.
#define IDD_GRID      120
#define IDD_RECT      121
#define IDD_PAINTRECT 122
#define IDD_OK        123
#define IDD_CANCEL    124
Setelah Anda membuat templat kotak dialog dan menyertakannya dalam file definisi sumber daya aplikasi, Anda harus menulis prosedur dialog. Prosedur ini memproses pesan yang dikirim sistem ke kotak dialog. Kutipan berikut dari kode sumber aplikasi menunjukkan prosedur kotak dialog untuk kotak dialog Kuas Kustom dan dua fungsi yang ditentukan aplikasi yang dipanggilnya.
BOOL CALLBACK BrushDlgProc( HWND hdlg, UINT message, LONG wParam,
                            LONG lParam)
{
    static HWND hwndGrid;       // grid-window control
    static HWND hwndBrush;      // pattern-brush control
    static RECT rctGrid;        // grid-window rectangle
    static RECT rctBrush;       // pattern-brush rectangle
    static UINT bBrushBits[8];  // bitmap bits
    static RECT rect[64];       // grid-cell array
    static HBITMAP hbm;         // bitmap handle
    HBRUSH hbrush;              // current brush
    HBRUSH hbrushOld;           // default brush
    HRGN hrgnCell;              // test-region handle
    HDC hdc;                    // device context (DC) handle
    int x, y, deltaX, deltaY;   // drawing coordinates
    POINTS ptlHit;              // mouse coordinates
    int i;                      // count variable

    switch (message)
        {
        case WM_INITDIALOG:

            // Retrieve a window handle for the grid-window and
            // pattern-brush controls.

            hwndGrid = GetDlgItem(hdlg, IDD_GRID);
            hwndBrush = GetDlgItem(hdlg, IDD_RECT);

            // Initialize the array of bits that defines the
            // custom brush pattern with the value 1 to produce a
            // solid white brush.

            for (i=0; i<8; i++)
                bBrushBits[i] = 0xFF;

            // Retrieve dimensions for the grid-window and pattern-
            // brush controls.

            GetClientRect(hwndGrid, &rctGrid);
            GetClientRect(hwndBrush, &rctBrush);

            // Determine the width and height of a single cell.

            deltaX = (rctGrid.right - rctGrid.left)/8;
            deltaY = (rctGrid.bottom - rctGrid.top)/8;

            // Initialize the array of cell rectangles.

            for (y=rctGrid.top, i=0; y < rctGrid.bottom; y += deltaY)
            {
                for(x=rctGrid.left; x < (rctGrid.right - 8) && i < 64;
                        x += deltaX, i++)
                {
                    rect[i].left = x; rect[i].top = y;
                    rect[i].right = x + deltaX;
                    rect[i].bottom = y + deltaY;
                }
            }
            return FALSE;


        case WM_PAINT:

            // Draw the grid.

            hdc = GetDC(hwndGrid);

            for (i=rctGrid.left; i<rctGrid.right;
                 i+=(rctGrid.right - rctGrid.left)/8)
            {
                 MoveToEx(hdc, i, rctGrid.top, NULL);
                 LineTo(hdc, i, rctGrid.bottom);
            }
            for (i=rctGrid.top; i<rctGrid.bottom;
                 i+=(rctGrid.bottom - rctGrid.top)/8)
            {
                 MoveToEx(hdc, rctGrid.left, i, NULL);
                 LineTo(hdc, rctGrid.right, i);
            }
            ReleaseDC(hwndGrid, hdc);
            return FALSE;


        case WM_LBUTTONDOWN:

            // Store the mouse coordinates in a POINT structure.

            ptlHit = MAKEPOINTS((POINTS FAR *)lParam);

            // Create a rectangular region with dimensions and
            // coordinates that correspond to those of the grid
            // window.

            hrgnCell = CreateRectRgn(rctGrid.left, rctGrid.top,
                        rctGrid.right, rctGrid.bottom);

            // Retrieve a window DC for the grid window.

            hdc = GetDC(hwndGrid);

            // Select the region into the DC.

            SelectObject(hdc, hrgnCell);

            // Test for a button click in the grid-window rectangle.

            if (PtInRegion(hrgnCell, ptlHit.x, ptlHit.y))
            {
                // A button click occurred in the grid-window
                // rectangle; isolate the cell in which it occurred.

                for(i=0; i<64; i++)
                {
                    DeleteObject(hrgnCell);

                    hrgnCell = CreateRectRgn(rect[i].left,
                               rect[i].top,
                               rect[i].right, rect[i].bottom);

                    if (PtInRegion(hrgnCell, ptlHit.x, ptlHit.y))
                    {
                        InvertRgn(hdc, hrgnCell);

                        // Set the appropriate brush bits.

                         if (i % 8 == 0)
                            bBrushBits[i/8] = bBrushBits[i/8] ^ 0x80;
                         else if (i % 8 == 1)
                            bBrushBits[i/8] = bBrushBits[i/8] ^ 0x40;
                         else if (i % 8 == 2)
                            bBrushBits[i/8] = bBrushBits[i/8] ^ 0x20;
                         else if (i % 8 == 3)
                            bBrushBits[i/8] = bBrushBits[i/8] ^ 0x10;
                         else if (i % 8 == 4)
                            bBrushBits[i/8] = bBrushBits[i/8] ^ 0x08;
                         else if (i % 8 == 5)
                            bBrushBits[i/8] = bBrushBits[i/8] ^ 0x04;
                         else if (i % 8 == 6)
                            bBrushBits[i/8] = bBrushBits[i/8] ^ 0x02;
                         else if (i % 8 == 7)
                            bBrushBits[i/8] = bBrushBits[i/8] ^ 0x01;

                      // Exit the "for" loop after the bit is set.

                         break;
                    } // end if

                } // end for

            } // end if

            // Release the DC for the control.

            ReleaseDC(hwndGrid, hdc);
            return TRUE;


        case WM_COMMAND:
            switch (wParam)
            {
               case IDD_PAINTRECT:

                    hdc = GetDC(hwndBrush);

                    // Create a monochrome bitmap.

                    hbm = CreateBitmap(8, 8, 1, 1,
                          (LPBYTE)bBrushBits);

                    // Select the custom brush into the DC.

                    hbrush = CreatePatternBrush(hbm);

                    hbrushOld = SelectObject(hdc, hbrush);

                    // Use the custom brush to fill the rectangle.

                    Rectangle(hdc, rctBrush.left, rctBrush.top,
                              rctBrush.right, rctBrush.bottom);

                    // Clean up memory.
                    SelectObject(hdc, hbrushOld);
                    DeleteObject(hbrush);
                    DeleteObject(hbm);

                    ReleaseDC(hwndBrush, hdc);
                    return TRUE;

                case IDD_OK:

                case IDD_CANCEL:
                    EndDialog(hdlg, TRUE);
                    return TRUE;

            } // end switch
            break;
        default:
            return FALSE;
        }
}


int GetStrLngth(LPTSTR cArray)
{
    int i = 0;

    while (cArray[i++] != 0);
    return i-1;

}

DWORD RetrieveWidth(LPTSTR cArray, int iLength)
{
    int i, iTmp;
    double dVal, dCount;

    dVal = 0.0;
    dCount = (double)(iLength-1);
    for (i=0; i<iLength; i++)
    {
        iTmp = cArray[i] - 0x30;
        dVal = dVal + (((double)iTmp) * pow(10.0, dCount--));
    }

    return (DWORD)dVal;
}
Prosedur kotak dialog untuk kotak dialog Kuas Kustom memproses empat pesan, seperti yang dijelaskan dalam tabel berikut ini.
| Pesan | Tindakan |
|---|---|
| WM_INITDIALOG | Mengambil handel jendela dan dimensi untuk kontrol jendela kisi dan kuas pola, menghitung dimensi sel tunggal dalam kontrol jendela kisi, dan menginisialisasi array koordinat sel kisi. |
| WM_PAINT | Menggambar pola kisi dalam kontrol jendela kisi. |
| WM_LBUTTONDOWN | Menentukan apakah kursor berada dalam kontrol jendela kisi saat pengguna menekan tombol mouse kiri. Jika demikian, prosedur kotak dialog membalikkan sel kisi yang sesuai dan merekam status sel tersebut dalam array bit yang digunakan untuk membuat bitmap untuk kuas kustom. |
| WM_COMMAND | Memproses input untuk tiga kontrol tombol dorong. Jika pengguna mengklik tombol Uji Pola , prosedur kotak dialog melukis kontrol Pola Uji dengan pola kuas kustom baru. Jika pengguna mengklik tombol OK atau Batal , prosedur kotak dialog melakukan tindakan yang sesuai. |
Untuk informasi selengkapnya tentang pesan dan pemrosesan pesan, lihat Pesan dan Antrean Pesan.
Setelah Anda menulis prosedur kotak dialog, sertakan definisi fungsi untuk prosedur dalam file header aplikasi lalu panggil prosedur kotak dialog pada titik yang sesuai dalam aplikasi.
Kutipan berikut dari file header aplikasi menunjukkan definisi fungsi untuk prosedur kotak dialog dan dua fungsi yang dipanggilnya.
BOOL CALLBACK BrushDlgProc(HWND, UINT, WPARAM, LPARAM);
int GetStrLngth(LPTSTR);
DWORD RetrieveWidth(LPTSTR, int);
Terakhir, kode berikut menunjukkan bagaimana prosedur kotak dialog dipanggil dari file kode sumber aplikasi.
    DialogBox((HANDLE)GetModuleHandle(NULL),
        (LPTSTR)"CustBrush",
        hWnd,
        (DLGPROC) BrushDlgProc);
Panggilan ini biasanya dilakukan sebagai respons terhadap pengguna yang memilih opsi dari menu aplikasi.
Saran dan Komentar
Segera hadir: Sepanjang tahun 2024 kami akan menghentikan penggunaan GitHub Issues sebagai mekanisme umpan balik untuk konten dan menggantinya dengan sistem umpan balik baru. Untuk mengetahui informasi selengkapnya, lihat: https://aka.ms/ContentUserFeedback.
Kirim dan lihat umpan balik untuk