Metode IWindowNative::get_WindowHandle (microsoft.ui.xaml.window.h)
Mengambil handel jendela (HWND) jendela yang diwakili oleh objek yang mengimplementasikan IWindowNative.
Untuk informasi selengkapnya, dan contoh kode, lihat Mengambil handel jendela (HWND).
Sintaks
HRESULT get_WindowHandle(
  HWND *hWnd
);
Parameter
hWnd
Handel jendela (HWND).
Mengembalikan nilai
Jika metode ini berhasil, metode akan mengembalikan S_OK. Jika tidak, kode kesalahan HRESULT akan dikembalikan.
Keterangan
Contoh
Sebelum mengikuti contoh ini, tinjau topik-topik ini:
Ikon jendela yang dikustomisasi
Dalam contoh ini, kami menunjukkan cara mengambil handel jendela (HWND) dari jendela utama kami, dan menggunakannya untuk menyesuaikan bilah judul jendela dan kontennya.
Membuat proyek baru
- Di Visual Studio, buat proyek C# atau C++/WinRT baru dari templat proyek Blank App, Packaged (WinUI 3 in Desktop).
MainWindow.xaml
Catatan
Jika Anda memerlukan file ikon untuk digunakan dengan panduan ini, Anda dapat mengunduh computer.ico file dari aplikasi sampel WirelessHostednetwork . Tempatkan file tersebut di folder Anda Assets , dan tambahkan file ke proyek Anda sebagai konten. Anda kemudian akan dapat merujuk ke file menggunakan url Assets/computer.ico.
Jika tidak, jangan ragu untuk menggunakan file ikon yang sudah Anda miliki, dan ubah dua referensi ke dalam daftar kode di bawah ini.
- Dalam daftar kode di bawah ini, Anda akan melihat bahwa di
MainWindow.xamlkami telah menambahkan dua tombol, dan menentukan Penangan Klik untuk masing-masing tombol. Di klik handler untuk tombol pertama (basicButton_Click), kami mengatur ikon dan teks bilah judul. Di yang kedua (customButton_Click), kami menunjukkan kustomisasi yang lebih signifikan dengan mengganti bilah judul dengan konten StackPanel bernama customTitleBarPanel.
<Window
    x:Class="window_titlebar.MainWindow"
    xmlns="http://schemas.microsoft.com/winfx/2006/xaml/presentation"
    xmlns:x="http://schemas.microsoft.com/winfx/2006/xaml"
    xmlns:local="using:window_titlebar"
    xmlns:d="http://schemas.microsoft.com/expression/blend/2008"
    xmlns:mc="http://schemas.openxmlformats.org/markup-compatibility/2006"
    mc:Ignorable="d">

    <Grid x:Name="rootElement" RowDefinitions="100, *, 100, *">

        <StackPanel x:Name="customTitleBarPanel" Grid.Row="0" Orientation="Horizontal" HorizontalAlignment="Stretch" VerticalAlignment="Top" Visibility="Collapsed">
            <Image Source="Images/windowIcon.gif" />
            <TextBlock VerticalAlignment="Center" Text="Full customization of title bar"/>
        </StackPanel>

        <StackPanel x:Name="buttonPanel"  Grid.Row="2" Orientation="Horizontal" HorizontalAlignment="Center">
            <Button x:Name="basicButton" Click="basicButton_Click" Margin="25">Set the Window title and icon</Button>
            <Button x:Name="customButton" Click="customButton_Click" Margin="25">Customize the window title bar</Button>
        </StackPanel>

    </Grid>
</Window>
MainWindow.xaml.cs/cpp
- Dalam daftar kode di bawah ini untuk handler basicButton_Click —agar bilah judul kustom tetap tersembunyi—kami menciutkan customTitleBarPanelStackPanel, dan kami mengatur properti ExtendsContentIntoTitleBar ke
false. - Kami kemudian memanggil IWindowNative::get_WindowHandle (untuk C#, menggunakan metode pembantu interop GetWindowHandle) untuk mengambil handel jendela (HWND) dari jendela utama.
- Selanjutnya, kami mengatur ikon aplikasi (untuk C#, menggunakan paket PInvoke.User32 NuGet) dengan memanggil fungsi LoadImage dan SendMessage .
- Terakhir, kami memanggil SetWindowText untuk memperbarui string bilah judul.
private void basicButton_Click(object sender, RoutedEventArgs e)
{
    // Ensure the custom title bar content is not displayed.
    customTitleBarPanel.Visibility = Visibility.Collapsed;

    // Disable custom title bar content.
    ExtendsContentIntoTitleBar = false;

    //Get the Window's HWND
    var hwnd = WinRT.Interop.WindowNative.GetWindowHandle(this);

    IntPtr hIcon = PInvoke.User32.LoadImage(
        IntPtr.Zero,
        "Images/windowIcon.ico",
        PInvoke.User32.ImageType.IMAGE_ICON,
        20, 20,
        PInvoke.User32.LoadImageFlags.LR_LOADFROMFILE);

    PInvoke.User32.SendMessage(
        hwnd,
        PInvoke.User32.WindowMessage.WM_SETICON,
        (IntPtr)0,
        hIcon);

    PInvoke.User32.SetWindowText(hwnd, "Basic customization of title bar");
}
// pch.h
...
#include <microsoft.ui.xaml.window.h>
...

// MainWindow.xaml.h
...
void basicButton_Click(Windows::Foundation::IInspectable const& sender, Microsoft::UI::Xaml::RoutedEventArgs const& args);
...

// MainWindow.xaml.cpp
void MainWindow::basicButton_Click(IInspectable const&, RoutedEventArgs const&)
{
    // Ensure the that custom title bar content is not displayed.
    customTitleBarPanel().Visibility(Visibility::Collapsed);

    // Disable custom title bar content.
    ExtendsContentIntoTitleBar(false);

    // Get the window's HWND
    auto windowNative{ this->m_inner.as<::IWindowNative>() };
    HWND hWnd{ 0 };
    windowNative->get_WindowHandle(&hWnd);

    HICON icon{ reinterpret_cast<HICON>(::LoadImage(nullptr, L"Assets/computer.ico", IMAGE_ICON, 0, 0, LR_DEFAULTSIZE | LR_LOADFROMFILE)) };
    ::SendMessage(hWnd, WM_SETICON, 0, (LPARAM)icon);

    this->Title(L"Basic customization of title bar");
}
- Di handler customButton_Click , kami mengatur visibilitas customTitleBarPanelStackPanel ke Visible.
- Kami kemudian mengatur properti ExtendsContentIntoTitleBar ke
true, dan memanggil SetTitleBar untuk menampilkan customTitleBarPanelStackPanel sebagai bilah judul kustom kami.
private void customButton_Click(object sender, RoutedEventArgs e)
{
    customTitleBarPanel.Visibility = Visibility.Visible;

    // Enable custom title bar content.
    ExtendsContentIntoTitleBar = true;
    // Set the content of the custom title bar.
    SetTitleBar(customTitleBarPanel);
}
// MainWindow.xaml.h
...
void customButton_Click(Windows::Foundation::IInspectable const& sender, Microsoft::UI::Xaml::RoutedEventArgs const& args);
...

// MainWindow.xaml.cpp
void MainWindow::customButton_Click(IInspectable const&, RoutedEventArgs const&)
{
    customTitleBarPanel().Visibility(Visibility::Visible);

    // Enable custom title bar content.
    ExtendsContentIntoTitleBar(true);

    // Set the content of the custom title bar.
    SetTitleBar(customTitleBarPanel());
}
App.xaml
App.xamlDalam file, segera setelah<!-- Other app resources here -->komentar, kami telah menambahkan beberapa kuas berwarna khusus untuk bilah judul, seperti yang ditunjukkan di bawah ini.
<Application
    x:Class="window_titlebar.App"
    xmlns="http://schemas.microsoft.com/winfx/2006/xaml/presentation"
    xmlns:x="http://schemas.microsoft.com/winfx/2006/xaml"
    xmlns:local="using:window_titlebar">
    <Application.Resources>
        <ResourceDictionary>
            <ResourceDictionary.MergedDictionaries>
                <XamlControlsResources xmlns="using:Microsoft.UI.Xaml.Controls" />
                <!-- Other merged dictionaries here -->
            </ResourceDictionary.MergedDictionaries>
            <!-- Other app resources here -->
            <SolidColorBrush x:Key="WindowCaptionBackground">Green</SolidColorBrush>
            <SolidColorBrush x:Key="WindowCaptionBackgroundDisabled">LightGreen</SolidColorBrush>
            <SolidColorBrush x:Key="WindowCaptionForeground">Red</SolidColorBrush>
            <SolidColorBrush x:Key="WindowCaptionForegroundDisabled">Pink</SolidColorBrush>
        </ResourceDictionary>
    </Application.Resources>
</Application>
Jika Anda telah mengikuti langkah-langkah ini di aplikasi Anda sendiri, maka Anda dapat membangun proyek sekarang, dan menjalankan aplikasi. Anda akan melihat jendela aplikasi yang mirip dengan yang berikut ini (dengan ikon aplikasi kustom):
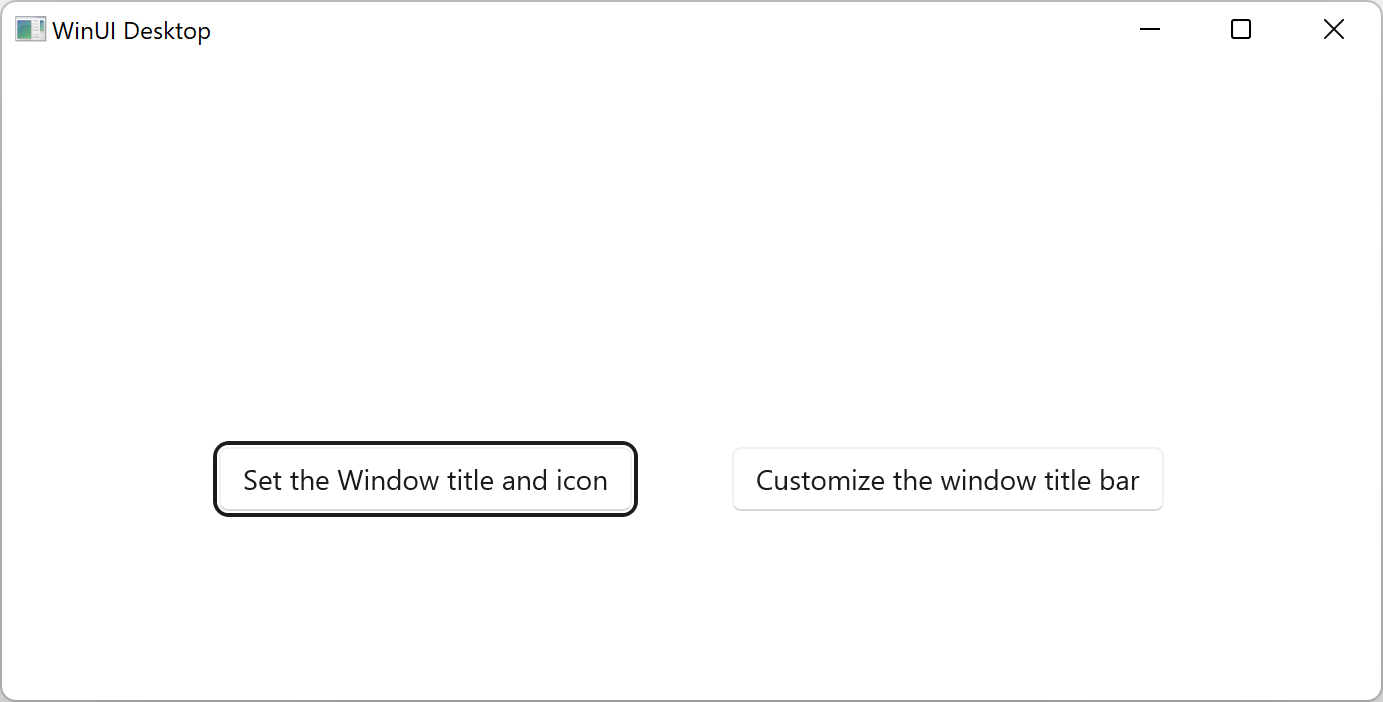
Aplikasi templat.
Berikut adalah bilah judul kustom dasar:
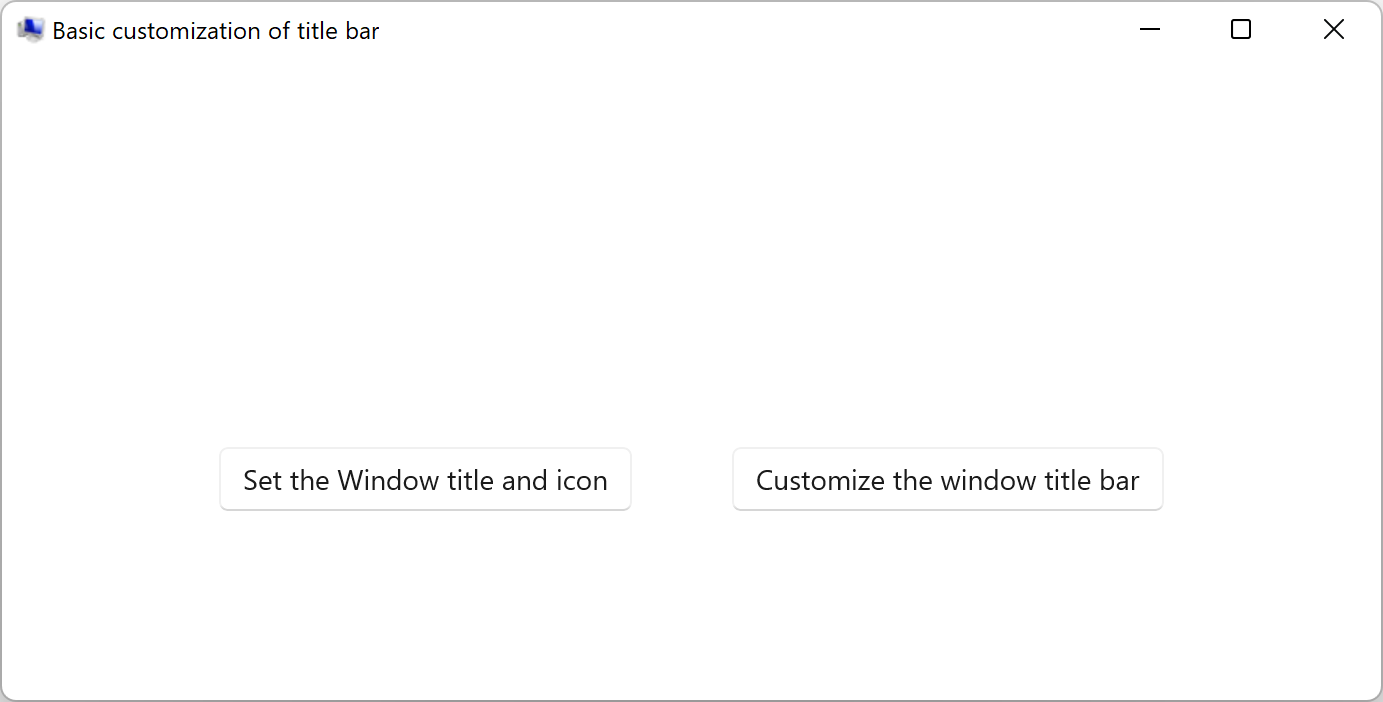
Aplikasi templat dengan ikon aplikasi kustom.Berikut adalah bilah judul yang sepenuhnya kustom:
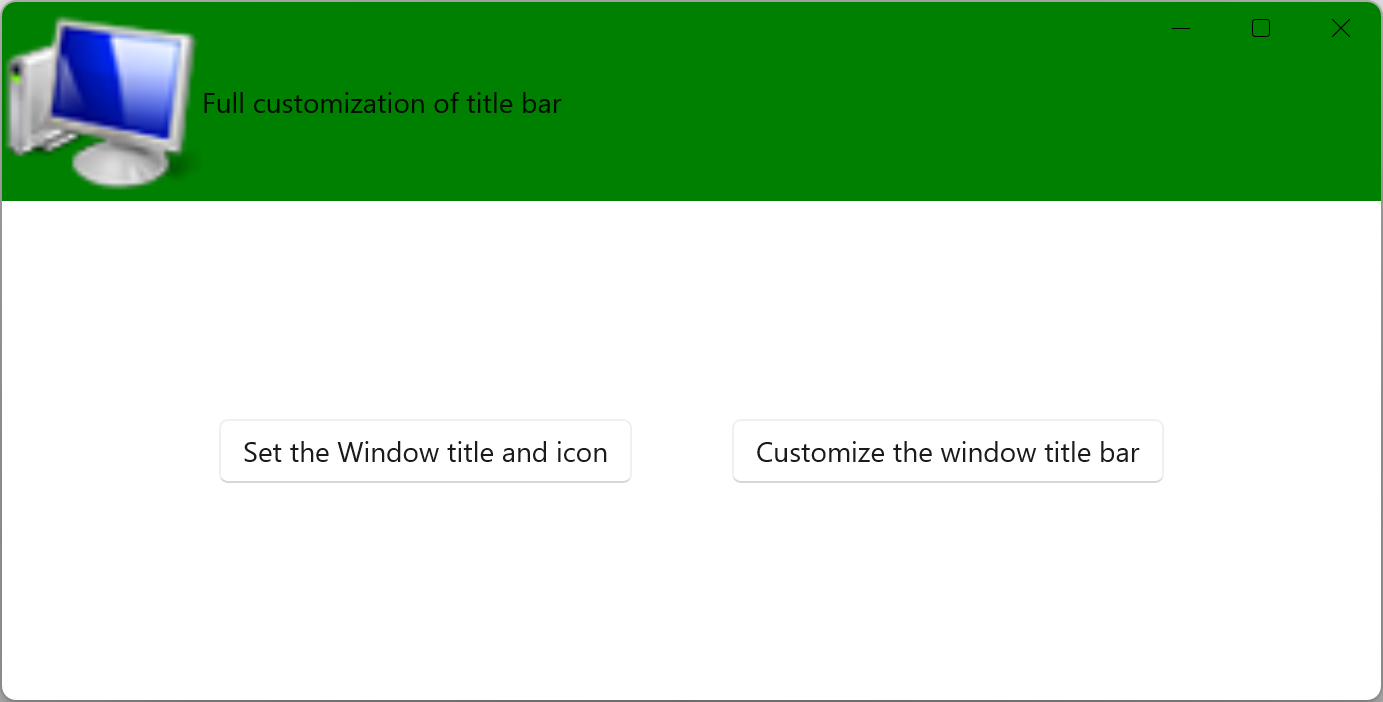
Aplikasi templat dengan bilah judul kustom.
Persyaratan
| Persyaratan | Nilai |
|---|---|
| Klien minimum yang didukung | Windows 10, versi 1809 (dengan SDK Aplikasi Windows 0.5 atau yang lebih baru) |
| Header | microsoft.ui.xaml.window.h |
Lihat juga
Saran dan Komentar
Segera hadir: Sepanjang tahun 2024 kami akan menghentikan penggunaan GitHub Issues sebagai mekanisme umpan balik untuk konten dan menggantinya dengan sistem umpan balik baru. Untuk mengetahui informasi selengkapnya, lihat: https://aka.ms/ContentUserFeedback.
Kirim dan lihat umpan balik untuk