Emission factors

There are two main categories of factors in Microsoft Sustainability Manager: emission factors and estimation factors.
Emission factors are required to calculate emissions. There are emission factors for every emission source or category that is applied to the activity data. They are used to calculate the emission values for corresponding gases.
Estimation factors are used to convert proxy data into activity data that can be used with an emission factor. Typical examples are square footage of real estate to convert to energy or refrigerants, and the number of nights of a hotel stay.
The following considerations are important for emission and estimation factors:
The factors appear in two places: Microsoft Cloud Solution Center and Sustainability Manager. Sustainability Manager already has a basic set of factors loaded by default for demonstration purposes. To add more factors to the Sustainability Manager, simply select and load them from Solution Center. Within Sustainability Manager, factors are stored in factor libraries. Factor libraries consist of three types of factors: default, custom, and demo.
- Default – This type is provided by Sustainability Manager as a standard. These standards aren't the only standards that exist. However, they are the standards that Microsoft has permission to broadly distribute.
- Custom – This type is unique to an organization.
- Demo – This type is provided in the tool for demonstrative purposes only.
You can find emission and estimation factors under Factor libraries in the left navigation pane.
For details about specific emission factors and calculation citations, see Scope 1 emissions, Scope 2 emissions, and Scope 3 emissions.
The factor libraries where emission factors are stored in Microsoft Sustainability Manager are groups of related emission factors that often have the same source. For example, EPA Factors Hub is stored in a factor library. Emission factors are also mapped to reference data for calculations in the same library. For more information, see the Factor mappings section of this topic.
Demo data emission factors
To enhance the trial experience for Microsoft Sustainability Manager, Microsoft has provided demo data for emission factors, so that you can easily test calculations.
To view the demo data, follow these steps.
- In the navigation pane, select Factor libraries.
- Select Demo Energy Emission Factor Library.
- Select each header to view the emission factors and factor mappings.
To delete the demo data, follow these steps.
- In the navigation pane, select Factor libraries.
- Select Demo Energy Emission Factor Library.
- Select Delete.
Custom emission factors
Custom emission factors are required when standard United States Environmental Protection Agency (EPA) factor sets, United Kingdom Department for Environment Food & Rural Affairs (DEFRA) factor sets, select Intergovernmental Panel on Climate Change (IPCC), or other factor sets don't cover your calculation needs or haven't yet been added to Microsoft Sustainability Manager. Custom factors are often used in industrial processes and renewable energy.
Add a new factor library
- In the navigation pane, select Factor libraries. A list of existing libraries is shown.
- Select New.
- Enter a name for the library, and add any relevant information, such as a description and year.
- Save your changes, and close the page.
Manually add a new emission factor
In the navigation pane, select Factor libraries. A list of existing libraries is shown.
Select the library to add an emission factor to.
Go to the Emission factors tab.
Select New emission factor.
Set the required fields. Be sure to include at least one value and unit for a greenhouse gas.
Note
The units you use for greenhouse gases (GHGs) must be included in the Weight/mass unit group. For more information about unit groups, go to Set up unit groups.
Save your changes, and close the page.
Add new emission or estimation factors through a connection
- In the navigation pane, select Factor libraries. A list of existing libraries is shown.
- Select Create new library.
- Complete the general information about the library.
- Make sure that the library name is included in the upload of the factors that you're importing.
- In the navigation pane, select Data connections>New.
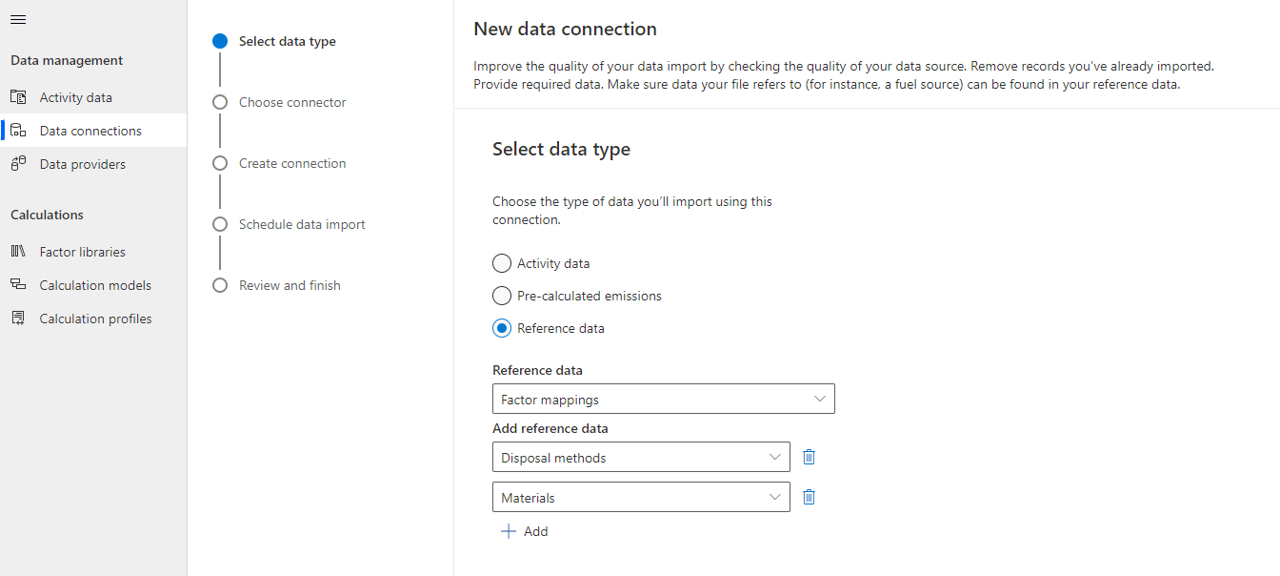
- Select Reference data as the type, and select the source of the factors.
- Connect by using the Data connections process.
- Make sure that you map required fields, such as the factor name, input unit, and factor library name.
Factor mappings
To correctly calculate emission factors, based on fuels, facilities, or other reference data, you must create factor mappings. In this way, you don't have to create separate calculations for each emission factor. For more information, see Scope 1 emissions and Scope 2 emissions.
For example, you have one hundred facilities, each of which is in a different region and has different emission factors. By creating a factor mapping for the emission factor of each facility, you can efficiently set up your calculation.
Create factor mappings
In the left navigation pane, select Factor libraries.
Select the library that contains the emission factors that you want to map to.
Important
Emission factors and reference data must be set up before factor mapping can occur.
Go to the Factor mappings tab.
On the action pane, select New factor mapping to manually add the mapping information or import it by using the Connections process.
Note
If you use the Connections process, for factors that require more than one piece of reference data, in the Reference data drop-down menu, select Factor mappings. Then add the first piece of reference data. Select Add and then add the additional reference data. For example, for Scope 3 Category 5 Waste generated in operations, you might add Materials and Disposal methods.
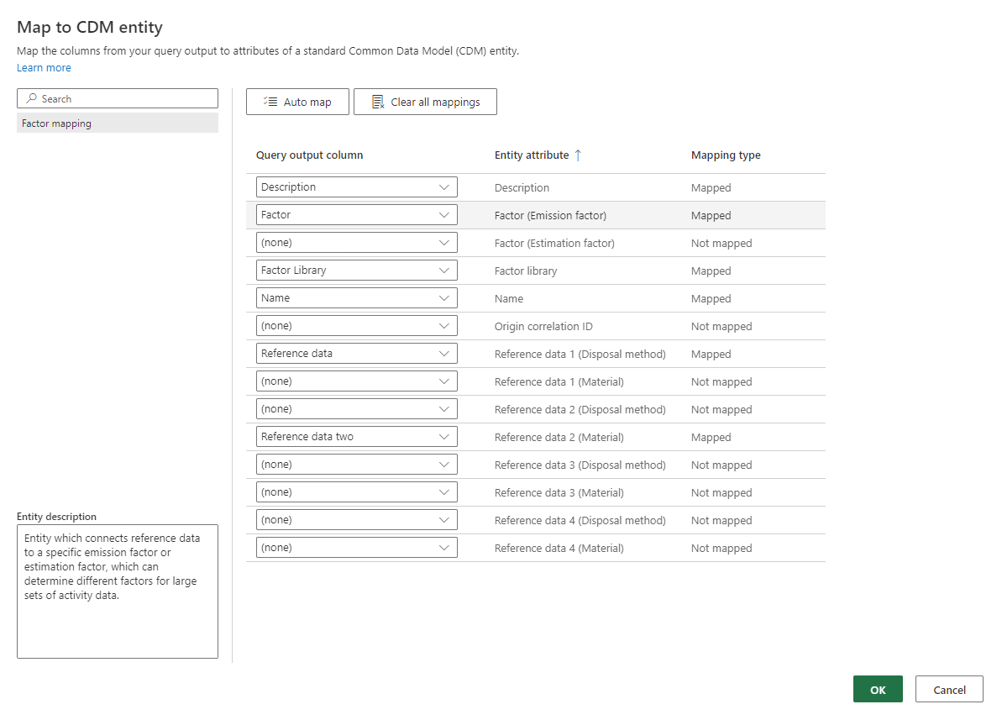
Be sure to map required fields, such as the name, factor library name, and reference data.
Note
For emission factors that have more than one piece of reference data, be sure to only map one piece of reference data to one entity attribute. For example, in this mapping for Scope 3 Category 5 Waste generated in operations, the Disposal method is mapped to Reference data 1, and the Material is mapped to Reference data 2. Be sure not to map both the Disposal method and Material to Reference data 1, because that will result in an error.
Make sure that the activity data you include references the corresponding reference data type used in factor mappings. For example, while you can choose Material when you create a factor mapping, you can't use it in Scope 3 Category 2 Capital Goods because the reference data for Material isn't associated with that specific activity.
Enter a name for the mapping.
Find and select the entity name that you're mapping to. This entity can be any type of reference data that you've added, such as facility or fuel.
Find and select the entity ID.
Find and select the emission factor to map to.
Save your changes, and close the page.
If you're using the Connections process, make sure that the factor library name is in the source.
Note
To import data to calculate against these factor mappings, you must create a lookup for each scenario that you're importing.