Nóta
Aðgangur að þessari síðu krefst heimildar. Þú getur prófað aðskrá þig inn eða breyta skráasöfnum.
Aðgangur að þessari síðu krefst heimildar. Þú getur prófað að breyta skráasöfnum.
APPLIES TO:  Azure Data Factory
  Azure Synapse Analytics
Tip
Try out Data Factory in Microsoft Fabric, an all-in-one analytics solution for enterprises. Microsoft Fabric covers everything from data movement to data science, real-time analytics, business intelligence, and reporting. Learn how to start a new trial for free!
This article provides information about the schedule trigger and the steps to create, start, and monitor a schedule trigger. For other types of triggers, see Pipeline execution and triggers.
When you create a schedule trigger, you specify a schedule like a start date, recurrence, or end date for the trigger and associate it with a pipeline. Pipelines and triggers have a many-to-many relationship. Multiple triggers can kick off a single pipeline. A single trigger can kick off multiple pipelines.
The following sections provide steps to create a schedule trigger in different ways.
Azure Data Factory and Azure Synapse portal experience
You can create a schedule trigger to schedule a pipeline to run periodically, such as hourly or daily.
Note
For a complete walkthrough of creating a pipeline and a schedule trigger, which associates the trigger with the pipeline and runs and monitors the pipeline, see Quickstart: Create a data factory by using Data Factory UI.
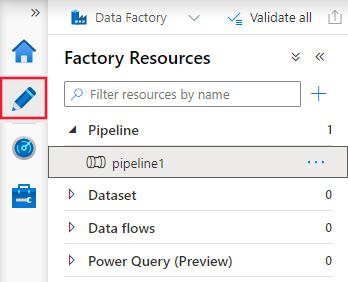
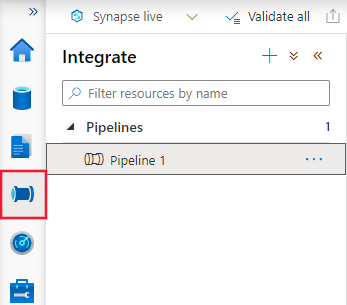
Switch to the Edit tab in Data Factory or the Integrate tab in Azure Synapse.
Select Trigger on the menu, and then select New/Edit.

On the Add triggers page, select Choose trigger, and then select New.

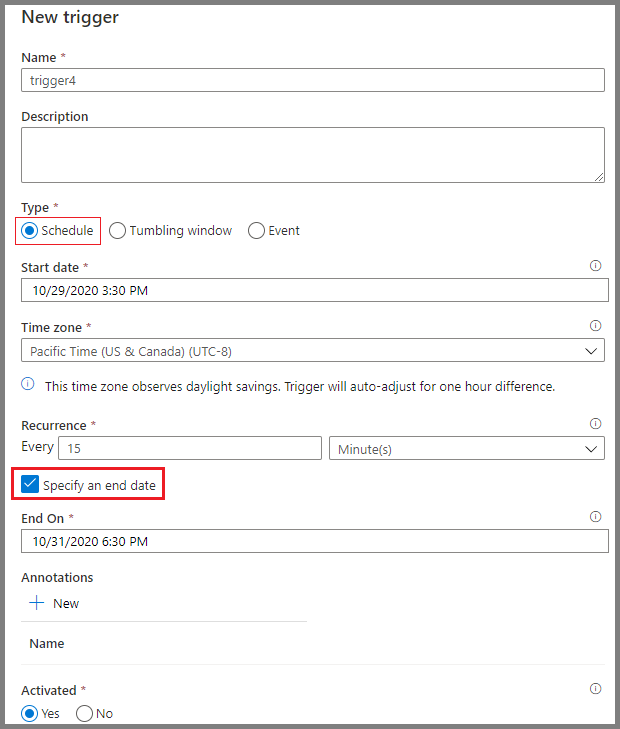
On the New trigger page:
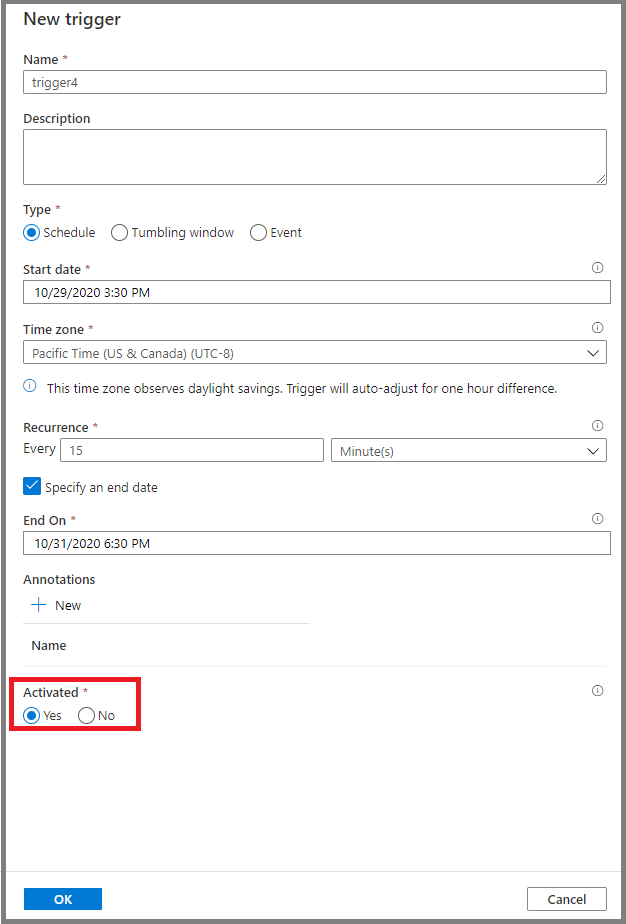
Confirm that Schedule is selected for Type.
Specify the start datetime of the trigger for Start Date. It's set to the current datetime in Coordinated Universal Time (UTC) by default.
Specify the time zone in which the trigger is created. The time zone setting applies to Start Date, End Date, and Schedule Execution Times in Advanced recurrence options. Changing the Time Zone setting doesn't automatically change your start date. Make sure the start date is correct in the specified time zone. The Scheduled Execution time of Trigger is considered post the start date. (Ensure that the start date is at least 1 minute less than the execution time or else it triggers the pipeline in the next recurrence.)
Note
For time zones that observe daylight saving, trigger time auto-adjusts for the twice-a-year change, if the recurrence is set to Days or above. To opt out of the daylight saving change, select a time zone that doesn't observe daylight saving, for instance, UTC.
Daylight saving adjustment only happens for a trigger with the recurrence set to Days or above. If the trigger is set to Hours or Minutes frequency, it continues to fire at regular intervals.
Specify Recurrence for the trigger. Select one of the values from the dropdown list (Every minute, Hourly, Daily, Weekly, or Monthly). Enter the multiplier in the text box. For example, if you want the trigger to run once for every 15 minutes, you select Every Minute and enter 15 in the text box.
Under Recurrence, if you choose Day(s), Week(s), or Month(s) from the dropdown list, you can see Advanced recurrence options.

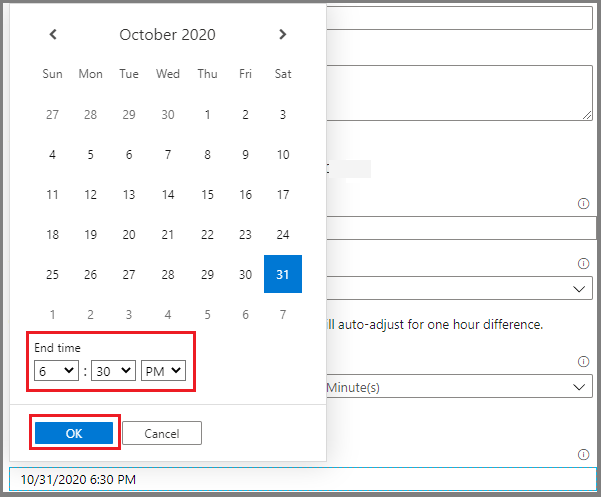
To specify an end-date time, select Specify an end date. Specify the Ends On information, and then select OK.
A cost is associated with each pipeline run. If you're testing, you might want to ensure that the pipeline is triggered only a couple of times. However, ensure that there's enough time for the pipeline to run between the publish time and the end time. The trigger comes into effect only after you publish the solution, not when you save the trigger in the UI.
In the New Trigger window, select Yes in the Activated option, and then select OK. You can use this checkbox to deactivate the trigger later.
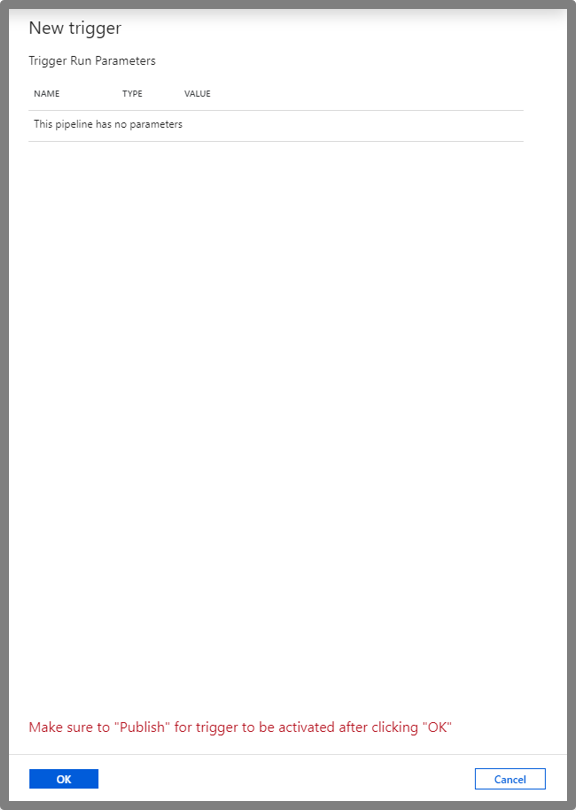
In the New Trigger window, review the warning message and then select OK.
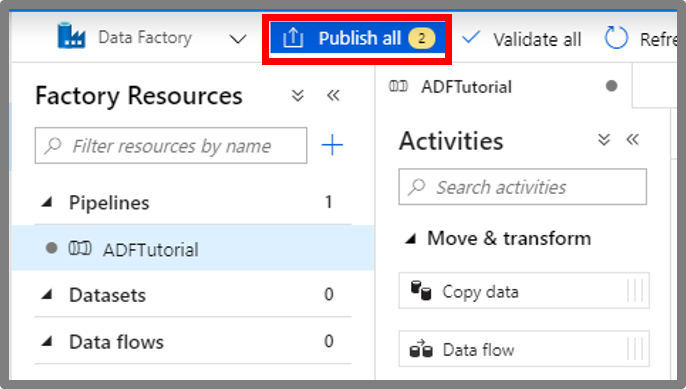
Select Publish all to publish the changes. Until you publish the changes, the trigger doesn't start triggering the pipeline runs.
Switch to the Pipeline runs tab on the left, and then select Refresh to refresh the list. You see the pipeline runs triggered by the scheduled trigger. Notice the values in the Triggered By column. If you use the Trigger Now option, you see the manual trigger run in the list.
Switch to the Trigger runs > Schedule view.
Azure PowerShell
Note
We recommend that you use the Azure Az PowerShell module to interact with Azure. To get started, see Install Azure PowerShell. To learn how to migrate to the Az PowerShell module, see Migrate Azure PowerShell from AzureRM to Az.
This section shows you how to use Azure PowerShell to create, start, and monitor a schedule trigger. To see this sample working, first go through Quickstart: Create a data factory by using Azure PowerShell. Then, add the following code to the main method, which creates and starts a schedule trigger that runs every 15 minutes. The trigger is associated with a pipeline named Adfv2QuickStartPipeline that you create as part of the quickstart.
Prerequisites
- Azure subscription. If you don't have an Azure subscription, create a free account before you begin.
- Azure PowerShell. Follow the instructions in Install Azure PowerShell on Windows with PowerShellGet.
Sample code
Create a JSON file named MyTrigger.json in the *C:\ADFv2QuickStartPSH* folder with the following content:
Important
Before you save the JSON file, set the value of the
startTimeelement to the current UTC time. Set the value of theendTimeelement to one hour past the current UTC time.{ "properties": { "name": "MyTrigger", "type": "ScheduleTrigger", "typeProperties": { "recurrence": { "frequency": "Minute", "interval": 15, "startTime": "2017-12-08T00:00:00Z", "endTime": "2017-12-08T01:00:00Z", "timeZone": "UTC" } }, "pipelines": [{ "pipelineReference": { "type": "PipelineReference", "referenceName": "Adfv2QuickStartPipeline" }, "parameters": { "inputPath": "adftutorial/input", "outputPath": "adftutorial/output" } } ] } }In the JSON snippet:
The
typeelement of the trigger is set toScheduleTrigger.The
frequencyelement is set toMinuteand theintervalelement is set to15. As such, the trigger runs the pipeline every 15 minutes between the start and end times.The
timeZoneelement specifies the time zone in which the trigger is created. This setting affects bothstartTimeandendTime.The
endTimeelement is one hour after the value of thestartTimeelement. As such, the trigger runs the pipeline 15 minutes, 30 minutes, and 45 minutes after the start time. Don't forget to update the start time to the current UTC time and the end time to one hour past the start time.Important
For the UTC time zone,
startTimeandendTimeneed to follow the formatyyyy-MM-ddTHH:mm:ssZ. For other time zones,startTimeandendTimefollow theyyyy-MM-ddTHH:mm:ssformat.Per the ISO 8601 standard, the
Zsuffix is used to timestamp mark the datetime to the UTC time zone and render thetimeZonefield useless. If theZsuffix for the UTC time zone is missing, the result is an error upon trigger activation.The trigger is associated with the
Adfv2QuickStartPipelinepipeline. To associate multiple pipelines with a trigger, add morepipelineReferencesections.The pipeline in the quickstart takes two
parametersvalues:inputPathandoutputPath. You pass values for these parameters from the trigger.
Create a trigger by using the Set-AzDataFactoryV2Trigger cmdlet:
Set-AzDataFactoryV2Trigger -ResourceGroupName $ResourceGroupName -DataFactoryName $DataFactoryName -Name "MyTrigger" -DefinitionFile "C:\ADFv2QuickStartPSH\MyTrigger.json"Confirm that the status of the trigger is Stopped by using the Get-AzDataFactoryV2Trigger cmdlet:
Get-AzDataFactoryV2Trigger -ResourceGroupName $ResourceGroupName -DataFactoryName $DataFactoryName -Name "MyTrigger"Start the trigger by using the Start-AzDataFactoryV2Trigger cmdlet:
Start-AzDataFactoryV2Trigger -ResourceGroupName $ResourceGroupName -DataFactoryName $DataFactoryName -Name "MyTrigger"Confirm that the status of the trigger is Started by using the Get-AzDataFactoryV2Trigger cmdlet:
Get-AzDataFactoryV2Trigger -ResourceGroupName $ResourceGroupName -DataFactoryName $DataFactoryName -Name "MyTrigger"Get the trigger runs in Azure PowerShell by using the Get-AzDataFactoryV2TriggerRun cmdlet. To get the information about the trigger runs, execute the following command periodically. Update the
TriggerRunStartedAfterandTriggerRunStartedBeforevalues to match the values in your trigger definition:Get-AzDataFactoryV2TriggerRun -ResourceGroupName $ResourceGroupName -DataFactoryName $DataFactoryName -TriggerName "MyTrigger" -TriggerRunStartedAfter "2017-12-08T00:00:00" -TriggerRunStartedBefore "2017-12-08T01:00:00"Note
The trigger time of schedule triggers are specified in the UTC timestamp.
TriggerRunStartedAfterandTriggerRunStartedBeforealso expect the UTC timestamp.To monitor the trigger runs and pipeline runs in the Azure portal, see Monitor pipeline runs.
Azure CLI
This section shows you how to use the Azure CLI to create, start, and monitor a schedule trigger. To see this sample working, first go through Quickstart: Create an Azure Data Factory by using the Azure CLI. Then, follow the steps to create and start a schedule trigger that runs every 15 minutes. The trigger is associated with a pipeline named Adfv2QuickStartPipeline that you create as part of the quickstart.
Prerequisites
Use the Bash environment in Azure Cloud Shell. For more information, see Get started with Azure Cloud Shell.
If you prefer to run CLI reference commands locally, install the Azure CLI. If you're running on Windows or macOS, consider running Azure CLI in a Docker container. For more information, see How to run the Azure CLI in a Docker container.
If you're using a local installation, sign in to the Azure CLI by using the az login command. To finish the authentication process, follow the steps displayed in your terminal. For other sign-in options, see Authenticate to Azure using Azure CLI.
When you're prompted, install the Azure CLI extension on first use. For more information about extensions, see Use and manage extensions with the Azure CLI.
Run az version to find the version and dependent libraries that are installed. To upgrade to the latest version, run az upgrade.
Sample code
In your working directory, create a JSON file named MyTrigger.json with the trigger's properties. For this example, use the following content:
Important
Before you save the JSON file, set the value of the
startTimeelement to the current UTC time. Set the value of theendTimeelement to one hour past the current UTC time.{ "name": "MyTrigger", "type": "ScheduleTrigger", "typeProperties": { "recurrence": { "frequency": "Minute", "interval": 15, "startTime": "2017-12-08T00:00:00Z", "endTime": "2017-12-08T01:00:00Z", "timeZone": "UTC" } }, "pipelines": [{ "pipelineReference": { "type": "PipelineReference", "referenceName": "Adfv2QuickStartPipeline" }, "parameters": { "inputPath": "adftutorial/input", "outputPath": "adftutorial/output" } } ] }In the JSON snippet:
The
typeelement of the trigger is set toScheduleTrigger.The
frequencyelement is set toMinuteand theintervalelement is set to15. As such, the trigger runs the pipeline every 15 minutes between the start and end times.The
timeZoneelement specifies the time zone in which the trigger is created. This setting affects bothstartTimeandendTime.The
endTimeelement is one hour after the value of thestartTimeelement. As such, the trigger runs the pipeline 15 minutes, 30 minutes, and 45 minutes after the start time. Don't forget to update the start time to the current UTC time and the end time to one hour past the start time.Important
For the UTC time zone, the
startTimeand endTime need to follow the formatyyyy-MM-ddTHH:mm:ssZ. For other time zones,startTimeandendTimefollow theyyyy-MM-ddTHH:mm:ssformat.Per the ISO 8601 standard, the Z suffix is used to timestamp mark the datetime to the UTC time zone and render the
timeZonefield useless. If the Z suffix is missing for the UTC time zone, the result is an error upon trigger activation.The trigger is associated with the
Adfv2QuickStartPipelinepipeline. To associate multiple pipelines with a trigger, add morepipelineReferencesections.The pipeline in the quickstart takes two
parametersvalues:inputPathandoutputPath. You pass values for these parameters from the trigger.
Create a trigger by using the az datafactory trigger create command:
az datafactory trigger create --resource-group "ADFQuickStartRG" --factory-name "ADFTutorialFactory" --name "MyTrigger" --properties @MyTrigger.jsonConfirm that the status of the trigger is Stopped by using the az datafactory trigger show command:
az datafactory trigger show --resource-group "ADFQuickStartRG" --factory-name "ADFTutorialFactory" --name "MyTrigger"Start the trigger by using the az datafactory trigger start command:
az datafactory trigger start --resource-group "ADFQuickStartRG" --factory-name "ADFTutorialFactory" --name "MyTrigger"Confirm that the status of the trigger is Started by using the az datafactory trigger show command:
az datafactory trigger show --resource-group "ADFQuickStartRG" --factory-name "ADFTutorialFactory" --name "MyTrigger"Get the trigger runs in the Azure CLI by using the az datafactory trigger-run query-by-factory command. To get information about the trigger runs, execute the following command periodically. Update the
last-updated-afterandlast-updated-beforevalues to match the values in your trigger definition:az datafactory trigger-run query-by-factory --resource-group "ADFQuickStartRG" --factory-name "ADFTutorialFactory" --filters operand="TriggerName" operator="Equals" values="MyTrigger" --last-updated-after "2017-12-08T00:00:00" --last-updated-before "2017-12-08T01:00:00"Note
The trigger times of schedule triggers are specified in the UTC timestamp. last-updated-after and last-updated-before also expects the UTC timestamp.
To monitor the trigger runs and pipeline runs in the Azure portal, see Monitor pipeline runs.
.NET SDK
This section shows you how to use the .NET SDK to create, start, and monitor a trigger. To see this sample working, first go through Quickstart: Create a data factory by using the .NET SDK. Then, add the following code to the main method, which creates and starts a schedule trigger that runs every 15 minutes. The trigger is associated with a pipeline named Adfv2QuickStartPipeline that you create as part of the quickstart.
To create and start a schedule trigger that runs every 15 minutes, add the following code to the main method:
            // Create the trigger
            Console.WriteLine("Creating the trigger");

            // Set the start time to the current UTC time
            DateTime startTime = DateTime.UtcNow;

            // Specify values for the inputPath and outputPath parameters
            Dictionary<string, object> pipelineParameters = new Dictionary<string, object>();
            pipelineParameters.Add("inputPath", "adftutorial/input");
            pipelineParameters.Add("outputPath", "adftutorial/output");

            // Create a schedule trigger
            string triggerName = "MyTrigger";
            ScheduleTrigger myTrigger = new ScheduleTrigger()
            {
                Pipelines = new List<TriggerPipelineReference>()
                {
                    // Associate the Adfv2QuickStartPipeline pipeline with the trigger
                    new TriggerPipelineReference()
                    {
                        PipelineReference = new PipelineReference(pipelineName),
                        Parameters = pipelineParameters,
                    }
                },
                Recurrence = new ScheduleTriggerRecurrence()
                {
                    // Set the start time to the current UTC time and the end time to one hour after the start time
                    StartTime = startTime,
                    TimeZone = "UTC",
                    EndTime = startTime.AddHours(1),
                    Frequency = RecurrenceFrequency.Minute,
                    Interval = 15,
                }
            };

            // Now, create the trigger by invoking the CreateOrUpdate method
            TriggerResource triggerResource = new TriggerResource()
            {
                Properties = myTrigger
            };
            client.Triggers.CreateOrUpdate(resourceGroup, dataFactoryName, triggerName, triggerResource);

            // Start the trigger
            Console.WriteLine("Starting the trigger");
            client.Triggers.Start(resourceGroup, dataFactoryName, triggerName);
To create triggers in a different time zone, other than UTC, the following settings are required:
<<ClientInstance>>.SerializationSettings.DateFormatHandling = Newtonsoft.Json.DateFormatHandling.IsoDateFormat;
<<ClientInstance>>.SerializationSettings.DateTimeZoneHandling = Newtonsoft.Json.DateTimeZoneHandling.Unspecified;
<<ClientInstance>>.SerializationSettings.DateParseHandling = DateParseHandling.None;
<<ClientInstance>>.DeserializationSettings.DateParseHandling = DateParseHandling.None;
<<ClientInstance>>.DeserializationSettings.DateFormatHandling = Newtonsoft.Json.DateFormatHandling.IsoDateFormat;
<<ClientInstance>>.DeserializationSettings.DateTimeZoneHandling = Newtonsoft.Json.DateTimeZoneHandling.Unspecified;
To monitor a trigger run, add the following code before the last Console.WriteLine statement in the sample:
            // Check that the trigger runs every 15 minutes
            Console.WriteLine("Trigger runs. You see the output every 15 minutes");

            for (int i = 0; i < 3; i++)
            {
                System.Threading.Thread.Sleep(TimeSpan.FromMinutes(15));
                List<TriggerRun> triggerRuns = client.Triggers.ListRuns(resourceGroup, dataFactoryName, triggerName, DateTime.UtcNow.AddMinutes(-15 * (i + 1)), DateTime.UtcNow.AddMinutes(2)).ToList();
                Console.WriteLine("{0} trigger runs found", triggerRuns.Count);

                foreach (TriggerRun run in triggerRuns)
                {
                    foreach (KeyValuePair<string, string> triggeredPipeline in run.TriggeredPipelines)
                    {
                        PipelineRun triggeredPipelineRun = client.PipelineRuns.Get(resourceGroup, dataFactoryName, triggeredPipeline.Value);
                        Console.WriteLine("Pipeline run ID: {0}, Status: {1}", triggeredPipelineRun.RunId, triggeredPipelineRun.Status);
                        List<ActivityRun> runs = client.ActivityRuns.ListByPipelineRun(resourceGroup, dataFactoryName, triggeredPipelineRun.RunId, run.TriggerRunTimestamp.Value, run.TriggerRunTimestamp.Value.AddMinutes(20)).ToList();
                    }
                }
            }
To monitor the trigger runs and pipeline runs in the Azure portal, see Monitor pipeline runs.
Python SDK
This section shows you how to use the Python SDK to create, start, and monitor a trigger. To see this sample working, first go through Quickstart: Create a data factory by using the Python SDK. Then, add the following code block after the monitor the pipeline run code block in the Python script. This code creates a schedule trigger that runs every 15 minutes between the specified start and end times. Update the start_time variable to the current UTC time and the end_time variable to one hour past the current UTC time.
    # Create a trigger
    tr_name = 'mytrigger'
    scheduler_recurrence = ScheduleTriggerRecurrence(frequency='Minute', interval='15',start_time='2017-12-12T04:00:00Z', end_time='2017-12-12T05:00:00Z', time_zone='UTC')
    pipeline_parameters = {'inputPath':'adftutorial/input', 'outputPath':'adftutorial/output'}
    pipelines_to_run = []
    pipeline_reference = PipelineReference('copyPipeline')
    pipelines_to_run.append(TriggerPipelineReference(pipeline_reference, pipeline_parameters))
    tr_properties = TriggerResource(properties=ScheduleTrigger(description='My scheduler trigger', pipelines = pipelines_to_run, recurrence=scheduler_recurrence))
    adf_client.triggers.create_or_update(rg_name, df_name, tr_name, tr_properties)

    # Start the trigger
    adf_client.triggers.start(rg_name, df_name, tr_name)
To monitor the trigger runs and pipeline runs in the Azure portal, see Monitor pipeline runs.
Azure Resource Manager template
You can use an Azure Resource Manager template to create a trigger. For step-by-step instructions, see Create an Azure data factory by using an Azure Resource Manager template.
Pass the trigger start time to a pipeline
Azure Data Factory version 1 supports reading or writing partitioned data by using the system variables SliceStart, SliceEnd, WindowStart, and WindowEnd. In the current version of Data Factory and Azure Synapse pipelines, you can achieve this behavior by using a pipeline parameter. The start time and scheduled time for the trigger are set as the value for the pipeline parameter. In the following example, the scheduled time for the trigger is passed as a value to the pipeline scheduledRunTime parameter:
"parameters": {
    "scheduledRunTime": "@trigger().scheduledTime"
}
JSON schema
The following JSON definition shows you how to create a schedule trigger with scheduling and recurrence:
{
  "properties": {
    "type": "ScheduleTrigger",
    "typeProperties": {
      "recurrence": {
        "frequency": <<Minute, Hour, Day, Week, Month>>,
        "interval": <<int>>,             // Optional, specifies how often to fire (default to 1)
        "startTime": <<datetime>>,
        "endTime": <<datetime - optional>>,
        "timeZone": "UTC"
        "schedule": {                    // Optional (advanced scheduling specifics)
          "hours": [<<0-23>>],
          "weekDays": [<<Monday-Sunday>>],
          "minutes": [<<0-59>>],
          "monthDays": [<<1-31>>],
          "monthlyOccurrences": [
               {
                    "day": <<Monday-Sunday>>,
                    "occurrence": <<1-5>>
               }
           ]
        }
      }
    },
   "pipelines": [
            {
                "pipelineReference": {
                    "type": "PipelineReference",
                    "referenceName": "<Name of your pipeline>"
                },
                "parameters": {
                    "<parameter 1 Name>": {
                        "type": "Expression",
                        "value": "<parameter 1 Value>"
                    },
                    "<parameter 2 Name>" : "<parameter 2 Value>"
                }
           }
      ]
  }
}
Important
The parameters property is a mandatory property of the pipelines element. If your pipeline doesn't take any parameters, you must include an empty JSON definition for the parameters property.
Schema overview
The following table provides a high-level overview of the major schema elements that are related to recurrence and scheduling of a trigger.
| JSON property | Description |
|---|---|
startTime |
A Date-Time value. For simple schedules, the value of the startTime property applies to the first occurrence. For complex schedules, the trigger starts no sooner than the specified startTime value. For the UTC time zone, the format is 'yyyy-MM-ddTHH:mm:ssZ'. For other time zones, the format is yyyy-MM-ddTHH:mm:ss. |
endTime |
The end date and time for the trigger. The trigger doesn't execute after the specified end date and time. The value for the property can't be in the past. This property is optional. For the UTC time zone, the format is 'yyyy-MM-ddTHH:mm:ssZ'. For other time zones, the format is yyyy-MM-ddTHH:mm:ss. |
timeZone |
The time zone in which the trigger is created. This setting affects startTime, endTime, and schedule. See a list of supported time zones. |
recurrence |
A recurrence object that specifies the recurrence rules for the trigger. The recurrence object supports the frequency, interval, endTime, count, and schedule elements. When a recurrence object is defined, the frequency element is required. The other elements of the recurrence object are optional. |
frequency |
The unit of frequency at which the trigger recurs. The supported values include minute, hour, day, week, and month. |
interval |
A positive integer that denotes the interval for the frequency value, which determines how often the trigger runs. For example, if the interval is 3 and the frequency is week, the trigger recurs every 3 weeks. |
schedule |
The recurrence schedule for the trigger. A trigger with a specified frequency value alters its recurrence based on a recurrence schedule. The schedule property contains modifications for the recurrence that are based on minutes, hours, weekdays, month days, and week number. |
Important
For the UTC time zone, startTime and endTime need to follow the format yyyy-MM-ddTHH:mm:ssZ. For other time zones, startTime and endTime follow the yyyy-MM-ddTHH:mm:ss format.
Per the ISO 8601 standard, the Z suffix is used to timestamp mark the datetime to the UTC time zone and render the timeZone field useless. If the Z suffix is missing for the UTC time zone, the result is an error upon trigger activation.
Schema defaults, limits, and examples
| JSON property | Type | Required | Default value | Valid values | Example |
|---|---|---|---|---|---|
startTime |
String | Yes | None | ISO-8601 Date-Times | For the UTC time zone: "startTime" : "2013-01-09T09:30:00-08:00Z" For other time zones: "2013-01-09T09:30:00-08:00" |
timeZone |
String | Yes | None | Time zone values | "UTC" |
recurrence |
Object | Yes | None | Recurrence object | "recurrence" : { "frequency" : "monthly", "interval" : 1 } |
interval |
Number | No | 1 | 1 to 1,000 | "interval":10 |
endTime |
String | Yes | None | Date-Time value that represents a time in the future | For the UTC time zone: "endTime" : "2013-02-09T09:30:00-08:00Z" For other time zones: "endTime" : "2013-02-09T09:30:00-08:00" |
schedule |
Object | No | None | Schedule object | "schedule" : { "minute" : [30], "hour" : [8,17] } |
Time zone option
Here are some of the time zones supported for schedule triggers.
| Time zone | UTC offset (Non-daylight saving) | timeZone value | Observe daylight saving | Time stamp format |
|---|---|---|---|---|
| Coordinated Universal Time | 0 | UTC |
No | 'yyyy-MM-ddTHH:mm:ssZ' |
| Pacific Time (PT) | -8 | Pacific Standard Time |
Yes | 'yyyy-MM-ddTHH:mm:ss' |
| Central Time (CT) | -6 | Central Standard Time |
Yes | 'yyyy-MM-ddTHH:mm:ss' |
| Eastern Time (ET) | -5 | Eastern Standard Time |
Yes | 'yyyy-MM-ddTHH:mm:ss' |
| Greenwich Mean Time (GMT) | 0 | GMT Standard Time |
Yes | 'yyyy-MM-ddTHH:mm:ss' |
| Central European Standard Time | +1 | W. Europe Standard Time |
Yes | 'yyyy-MM-ddTHH:mm:ss' |
| India Standard Time (IST) | +5:30 | India Standard Time |
No | 'yyyy-MM-ddTHH:mm:ss' |
| China Standard Time | +8 | China Standard Time |
No | 'yyyy-MM-ddTHH:mm:ss' |
This list is incomplete. For a complete list of time-zone options, see the Trigger creation page in the portal.
startTime property
The following table shows you how the startTime property controls a trigger run.
| startTime value | Recurrence without schedule | Recurrence with schedule |
|---|---|---|
| Start time in past | Calculates the first future execution time after the start time and runs at that time. Runs subsequent executions based on calculating from the last execution time. See the example that follows this table. |
The trigger starts no sooner than the specified start time. The first occurrence is based on the schedule that's calculated from the start time. Runs subsequent executions based on the recurrence schedule. |
| Start time in future or at present | Runs once at the specified start time. Runs subsequent executions based on calculating from the last execution time. |
The trigger starts no sooner than the specified start time. The first occurrence is based on the schedule that's calculated from the start time. Runs subsequent executions based on the recurrence schedule. |
Let's see an example of what happens when the start time is in the past, with a recurrence, but no schedule. Assume that the current time is 2017-04-08 13:00, the start time is 2017-04-07 14:00, and the recurrence is every two days. (The recurrence value is defined by setting the frequency property to day and the interval property to 2.) Notice that the startTime value is in the past and occurs before the current time.
Under these conditions, the first execution is at 2017-04-09 at 14:00. The Scheduler engine calculates execution occurrences from the start time. Any instances in the past are discarded. The engine uses the next instance that occurs in the future. In this scenario, the start time is 2017-04-07 at 2:00pm, so the next instance is two days from that time, which is 2017-04-09 at 2:00pm.
The first execution time is the same even if the startTime value is 2017-04-05 14:00 or 2017-04-01 14:00. After the first execution, subsequent executions are calculated by using the schedule. Therefore, the subsequent executions are at 2017-04-11 at 2:00pm, then 2017-04-13 at 2:00pm, then 2017-04-15 at 2:00pm, and so on.
Finally, when the hours or minutes aren't set in the schedule for a trigger, the hours or minutes of the first execution are used as the defaults.
schedule property
The use of a schedule can limit the number of trigger executions. For example, if a trigger with a monthly frequency is scheduled to run only on day 31, the trigger runs only in those months that have a 31st day.
A schedule can also expand the number of trigger executions. For example, a trigger with a monthly frequency that's scheduled to run on month days 1 and 2, runs on the first and second days of the month, rather than once a month.
If multiple schedule elements are specified, the order of evaluation is from the largest to the smallest schedule setting. The evaluation starts with the week number, and then the month day, weekday, hour, and finally, minute.
The following table describes the schedule elements in detail.
| JSON element | Description | Valid values |
|---|---|---|
minutes |
Minutes of the hour at which the trigger runs. |
|
hours |
Hours of the day at which the trigger runs. |
|
weekDays |
Days of the week on which the trigger runs. The value can be specified with a weekly frequency only. |
|
monthlyOccurrences |
Days of the month on which the trigger runs. The value can be specified with a monthly frequency only. |
|
monthDays |
Day of the month on which the trigger runs. The value can be specified with a monthly frequency only. |
|
Examples of trigger recurrence schedules
This section provides examples of recurrence schedules and focuses on the schedule object and its elements.
The examples assume that the interval value is 1 and that the frequency value is correct according to the schedule definition. For example, you can't have a frequency value of day and also have a monthDays modification in the schedule object. Restrictions such as these are mentioned in the table in the previous section.
| Example | Description |
|---|---|
{"hours":[5]} |
Run at 5:00 AM every day. |
{"minutes":[15], "hours":[5]} |
Run at 5:15 AM every day. |
{"minutes":[15], "hours":[5,17]} |
Run at 5:15 AM and 5:15 PM every day. |
{"minutes":[15,45], "hours":[5,17]} |
Run at 5:15 AM, 5:45 AM, 5:15 PM, and 5:45 PM every day. |
{"minutes":[0,15,30,45]} |
Run every 15 minutes. |
{hours":[0, 1, 2, 3, 4, 5, 6, 7, 8, 9, 10, 11, 12, 13, 14, 15, 16, 17, 18, 19, 20, 21, 22, 23]} |
Run every hour. This trigger runs every hour. The minutes are controlled by the startTime value, when a value is specified. If a value isn't specified, the minutes are controlled by the creation time. For example, if the start time or creation time (whichever applies) is 12:25 PM, the trigger runs at 00:25, 01:25, 02:25, ..., and 23:25.This schedule is equivalent to having a trigger with a frequency value of hour, an interval value of 1, and no schedule. This schedule can be used with different frequency and interval values to create other triggers. For example, when the frequency value is month, the schedule runs only once a month, rather than every day, when the frequency value is day. |
{"minutes":[0]} |
Run every hour on the hour. This trigger runs every hour on the hour starting at 12:00 AM, 1:00 AM, 2:00 AM, and so on. This schedule is equivalent to a trigger with a frequency value of hour and a startTime value of zero minutes, or no schedule but a frequency value of day. If the frequency value is week or month, the schedule executes one day a week or one day a month only, respectively. |
{"minutes":[15]} |
Run at 15 minutes past every hour. This trigger runs every hour at 15 minutes past the hour starting at 00:15 AM, 1:15 AM, 2:15 AM, and so on, and ending at 11:15 PM. |
{"hours":[17], "weekDays":["saturday"]} |
Run at 5:00 PM on Saturdays every week. |
{"hours":[17], "weekDays":["monday", "wednesday", "friday"]} |
Run at 5:00 PM on Monday, Wednesday, and Friday every week. |
{"minutes":[15,45], "hours":[17], "weekDays":["monday", "wednesday", "friday"]} |
Run at 5:15 PM and 5:45 PM on Monday, Wednesday, and Friday every week. |
{"minutes":[0,15,30,45], "weekDays":["monday", "tuesday", "wednesday", "thursday", "friday"]} |
Run every 15 minutes on weekdays. |
{"minutes":[0,15,30,45], "hours": [9, 10, 11, 12, 13, 14, 15, 16] "weekDays":["monday", "tuesday", "wednesday", "thursday", "friday"]} |
Run every 15 minutes on weekdays between 9:00 AM and 4:45 PM. |
{"weekDays":["tuesday", "thursday"]} |
Run on Tuesdays and Thursdays at the specified start time. |
{"minutes":[0], "hours":[6], "monthDays":[28]} |
Run at 6:00 AM on the 28th day of every month (assuming a frequency value of month). |
{"minutes":[0], "hours":[6], "monthDays":[-1]} |
Run at 6:00 AM on the last day of the month. To run a trigger on the last day of a month, use -1 instead of day 28, 29, 30, or 31. |
{"minutes":[0], "hours":[6], "monthDays":[1,-1]} |
Run at 6:00 AM on the first and last day of every month. |
{monthDays":[1,14]} |
Run on the first and 14th day of every month at the specified start time. |
{"minutes":[0], "hours":[5], "monthlyOccurrences":[{"day":"friday", "occurrence":1}]} |
Run on the first Friday of every month at 5:00 AM. |
{"monthlyOccurrences":[{"day":"friday", "occurrence":1}]} |
Run on the first Friday of every month at the specified start time. |
{"monthlyOccurrences":[{"day":"friday", "occurrence":-3}]} |
Run on the third Friday from the end of the month, every month, at the specified start time. |
{"minutes":[15], "hours":[5], "monthlyOccurrences":[{"day":"friday", "occurrence":1},{"day":"friday", "occurrence":-1}]} |
Run on the first and last Friday of every month at 5:15 AM. |
{"monthlyOccurrences":[{"day":"friday", "occurrence":1},{"day":"friday", "occurrence":-1}]} |
Run on the first and last Friday of every month at the specified start time. |
{"monthlyOccurrences":[{"day":"friday", "occurrence":5}]} |
Run on the fifth Friday of every month at the specified start time. When there's no fifth Friday in a month, the pipeline doesn't run because it's scheduled to run only on fifth Fridays. To run the trigger on the last occurring Friday of the month, consider using -1 instead of 5 for the occurrence value. |
{"minutes":[0,15,30,45], "monthlyOccurrences":[{"day":"friday", "occurrence":-1}]} |
Run every 15 minutes on the last Friday of the month. |
{"minutes":[15,45], "hours":[5,17], "monthlyOccurrences":[{"day":"wednesday", "occurrence":3}]} |
Run at 5:15 AM, 5:45 AM, 5:15 PM, and 5:45 PM on the third Wednesday of every month. |
Related content
- For more information about triggers, see Pipeline execution and triggers.
- To learn how to reference trigger metadata in pipeline, see Reference trigger metadata in pipeline runs.
