Nóta
Aðgangur að þessari síðu krefst heimildar. Þú getur prófað aðskrá þig inn eða breyta skráasöfnum.
Aðgangur að þessari síðu krefst heimildar. Þú getur prófað að breyta skráasöfnum.
You can use Classification to classify your documents into predefined categories with AI.
Examples of classification include:
- Classifying customer call transcripts by intent
- Classifying documents by content type
- Classifying product reviews by sentiment
Classification is available through the Agent Bricks UI, in SQL, with the REST API, and with the Asynchronous API (Beta).
Create a classification agent in the UI
Requirements
- A workspace that includes the following:
- Serverless compute enabled. See Serverless compute requirements.
- Unity Catalog enabled. See Enable a workspace for Unity Catalog.
- Access to a serverless usage policy with a nonzero budget.
- This function is only available in some regions, see AI function availability.
- For workspaces with the Enhanced Security and Compliance add-on,
- See regional support for
ai_classifyfor the appropriate compliance standard. - See Manage Azure Databricks previews for how to enable it on your workspace.
- See regional support for
- Ability to use the
ai_classifySQL function. - Unstructured data that you want to classify. The data must be in a Unity Catalog volume or table.
- To build your agent, you need at least 1 unlabeled document in your Unity Catalog volume or 1 row in your table.
Go to  Agents in the left navigation pane of your workspace. Click Create Agent, and select Text Classification.
Step 1. Select your source data
Use Classification to classify your documents.
Select your source data. You can select a volume with documents or a table with text data.
Click Create Agent.
Step 2. Configure classification labels
After Classification processes your data, configure and refine your classification labels.
To add classification labels manually:
- Click + Add label to add a classification label.
- Enter the label name and optional description, then click Add label.
- Repeat 1-2 for each label you want to add.
- (Optional) Enable Multiple labels if you want the agent to return more than one label.
To import labels from a table:
- Click Import from table.
- Select the table and click Next.
- Select the label column, description column, and SQL warehouse.
- Click Preview to see the labels that are imported.
- If you're happy with the labels, click Import and replace labels.
You must have at least two labels defined to run classification. After you've finished adding your labels, click Save and run classification.
To configure additional options, click the options toggle  next to Save and run classification, then enable one or more of the following options:
- Confidence scores: Shows confidence levels for predicted labels.
- Rationales: Shows justification for predicted labels.
Classification classifies up to 5 documents and rows and displays the results. You can add more as well.
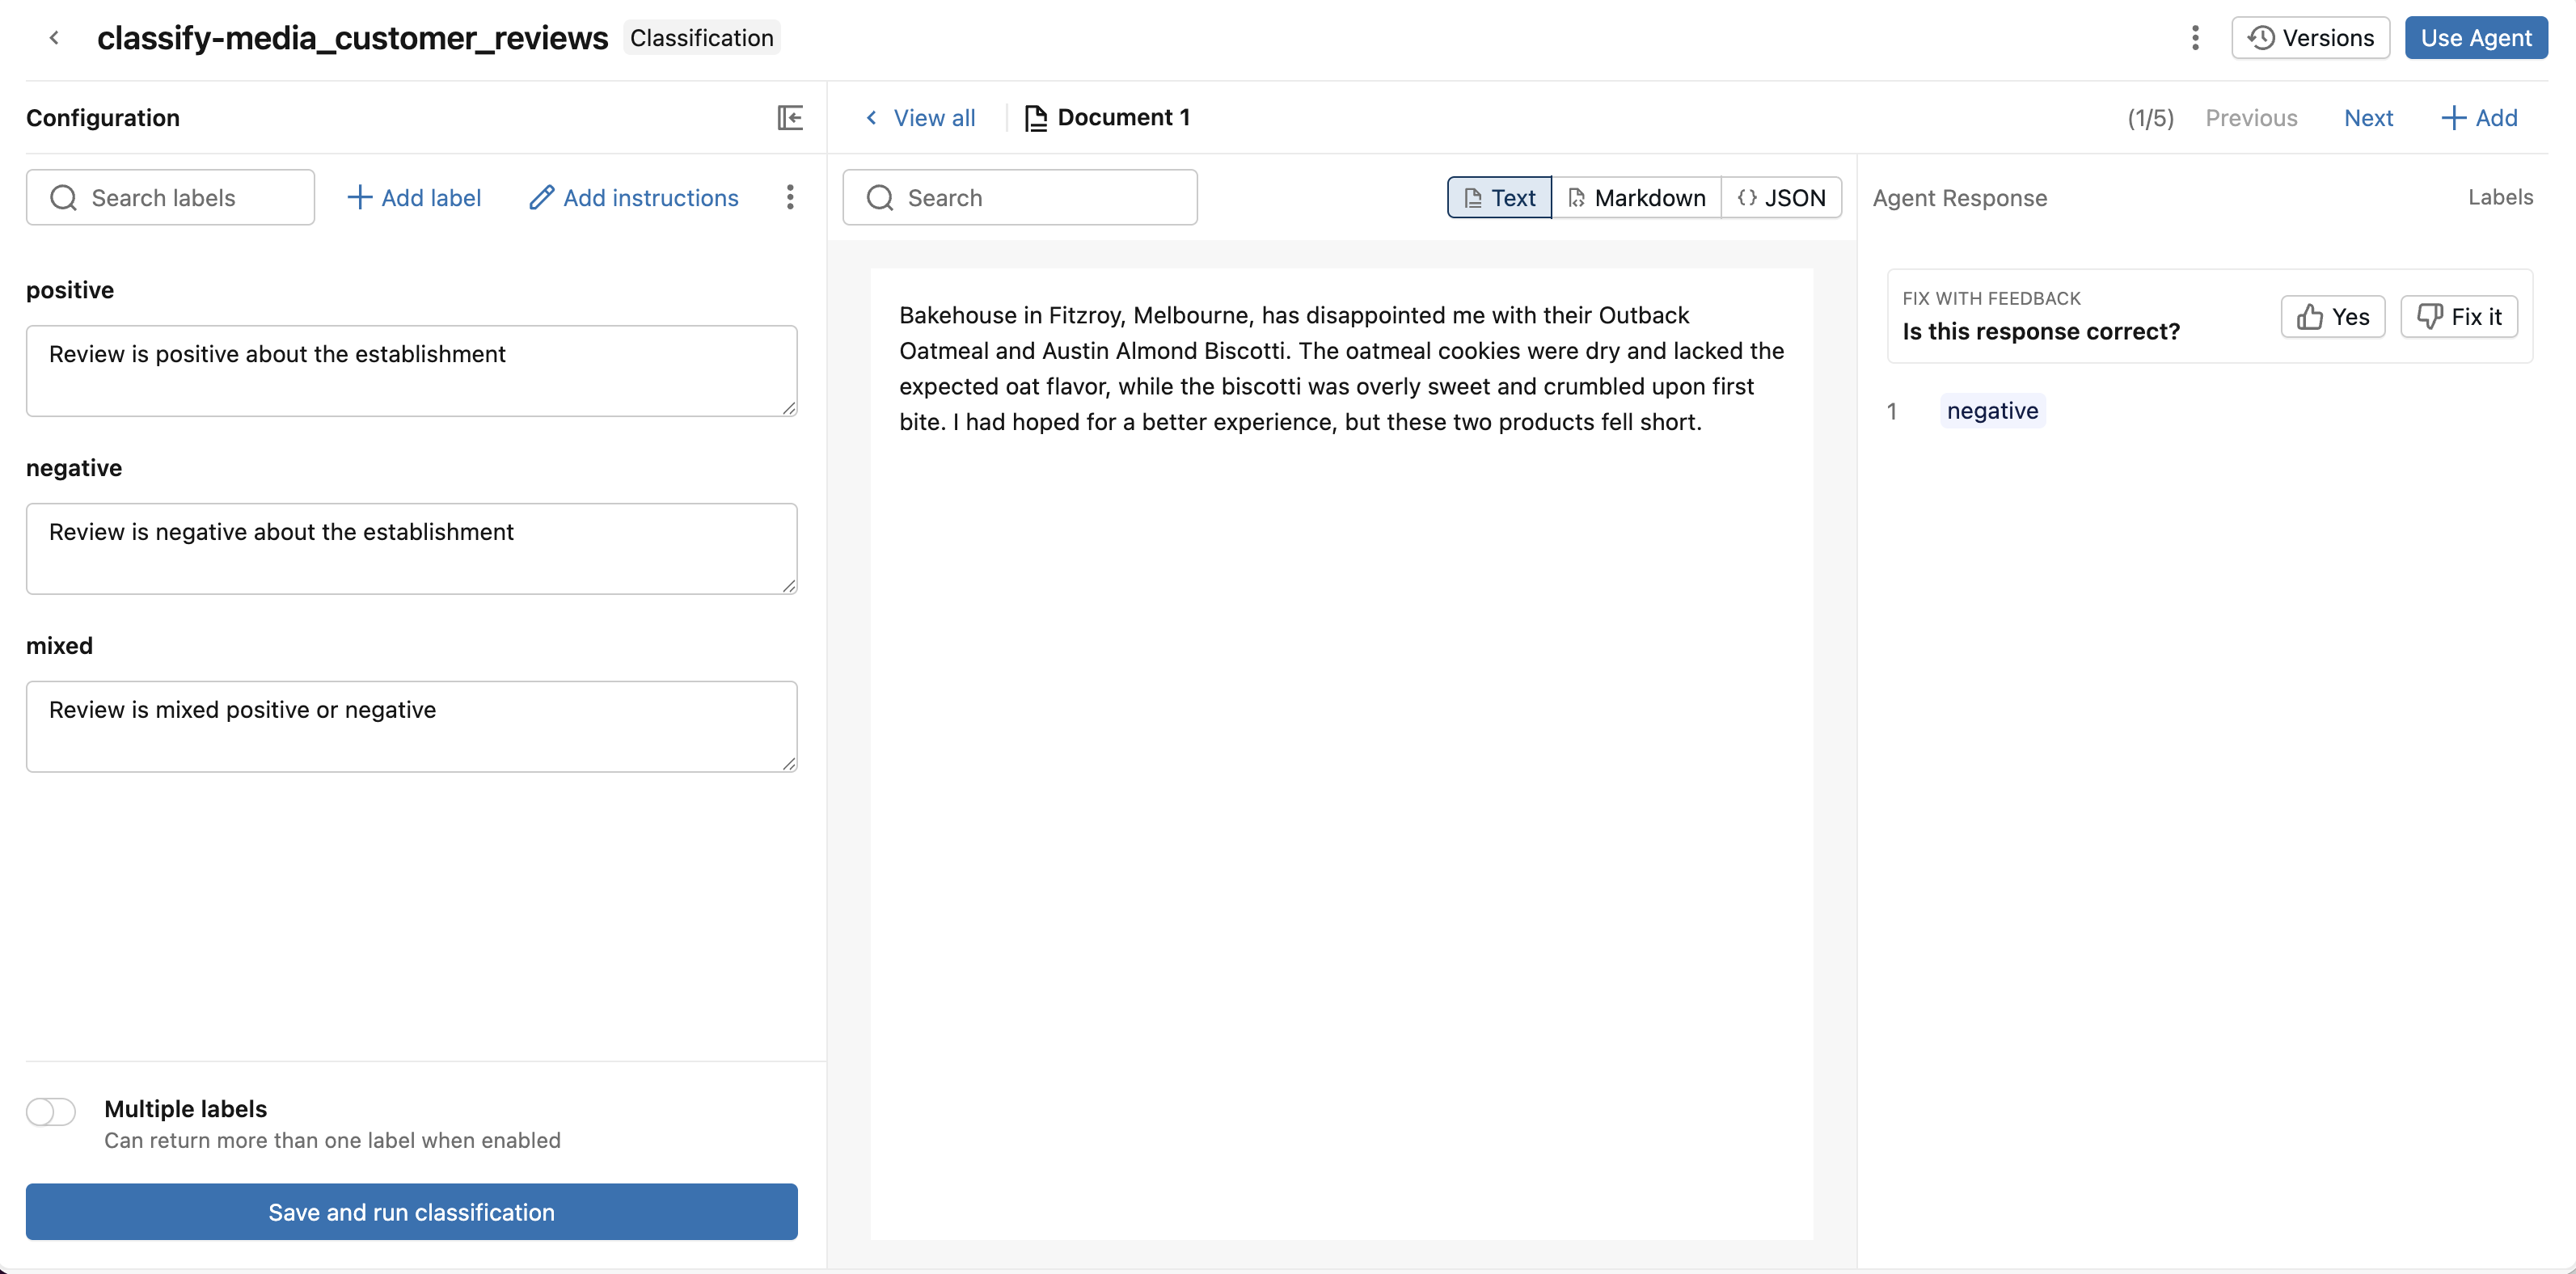
Step 3. Review and improve classification responses
Review the classification responses and give feedback to improve the agent.
Review the document and classification response:
- If the response is correct, give it a thumbs up.
- If the response is incorrect, give it a thumbs down. Help Classification fix the response by selecting the correct label. Click Save.
To improve the agent's responses, adjust the classification label descriptions.
Compare versions to optimize the agent's performance. Click Versions. Next to a previous version, click Compare to compare the classification label descriptions of a previous version with the current version. Click Restore to restore a previous version.
Step 4. Use the classification agent
If you're happy with the responses, start using the agent for classification at scale.
Click Use Agent in the upper-right. You can choose either:
- Run in SQL to use the agent to classify your entire volume or table. This opens a SQL query that uses
ai_classifyusing the classification labels you defined. For more information on usingai_classifyin SQL queries, seeai_classifyfunction. - Create a Lakeflow pipeline that runs on scheduled intervals to invoke your agent on new data. This creates a Lakeflow pipeline that updates a streaming table with your classified data. You can configure the pipeline's schedule so that it runs when new data arrives. For more information on Lakeflow pipelines, see Spark Declarative Pipelines on Lakeflow.
Classify documents in SQL
Call ai_classify in SQL to classify documents at scale:
SELECT ai_classify(
  'My password is leaked.',
  '["urgent", "not_urgent"]',
  MAP('version', '2.1')
);
See the ai_classify SQL reference.
Classify documents with the REST API
Use the REST API to classify documents from applications, services, and automation workflows. See the REST API docs for reference.
The default rate limit for ai_classify REST API requests is 1,200 requests per minute per workspace. Contact your Databricks account team to request a higher limit.
The following example classifies a customer support message:
curl -X POST "$DATABRICKS_HOST/api/2.0/ai-functions/ai-classify" \
     -H "Authorization: Bearer $DATABRICKS_TOKEN" \
     -H "Content-Type: application/json" \
     -d '{
  "content": "My password is leaked.",
  "labels": ["urgent", "not_urgent"],
  "options": {
    "instructions": "Classify the support request by urgency."
  }
}'
Classify documents with the Asynchronous API (Beta)
For batch processing, Databricks recommends AI Function tasks in Lakeflow Jobs. To classify records in a job, use an ai_classify task, which does the following:
- Runs the processing in the background and writes the results to a Unity Catalog table, so you don't submit batches, check their status, or download output files.
- Processes only the rows that are new or changed since the previous run.
- Shows the progress of each run, and how many inputs succeeded and failed.
Use the AI Functions Asynchronous API (Beta) instead when you want to integrate the processing into an existing application or an external orchestrator, and manage the submissions and results yourself.
Important
This feature is in Beta. To use it, a workspace admin must turn on AI Functions Asynchronous API from the Previews page. See Manage Azure Databricks previews.
For the request and response fields, and for the requests to cancel and list batches, see the Asynchronous API reference.
Input file
The input file of an ai_classify batch is a JSONL file in a Unity Catalog volume, with one request on each line. Each line is a JSON object with exactly the following fields:
| Field | Description |
|---|---|
custom_id |
A string that identifies the request. Each line of the output file has the custom_id of its request, so use a value that you can match the results to, such as the key of the source row. |
body |
The text to classify, in the form {"text": "..."}. |
The following input file has two requests:
{"custom_id": "ticket-001", "body": {"text": "My password is leaked."}}
{"custom_id": "ticket-002", "body": {"text": "How do I change my billing address?"}}
The input file has only the text and ID of each record. You set the other parameters of ai_classify in params when you create the batch, and they apply to every request:
labels(required): The labels to classify the records into, as a list of labels or as an object that maps each label to its description.options: The function options, such asinstructionsandmultilabel.
For what each parameter does, see the AI Classify REST API reference. In params.options, write each option name in camelCase, for example enableRationales rather than enable_rationales.
When you create a batch, the API checks the whole input file and params first. If the input file or params breaks one of the following rules, the request fails with HTTP 400 and no batch is created:
- The file is UTF-8 encoded, and each line is one JSON object with exactly the fields
custom_idandbody. The file has no blank lines. - Each
custom_idis a non-empty string, and no two lines have the samecustom_id. - Each
bodyhas exactly one key,text.- If a
textvalue isn't a string, the batch is still created, and that request fails with the error typeinvalid_request.
- If a
- The file has from 1 to 50,000 lines and is at most 200 MiB.
- To process more records, split them into several input files and create a batch for each file.
paramshaslabelsand no parameters thatai_classifydoesn't take.
For a problem in a line of the input file, the error message gives the line number and the rule, for example Batch input line 3 custom_id must be unique. If you can't read the input file or write to output_ref, the request fails with HTTP 403.
The API copies the input file when it creates the batch, so changes that you make to the file afterward don't affect the batch.
Run a batch
To classify records with the Asynchronous API:
Create the input file, and upload it to a Unity Catalog volume, for example with the Files API.
Create a batch that runs
ai_classifyon the input file. Setinput_refto the path of the input file,paramsto the parameters for every request, andoutput_refto a volume directory or a new file path for the output file:curl -X POST "$DATABRICKS_HOST/api/2.0/ai-functions/batches" \ -H "Authorization: Bearer $DATABRICKS_TOKEN" \ -H "Content-Type: application/json" \ -d '{ "endpoint": "ai_classify", "input_ref": "/Volumes/my_catalog/my_schema/my_volume/requests.jsonl", "params": { "labels": ["urgent", "not_urgent"], "options": { "instructions": "Classify the support request by urgency." } }, "output_ref": "/Volumes/my_catalog/my_schema/my_volume/output/" }'The response contains the batch
name. Use it in place of<batch-name>in the next steps. By default, a workspace can have up to 20 unfinished batches at a time, across all users. If it's at the limit, the request fails with HTTP 409. Create the batch again after another batch finishes or is cancelled.Check the status of the batch. The batch is finished when
statusisCOMPLETED,CANCELLED, orFAILED:curl -X GET "$DATABRICKS_HOST/api/2.0/ai-functions/batches/<batch-name>" \ -H "Authorization: Bearer $DATABRICKS_TOKEN"When the output file is ready,
output_refin the response contains its path.Download the output file with the Files API:
curl -X GET "$DATABRICKS_HOST/api/2.0/fs/files/Volumes/my_catalog/my_schema/my_volume/output/<batch-name>_output.jsonl" \
     -H "Authorization: Bearer $DATABRICKS_TOKEN" \
     -o output.jsonl
Output file
The Asynchronous API writes the output file of an ai_classify batch to the location in output_ref:
- If
output_refends with/or names an existing directory, the API writes the output file to<batch-name>_output.jsonlin that directory. Several batches can share one output directory. - Otherwise,
output_refis the path of the output file. The file must not exist when you create the batch.
The output file has one line for each line of the input file. The lines are in the same order as the input file. Each line has the custom_id of its request and one of the following fields:
response: The result of the request. It has the same fields as the AI Classify REST API response.error: Thetypeandmessageof the error, if the request failed. If the batch was cancelled before the request ran, the type iscancelled.
The following example shows a line for a request that succeeded and a line for a request that failed:
{"custom_id": "ticket-001", "response": {...}}
{"custom_id": "ticket-002", "error": {"type": "request_failed", "message": "..."}}
Limitations
See Limitations