Tutorial: Send notifications to specific devices using Notification Hubs and Google Firebase Cloud Messaging
Overview
Important
As of June 2024, FCM legacy APIs will no longer be supported and will be retired. To avoid any disruption in your push notification service, you must migrate to the FCM v1 protocol as soon as possible.
This tutorial shows you how to use Azure Notification Hubs to broadcast breaking news notifications to an Android app. When complete, you will be able to register for breaking news categories you are interested in, and receive only push notifications for those categories. This scenario is a common pattern for many apps where notifications have to be sent to groups of users that have previously declared interest in them, for example, RSS reader, apps for music fans, etc.
Broadcast scenarios are enabled by including one or more tags when creating a registration in the notification hub. When notifications are sent to a tag, all devices that have registered for the tag will receive the notification. Because tags are simply strings, they do not have to be provisioned in advance. For more information about tags, see Notification Hubs Routing and Tag Expressions.
In this tutorial, you do the following actions:
- Add category selection to the mobile app.
- Registered for notifications with tags.
- Send tagged notifications.
- Test the app
Prerequisites
This tutorial builds on the app you created in Tutorial: Push notifications to Android devices by using Azure Notification Hubs and Firebase Cloud Messaging. Before starting this tutorial, complete the Tutorial: Push notifications to Android devices by using Azure Notification Hubs and Firebase Cloud Messaging.
Add category selection to the app
The first step is to add the UI elements to your existing main activity that enable the user to select categories to register. The categories selected by a user are stored on the device. When the app starts, a device registration is created in your notification hub with the selected categories as tags.
Open the
res/layout/activity_main.xml file, and replace the content with the following:<LinearLayout xmlns:android="http://schemas.android.com/apk/res/android" xmlns:tools="http://schemas.android.com/tools" android:layout_width="match_parent" android:layout_height="match_parent" tools:context="com.example.breakingnews.MainActivity" android:orientation="vertical"> <CheckBox android:id="@+id/worldBox" android:layout_width="wrap_content" android:layout_height="wrap_content" android:text="@string/label_world" /> <CheckBox android:id="@+id/politicsBox" android:layout_width="wrap_content" android:layout_height="wrap_content" android:text="@string/label_politics" /> <CheckBox android:id="@+id/businessBox" android:layout_width="wrap_content" android:layout_height="wrap_content" android:text="@string/label_business" /> <CheckBox android:id="@+id/technologyBox" android:layout_width="wrap_content" android:layout_height="wrap_content" android:text="@string/label_technology" /> <CheckBox android:id="@+id/scienceBox" android:layout_width="wrap_content" android:layout_height="wrap_content" android:text="@string/label_science" /> <CheckBox android:id="@+id/sportsBox" android:layout_width="wrap_content" android:layout_height="wrap_content" android:text="@string/label_sports" /> <Button android:layout_width="wrap_content" android:layout_height="wrap_content" android:onClick="subscribe" android:text="@string/button_subscribe" /> <TextView android:layout_width="wrap_content" android:layout_height="wrap_content" android:text="Hello World!" android:id="@+id/text_hello" /> </LinearLayout>Open the
res/values/strings.xmlfile and add the following lines:<string name="button_subscribe">Subscribe</string> <string name="label_world">World</string> <string name="label_politics">Politics</string> <string name="label_business">Business</string> <string name="label_technology">Technology</string> <string name="label_science">Science</string> <string name="label_sports">Sports</string>Your
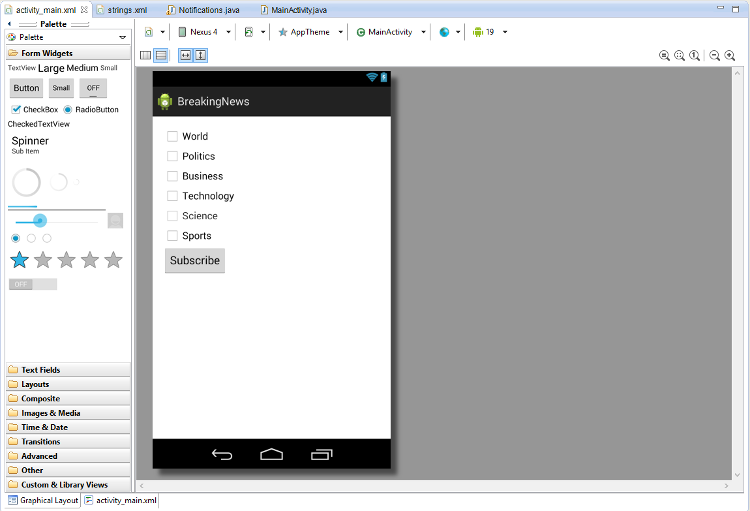
main_activity.xmlgraphical layout should look like in the following image:
Create a class
Notificationsin the same package as yourMainActivityclass.import java.util.HashSet; import java.util.Set; import java.util.concurrent.TimeUnit; import android.content.Context; import android.content.SharedPreferences; import android.os.AsyncTask; import android.util.Log; import android.widget.Toast; import com.google.android.gms.tasks.OnSuccessListener; import com.google.firebase.iid.FirebaseInstanceId; import com.google.firebase.iid.InstanceIdResult; import com.microsoft.windowsazure.messaging.NotificationHub; public class Notifications { private static final String PREFS_NAME = "BreakingNewsCategories"; private FirebaseInstanceId fcm; private NotificationHub hub; private Context context; private String senderId; public static String FCM_token = ""; private static final String TAG = "Notifications"; public Notifications(Context context, String hubName, String listenConnectionString) { this.context = context; this.senderId = senderId; fcm = FirebaseInstanceId.getInstance(); hub = new NotificationHub(hubName, listenConnectionString, context); } public void storeCategoriesAndSubscribe(Set<String> categories) { SharedPreferences settings = context.getSharedPreferences(PREFS_NAME, 0); settings.edit().putStringSet("categories", categories).commit(); subscribeToCategories(categories); } public Set<String> retrieveCategories() { SharedPreferences settings = context.getSharedPreferences(PREFS_NAME, 0); return settings.getStringSet("categories", new HashSet<String>()); } public void subscribeToCategories(final Set<String> categories) { new AsyncTask<Object, Object, Object>() { @Override protected Object doInBackground(Object... params) { try { FirebaseInstanceId.getInstance().getInstanceId().addOnSuccessListener(new OnSuccessListener<InstanceIdResult>() { @Override public void onSuccess(InstanceIdResult instanceIdResult) { FCM_token = instanceIdResult.getToken(); Log.d(TAG, "FCM Registration Token: " + FCM_token); } }); TimeUnit.SECONDS.sleep(1); String templateBodyFCM = "{\"data\":{\"message\":\"$(messageParam)\"}}"; hub.registerTemplate(FCM_token,"simpleFCMTemplate", templateBodyFCM, categories.toArray(new String[categories.size()])); } catch (Exception e) { Log.e("MainActivity", "Failed to register - " + e.getMessage()); return e; } return null; } protected void onPostExecute(Object result) { String message = "Subscribed for categories: " + categories.toString(); Toast.makeText(context, message, Toast.LENGTH_LONG).show(); } }.execute(null, null, null); } }This class uses the local storage to store the categories of news that this device has to receive. It also contains methods to register for these categories.
In your
MainActivityclass, add a field forNotifications:private Notifications notifications;Then, update the
onCreatemethod as shown in the following code. You register with Notification Hubs in the subscribeToCategories method of the Notifications class.@Override protected void onCreate(Bundle savedInstanceState) { super.onCreate(savedInstanceState); setContentView(R.layout.activity_main); mainActivity = this; FirebaseService.createChannelAndHandleNotifications(getApplicationContext()); notifications = new Notifications(this, NotificationSettings.HubName, NotificationSettings.HubListenConnectionString); notifications.subscribeToCategories(notifications.retrieveCategories()); }Confirm that the hub name and the connection string are set properly in the NotificationSettings class.
Note
Because credentials that are distributed with a client app are not generally secure, you should only distribute the key for listen access with your client app. Listen access enables your app to register for notifications, but existing registrations cannot be modified and notifications cannot be sent. The full access key is used in a secured backend service for sending notifications and changing existing registrations.
Then, add the following imports:
import android.widget.CheckBox;
import java.util.HashSet;
import java.util.Set;
import android.view.View;
Add the following
subscribemethod to handle the subscribe button click event:public void subscribe(View sender) { final Set<String> categories = new HashSet<String>(); CheckBox world = (CheckBox) findViewById(R.id.worldBox); if (world.isChecked()) categories.add("world"); CheckBox politics = (CheckBox) findViewById(R.id.politicsBox); if (politics.isChecked()) categories.add("politics"); CheckBox business = (CheckBox) findViewById(R.id.businessBox); if (business.isChecked()) categories.add("business"); CheckBox technology = (CheckBox) findViewById(R.id.technologyBox); if (technology.isChecked()) categories.add("technology"); CheckBox science = (CheckBox) findViewById(R.id.scienceBox); if (science.isChecked()) categories.add("science"); CheckBox sports = (CheckBox) findViewById(R.id.sportsBox); if (sports.isChecked()) categories.add("sports"); notifications.storeCategoriesAndSubscribe(categories); }This method creates a list of categories and uses the
Notificationsclass to store the list in the local storage and register the corresponding tags with your notification hub. When categories are changed, the registration is recreated with the new categories.
Your app is now able to store a set of categories in local storage on the device and register with the notification hub whenever the user changes the selection of categories.
Register for notifications
These steps register with the notification hub on startup using the categories that have been stored in local storage.
Confirm that the following code is at the end of the
onCreatemethod in theMainActivityclass:notifications.subscribeToCategories(notifications.retrieveCategories());This code makes sure that every time the app starts it retrieves the categories from local storage and requests a registration for these categories.
Then update the
onStart()method of theMainActivityclass as follows:@Override protected void onStart() { super.onStart(); isVisible = true; Set<String> categories = notifications.retrieveCategories(); CheckBox world = (CheckBox) findViewById(R.id.worldBox); world.setChecked(categories.contains("world")); CheckBox politics = (CheckBox) findViewById(R.id.politicsBox); politics.setChecked(categories.contains("politics")); CheckBox business = (CheckBox) findViewById(R.id.businessBox); business.setChecked(categories.contains("business")); CheckBox technology = (CheckBox) findViewById(R.id.technologyBox); technology.setChecked(categories.contains("technology")); CheckBox science = (CheckBox) findViewById(R.id.scienceBox); science.setChecked(categories.contains("science")); CheckBox sports = (CheckBox) findViewById(R.id.sportsBox); sports.setChecked(categories.contains("sports")); }This code updates the main activity based on the status of previously saved categories.
The app is now complete and can store a set of categories in the device local storage used to register with the notification hub whenever the user changes the selection of categories. Next, define a backend that can send category notifications to this app.
Send tagged notifications
In this section, you send breaking news as tagged template notifications from a .NET console app.
In Visual Studio, create a new Visual C# console application:
- On the menu, select File > New > Project.
- In Create a new project, select Console App (.NET Framework) for C# in the list of templates, and select Next.
- Enter a name for the app.
- For Solution, choose Add to solution, and select Create to create the project.
Select Tools > NuGet Package Manager > Package Manager Console and then, in the console window, run the following command:
Install-Package Microsoft.Azure.NotificationHubsThis action adds a reference to the Azure Notification Hubs SDK by using the Microsoft.Azure.NotificationHubs package.
Open the Program.cs file, and add the following
usingstatement:using Microsoft.Azure.NotificationHubs;In the
Programclass, add the following method, or replace it if it already exists:private static async void SendTemplateNotificationAsync() { // Define the notification hub. NotificationHubClient hub = NotificationHubClient.CreateClientFromConnectionString("<connection string with full access>", "<hub name>"); // Apple requires the apns-push-type header for all requests var headers = new Dictionary<string, string> {{"apns-push-type", "alert"}}; // Create an array of breaking news categories. var categories = new string[] { "World", "Politics", "Business", "Technology", "Science", "Sports"}; // Send the notification as a template notification. All template registrations that contain // "messageParam" and the proper tags will receive the notifications. // This includes APNS, GCM/FCM, WNS, and MPNS template registrations. Dictionary<string, string> templateParams = new Dictionary<string, string>(); foreach (var category in categories) { templateParams["messageParam"] = "Breaking " + category + " News!"; await hub.SendTemplateNotificationAsync(templateParams, category); } }This code sends a template notification for each of the six tags in the string array. The use of tags ensures that devices receive notifications only for the registered categories.
In the preceding code, replace the
<hub name>and<connection string with full access>placeholders with your notification hub name and the connection string for DefaultFullSharedAccessSignature from the dashboard of your notification hub.In the
Main()method, add the following lines:SendTemplateNotificationAsync(); Console.ReadLine();Build the console app.
Test the app
In Android Studio, run the app on your Android device or emulator. The app UI provides a set of toggles that lets you choose the categories to subscribe to.
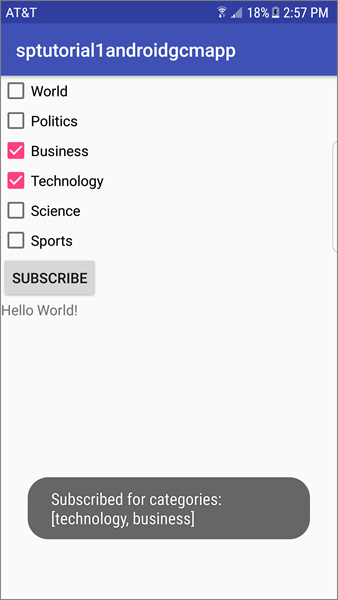
Enable one or more categories toggles, then click Subscribe. The app converts the selected categories into tags and requests a new device registration for the selected tags from the notification hub. The registered categories are returned and displayed in a toast notification.

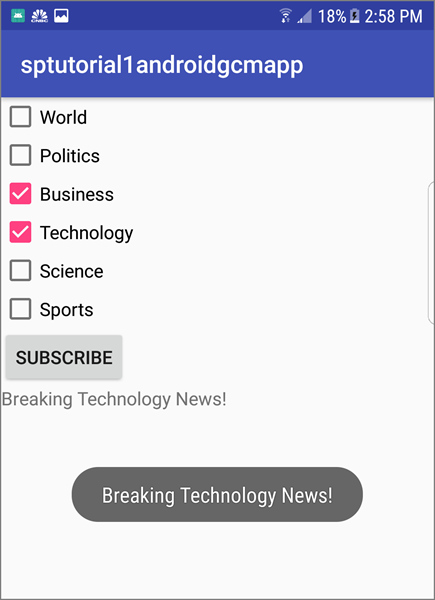
Run the .NET console app, which sends notifications for each category. Notifications for the selected categories appear as toast notifications.

Next steps
In this tutorial, you sent broadcast notifications to specific Android devices that have registered for the categories. To learn how to push notifications to specific users, advance to the following tutorial: