Set up data access control for Split Experimentation Workspace (preview)
Split Experimentation in Azure App Configuration (preview) uses Microsoft Entra to authorize requests for Split Experimentation Workspace resources. Microsoft Entra also enables the use of custom roles to grant permissions to security principals.
Data access control overview
All requests made to Split Experimentation Workspace must be authorized. To set up an access control policy, create a new Microsoft Entra Application registration or use an existing one. The registered application provides the authentication policy, security principles, role definitions, etc., for allowing access to Split Experimentation Workspace.
Optionally, a single Microsoft Entra Enterprise Application may be used to control access to multiple Split Experimentation workspaces.
To set up the Access Control policy for Split Experimentation Workspace, a control plane operation is needed. Split Experimentation only requires the application ID to set up the access policy. The said Entra application is owned and fully controlled by the customer. The application must be in the same Microsoft Entra tenant, in which the Split Experimentation Workspace resource is provisioned or considered to be provisioned.
With Microsoft Entra, access to a resource is set up in a two-step process:
- The security principal's identity is authenticated, and an OAuth 2.0 token is issued. The resource name used to request a token is
https://login.microsoftonline.com/<tenantID>, where<tenantID>matches the Microsoft Entra tenant ID to which the service principal belongs. Ensure the scope isapi://{Entra application ID>/.default, where<Entra application ID>matches the application ID linked as access policy to the Split Experimentation Workspace resource. - The token is passed as part of a request to the App Configuration service to authorize access to the specified resource.
Register an application
Register a new app or use an existing Microsoft Entra application registration to run your experimentation.
To register a new app:
In the Microsoft admin center, go to Identity > Applications > App registrations.

Enter a Name for your app, and under Supported account types, select Accounts in this organizational directory only.
Note
The application must be in the same Microsoft Entra tenant in which the Split Experimentation Workspace is provisioned or considered to be provisioned. Only a basic registration is needed at this point. Read more on this topic at Register an application.
Enable Entra application to be used as audience
Configure the application ID URI to allow the Entra application to be used as global audience/scope when requesting an authentication token.
In the Microsoft Entra admin center, in Identity > Applications > App registrations, open your application by selecting its Display name. In the pane that opens, under Overview, copy the Application ID URI. If instead of the application ID URI you see Add an Application ID URI, select this option, then select Add and Save.

Then select Expose an API in the app's left menu. Ensure the Application ID URI value is:
api://<Entra application ID>whereEntra application IDmust be the same Microsoft Entra application ID.
Allow users to request access to Split Experimentation from Azure portal
The Azure portal user interface is effectively the UX for Split Experimentation Workspace. It interacts with the Split Experimentation data plane to set up Metrics, Create/Update/Archive/Delete experiments, Get experiment results, etc.
You must preauthorize the Azure portal Split UI to achieve that.
Add scope
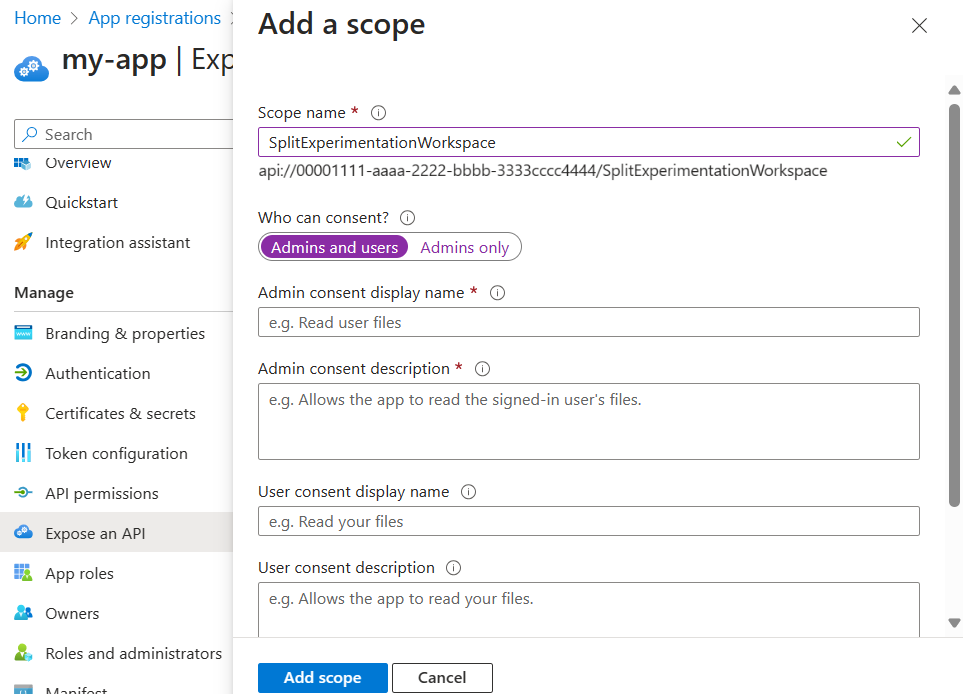
In the Microsoft Entra admin center, go to your app and open the Expose an API left menu, then select Add a Scope.

- Under Who can consent?, select Admins and users.
- Enter an Admin consent display name and an Admin consent description.
Authorize Split Experimentation Resource Provider ID
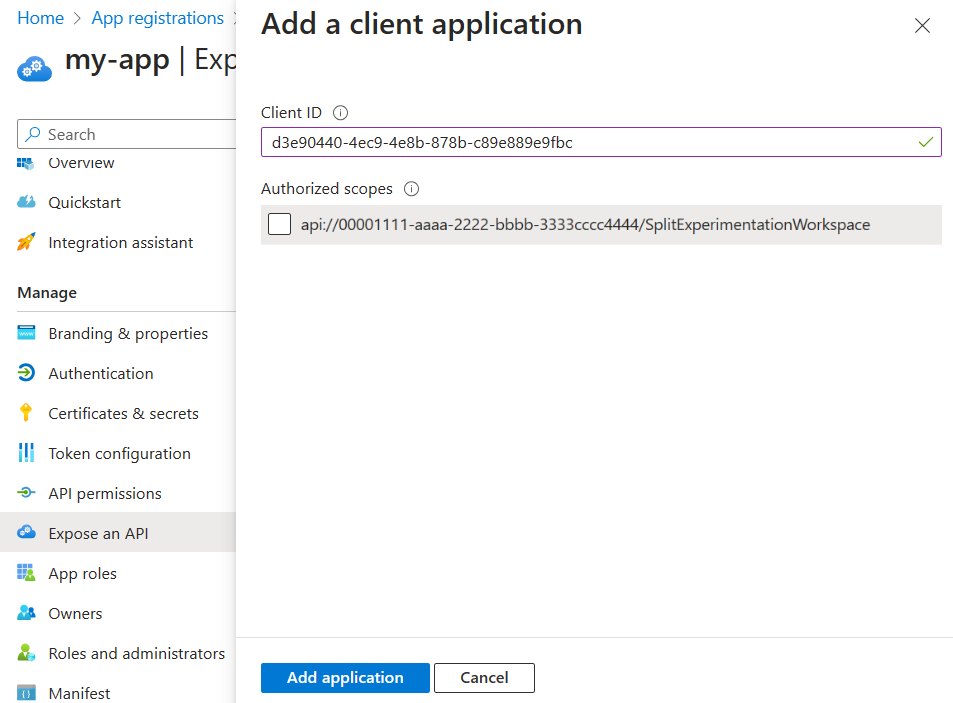
Staying in the Expose an API menu, scroll down to Authorized client applications > Add a client application and enter the Client ID corresponding to the Split Experimentation Resource Provider ID: d3e90440-4ec9-4e8b-878b-c89e889e9fbc.

Select Add application.
Add authorization roles
Split Experimentation workspace supports well-known roles to scope access control. Add the following roles in the Entra application.
Go to the App roles menu of your app and select Create app role.
Select or enter the following information in the pane that opens to create an ExperimentationDataOwner role. This role gives the app full access to execute all operations on the Split Experimentation resource.
- Display name: enter ExperimentationDataOwner
- Allowed member types: select Both (Users/Groups + Applications)
- Value enter ExperimentationDataOwner
- Description: enter Read-write access to Experimentation Workspace
- Do you want to enable this app role?: Check this box.

Create an ExperimentationDataReader role. This role gives the app read access on the Split Experimentation resource, but doesn't allow it to make any changes.
- Display name: enter ExperimentationDataReader
- Allowed member types: select Both (Users/Groups + Applications)
- Value enter ExperimentationDataReader
- Description: enter Read-only access to Experimentation Workspace
- Do you want to enable this app role?: Check this box.
Configure user and role assignments
Choose an assignment requirement option
Go to the Overview menu of your app and select the link under Managed application in local directory. This opens your app in the Microsoft admin center Identity > Enterprise Application menu.
Open Manage > Properties on the left and select your preferred option for the Assignment required setting.
- Yes: means that only the entries explicitly defined under Users and Groups in the enterprise application can obtain a token and therefore access the associated Split Experimentation Workspace. This is the recommended option.
- No: means that everyone in the same Entra tenant can obtain tokens and therefore may be allowed, via the Split Experimentation control plane opt-in setting, to access the associated Split Experimentation Workspace.

Assign users and groups
Go back to the Users and groups menu and select Add user/group

Select a user or a group and select one of the roles you created for the Split Experimentation Workspace.
Related content
- Learn about troubleshooting Split Experimentation Workspace.