Connect to Azure Logic Apps from BizTalk Server
To exchange messages between BizTalk Server and a logic app workflow in Azure, you can use the adapter in BizTalk Server for Azure Logic Apps. This guide shows how to receive a message in BizTalk Server from a logic app workflow. The workflow can send messages to BizTalk Server. The receiving end uses Internet Information Services (IIS) applications to handle communication with an Azure service.
If BizTalk Server is on premises and joined to your domain, you must install the on-premises data gateway on BizTalk Server, and create an on-premises data gateway resource in Azure. However, if BizTalk Server is installed on an Azure virtual machine, you can choose whether or not to expose the virtual machine as an HTTP endpoint, which has a URL that you can call.
If you choose the HTTP endpoint option, you don't need to use the gateway. Instead, you create a logic app workflow, add the BizTalkServer connector action that you want, and provide the HTTP endpoint URL as required by the action's connection information. However, if you choose the on premises option, you must set up and use the data gateway, described later in this guide.
This guide also shows how to send messages from BizTalk Server to a logic app workflow. Put another way, your logic app workflow can receive messages from BizTalk Server.
This guide shows how to create a receive location and a send port using the Azure Logic Apps adapter. You can use this adapter with an on-premises BizTalk Server or an Azure virtual machine running BizTalk Server.
Prerequisites
An Azure account and subscription so that you can sign in to the Azure portal, and create a logic app resource and workflow. If you don't have a subscription, sign up for a free Azure account.
BizTalk Server requirements based on the location where the server is installed:
On-premises computer with BizTalk Server: Install and set up the on-premises data gateway for Azure Logic Apps. Then, in the Azure portal, create the data gateway resource to use with the BizTalk server connector in your logic app workflow.
Azure virtual machine with BizTalk Server:
If the virtual machine isn't exposed as an HTTP endpoint, install and set up the on-premises data gateway for Azure Logic Apps. Then, in the Azure portal, create the data gateway resource to use with the BizTalk Server connector in your logic app workflow.
If the virtual machine is exposed as an HTTP endpoint, you don't need to use the data gateway installation nor create the data gateway resource.
Some familiarity with Azure Logic Apps. If you're new to logic apps, see What is Azure Logic Apps? and create an example Consumption logic app workflow in multitenant Azure Logic Apps.
Optionally, assuming that your workflow starts with a trigger that can receive HTTP requests, such as a Request trigger, you can send a test message that triggers your logic app workflow. To send this message, use a tool that can send HTTP requests to the endpoint URL generated for the trigger in your workflow. The following list includes some example tools:
- Visual Studio Code with an extension from Visual Studio Marketplace
- PowerShell Invoke-RestMethod
- Microsoft Edge - Network Console tool
- Bruno
- Curl
Caution
For scenarios where you have sensitive data, such as credentials, secrets, access tokens, API keys, and other similar information, make sure to use a tool that protects your data with the necessary security features, works offline or locally, doesn't sync your data to the cloud, and doesn't require that you sign in to an online account. This way, you reduce the risk around exposing sensitive data to the public.
Install the Azure Logic Apps adapter
BizTalk Server 2020 and newer
Starting with BizTalk Server 2020, the Azure Logic Apps adapter is included with the BizTalk Server installation.
BizTalk Server 2016
On your BizTalk Server, download and install the Azure Logic Apps adapter:
Go to Microsoft BizTalk Server Adapter for Logic Apps, and select Download.
To install, open the LogicAppAdapter.iso file, and run the LogicApp Adapter.msi file.
Accept the license agreement, and select Install.
After the install completes, restart the BizTalkServerApplication and BizTalkServerIsolatedHost host instances.
After installation completes, you have the following states:
The Azure Logic Apps adapter is added to BizTalk Administration.
The send handler is created and uses the BizTalkServerApplication host instance.
The receive handler is created as a Windows Communication Foundation service and uses the BizTalkServerIsolatedHost host instance.
The LogicApp Adapter folder is created inside the BizTalk installation directory and includes two services: Management and ReceiveService.
Management: Used by the BizTalk connector in a logic app workflow to connect to BizTalk Server using the data gateway. This management service allows BizTalk Server to receive messages from a logic app workflow using the data gateway. This service is used only on the receive side of BizTalk, not the send side.
ReceiveService: Used by the BizTalk connector in a logic app workflow with the receive location. This service is responsible for sending messages from the logic app workflow. This service is used only on the receive side of BizTalk, not the send side.
Receive messages from a workflow
This section lists the extra steps required for BizTalk Server to receive messages from a logic app workflow. As the Azure portal can change, some steps might not exactly match those listed.
BizTalk Server 2016 only: NullAdapter and Azure Logic Apps adapter
If you install the Azure Logic Apps adapter and the NullAdapter, you might see the following error:
Another adapter with the same OutboundEngineCLSID value already exists
The Adapter class GUID is the same for the Azure Logic Apps adapter and NullAdapter. If you need both adapters, follow these steps:
Download the NullAdapter source code on GitHub.
In the NullSendAdapter.cs class, update the GUID.
In the NullAdapter.reg file, update the OutboundEngineCLSID value.
Build and deploy the NullAdapter.
Step 1: Create the IIS applications
The IIS applications use the servcies Management and ReceiveService. You can run the IIS applications using a new or existing application pool. The identity of the AppPool requires membership in the same groups as the account that runs the BizTalk services, such as the BizTalk Application Users and BizTalk Isolated Host Users groups.
Tip
If you create a new application pool, make sure to keep the default .NET CLR version and managed pipeline. Remember, choose an identity (Advanced Settings) that has membership to the same BizTalk groups as your BizTalk service account.
Create the Management IIS application
The BizTalkServer connector in your logic app workflow uses the URL for this IIS application to connect through the data gateway on your BizTalk Server.
BizTalk Server 2020 and newer
Configure the REST APIs using the BizTalk Configuration Wizard.
For more information, see the Configuration Guide.
For more details about the REST APIs, see the BizTalk REST API Reference.
In a web browser, go to
http://localhost/BizTalkManagementService/Schemas.Based on your web browser, either the schemas list appears, or you get a prompt to open and save a schemas.json file. If neither happens, check your REST API configuration.
BizTalk Server 2016
Open the Internet Information Services (IIS) Manager.
From the Default Web Site shortcut menu, select Add Application.
In this new application:
Enter the Alias (name) for your application, such as IISLogicApp.
Select the application pool.
Set the Physical path to
C:\Program Files (x86)\Microsoft BizTalk Server 2016\LogicApp Adapter\Management.Test the settings to confirm that the application pool identity passes the Authentication and Authorization tests.
Select OK to save your changes.
In a web browser, go to
http://localhost/YourApplicationAlias/schemas?api-version=2016-10-26, for example:http://localhost/IISLogicApp/Schemas?api-version=2016-10-26.Based on your web browser, either the schemas list appears, or you get a prompt to open and save a schemas.json file. If neither happens, your AppPool identity might be missing membership to the BizTalk groups.
Create the BizTalk ReceiveService IIS application
The BizTalkServer connector in your logic app workflow uses the URL for this IIS application for the receive location that you specify.
Open the Internet Information Services (IIS) Manager.
Open the Default Web Site shortcut menu, and select Add Application.
In this new application, follow these steps:
Enter the Alias (name) for your application, such as ReceiveWCFService.
Select the same application pool as the previous IIS application.
Set the Physical path to the following, based on the version:
- BizTalk Server 2020:
C:\Program Files (x86)\Microsoft BizTalk Server\LogicApp Adapter\ReceiveService - BizTalk Server 2016:
C:\Program Files (x86)\Microsoft BizTalk Server 2016\LogicApp Adapter\ReceiveService
- BizTalk Server 2020:
Test the settings to confirm that the application pool identity passes the Authentication and Authorization tests.
Select OK to save your changes.
Step 2: Create a logic app workflow
In the Azure portal, create a new logic app resource and blank workflow.
Based on the workflow that you create, follow these generic steps to add the Request trigger named When an HTTP request is received to your workflow.
Follow these generic steps to add the BizTalkServer action named Prepare message from JSON to your workflow.
On the action's connection pane, provide the following information:
Property Description Connect via on-premises data gateway Select if you're using the on-premises data gateway. The gateway is required only in the following scenarios:
- You're using an on-premises BizTalk Server.
- You're using a BizTalk Server on an Azure virtual machine, but the virtual machine isn't exposed as an HTTP endpoint.Connection Name Enter a friendly name for the connection. BizTalk Server URL Enter the fully qualified domain name (FQDN) of the BizTalk Management in IIS application URL. For example, enter http://BizTalkServerName.corp.contoso.com/IISLogicApp/.Authentication Type Select Windows. Username Enter the identity of the IIS application pool. Password Enter the password of the IIS application pool. Gateway - Subscription: Select the Azure subscription associated with the gateway resource that you created in the Azure portal.
- Gateway: Select the gateway resource that you created in the Azure portal.Select Create New.
After the action information pane appears, provide the necessary details, for example:
Property Description Body Select the HTTP body output. Schema Select the schema you want to use. Note
This step assumes that you're familiar with schemas in BizTalk, and that you know which schema you want. If you're not sure, deploy the HelloWorld SDK sample, update its artifacts to use the Azure Logic Apps adapter, and use its schema and sample message.
Follow these generic steps to add the BizTalkServer action named Send message to your workflow.
Property Description Receive Location From the list, select the URL, or enter the fully qualified domain name (FQDN) for the ReceiveService IIS application URL. For example, enter http://BizTalkServerName.corp.contoso.com/ReceiveWCFService/Service1.svc.
When you create the receive location, you also enter this exact URL on the General tab as the Public Address in the receive location transport properties.Body Select the body output from the preceding BizTalk Server action. Save your workflow. On the designer toolbar, select Save.
This step automatically creates an endpoint URL, which appears in the Request trigger. You can send HTTP requests to this URL, which trigger or cause the workflow to start running.
Copy and save the endpoint URL. You need this information for Step 4: Send a message.
Step 3: Create a receive port and a receive location
This section describes how to create your own artifacts.
Tip
Rather than create your own receive ports and receive location, you can deploy the HelloWorld SDK sample, and then update the artifacts to use the Azure Logic Apps adapter.
In BizTalk Server Administration, expand the following:
BizTalk Server Administration > BizTalk Group > Applications
Expand the application to use for running the receive location. For example, expand BizTalk Application - Receive.
From the Receive Ports shortcut menu, select New, and select One-way Receive Port.
In the Receive Port properties, enter the following information:
Property Description Name Enter a name for the receive port. For example, enter LAReceivePort. Authentication
- No Authentication (default): Disable authentication.
- Drop messages if authentication fails: Enable authentication but drops unauthenticated messages.
- Keep messages if authentication fails: Enable authentication and keep unauthenticated messages.Enable routing for failed messages Route any message that fails processing to a subscribing application, such as another receive port or orchestration schedule. Clear this option to suspend failed messages and generate a negative acknowledgment (NACK). By default, the option is cleared.
For more information, see How to Enable Routing for Failed Messages for a Receive Port.Select Receive Locations, and select New.
Enter a Name for the receive location. For example, enter LAReceiveLoc.
For Type, select LogicApp, and then select Configure.
On the General tab, set up the endpoint address for your logic app workflow:
Property Description Address (URI) Required. Enter the BizTalk ReceiveService IIS application URL as follows:
Format:/{your-IIS-app2-name}/Service1.svc
Example:/ReceiveWCFService/Service1.svc.Public Address Required. Enter the following URL as follows:
Format:http://{fully-qualified-machine-name}/{your-IIS-App2-name}/Service1.svc.
Example:http://btsProd.northamerica.corp.contoso.com/ReceiveWCFService/Service1.svc
This exact URL is also listed in your logic app in the receive location.Optional. On the Binding tab, configure any timeout and encoding-related properties of the underlying WCF-WebHttp binding. The following properties are helpful when handling large messages:
Property Description Open timeout Enter the time interval expected for the channel open operation to complete. This value is greater than or equal to System.TimeSpan.Zero.
- Default value: 00:01:00
- Maximum value: 23:59:59Send timeout Enter the time interval expected for the send operation to complete. This value is greater than or equal to System.TimeSpan.Zero. If you use a request-response receive port, this value specifies a time span for the entire interaction to complete, even if the client returns a large message.
- Default value: 00:01:00
- Maximum value: 23:59:59Close timeout Enter the time interval expected for the channel close operation to complete. This value is greater than or equal to System.TimeSpan.Zero.
- Default value: 00:01:00
- Maximum value: 23:59:59Maximum received message size (bytes) Enter the maximum size in bytes for a message, including headers, to be received on the wire. The message size is bound by the amount of memory allocated for each message. You can use this property to limit exposure to denial of service (DoS) attacks.
- Default value: 65536
- Maximum value: 2147483647Maximum concurrent calls Enter the number of concurrent calls to a single service instance. Calls that exceed the limit are queued. Setting this value to 0 is equivalent to setting the value to Int32.MaxValue.
Default value: 200Optional. On the Security tab, configure any security properties. For development purposes, you can select None:
Property Description Security mode - None: Messages aren't secured during transfer.
- Transport: Security is provided using the HTTPS transport. The SOAP messages are secured using HTTPS. To use this mode, you must set up Secure Sockets Layer (SSL) in IIS.
- TransportCredentialOnly: Default.Transport client credential types Select the credential type when you use client authentication.
- None: No authentication occurs at the transport level.
- Basic: Use Basic authentication to send user names and passwords in plain text over the network. You must create the domain or local user accounts corresponding to the credentials.
- Digest: Use Digest authentication to send passwords as a hash value over the network. Only available on domains with domain controllers running Windows Server operating systems authentication. You must create the domain or local user accounts corresponding to client credentials.
- Ntlm (default): Clients send the credentials without sending a password to this receive location. You must create the domain or local user accounts corresponding to client credentials.
- Windows: Windows integrated authentication negotiates Kerberos or NTLM, preferring Kerberos if a domain is present. To use Kerberos, it is important to have the client identify the service with a service principal name (SPN). You must create the domain or local user accounts corresponding to client credentials.
- Certificate: Use a client certificate. You must install the CA certificate chain for the client X.509 certificates in the Trusted Root Certification Authorities certificate store of this computer so that the clients can authenticate to this receive location.
- InheritedFromHostUse Single Sign-On Optional. On the Messages tab, use the Outbound HTTP Headers property to add any custom headers, and use the additional properties to help with faults:
Property Description Outbound HTTP Headers Enter any HTTP headers that you want stamped on the response message. Disable location on failure Disable the receive location if inbound processing fails due to a receive pipeline failure or a routing failure. By default, the option is cleared. Suspend request message on failure Suspend the request message if inbound processing fails due to a receive pipeline failure or a routing failure. By default, the option is cleared. Include exception detail in faults When an error occurs, return any SOAP faults to help debugging. By default, the option is cleared.
For more receive port and location properties, see Managing Receive Locations.
Step 4: Send a message
Open your tool for sending HTTP messages or requests.
Paste the endpoint URL that you saved from the Request trigger in your logic app workflow. You copied this URL in an earlier step.
Select POST as the HTTP method to use. Set the Content-type header to
application/json. In the request body, paste the following JSON, and follow the tool's instructions to send the HTTP message.{"hello":"world"}As the request is a one-way call to BizTalk, you should expect an HTTP 202 as the result.
If you're using the HelloWorld SDK sample, go to your BizTalk server. A file might exist in your send folder.
Send message to logic app workflow
Step 1: Create a logic app workflow
In the Azure portal, create a new logic app resource and blank workflow.
Follow these generic steps to add the Request trigger named When an HTTP request is received to your workflow.
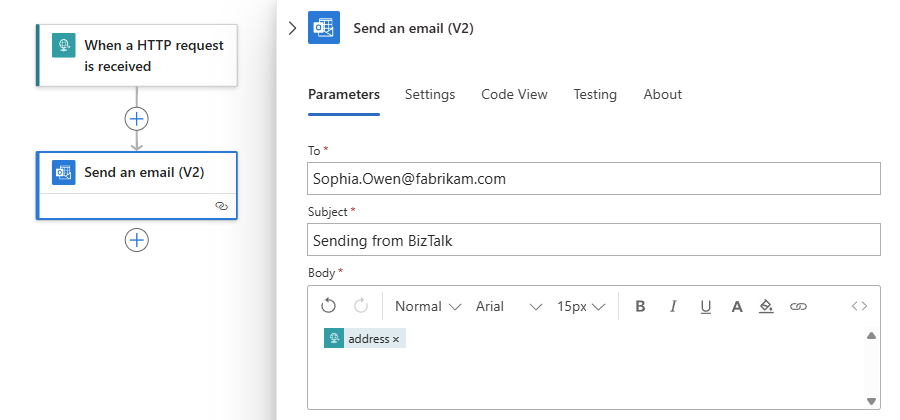
Assuming that you have a Microsoft work or school account, follow these generic steps to add the Office 365 Outlook action named Send an email to your workflow.
If prompted, sign in to Office 365 Outlook.
On the action's connection pane, provide the following information:
Property Description To Enter your Office 365 email address. Subject Enter Sending from BizTalk. Body Select inside the edit box. When the lightning and function icons appear, select the lightning icon to open the dynamic content list. From the list, under When a HTTP request is received, select the trigger output that you want to include in the email. Your workflow looks similar to the following example:

Save your workflow. On the designer, select Save.
In the Request trigger information, copy the HTTP URL, which is automatically created when you save the workflow. You need this URL for the next step. If the URL doesn't appear, you might have to close and reopen the logic app.


Step 2: Create a send port
For BizTalk Server to send messages to a logic app workflow, the workflow must start with a manual trigger, such as When a HTTP request is received.
In BizTalk Server Administration, expand the following:
BizTalk Server Administration > BizTalk Group > Applications
Expand the application to use for running the send port. For example, expand BizTalk Application - Send.
From the Send Ports shortcut menu, select New, and select Static One-way Send Port.
Enter a Name for the send port. For example, enter LASendPort.
From the Type list, select LogicApp, and select Configure.
On the General tab, provide the Callback URI for your logic app workflow trigger by choosing an option:
Option 1
In the Trigger (Callback URI) property, paste the previously copied HTTP URL.
Tip
You can also use your Azure Resource Manager APIs to get this URI.
Option 2
If you don't know the Callback URI, select Configure, and sign in to Azure. Select the values for Subscription, Resource Group, Logic App, and Trigger.
Optional. On the Binding tab, configure any timeout and encoding-related properties of the underlying WCF-WebHttp binding. These properties are helpful when handling large messages:
Property Description Open timeout Enter the time interval expected for the channel open operation to complete. This value is greater than or equal to System.TimeSpan.Zero.
- Default value: 00:01:00
- Maximum value: 23:59:59Send timeout Enter the time interval expected for the send operation to complete. This value is greater than or equal to System.TimeSpan.Zero. If you use a request-response receive port, this value specifies a time span for the entire interaction to complete, even if the client returns a large message.
- Default value: 00:01:00
- Maximum value: 23:59:59Close timeout Enter the time interval expected for the channel close operation to complete. This value is greater than or equal to System.TimeSpan.Zero.
- Default value: 00:01:00
- Maximum value: 23:59:59Maximum received message size (bytes) Enter the maximum size in bytes for a message, including headers, to be received on the wire. The message size is bound by the amount of memory allocated for each message. You can use this property to limit exposure to denial of service (DoS) attacks.
The Azure Logic Apps adapter uses the WebHttpBinding class in the buffered transfer mode to communicate with an endpoint. For the buffered transport mode, the WebHttpBinding.MaxBufferSize property is always equal to the value of this property.
- Default value: 65536
- Maximum value: 2147483647Optional. On the Messages tab, use the Outbound HTTP Headers property to add any custom headers on the outgoing message.
Select OK to save your configuration.
For more send port properties, see Managing Send Ports and Send Port Groups.
Step 3: Send some messages
You can create a receive port and a receive location by using the File adapter. Make sure that your logic app resource is enabled.
Create a receive port, for example, *FileSendPort.
Create a receive location, and set the properties similar to the following example values:
Property Sample input Receive folder C:\temp\In\File mask *.txtPipeline PassThruReceiveIn the send port that you previously created, set the Filter to the following example values:
Property Operator Value BTS.ReceivePortName == FileSendPortCreate a text file named {file-name}.txt with the following text, and then this text file as your sample message:
<Data>
  <DataID>DataID_0</DataID>
  <DataDetails>DataDetails_0</DataDetails>
</Data>
Copy {file-name}.txt into the receive folder.
The send port sends the .txt file to the logic app workflow by using the URI that you provided. After your workflow receives the files, the workflow sends an email with the sample message to the specified To address.
Next
Athugasemdir
Væntanlegt: Á árinu 2024 munum við hætta með GitHub-mál sem ábendingaleið fyrir efni og skipta því út fyrir nýtt ábendingakerfi. Frekari upplýsingar er að finna hér: https://aka.ms/ContentUserFeedback.
Senda inn og skoða endurgjöf fyrir