Nóta
Aðgangur að þessari síðu krefst heimildar. Þú getur prófað aðskrá þig inn eða breyta skráasöfnum.
Aðgangur að þessari síðu krefst heimildar. Þú getur prófað að breyta skráasöfnum.
One of the most common scenarios for IoT devices is detection of environmental conditions. A variety of sensors are available to monitor temperature, humidity, barometric pressure, and more.
In this topic, you will use .NET to read environmental conditions from a sensor.
Prerequisites
- ARM-based (ARMv7 or greater) single-board computer (SBC)
- BME280 humidity/barometric pressure/temperature sensor breakout
- Jumper wires
- Breadboard (optional)
- Raspberry Pi GPIO breakout board (optional)
- .NET SDK 8 or later
Note
This tutorial is written assuming the target device is Raspberry Pi. However, this tutorial can be used for any Linux-based SBC that supports .NET, such as Orange Pi, ODROID, and more.
Important
There are many manufacturers of BME280 breakouts. Most designs are similar, and the manufacturer shouldn't make any difference to the functionality. This tutorial attempts to account for variations. Ensure your BME280 breakout includes an Inter-Integrated Circuit (I2C) interface.
Components like BME280 breakouts are often sold with unsoldered pin headers. If you're uncomfortable with soldering, look for a BME280 breakout board with a pre-soldered header or a different connector. If you want, consider learning how to solder! Here's a good beginner's guide to soldering.
Prepare the SBC
Ensure your SBC is configured to support the following services:
- SSH
- I2C
For many devices, no additional configuration is required. For Raspberry Pi, use the raspi-config command. For more information on raspi-config, refer to the Raspberry Pi documentation.
Prepare the hardware
Use the hardware components to build the circuit as depicted in the following diagram:
The following are the connections from the Raspberry Pi to the BME280 breakout. Note that pin labels differ on various BME280 breakouts.
| Raspberry Pi | BME280 Breakout | Color |
|---|---|---|
| 3.3V | VIN/3V3 | red |
| Ground | GND | black |
| SDA (GPIO 2) | SDI/SDA | blue |
| SCL (GPIO 3) | SCK/SCL | orange |
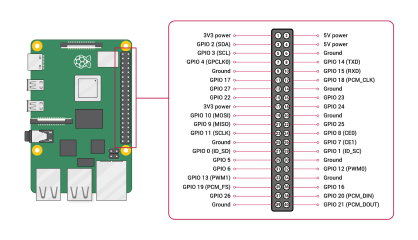
Refer to the following pinout diagram as needed:

Image courtesy Raspberry Pi Foundation.
Tip
A GPIO breakout board in conjunction with a breadboard is recommended to streamline connections to the GPIO header.
Create the app
Complete the following steps in your preferred development environment:
Create a new .NET Console App using either the .NET CLI or Visual Studio. Name it SensorTutorial.
dotnet new console -o SensorTutorial
cd SensorTutorial
Add the Iot.Device.Bindings package to the project. Use either .NET CLI from the project directory or Visual Studio.
dotnet add package Iot.Device.Bindings --version 3.2.0-*Replace the contents of Program.cs with the following code:
using System;
using System.Device.I2c;
using System.Threading;
using Iot.Device.Bmxx80;
using Iot.Device.Bmxx80.PowerMode;

var i2cSettings = new I2cConnectionSettings(1, Bme280.DefaultI2cAddress);
using I2cDevice i2cDevice = I2cDevice.Create(i2cSettings);
using var bme280 = new Bme280(i2cDevice);

int measurementTime = bme280.GetMeasurementDuration();

while (true)
{
    Console.Clear();

    bme280.SetPowerMode(Bmx280PowerMode.Forced);
    Thread.Sleep(measurementTime);

    bme280.TryReadTemperature(out var tempValue);
    bme280.TryReadPressure(out var preValue);
    bme280.TryReadHumidity(out var humValue);
    bme280.TryReadAltitude(out var altValue);

    Console.WriteLine($"Temperature: {tempValue.DegreesCelsius:0.#}\u00B0C");
    Console.WriteLine($"Pressure: {preValue.Hectopascals:#.##} hPa");
    Console.WriteLine($"Relative humidity: {humValue.Percent:#.##}%");
    Console.WriteLine($"Estimated altitude: {altValue.Meters:#} m");

    Thread.Sleep(1000);
}
In the preceding code:
i2cSettingsis set to a new instance ofI2cConnectionSettings. The constructor sets thebusIdparameter to 1 and thedeviceAddressparameter toBme280.DefaultI2cAddress.Important
Some BME280 breakout manufacturers use the secondary address value. For those devices, use
Bme280.SecondaryI2cAddress.A using declaration creates an instance of
I2cDeviceby callingI2cDevice.Createand passing ini2cSettings. ThisI2cDevicerepresents the I2C bus. Theusingdeclaration ensures the object is disposed and hardware resources are released properly.Another
usingdeclaration creates an instance ofBme280to represent the sensor. TheI2cDeviceis passed in the constructor.The time required for the chip to take measurements with the chip's current (default) settings is retrieved by calling
GetMeasurementDuration.A
whileloop runs indefinitely. Each iteration:Clears the console.
Sets the power mode to
Bmx280PowerMode.Forced. This forces the chip to perform one measurement, store the results, and then sleep.Reads the values for temperature, pressure, humidity, and altitude.
Note
Altitude is calculated by the device binding. This overload of
TryReadAltitudeuses mean sea level pressure to generate an estimate.Writes the current environmental conditions to the console.
Sleeps 1000 ms.
Build the app. If using the .NET CLI, run
dotnet build. To build in Visual Studio, press Ctrl+Shift+B.Deploy the app to the SBC as a self-contained app. For instructions, see Deploy .NET apps to Raspberry Pi. Make sure to give the executable execute permission using
chmod +x.Run the app on the Raspberry Pi by switching to the deployment directory and running the executable.
./SensorTutorialObserve the sensor output in the console.
Terminate the program by pressing Ctrl+C.
Congratulations! You've used I2C to read values from a temperature/humidity/barometric pressure sensor!
Get the source code
The source for this tutorial is available on GitHub.

