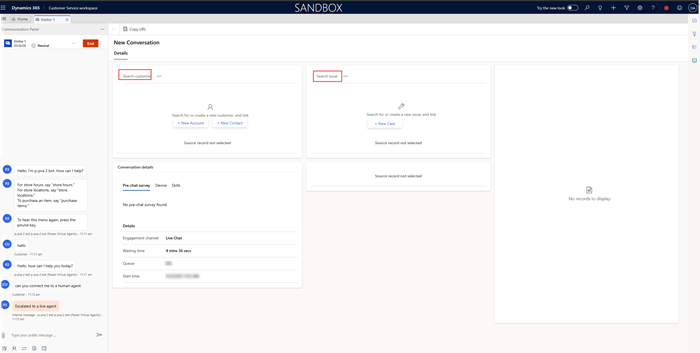
Customize the Active Conversation form
Important
The Customer Summary form is renamed as Active Conversation form.
You can customize the following for the Active Conversation page:
- Add or remove custom controls
- Add a web resource or iFrame to the form
- Customize the layout
- Add custom fields if the Customize active conversation form in Customer Service admin center is enabled.
- Embed canvas apps
Note
- For a conversation entity, you can't add custom forms.
- We recommend that you don't:
- Change the Conversation form or the order in which it's displayed, as it's the default form.
- Modify the default three-column layout for the Active Conversation form.
- Modify the out-of-the-box JavaScript handlers and web resource used in the Active Conversation form.
- Remove the form initiator control from the Search customer and Search issue lookup controls.
By default, the Active Conversation page displays the sections that are listed in this article. For information on how to customize these sections, see Customize quick view forms.
Customer profile
The Customer profile section provides details about the customer or account. These details include the name of the customer or account, category or job, title, relationship type, city, and the preferred channel of engagement. You can modify the quick view forms in this section by navigating to the respective entity forms.
Conversation summary
The Conversation summary section fetches details based on the context of the incoming conversation request.
This section includes Pre-chat survey and Visitor details. The details on these tabs help you to understand contextual channel-specific information about the conversation with the customer. The Pre-chat survey tab shows responses from the customer on the pre-chat questions.
The Visitor details tab provides some information such as the customer is authenticated or not, browser used by the customer for contacting support, an operating system used by the customer, location of the customer, interacting language of the customer, and so on. In addition, conversation and transfer details.
If the customer signs in to the portal to initiate a chat with the support, then as a customer service representative, you can see the Authenticated field value as Yes in the Visitor details tab of the Conversation summary section. Otherwise, the Authenticated field value is shown as No.
Issue snapshot
For an incoming conversation request, the system links an existing case to the conversation and shows it on the Issue Snapshot section. This section shows information such as the title of the case, the priority, the status of the case, the product, and the owner. You can modify the quick view forms in this section by navigating to the respective entity forms.
Recent cases
This form section displays the recent cases that relate to the customer. You can modify the quick view forms in this section by navigating to the respective entity forms.
Customize the labels for customer, account, and case on the conversation form
You can customize the labels for customer, account, and case that appear on the conversation form so that they're relevant to your business needs. These customizations are applicable to labels such as Search customer, New customer, Search issue, and New case. When you update a label, the updated name that you choose reflects in all occurrences where that name exists.
For example, you could change Search customer to Search client or Search issue to Search ticket using the following procedure.
To customize labels on the conversation form:
In your Dynamics 365 instance, go to Customize the System in Advanced Settings, and then select Web Resources.
Select the filters icon, select the dropdown menu next to the Type column, and then select the checkbox for String (RESX).
In the Name column filter, select Custom Filter, and in the dialog that is displayed, set Select Operator to Contains, and then type CustomerSummary for the value. All the CustomerSummary labels for all the languages are displayed.
Optionally, use the language filter to narrow the results to show the results for the required language.
In the Name column, select the CustomerSummary label. A dialog opens with the URL link to the content of the CustomerSummaryLabels.resx file.
Select the link in the URL field. A dialog opens and displays the contents of the resource file.
Copy and paste the contents into a text editor, and then update the text for the value tag of the labels you want to change with a label of your choice. For example, for Customer, update the text in value with "Client". This action replaces the "Customer" label with "Client" on the Active Conversation form.
Similarly, for the Issue tag, update the text in value* with "Ticket". This action replaces the "Issue" label with "Ticket" on the Active Conversation form.
The sample tags with the new values are as follows.
<data name="Customer" xml:space="preserve">
  <value>Client</value>
  <comment>Client Label</comment>
</data>
<data name="Issue" xml:space="preserve">
  <value>Ticket</value>
  <comment>Issue Label</comment>
</data>
Save the file locally, and then return to the CustomerSummaryLabels Web resource dialog, select Choose File, and upload the edited file.
Select the recently saved file, select Save, and then publish the changes.
To view the published changes, in the Customer Service workspace, manually refresh the page containing the conversation summary form.
Timeline
This section displays case-related and customer-related activities in the form of a timeline. You can create quick notes based on the discussion with the customer. Use the Linked records field to switch the timeline based on the Case, Contact, or Account record linked to the conversation.
You can customize the timeline dropdown labels for case, account, and contact by editing the display name for the corresponding entity and publishing your changes.
Related information
Omnichannel system customizers
Customize the conversation form
Configure agent and supervisor configurations in Unified Service Desk
Configure notification for agents
