Connect a sequence to records
After you create and activate a sequence for the selling process, you connect the sequence to records depending on the entity that you've created the sequence for. When a sequence is connected to an entity, the activities defined in the sequence will be shown in order on the record's Summary under Up next in My work.
Also, you can connect multiple sequences to a record. More information: Connect multiple sequences to record
Connect multiple sequences to record
To improve the customer engagement and collaboration when multiple team members work on a record, you can connect multiple sequences to that record. This helps in closing deals faster, and bringing better business results.
As a sales manager or seller, you can connect multiple sequences to a record manually. Select the Connect sequence option on the record page. In the Connect record to sequence dialog box, connect the required sequences. For connecting multiple sequences, verify that the record owner or the sequence owner has the necessary permissions.
More information: Through the record type grid view.
Note
When a segment is connected to the same sequence more than once for the same record and assigned to the same seller, the Up next widget displays duplicate activities.
Ways to connect sequence to records
You can connect a sequence to records in the following ways:
Through a sequence
Note
In this procedure, we're considering a sequence that was created based on Lead as an example. For sequences that are based on Opportunity, the procedure is similar.
Sign in to your sales app.
Go to Change area in the lower-left corner of the page, and select Sales Insights settings.
Under Sales accelerator, select Sequences.
On the Sequences page, select and open the sequence that is active state.
or
Hover over the sequence, and then select More options > View sequence.
The sequence opens.Note
You can assign records only to sequences that are in an Active state.
Select the Connected record tab. In this example, we're selecting a sequence with record type lead.
You can see the list of records that are connected to the sequence. If no records are connected, an empty section is displayed.
In the Connected leads section, select + Connect leads.
The list that appears shows available lead records that aren't connected to any sequence.
Note
On the record selection page, you can do the following tasks on the grid:
- Sort and filter the records based on the column options. Select the down arrow icon corresponding to column header, and then select the sort and filter options that are available.
- Reorder the columns by dragging-and-dropping at the location you want in the grid.
- Search is available only on the name and description of the sequence.
Choose the records that you want to connect to the sequence, and then select Connect.
Verify that the Open leads without sequences view is selected. Selecting this view helps to list only the records that aren't associated with other sequences. You can select other views to choose records to connect, but the records in that view must not be associated with other sequences.
The lead records are connected to the sequence and are added to the list of connected records.

Through the record type grid view
Sign in to your sales app.
Go to Change area in the lower-left corner of the page, and select Sales.
Under Sales, select the record type such as, Leads or Opportunities, depending on the records you want to connect.
In this example, we select Leads.
Select the records to which you want to connect the sequence. In this example, we select Sharon Thonpson and Christopher Anderson.

Note
- You can't connect a sequence to a record that has already been connected with a different sequence. When you select a record that was already connected, the Disconnect sequence option appears on the toolbar. To connect to a different sequence, select Disconnect sequence. The record will be available to connect to the sequence you want.
- When you choose multiple sequences to connect, and the chosen list contains both connected and disconnected records, no option to connect or disconnect will be displayed on the toolbar.
Select Connect sequence. The list of available sequences that appears includes sequences created by you and other sales managers.
In this example, a list of sequences that are configured for the Lead entity is displayed.
Select a sequence, and then select Connect.
A confirmation message appears at the bottom of the page, and the sequence is connected to the selected lead records. Now, sellers who have access to the lead record can see the activities connected with it.
Through a record
- Sign in to your sales app.
- Go to Change area in the lower-left corner of the page, and select Sales.
- Under Sales, select Leads or Opportunities, depending on the records you want to connect.
In this example, we select Leads.
- Open the record to which you want to connect the sequence. In this example, we opened the lead Sharon Thonpson.

Note
When you select a record that was already connected, the Disconnect sequence option appears on the toolbar. Disconnect the record from the sequence it's currently connected with, and then connect it to the sequence you want. More information: View details of a sequence and its connected records
- Select Connect sequence. The list of available sequences that appears includes sequences created by you and other sales managers.
In this example, a list of sequences that are configured for the Lead entity is displayed.
- Select a sequence, and then select Connect.
A confirmation message appears at the bottom of the page, and the sequence is connected to the selected lead records. Now, sellers who have access to the lead record can see the activities connected with it.
Through Power Automate
You can create a flow based on a sequence. The flow connects the records automatically to the sequence when the trigger satisfies the flow condition.
Go to Microsoft Power Automate, and sign in with your Dynamics 365 credentials.
Note
By default, your organization is selected based on your latest association. If you have multiple organizations associated with you, select the proper organization from your profile settings.
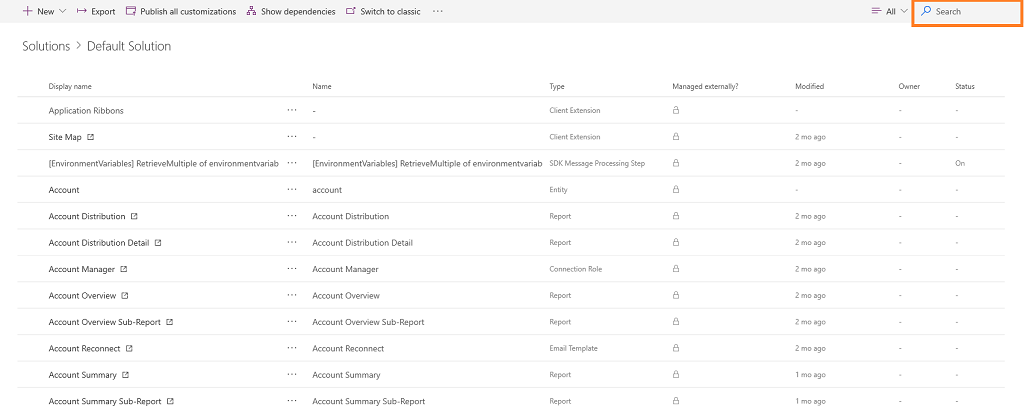
Select Solutions, and then select Default Solution.

All default solutions are listed.In the search box on the toolbar, search for the flow that you want update or view.

Configure a trigger to the flow.
Select New step.
In the Search connectors and actions box, select Microsoft Dataverse, and then search for and add the action Perform an unbound action.

In the Perform an unbound action step, select the Action Name as msdyn_ConnectSequence.

Enter the following additional information:- RegardingEntityId: The unique identifier of the entity record that is to be connected to the sequence.
- RegardingEntityName: The logical name of the entity.
- SequenceId: The unique identifier of the sequence.
- SegmentId: (Optional) The unique identifier of the segment.
- Source: (Optional) The source of the record.
- WaitTime: (Optional) The time to wait before connecting the record to the sequence.
- AdvancedToOtherSequenceTargetStepld: (Optional) The unique identifier of the sequence step to which the record is to be advanced to another sequence.
Note
To get the unique identifier of the sequence, query OData for the sequence entity (msdyn_sequence). More information: Querying or browsing an OData endpoint
Use Flow Checker to verify errors and warnings in the flow.
Errors and warnings in the flow cause performance or reliability issues. Ensure that the flow is free from errors and warnings. The checker is always active, appearing in the command bar in the designer. The checker shows a red dot when it finds one or more errors in your flow.
For example, while creating a For due date coming up card, you haven't entered Card Name. The flow checker identifies the error and displays a red dot.Note
You must resolve all errors and warnings to save the flow.
(Optional) Select Test to test your flow.
Ensure that all the configured steps are working as required. The test feature runs and validates each step in the flow, and highlights any step that contains an error. You must resolve the error to proceed.
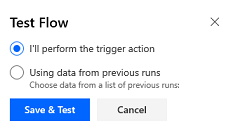
Select an option to test the flow by triggering actions or by using the data from previous test runs, and then select Save & Test.
Save and publish the flow.
Can't find the feature in your app?
There are a few possibilities:
- You don't have the necessary license to use this feature. Check out the comparison table and the licensing guide to see which features are available with your license.
- You don't have the necessary security role to use this feature.
- To configure or setup a feature, you need to have the Administration and customization roles
- To use sales-related features, you need to have the Primary sales roles
- Some tasks require specific Functional roles.
- Your administrator hasn't turned on the feature.
- Your organization is using a custom app. Check with your administrator for exact steps. The steps described in this article are specific to the out-of-the-box Sales Hub and Sales Professional apps.