Migrate Notebooks from Azure Synapse to Fabric
Azure Synapse and Fabric support notebooks. Migrating a notebook from Azure Synapse to Fabric can be done in two different ways:
- Option 1: you can export notebooks from Azure Synapse (.ipynb) and import them to Fabric (manually).
- Option 2: you can use a script to export notebooks from Azure Synapse and import them to Fabric using the API.
For notebook considerations, refer to differences between Azure Synapse Spark and Fabric.
Prerequisites
If you don’t have one already, create a Fabric workspace in your tenant.
Option 1: Export and import notebook manually
To export a notebook from Azure Synapse:
- Open Synapse Studio: Sign-in into Azure. Navigate to your Azure Synapse workspace and open the Synapse Studio.
- Locate the notebook: In Synapse Studio, locate the notebook you want to export from the Notebooks section of your workspace.
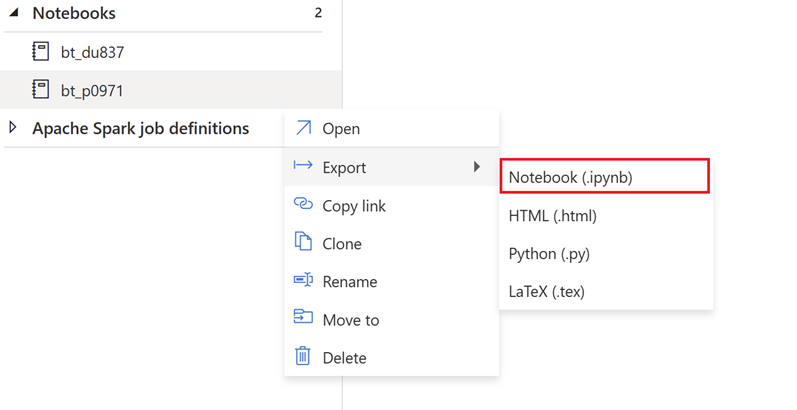
- Export notebook:
- Right-click on the notebook you wish to export.
- Select Export > Notebook (.ipynb).
- Choose a destination folder and provide a name for the exported notebook file.
- Once the export is complete, you should have the notebook file available for upload.

To import the exported notebook in Fabric:
- Access Fabric workspace: Sign-in into Fabric and access your workspace.
- Navigate to Data Engineering homepage: Once inside your Fabric workspace, go to Data Engineering homepage.
- Import notebook:
- Select Import notebook. You can import one or more existing notebooks from your local computer to a Fabric workspace.
- Browse for the .ipynb notebook files that you downloaded from Azure Synapse.
- Select the notebook files and click Upload.
- Open and use the Notebook: Once the import is completed, you can open and use the notebook in your Fabric workspace.
Once the notebook is imported, validate notebook dependencies:
- Ensure using the same Spark version.
- If you're using referenced notebooks, you can use msparkutils also in Fabric. However, if you import a notebook that references another one, you need to import the latter as well. Fabric workspace doesn't support folders for now, so any references to notebooks in other folders should be updated. You can use notebook resources if needed.
- If a notebook is using pool specific libraries and configurations, you need to import those libraries and/or configurations as well.
- Linked services, data source connections, and mount points.
Option 2: Use the Fabric API
Follow these key steps for migration:
- Prerequisites.
- Step 1: Export notebooks from Azure Synapse to OneLake (.ipynb).
- Step 2: Import notebooks automatically into Fabric using the Fabric API.
Prerequisites
The prerequisites include actions you need to consider before starting notebook migration to Fabric.
- A Fabric workspace.
- If you don’t have one already, create a Fabric lakehouse in your workspace.
Step 1: Export notebooks from Azure Synapse workspace
The focus of Step 1 is on exporting the notebooks from Azure Synapse workspace to OneLake in .ipynb format. This process is as follows:
- 1.1) Import migration notebook to Fabric workspace. This notebook exports all notebooks from a given Azure Synapse workspace to an intermediate directory in OneLake. Synapse API is used to export notebooks.
- 1.2) Configure the parameters in the first command to export notebooks to an intermediate storage (OneLake). The following snippet is used to configure the source and destination parameters. Ensure to replace them with your own values.
# Azure config
azure_client_id = "<client_id>"
azure_tenant_id = "<tenant_id>"
azure_client_secret = "<client_secret>"

# Azure Synapse workspace config
synapse_workspace_name = "<synapse_workspace_name>"

# Fabric config
workspace_id = "<workspace_id>"
lakehouse_id = "<lakehouse_id>"
export_folder_name = f"export/{synapse_workspace_name}"
prefix = "" # this prefix is used during import {prefix}{notebook_name}

output_folder = f"abfss://{workspace_id}@onelake.dfs.fabric.microsoft.com/{lakehouse_id}/Files/{export_folder_name}"
- 1.3) Run the first two cells of the export/import notebook to export notebooks to OneLake. Once cells are completed, this folder structure under the intermediate output directory is created.

Step 2: Import notebooks into Fabric
Step 2 is when notebooks are imported from intermediate storage into the Fabric workspace. This process is as follows:
- 2.1) Validate the configurations in step 1.2 to ensure the right Fabric workspace and prefix values are indicated to import the notebooks.
- 2.2) Run the third cell of the export/import notebook to import all notebooks from intermediate location.