Esercitazione: Visualizzazione di un modello sottoposto a rendering remoto
In questa esercitazione apprenderai a:
- Effettuare il provisioning di un'istanza di Rendering remoto di Azure
- Creare e arrestare una sessione di rendering
- Riutilizzare una sessione di rendering esistente
- Connettersi e disconnettersi dalle sessioni
- Caricare modelli in una sessione di rendering
Prerequisiti
Per eseguire questa esercitazione, è necessario avere:
- Una sottoscrizione attiva di Azure con pagamento in base al consumo. Creare un account
- Windows SDK 10.0.18362.0 (download)
- La versione più recente di Visual Studio 2022 (download)
- Git (download)
- Plug-in Git LFS (download)
- Unity (vedere i requisiti di sistema per le versioni supportate)
- Conoscenza intermedia di Unity e del linguaggio C# (ad esempio, creazione di script e oggetti, uso di prefab, configurazione di eventi di Unity e così via)
Effettuare il provisioning di un'istanza di Rendering remoto di Azure
Per ottenere l'accesso al servizio Rendering remoto di Azure, è prima di tutto necessario creare un account.
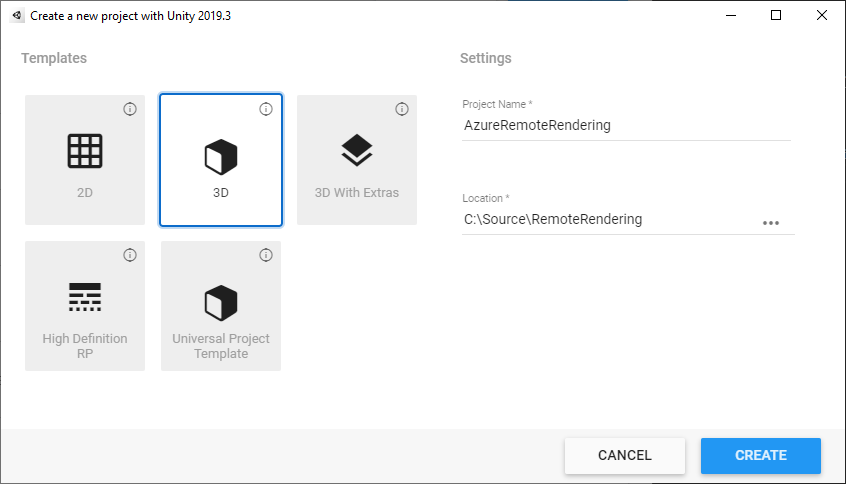
Creare un nuovo progetto Unity
Suggerimento
Il repository di esempi di Rendering remoto di Azure contiene un progetto con tutte le esercitazioni completate, che può essere usato come riferimento. Esplorare Unity\Tutorial-Complete per trovare il progetto Unity completo.
Nell'hub Unity creare un nuovo progetto. In questo esempio si presuppone che il progetto venga creato in una cartella denominata RemoteRendering.
Includere i pacchetti Di Azure Rendering remoto e OpenXR
Seguire le istruzioni su come aggiungere i pacchetti Azure Rendering remoto e OpenXR al progetto Unity.
Nota
Se Unity visualizza una finestra di dialogo di avviso dopo l'importazione del pacchetto OpenXR in cui viene chiesto se abilitare i back-end della piattaforma nativa per il nuovo sistema di input, fare clic su No per il momento. Verrà abilitato in un passaggio successivo.
Configurare la fotocamera
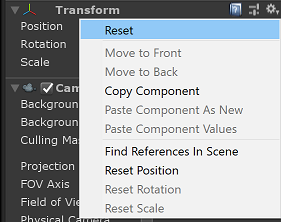
Selezionare il nodo Main Camera (Fotocamera principale).
Aprire il menu di scelta rapida facendo clic con il pulsante destro del mouse sul componente Trasforma e scegliendo l'opzione Reimposta :
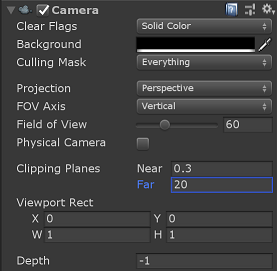
Impostare Clear flags (Flag di cancellazione) su Solid Color (Tinta unita)
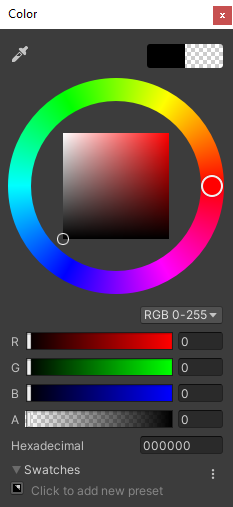
Impostare Background (Sfondo) su Black (Nero) (#000000), con alfa (A) completamente trasparente (0)
Impostare Piani di ritaglio su Near = 0,1 e Far = 20. Questa configurazione significa eseguire il rendering della geometria delle clip più vicina a 10 cm o più lontano di 20 metri.
Modificare le impostazioni del progetto
Aprire Modifica > Impostazioni progetto...
Selezionare Quality (Qualità) nel menu di elenco a sinistra
Impostare Default Quality Level (Livello di qualità predefinito) per tutte le piattaforme su Low (Basso). Questa impostazione consente un rendering più efficiente del contenuto locale e non influisce sulla qualità del contenuto sottoposto a rendering remoto.
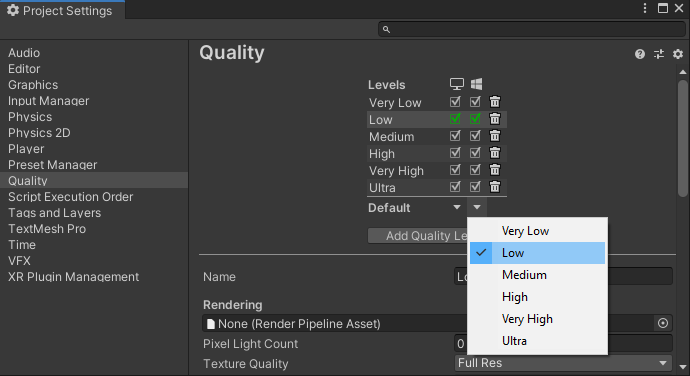
Nota
Nell'ambito di questa esercitazione si usa la pipeline di rendering predefinita di Unity. Se si vuole usare la pipeline di rendering universale, vedere Pipeline di rendering unity per altri passaggi di configurazione.
Selezionare XR Plugin Management (Gestione plug-in XR) dal menu a sinistra
- Fare clic sul pulsante Install XR Plugin Management (Installa gestione plug-in XR).
- Selezionare la scheda Universal Windows Platform settings (Impostazioni di Universal Windows Platform), rappresentata dall'icona di Windows.
- Selezionare la casella di controllo Apri XR in Provider plug-in
- Se viene visualizzata una finestra di dialogo che chiede di abilitare i back-end della piattaforma nativa per il nuovo sistema di input, selezionare No.
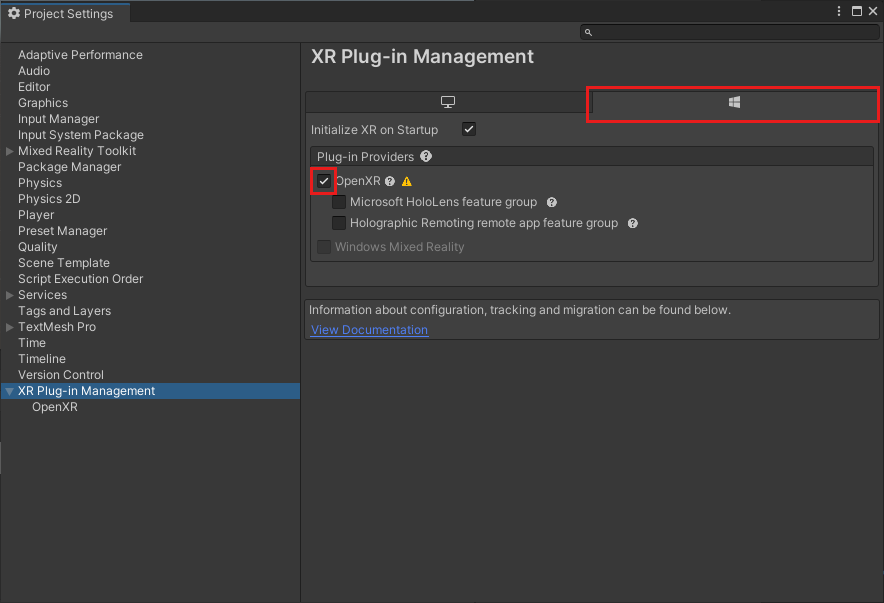
Nota
Se il gruppo di funzionalità di Microsoft HoloLens è disabilitato, il plug-in OpenXR di Windows Realtà mista manca dal progetto. Seguire le istruzioni su come aggiungere i pacchetti Di Azure Rendering remoto e OpenXR per installarli.
Selezionare OpenXR dal menu a sinistra
- Impostare modalità di invio profondità su Profondità 16 bit
- Aggiungere il profilo di interazione manuale Microsoft ai profili di interazione.
- Abilitare queste funzionalità di OpenXR:
- Rendering remoto di Azure
- Tracciamento della mano
- Funzionalità di Realtà mista
- Motion Controller Model
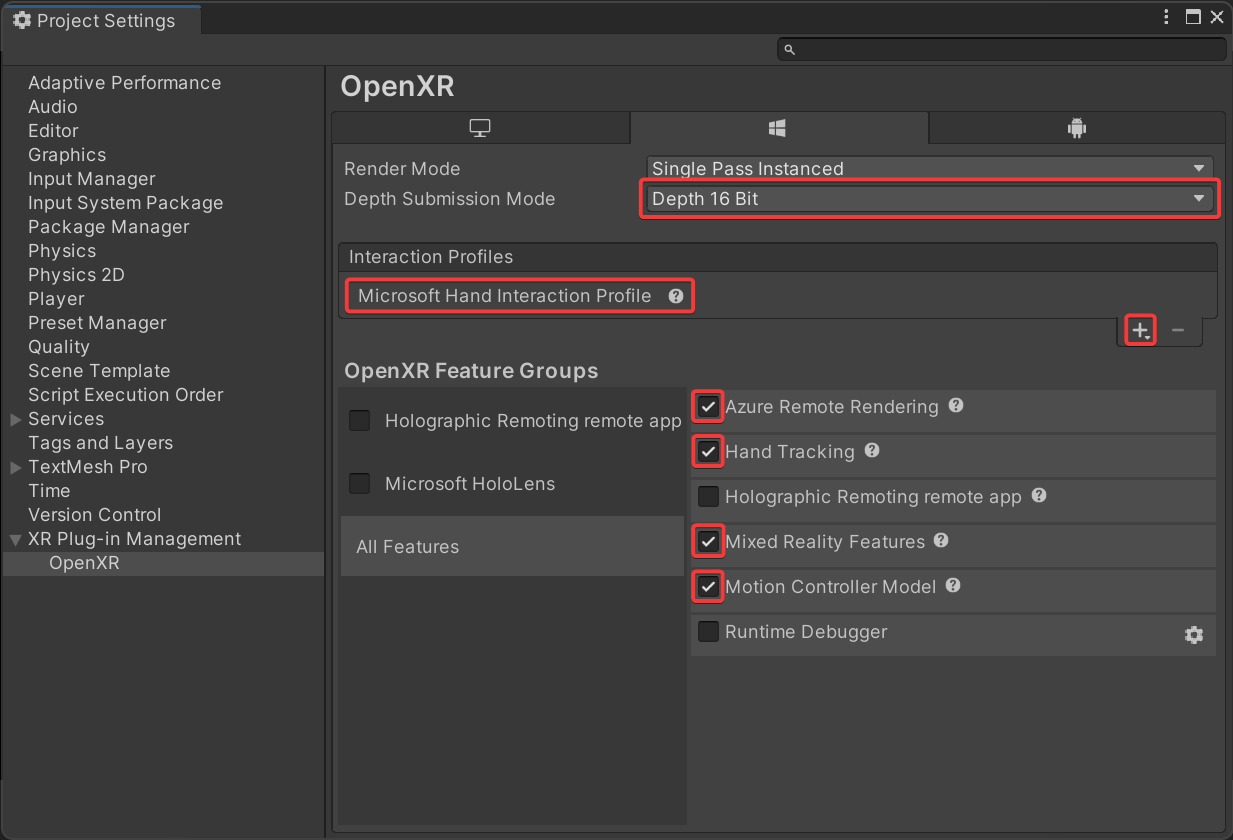
Nota
Se non vengono visualizzate le funzionalità OpenXR necessarie elencate nel plug-in OpenXR di Windows Realtà mista manca nel progetto. Seguire le istruzioni su come aggiungere i pacchetti Di Azure Rendering remoto e OpenXR per installarli.
Selezionare Player (Lettore) nel menu di elenco a sinistra
- Selezionare la scheda Universal Windows Platform settings (Impostazioni di Universal Windows Platform), rappresentata dall'icona di Windows.
- Espandere Altri Impostazioni
- In Rendering impostare Spazio colore su Lineare e riavviare Unity quando viene richiesto.
- In Configurazione modificare Gestione input attivo su Entrambi e riavviare Unity quando chiede di.
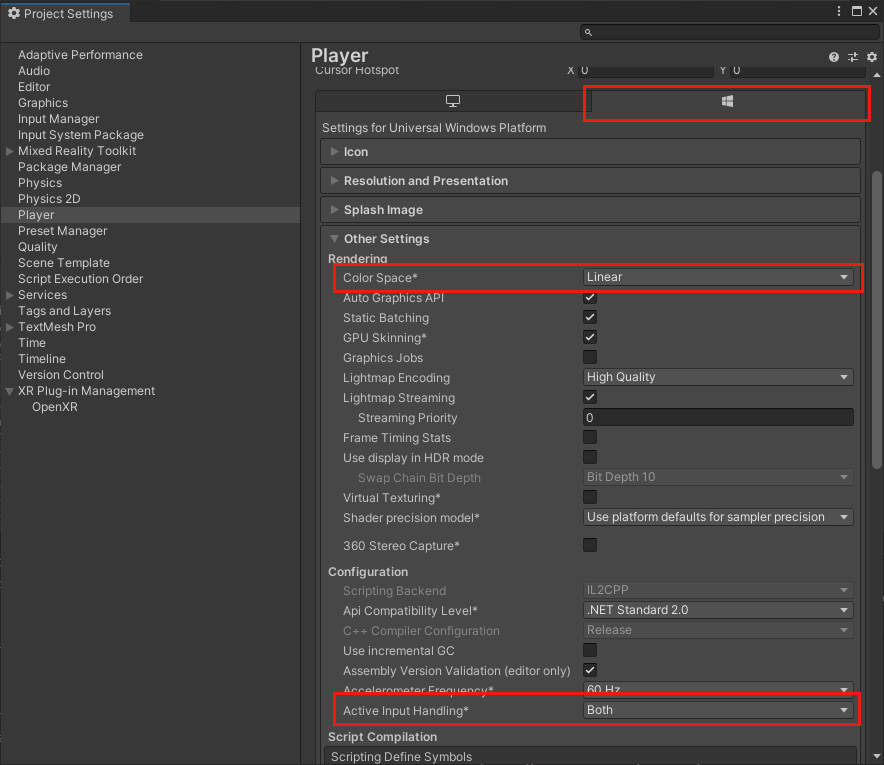
- Espandere Pubblicazione Impostazioni
- Scorrere verso il basso fino a Funzionalità e selezionare:
- InternetClient
- InternetClientServer
- SpatialPerception
- PrivateNetworkClientServer (facoltativo). Selezionare questa opzione se si vuole connettere il debugger remoto di Unity al dispositivo.
- In Supported Device Families (Famiglie di dispositivi supportate) abilitare Holographic (Dispositivo olografico) e Desktop
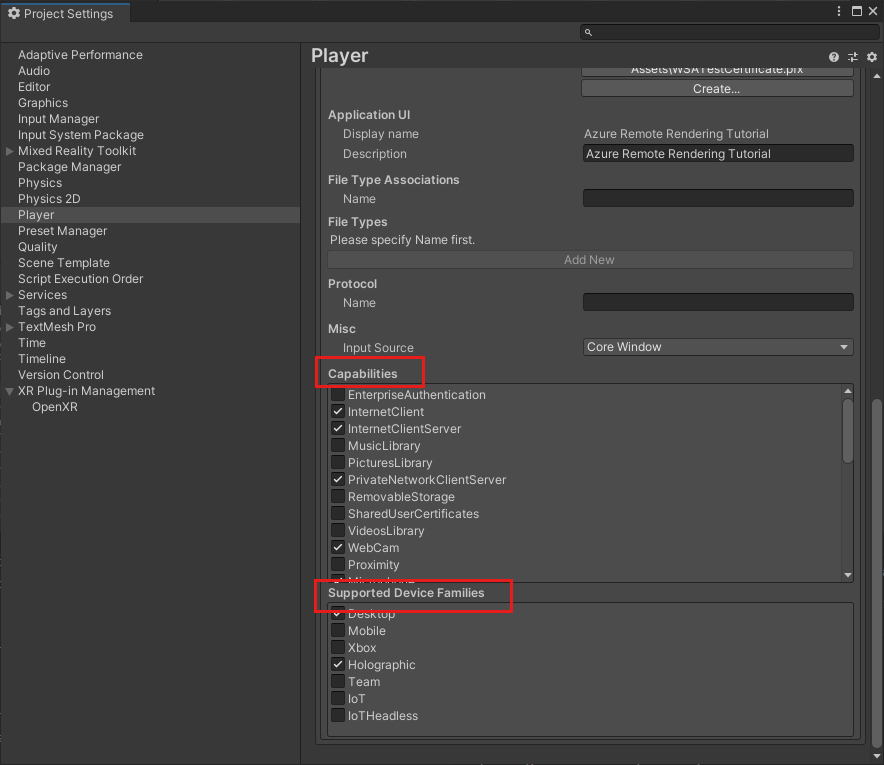
Chiudere o ancorare il pannello Project Settings (Impostazioni progetto)
Aprire Impostazioni di compilazione file>
- Selezionare Universal Windows Platform
- Configurare le impostazioni in modo che corrispondano a quelle indicate di seguito
- Premere il pulsante Cambia piattaforma .
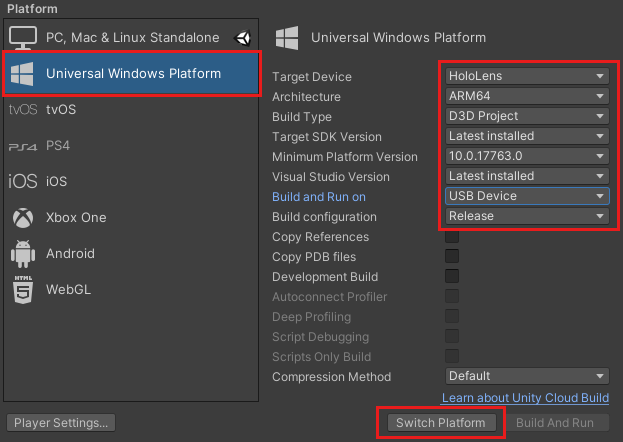
Dopo che Unity cambia piattaforma, chiudere il pannello di compilazione.
Verificare la configurazione del progetto
Eseguire la procedura seguente per verificare che le impostazioni del progetto siano corrette.
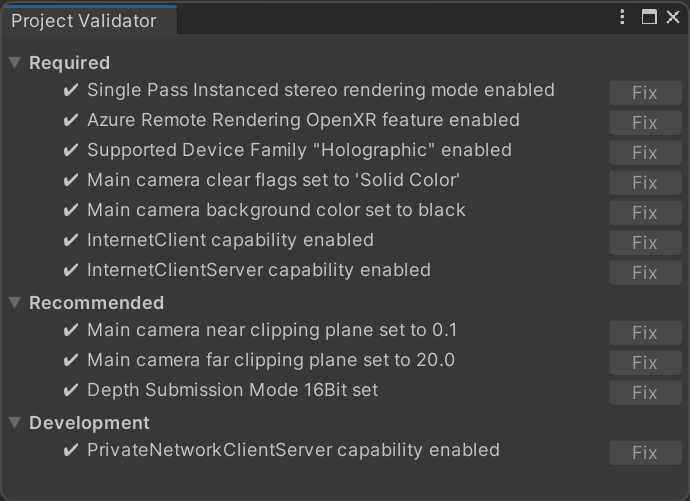
Scegliere la voce ValidateProject dal menu RemoteRendering sulla barra degli strumenti dell'editor di Unity.
Esaminare la finestra Project Validator per individuare gli errori e correggere le impostazioni del progetto, se necessario.
Nota
Se si usa MRTK nel progetto e si abilita il sottosistema della fotocamera, MRTK sostituirà le modifiche manuali applicate alla fotocamera. Sono incluse le correzioni dello strumento ValidateProject.
Creare uno script per coordinare la connessione e lo stato di Rendering remoto di Azure
Sono disponibili quattro fasi di base per visualizzare i modelli sottoposti a rendering remoto, descritte nel diagramma di flusso seguente. Ogni fase deve essere eseguita nell'ordine indicato. Il passaggio successivo consiste nel creare uno script che gestisce lo stato dell'applicazione e procedere in ogni fase richiesta.

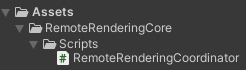
Nel riquadro Project (Progetto), in Assets, creare una nuova cartella denominata RemoteRenderingCore. Quindi all'interno di RemoteRenderingCore creare un'altra cartella denominata Scripts.
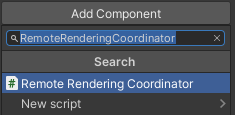
Creare un nuovo script C# denominato RemoteRenderingCoordinator. Il progetto sarà simile al seguente:
Questo script coordinatore tiene traccia e gestisce lo stato di rendering remoto. Si noti che alcuni di questo codice vengono usati per mantenere lo stato, esponendo funzionalità ad altri componenti, attivando eventi e archiviando dati specifici dell'applicazione che non sono direttamente correlati ad Azure Rendering remoto. Usare il codice seguente come punto di partenza. Il codice di Rendering remoto di Azure specifico verrà descritto e implementato più avanti nell'esercitazione.
Aprire RemoteRenderingCoordinator nell'editor di codice e sostituirne l'intero contenuto con il codice seguente:
// Copyright (c) Microsoft Corporation. All rights reserved.
// Licensed under the MIT License. See LICENSE in the project root for license information.

using Microsoft.Azure.RemoteRendering;
using Microsoft.Azure.RemoteRendering.Unity;
using System;
using System.Linq;
using System.Threading.Tasks;
using UnityEngine;
using UnityEngine.Events;

#if UNITY_WSA
using UnityEngine.XR.WSA;
#endif

/// <summary>
/// Remote Rendering Coordinator is the controller for all Remote Rendering operations.
/// </summary>

// Require the GameObject with a RemoteRenderingCoordinator to also have the ARRServiceUnity component
[RequireComponent(typeof(ARRServiceUnity))]
public class RemoteRenderingCoordinator : MonoBehaviour
{
    public enum RemoteRenderingState
    {
        NotSet,
        NotInitialized,
        NotAuthorized,
        NoSession,
        ConnectingToExistingRemoteSession,
        ConnectingToNewRemoteSession,
        RemoteSessionReady,
        ConnectingToRuntime,
        RuntimeConnected
    }

    public static RemoteRenderingCoordinator instance;

    // Account
    // RemoteRenderingDomain must be '<region>.mixedreality.azure.com' - if no '<region>' is specified, connections will fail
    // For most people '<region>' is either 'westus2' or 'westeurope'
    [SerializeField]
    private string remoteRenderingDomain = "westus2.mixedreality.azure.com";
    public string RemoteRenderingDomain
    {
        get => remoteRenderingDomain.Trim();
        set => remoteRenderingDomain = value;
    }

    [Header("Development Account Credentials")]
    [SerializeField]
    private string accountDomain = "<enter your account domain here>";
    public string AccountDomain
    {
        get => accountDomain.Trim();
        set => accountDomain = value;
    }

    [SerializeField]
    private string accountId = "<enter your account id here>";
    public string AccountId {
        get => accountId.Trim();
        set => accountId = value;
    }

    [SerializeField]
    private string accountKey = "<enter your account key here>";
    public string AccountKey {
        get => accountKey.Trim();
        set => accountKey = value;
    }

    // These settings are important. All three should be set as low as possible, while maintaining a good user experience
    // See the documentation around session management and the technical differences in session VM size
    [Header("New Session Defaults")]

    public RenderingSessionVmSize renderingSessionVmSize = RenderingSessionVmSize.Standard;
    public uint maxLeaseHours = 0;
    public uint maxLeaseMinutes = 20;

    [Header("Other Configuration")]

    [Tooltip("If you have a known active SessionID, you can fill it in here before connecting")]
    [SerializeField]
    private string sessionIDOverride;
    public string SessionIDOverride {
        get => sessionIDOverride.Trim();
        set => sessionIDOverride = value;
    }

    // When Automatic Mode is true, the coordinator will attempt to automatically proceed through the process of connecting and loading a model
    public bool automaticMode = true;

    public event Action RequestingAuthorization;
    public UnityEvent OnRequestingAuthorization = new UnityEvent();

    public event Action AuthorizedChanged;
    public UnityEvent OnAuthorizationChanged = new UnityEvent();
    private bool authorized;
    public bool Authorized
    {
        get => authorized;
        set
        {
            if (value == true) //This is a one-way value, once we're authorized it lasts until the app is shutdown.
            {
                authorized = value;
                AuthorizedChanged?.Invoke();
            }
        }
    }

    public delegate Task<SessionConfiguration> AccountInfoGetter();

    public static AccountInfoGetter ARRCredentialGetter
    {
        private get;
        set;
    }

    private RemoteRenderingState currentCoordinatorState = RemoteRenderingState.NotSet;
    public RemoteRenderingState CurrentCoordinatorState
    {
        get => currentCoordinatorState;
        private set
        {
            if (currentCoordinatorState != value)
            {
                currentCoordinatorState = value;
                Debug.LogFormat(LogType.Log, LogOption.NoStacktrace, null, "{0}", $"State changed to: {currentCoordinatorState}");
                CoordinatorStateChange?.Invoke(currentCoordinatorState);
            }
        }
    }

    public static event Action<RemoteRenderingState> CoordinatorStateChange;

    public static RenderingSession CurrentSession => instance?.ARRSessionService?.CurrentActiveSession;

    private ARRServiceUnity arrSessionService;

    private ARRServiceUnity ARRSessionService
    {
        get
        {
            if (arrSessionService == null)
                arrSessionService = GetComponent<ARRServiceUnity>();
            return arrSessionService;
        }
    }

    private async Task<SessionConfiguration> GetDevelopmentCredentials()
    {
        Debug.LogWarning("Using development credentials! Not recommended for production.");
        return await Task.FromResult(new SessionConfiguration(AccountDomain, RemoteRenderingDomain, AccountId, AccountKey));
    }

    /// <summary>
    /// Keep the last used SessionID, when launching, connect to this session if its available
    /// </summary>
    private string LastUsedSessionID
    {
        get
        {
            if (!string.IsNullOrEmpty(SessionIDOverride))
                return SessionIDOverride;

            if (PlayerPrefs.HasKey("LastUsedSessionID"))
                return PlayerPrefs.GetString("LastUsedSessionID");
            else
                return null;
        }
        set
        {
            PlayerPrefs.SetString("LastUsedSessionID", value);
        }
    }

    public void Awake()
    {
        //Forward events to Unity events
        RequestingAuthorization += () => OnRequestingAuthorization?.Invoke();
        AuthorizedChanged += () => OnAuthorizationChanged?.Invoke();

        //Attach to event
        AuthorizedChanged += RemoteRenderingCoordinator_AuthorizedChanged;

        if (instance == null)
            instance = this;
        else
            Destroy(this);

        CoordinatorStateChange += AutomaticMode;

        CurrentCoordinatorState = RemoteRenderingState.NotInitialized;
    }

    private void RemoteRenderingCoordinator_AuthorizedChanged()
    {
        if (CurrentCoordinatorState != RemoteRenderingState.NotAuthorized)
            return; //This isn't valid from any other state than NotAuthorized


        //We just became authorized to connect to Azure
        InitializeSessionService();
    }

    /// <summary>
    /// Automatic mode attempts to automatically progress through the connection and loading steps. Doesn't handle error states.
    /// </summary>
    /// <param name="currentState">The current state</param>
    private async void AutomaticMode(RemoteRenderingState currentState)
    {
        if (!automaticMode)
            return;

        //Add a small delay for visual effect
        await Task.Delay(1500);
        switch (currentState)
        {
            case RemoteRenderingState.NotInitialized:
                InitializeARR();
                break;
            case RemoteRenderingState.NotAuthorized:
                RequestAuthorization();
                break;
            case RemoteRenderingState.NoSession:
                JoinRemoteSession();
                break;
            case RemoteRenderingState.RemoteSessionReady:
                ConnectRuntimeToRemoteSession();
                break;
        }
    }

    /// <summary>
    /// Initializes ARR, associating the main camera
    /// Note: This must be called on the main Unity thread
    /// </summary>
    public void InitializeARR()
    {
        //Implement me
    }

    /// <summary>
    /// Create a new remote session manager
    /// If the ARRCredentialGetter is set, use it as it, otherwise use the development credentials
    /// </summary>
    public async void InitializeSessionService()
    {
        //Implement me
    }

    /// <summary>
    /// Trigger the event for checking authorization, respond to this event by prompting the user for authentication
    /// If authorized, set Authorized = true
    /// </summary>
    public void RequestAuthorization()
    {
        RequestingAuthorization?.Invoke();
    }

    public void BypassAuthorization()
    {
        Authorized = true;
    }

    /// <summary>
    /// Attempts to join an existing session or start a new session
    /// </summary>
    public async void JoinRemoteSession()
    {
        //Implement me
    }

    public async void StopRemoteSession()
    {
        //Implement me
    }

    private async Task<bool> IsSessionAvailable(string sessionID)
    {
        bool sessionAvailable = false;
        try
        {
            RenderingSessionPropertiesArrayResult result = await ARRSessionService.Client.GetCurrentRenderingSessionsAsync();
            if (result.ErrorCode == Result.Success)
            {
                RenderingSessionProperties[] properties = result.SessionProperties;
                if (properties != null)
                {
                    sessionAvailable = properties.Any(x => x.Id == sessionID && (x.Status == RenderingSessionStatus.Ready || x.Status == RenderingSessionStatus.Starting));
                }
            }
            else
            {
                Debug.LogError($"Failed to get current rendering sessions. Error: {result.Context.ErrorMessage}");
            }
        }
        catch (RRException ex)
        {
            Debug.LogError($"Failed to get current rendering sessions. Error: {ex.Message}");
        }
        return sessionAvailable;
    }

    /// <summary>
    /// Connects the local runtime to the current active session, if there's a session available
    /// </summary>
    public async void ConnectRuntimeToRemoteSession()
    {
        //Implement me
    }

    public void DisconnectRuntimeFromRemoteSession()
    {
        //Implement me
    }

    /// <summary>
    /// The session must have its runtime pump updated.
    /// The Connection.Update() will push messages to the server, receive messages, and update the frame-buffer with the remotely rendered content.
    /// </summary>
    private void LateUpdate()
    {
        ARRSessionService?.CurrentActiveSession?.Connection?.Update();
    }

    /// <summary>
    /// Loads a model into the remote session for rendering
    /// </summary>
    /// <param name="modelPath">The model's path</param>
    /// <param name="progress">A call back method that accepts a float progress value [0->1]</param>
    /// <param name="parent">The parent Transform for this remote entity</param>
    /// <returns>An awaitable Remote Rendering Entity</returns>
    public async Task<Entity> LoadModel(string modelPath, UnityEngine.Transform parent = null, Action<float> progress = null)
    {
        //Implement me
        return null;
    }

    private async void OnRemoteSessionStatusChanged(ARRServiceUnity caller, RenderingSession session)
    {
        var properties = await session.GetPropertiesAsync();

        switch (properties.SessionProperties.Status)
        {
            case RenderingSessionStatus.Error:
            case RenderingSessionStatus.Expired:
            case RenderingSessionStatus.Stopped:
            case RenderingSessionStatus.Unknown:
                CurrentCoordinatorState = RemoteRenderingState.NoSession;
                break;
            case RenderingSessionStatus.Starting:
                CurrentCoordinatorState = RemoteRenderingState.ConnectingToNewRemoteSession;
                break;
            case RenderingSessionStatus.Ready:
                CurrentCoordinatorState = RemoteRenderingState.RemoteSessionReady;
                break;
        }
    }

    private void OnLocalRuntimeStatusChanged(ConnectionStatus status, Result error)
    {
        switch (status)
        {
            case ConnectionStatus.Connected:
                CurrentCoordinatorState = RemoteRenderingState.RuntimeConnected;
                break;
            case ConnectionStatus.Connecting:
                CurrentCoordinatorState = RemoteRenderingState.ConnectingToRuntime;
                break;
            case ConnectionStatus.Disconnected:
                CurrentCoordinatorState = RemoteRenderingState.RemoteSessionReady;
                break;
        }
    }
}
Creare il GameObject di Rendering remoto di Azure
Il coordinatore del rendering remoto e il relativo script necessario (ARRServiceUnity) sono entrambi MonoBehavior che è necessario collegare a un GameObject nella scena. Lo script ARRServiceUnity viene fornito da Rendering remoto di Azure per esporre gran parte della funzionalità del servizio per la connessione e la gestione di sessioni remote.
- Creare un nuovo GameObject nella scena (CTRL+MAIUSC+N o GameObject-Create> Empty) e denominarlo RemoteRenderingCoordinator.
- Aggiungere lo script RemoteRenderingCoordinator al GameObject RemoteRenderingCoordinator .
- Verificare che lo script ARRServiceUnity, visualizzato come Service nella finestra di controllo, venga aggiunto automaticamente al GameObject. Questo è il risultato di avere
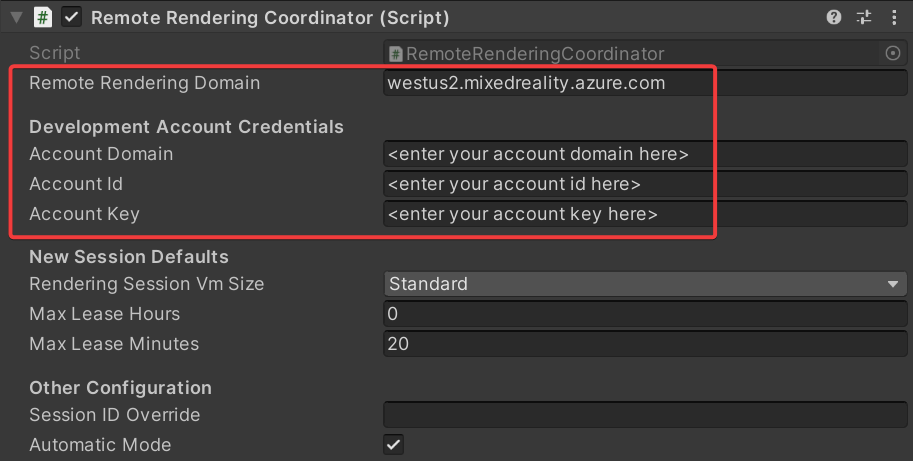
[RequireComponent(typeof(ARRServiceUnity))]all'inizio dello script RemoteRenderingCoordinator. - Aggiungere le credenziali di Azure Rendering remoto, il dominio dell'account e il dominio Rendering remoto allo script coordinatore:
Inizializzare Rendering remoto di Azure
Ora che è disponibile il framework per il coordinatore, verranno implementate ognuna delle quattro fasi a partire da Inizializza Rendering remoto.

L'inizializzazione indica a Rendering remoto di Azure quale oggetto videocamera usare per il rendering e fa avanzare la macchina a stati in NotAuthorized. Questo stato indica che è inizializzato ma non ancora autorizzato a connettersi a una sessione. Poiché l'avvio di una sessione di Rendering remoto di Azure comporta un costo, è necessario confermare che si vuole procedere.
Con il passaggio allo stato NotAuthorized, viene chiamato CheckAuthorization, che richiama l'evento RequestingAuthorization e determina quali credenziali dell'account usare (AccountInfo viene definito all'inizio della classe e usa le credenziali definite tramite la finestra di controllo di Unity nel passaggio precedente).
Nota
La ricompilazione del runtime non è supportata da Rendering remoto di Azure. Se lo script viene modificato e salvato mentre è attiva la modalità di riproduzione, è possibile che Unity si blocchi e che sia necessario arrestarlo tramite Gestione attività. Assicurarsi sempre di aver interrotto la modalità di riproduzione prima di modificare gli script.
Sostituire il contenuto di InitializeARR e InitializeSessionService con il codice completo seguente:
/// <summary>
/// Initializes ARR, associating the main camera
/// Note: This must be called on the main Unity thread
/// </summary>
public void InitializeARR()
{
    RemoteManagerUnity.InitializeManager(new RemoteUnityClientInit  (Camera.main));

    CurrentCoordinatorState = RemoteRenderingState.NotAuthorized;
}

/// <summary>
/// Create a new remote session manager
/// If the ARRCredentialGetter is set, use it as it, otherwise use  the development credentials
/// </summary>
public async void InitializeSessionService()
{
    if (ARRCredentialGetter == null)
        ARRCredentialGetter = GetDevelopmentCredentials;

    var sessionConfiguration = await ARRCredentialGetter.Invoke();

    ARRSessionService.OnSessionStatusChanged +=     OnRemoteSessionStatusChanged;

    try
    {
        ARRSessionService.Initialize(sessionConfiguration);
    }
    catch (ArgumentException argumentException)
    {
        Debug.LogError(argumentException.Message);
        CurrentCoordinatorState = RemoteRenderingState. NotAuthorized;
        return;
    }

    CurrentCoordinatorState = RemoteRenderingState.NoSession;
}
Per passare da NotAuthorized a NoSession, in genere viene presentato un dialogo modale all'utente in modo che possa scegliere (e lo facciamo in un altro capitolo). Per il momento, il controllo dell'autorizzazione viene ignorato automaticamente chiamando ByPassAuthentication non appena viene attivato l'evento RequestingAuthorization .
Selezionare il GameObject RemoteRenderingCoordinator e individuare l'evento OnRequestingAuthorization di Unity esposto nella finestra di controllo del componente RemoteRenderingCoordinator.
Aggiungere un nuovo evento premendo '+' in basso a destra.
Trascinare il componente sul proprio evento per fare riferimento a se stesso.
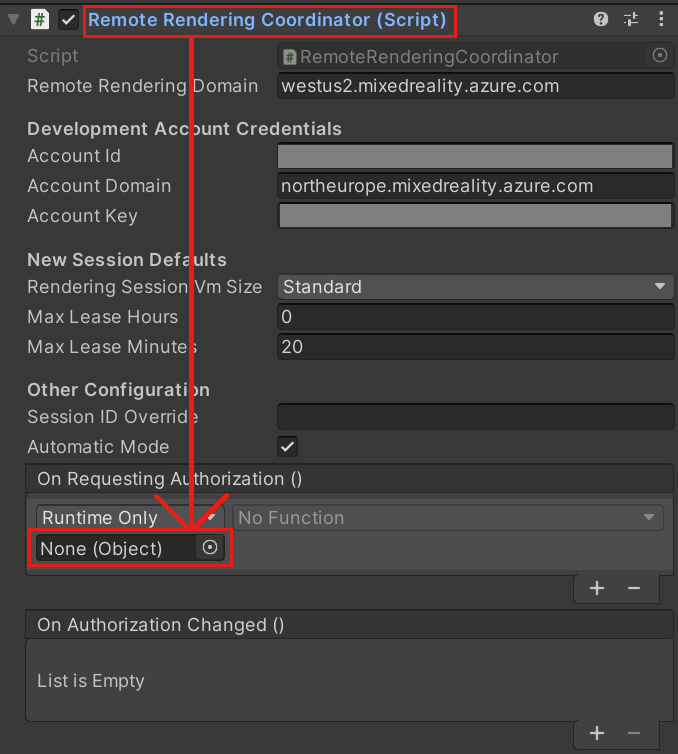
Nell'elenco a discesa selezionare RemoteRenderingCoordinator -> BypassAuthorization.

Creare o partecipare a una sessione remota
La seconda fase consiste nel creare o partecipare a una sessione di Rendering remoto . Per altre informazioni sulle sessioni di rendering, vedere sessioni di Rendering remoto.

La sessione remota è quella in cui verrà eseguito il rendering dei modelli. Il metodo JoinRemoteSession( ) tenta di partecipare a una sessione esistente, rilevata con la proprietà LastUsedSessionID o se è presente un ID sessione attivo assegnato in SessionIDOverride. SessionIDOverride è destinato solo a scopi di debug e deve essere usato esclusivamente quando si sa che la sessione esiste e si vuole stabilire una connessione in modo esplicito.
Se non sono disponibili sessioni, viene creata una nuova sessione. La creazione di una nuova sessione è, tuttavia, un'operazione che richiede molto tempo. Pertanto, è consigliabile provare a creare sessioni solo quando necessario e riutilizzarle quando possibile (vedere Commercial Ready: Session Pooling, scheduling e best practices per altre informazioni sulla gestione delle sessioni).
Suggerimento
StopRemoteSession() terminerà la sessione attiva. Per evitare addebiti inutili, arrestare sempre le sessioni quando non sono più necessarie.
La macchina a stati passerà ora a ConnectingToNewRemoteSession o ConnectingToExistingRemoteSession, a seconda delle sessioni disponibili. Sia l'apertura di una sessione esistente che la creazione di una nuova sessione attivano l'evento ARRSessionService.OnSessionStatusChanged , eseguendo il metodo OnRemoteSessionStatusChanged . Idealmente, ciò comporta l'avanzamento della macchina a stati in RemoteSessionReady.
- Per partecipare a una nuova sessione, modificare il codice per sostituire i metodi JoinRemoteSession( ) e StopRemoteSession( ) con gli esempi completi seguenti:
/// <summary>
/// Attempts to join an existing session or start a new session
/// </summary>
public async void JoinRemoteSession()
{
    //If there's a session available that previously belonged to us, and it's ready, use it. Otherwise start a new session.
    RenderingSessionProperties joinResult;
    if (await IsSessionAvailable(LastUsedSessionID))
    {
        CurrentCoordinatorState = RemoteRenderingState.ConnectingToExistingRemoteSession;
        joinResult = await ARRSessionService.OpenSession(LastUsedSessionID);
    }
    else
    {
        CurrentCoordinatorState = RemoteRenderingState.ConnectingToNewRemoteSession;
        joinResult = await ARRSessionService.StartSession(new RenderingSessionCreationOptions(renderingSessionVmSize, (int)maxLeaseHours, (int)maxLeaseMinutes));
    }

    if (joinResult.Status == RenderingSessionStatus.Ready || joinResult.Status == RenderingSessionStatus.Starting)
    {
        LastUsedSessionID = joinResult.Id;
    }
    else
    {
        //The session should be ready or starting, if it's not, something went wrong
        await ARRSessionService.StopSession();
        if(LastUsedSessionID == SessionIDOverride)
            SessionIDOverride = "";
        CurrentCoordinatorState = RemoteRenderingState.NoSession;
    }
}

public async void StopRemoteSession()
{
    if (ARRSessionService.CurrentActiveSession != null)
    {
        await ARRSessionService.CurrentActiveSession.StopAsync();
    }
}
Se si vuole risparmiare tempo riutilizzando le sessioni, assicurarsi di disattivare l'opzione Auto-Stop Session (Arresta automaticamente la sessione) nel componente ARRServiceUnity. Tenere presente che in questo modo le sessioni rimangono in esecuzione, anche se nessuno è connesso. La sessione può essere eseguita fino a quando viene raggiunto il valore di MaxLeaseTime prima che venga arrestata dal server. Il valore di MaxLeaseTime può essere modificato nel coordinatore di Rendering remoto, in New Session Defaults (Nuovi valori predefiniti della sessione). D'altra parte, se si arresta automaticamente ogni sessione quando si disconnette, è necessario attendere l'avvio di una nuova sessione ogni volta, che può essere un processo lungo.
Nota
L'arresto di una sessione avrà effetto immediato e non potrà essere annullato. Una volta arrestata, è necessario creare una nuova sessione con lo stesso sovraccarico di avvio.
Connettere il runtime locale alla sessione remota
Successivamente, l'applicazione deve connettere il runtime locale alla sessione remota.

L'applicazione deve inoltre restare in ascolto di eventi relativi alla connessione tra il runtime e la sessione corrente. Tali modifiche di stato vengono gestite in OnLocalRuntimeStatusChanged. Questo codice sposta lo stato su Connessione ingToRuntime. Dopo la connessione in OnLocalRuntimeStatusChanged, lo stato passa a Runtime Connessione ed. La connessione al runtime è l'ultimo stato di cui si occupa il coordinatore, il che significa che l'applicazione viene eseguita con tutta la configurazione comune ed è pronta per iniziare la funzione specifica della sessione, ossia il caricamento dei modelli sottoposti a rendering.
- Sostituire i metodi ConnectRuntimeToRemoteSession( ) e DisconnectRuntimeFromRemoteSession( ) con le versioni complete seguenti.
- È importante notare il metodo Unity LateUpdate e il fatto che aggiorna la sessione attiva corrente. In questo modo la sessione corrente può inviare e ricevere messaggi, nonché aggiornare il buffer dei fotogrammi con i fotogrammi ricevuti dalla sessione remota. È essenziale per il corretto funzionamento di Rendering remoto di Azure.
/// <summary>
/// Connects the local runtime to the current active session, if there's a session available
/// </summary>
public async void ConnectRuntimeToRemoteSession()
{
    if (ARRSessionService == null || ARRSessionService.CurrentActiveSession == null)
    {
        Debug.LogError("Not ready to connect runtime");
        return;
    }

    // Connect the local runtime to the currently connected session
    // This session is set when connecting to a new or existing session

    ARRSessionService.CurrentActiveSession.ConnectionStatusChanged += OnLocalRuntimeStatusChanged;
    await ARRSessionService.CurrentActiveSession.ConnectAsync(new RendererInitOptions());
}

public void DisconnectRuntimeFromRemoteSession()
{
    if (ARRSessionService == null || ARRSessionService.CurrentActiveSession == null || ARRSessionService.CurrentActiveSession.ConnectionStatus != ConnectionStatus.Connected)
    {
        Debug.LogError("Runtime not connected!");
        return;
    }

    ARRSessionService.CurrentActiveSession.Disconnect();
    ARRSessionService.CurrentActiveSession.ConnectionStatusChanged -= OnLocalRuntimeStatusChanged;
    CurrentCoordinatorState = RemoteRenderingState.RemoteSessionReady;
}
Nota
La connessione del runtime locale a una sessione remota dipende dalla chiamata a Update nella sessione attiva corrente. Se l'applicazione non avanza mai oltre lo stato ConnectingToRuntime, assicurarsi di chiamare regolarmente Update nella sessione attiva.
Caricare un modello
Con le basi necessarie, è possibile caricare un modello nella sessione remota e iniziare a ricevere fotogrammi.

Il metodo LoadModel è progettato per accettare un percorso di modelli, un gestore di stato e una trasformazione padre. Questi argomenti vengono usati per caricare un modello nella sessione remota, aggiornare l'utente sullo stato di avanzamento del caricamento e orientare il modello sottoposto a rendering remoto in base alla trasformazione padre.
Sostituire completamente il metodo LoadModel con il codice seguente:
/// <summary>
/// Loads a model into the remote session for rendering
/// </summary>
/// <param name="modelName">The model's path</param>
/// <param name="parent">The parent Transform for this remote entity</param>
/// <param name="progress">A call back method that accepts a float progress value [0->1]</param>
/// <returns>An awaitable Remote Rendering Entity</returns>
public async Task<Entity> LoadModel(string modelPath, UnityEngine.Transform parent = null, Action<float> progress = null)
{
    //Create a root object to parent a loaded model to
    var modelEntity = ARRSessionService.CurrentActiveSession.Connection.CreateEntity();

    //Get the game object representation of this entity
    var modelGameObject = modelEntity.GetOrCreateGameObject(UnityCreationMode.DoNotCreateUnityComponents);

    //Ensure the entity will sync its transform with the server
    var sync = modelGameObject.GetComponent<RemoteEntitySyncObject>();
    sync.SyncEveryFrame = true;

    //Parent the new object under the defined parent
    if (parent != null)
    {
        modelGameObject.transform.SetParent(parent, false);
        modelGameObject.name = parent.name + "_Entity";
    }

    //Load a model that will be parented to the entity
    var loadModelParams = new LoadModelFromSasOptions(modelPath, modelEntity);
    var loadModelAsync = ARRSessionService.CurrentActiveSession.Connection.LoadModelFromSasAsync(loadModelParams, progress);
    var result = await loadModelAsync;
    return modelEntity;
}
Questo codice esegue i passaggi seguenti:
- Crea un'entità remota.
- Crea un GameObject locale per rappresentare l'entità remota.
- Configurare l'oggetto GameObject locale per sincronizzarne lo stato (ovvero Transform) con l'entità remota ogni fotogramma.
- Carica i dati del modello da Archiviazione BLOB nell'entità remota.
- Restituisce l'entità padre per riferimento futuro.
Visualizza il modello di test
A questo punto è disponibile tutto il codice necessario per visualizzare un modello sottoposto a rendering remoto. Tutte e quattro le fasi necessarie per il rendering remoto sono state completate. Ora è necessario aggiungere il codice per avviare il processo di caricamento del modello.

Aggiungere il codice seguente alla classe RemoteRenderingCoordinator, subito sotto il metodo LoadModel:
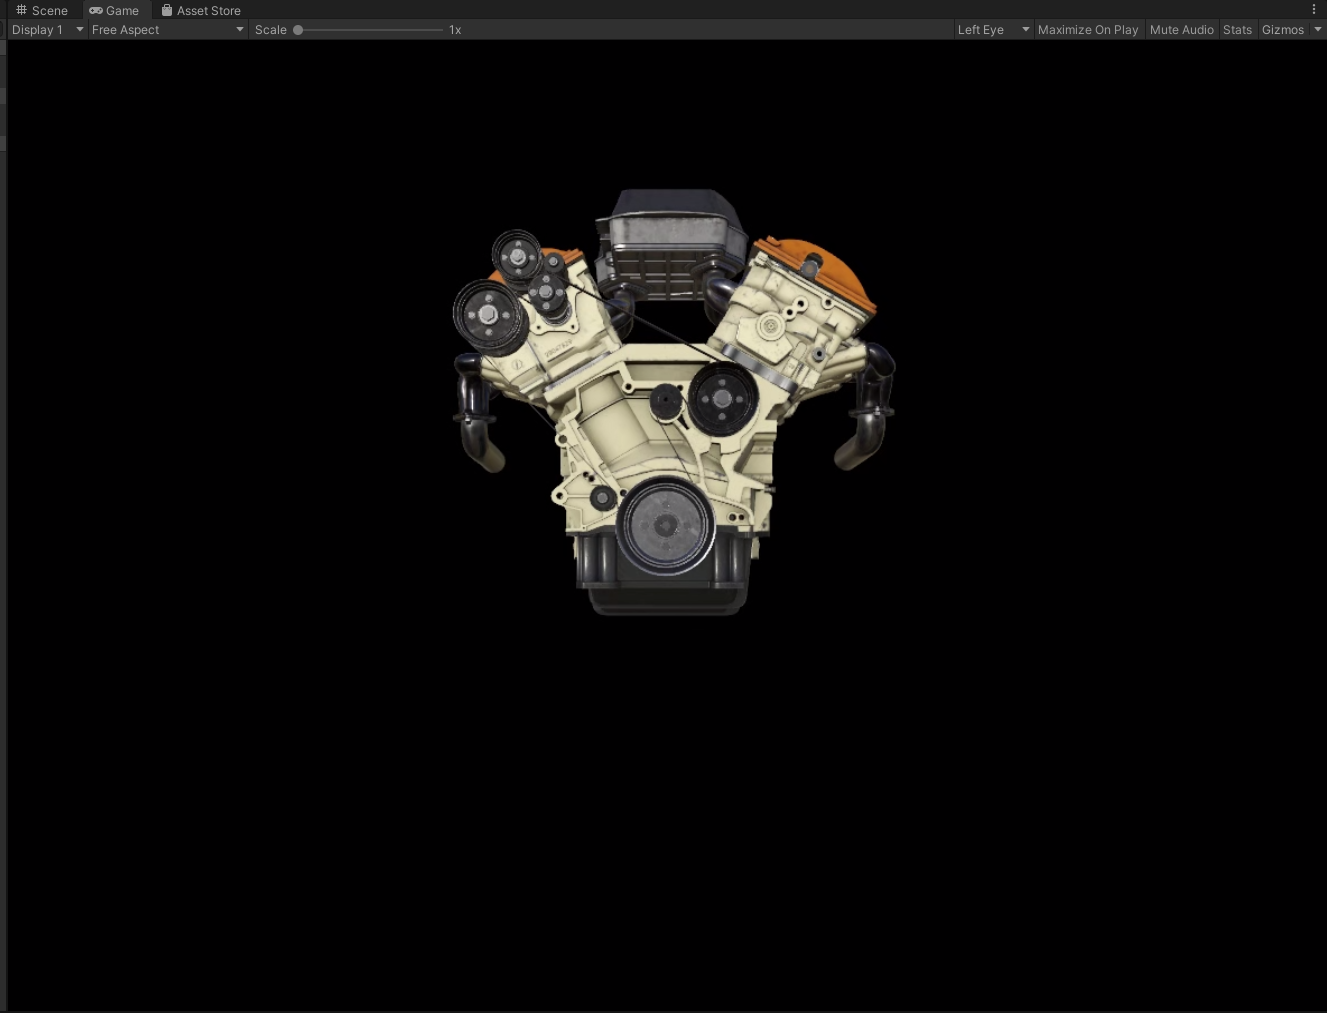
private bool loadingTestModel = false;
[ContextMenu("Load Test Model")]
public async void LoadTestModel()
{
    if(CurrentCoordinatorState != RemoteRenderingState.RuntimeConnected)
    {
        Debug.LogError("Please wait for the runtime to connect before loading the test model. Try again later.");
        return;
    }
    if(loadingTestModel)
    {
        Debug.Log("Test model already loading or loaded!");
        return;
    }
    loadingTestModel = true;

    // Create a parent object to use for positioning
    GameObject testParent = new GameObject("TestModelParent");
    testParent.transform.position = new Vector3(0f, 0f, 3f);

    // The 'built in engine path' is a special path that references a test model built into Azure Remote Rendering.
    await LoadModel("builtin://Engine", testParent.transform, (progressValue) => Debug.Log($"Loading Test Model progress: {Math.Round(progressValue * 100, 2)}%"));
}
Questo codice crea un GameObject che funge da elemento padre per il modello di test. Chiama quindi il metodo LoadModel per caricare il modello "builtin://Engine", che è un asset incorporato in Rendering remoto di Azure a scopo di test del rendering.
Salvare il codice.
Premere il pulsante Play nell'editor di Unity per avviare il processo di connessione a Rendering remoto di Azure e la creazione di una nuova sessione.
Non vedrai molto nella visualizzazione Gioco, ma la console mostra lo stato dell'applicazione che cambia. È probabile che passi a
ConnectingToNewRemoteSessione che rimanga in questo stato, possibilmente per un massimo di cinque minuti.Selezionare il GameObject RemoteRenderingCoordinator per vedere i relativi script collegati nella finestra di controllo. Osservare il componente Service che viene aggiornato tra le fasi di inizializzazione e connessione.
Monitorare l'output della console. Attendere che lo stato diventi RuntimeConnected.
Dopo la connessione del runtime, fare clic con il pulsante destro del mouse su RemoteRenderingCoordinator nella finestra di controllo per aprire il menu di scelta rapida. Selezionare quindi l'opzione Modello di test di carico nel menu di scelta rapida, aggiunta dalla
[ContextMenu("Load Test Model")]parte del codice precedente.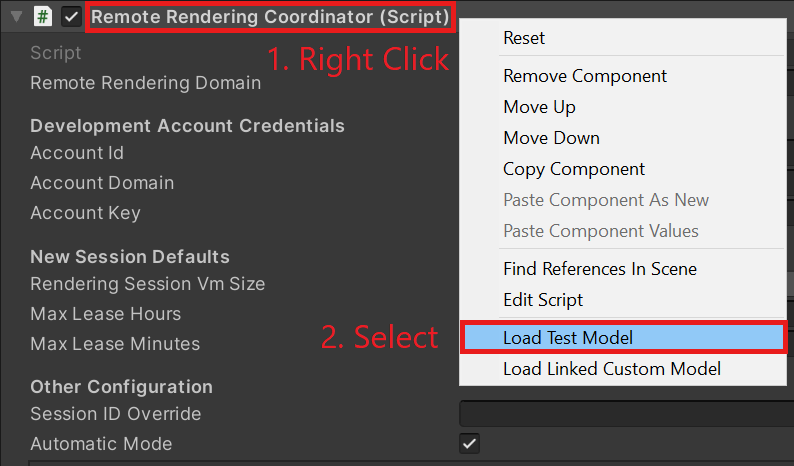
Osservare nella console l'output di ProgressHandler passato nel metodo LoadModel.
Il modello viene sottoposto a rendering remoto.
Nota
Il modello remoto non sarà mai visibile nella visualizzazione scena, ma solo nella visualizzazione gioco. Il motivo è che Rendering remoto di Azure esegue il rendering dei fotogrammi in remoto specificamente per la prospettiva della videocamera della visualizzazione gioco e non riconosce la videocamera dell'editor, usata per il rendering della visualizzazione scena.
Passaggi successivi
Congratulazioni. È stata creata un'applicazione di base in grado di visualizzare modelli sottoposti a rendering remoto con Rendering remoto di Azure. Nell'esercitazione successiva si integrerà MRTK e si importeranno i propri modelli.