Nota
L'accesso a questa pagina richiede l'autorizzazione. È possibile provare ad accedere o modificare le directory.
L'accesso a questa pagina richiede l'autorizzazione. È possibile provare a modificare le directory.
Si applica a: ✔️ macchine virtuali di Linux ✔️ set di scalabilità flessibili
Questo articolo illustra come collegare dischi nuovi ed esistenti a una macchina virtuale Linux tramite il portale di Azure. È anche possibile collegare un disco dati a una macchina virtuale Windows nel portale di Azure.
Prerequisiti
Prima di collegare i dischi alla macchina virtuale di Azure, vedere questi suggerimenti:
La dimensione della macchina virtuale controlla il numero di dischi dati che è possibile collegare. Per informazioni dettagliate, vedere Dimensioni per le macchine virtuali.
Trovare la macchina virtuale
Segui questi passaggi:
Passare al portale di Azure per trovare la macchina virtuale. Cercare e selezionare Macchine virtuali.
Selezionare la macchina virtuale a cui si vuole collegare il disco dall'elenco.
Nella pagina Macchine virtuali , in Impostazioni, selezionare Dischi.
Collegare un nuovo disco
Segui questi passaggi:
Nel riquadro Dischi selezionare Crea e collega un nuovo disco in Dischi dati.
Immettere un nome per il disco gestito. Esaminare le impostazioni predefinite e aggiornare il tipo di archiviazione, le dimensioni (GiB),la crittografia e la memorizzazione nella cache dell'host in base alle esigenze.

Al termine, selezionare Salva nella parte superiore della pagina per creare il disco gestito e aggiornare la configurazione della macchina virtuale.

Collegare un disco esistente
Segui questi passaggi:
Nel riquadro Dischi selezionare Collega dischi esistenti in Dischi dati.
Selezionare il menu a discesa per Nome disco e selezionare un disco dall'elenco dei dischi gestiti disponibili.
Selezionare Salva per collegare il disco gestito esistente e aggiornare la configurazione della macchina virtuale:
Connettersi alla macchina virtuale Linux per montare il nuovo disco
È necessario SSH nella macchina virtuale per partizionare, formattare e montare il nuovo disco in modo che la macchina virtuale di Linux possa usarlo. Per altre informazioni, vedere How to use SSH with Linux on Azure (Come usare SSH con Linux in Azure). L'esempio seguente si connette a una macchina virtuale con l'indirizzo IP pubblico 10.123.123.25 con il nome utente azureuser:
ssh azureuser@10.123.123.25
Trovare il disco
Dopo la connessione alla macchina virtuale, è necessario trovare il disco. In questo esempio viene usato lsblk per elencare i dischi.
lsblk -o NAME,HCTL,SIZE,MOUNTPOINT | grep -i "sd"
L'output è simile all'esempio seguente:
sda     0:0:0:0      30G
├─sda1             29.9G /
├─sda14               4M
└─sda15             106M /boot/efi
sdb     1:0:1:0      14G
└─sdb1               14G /mnt
sdc     3:0:0:0       4G
In questo esempio il disco aggiunto è .sdc Si tratta di un LUN 0 ed è di 4 GB.
Per un esempio più complesso, ecco l'aspetto di più dischi dati nel portale:
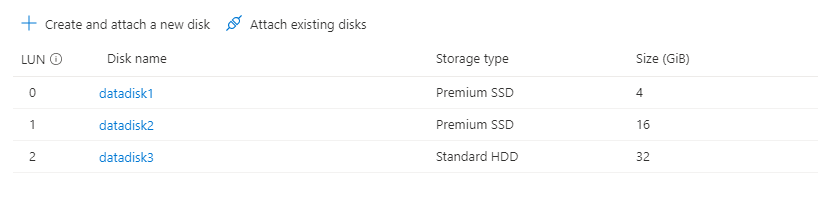
Nell'immagine è possibile notare che sono presenti tre dischi dati: 4 GB nel LUN 0, 16 GB in LUN 1 e 32G al LUN 2.
Dall'output di lsblkè possibile osservare che il disco da 4 GB al LUN 0 è sdc, il disco da 16 GB in LUN 1 è sdde il disco 32G in LUN 2 è sde.
sda     0:0:0:0      30G
├─sda1             29.9G /
├─sda14               4M
└─sda15             106M /boot/efi
sdb     1:0:1:0      14G
└─sdb1               14G /mnt
sdc     3:0:0:0       4G
sdd     3:0:0:1      16G
sde     3:0:0:2      32G
Preparare un nuovo disco vuoto
Importante
Se si usa un disco esistente che contiene dati, passare al montaggio del disco. Le istruzioni seguenti eliminano i dati sul disco.
Se si collega un nuovo disco, è necessario partizionare il disco.
L'utilità parted può essere usata per partizionare e per formattare un disco dati.
- Usare la versione
partedpiù recente disponibile per la distribuzione. - Se le dimensioni del disco sono pari a 2 tebibyte (TiB) o superiori, è necessario usare il partizionamento GPT. Se la dimensione del disco è inferiore a 2 TiB, è possibile usare il partizionamento MBR o GPT.
Nell'esempio seguente viene parted usato in /dev/sdc, in cui il primo disco dati si trova in genere nella maggior parte delle macchine virtuali. Sostituire sdc con l'opzione corretta per il disco. Viene anche formattato usando il file system XFS .
Usare l'utilità partprobe per assicurarsi che il kernel sia a conoscenza della nuova partizione e del file system. Se non si usa partprobe , i comandi blkid o lslbk non restituiscono immediatamente l'UUID per il nuovo file system.
sudo parted /dev/sdc --script mklabel gpt mkpart xfspart xfs 0% 100%
sudo mkfs.xfs /dev/sdc1
sudo partprobe /dev/sdc1
Montare il disco
Creare una directory per montare il file system usando mkdir, quindi usare mount per montare il file system. Successivamente, aggiungere l'unità al file /etc/fstab per assicurarsi che l'unità venga aggiunta automaticamente dopo un riavvio.
Assicurarsi che l'UUID (Universally Unique Identifier) venga usato in /etc/fstab per fare riferimento all'unità anziché solo al nome del dispositivo (ad esempio, /dev/sdc1). Se il sistema operativo rileva un errore del disco durante l'avvio, l'uso di UUID evita che venga montato il disco non corretto in una posizione specifica. Ai dischi dati rimanenti verrebbero quindi assegnati gli stessi ID di dispositivo. Per trovare l'UUID della nuova unità, usare l'utilità blkid .
sudo mkdir /datadrive
sudo mount /dev/sdc1 /datadrive
sudo blkid
/dev/sda1: LABEL="cloudimg-rootfs" UUID="11111111-1b1b-1c1c-1d1d-1e1e1e1e1e1e" TYPE="ext4" PARTUUID="1a1b1c1d-11aa-1234-1a1a1a1a1a1a"
/dev/sda15: LABEL="UEFI" UUID="BCD7-96A6" TYPE="vfat" PARTUUID="1e1g1cg1h-11aa-1234-1u1u1a1a1u1u"
/dev/sdb1: UUID="22222222-2b2b-2c2c-2d2d-2e2e2e2e2e2e" TYPE="ext4" TYPE="ext4" PARTUUID="1a2b3c4d-01"
/dev/sda14: PARTUUID="2e2g2cg2h-11aa-1234-1u1u1a1a1u1u"
/dev/sdc1: UUID="33333333-3b3b-3c3c-3d3d-3e3e3e3e3e3e" TYPE="xfs" PARTLABEL="xfspart" PARTUUID="c1c2c3c4-1234-cdef-asdf3456ghjk"
Modificare il file fstab
Annotazioni
Se il file /etc/fstab non viene modificato in modo corretto, il sistema potrebbe diventare non avviabile. In caso di dubbi, fare riferimento alla documentazione della distribuzione per informazioni su come modificare correttamente questo file. È necessario creare un backup del file /etc/fstab prima della modifica.
Aprire quindi il file /etc/fstab in un editor di testo. Aggiungere una riga alla fine del file, usando il valore UUID per il /dev/sdc1 dispositivo creato nei passaggi precedenti e il punto di montaggio di /datadrive. Se è stato usato l'esempio di questo articolo, la nuova riga sarà simile all'esempio seguente.
Al termine della modifica del file, salvare e chiudere l'editor.
Annotazioni
Se si rimuove successivamente un disco dati senza modificare fstab, è possibile che si verifichi un errore di avvio della VM. La maggior parte delle distribuzioni specifica le opzioni fstab nofail e/o nobootwait. Queste opzioni consentono l'avvio di un sistema anche se il montaggio del disco non riesce in fase di avvio. Per altre informazioni su questi parametri, consultare la documentazione della distribuzione.
L'opzione nofail garantisce l'avvio della macchina virtuale anche se il file system è danneggiato o il disco non esiste in fase di avvio. Senza questa opzione potrebbero verificarsi comportamenti come quelli descritti in Cannot SSH to Linux VM due to FSTAB errors (Impossibile eseguire una connessione SSH a VM Linux a causa di errori FSTAB).
UUID=33333333-3b3b-3c3c-3d3d-3e3e3e3e3e3e /datadrive xfs defaults,nofail 1 2
Verificare il disco
È ora possibile usare lsblk di nuovo per visualizzare il disco e il punto di montaggio. L'output dovrebbe quindi essere simile all'esempio.
Nell'output di esempio seguente è possibile vedere che sdc è ora montato in /datadrive.
lsblk -o NAME,HCTL,SIZE,MOUNTPOINT | grep -i "sd"
sda     0:0:0:0      30G
├─sda1             29.9G /
├─sda14               4M
└─sda15             106M /boot/efi
sdb     1:0:1:0      14G
└─sdb1               14G /mnt
sdc     3:0:0:0       4G
└─sdc1                4G /datadrive
Supporto TRIM/UNMAP per Linux in Azure
Alcuni kernel di Linux supportano operazioni TRIM/UNMAP allo scopo di rimuovere i blocchi inutilizzati sul disco. Questa funzionalità è utile principalmente per informare Azure che le pagine eliminate non sono più valide e possono essere rimosse. Questa funzionalità consente di risparmiare sui dischi fatturati in base alla quantità di spazio di archiviazione utilizzata, ad esempio dischi standard non gestiti e snapshot del disco.
Esistono due modi per abilitare la funzione TRIM in una VM Linux. Come di consueto, consultare la propria distribuzione per ottenere l'approccio consigliato.
Usare l'opzione
discarddi montaggio in /etc/fstab, ad esempio:```config UUID=33333333-3b3b-3c3c-3d3d-3e3e3e3e3e3e /datadrive xfs defaults,discard 1 2 ```In alcuni casi l'opzione
discardpuò avere implicazioni sulle prestazioni. In alternativa, è possibile eseguire il comandofstrimmanualmente dalla riga di comando oppure aggiungerlo a crontab per eseguirlo a intervalli regolari:Ubuntu
sudo apt-get install util-linux
sudo fstrim /datadrive
RHEL
sudo yum install util-linux
sudo fstrim /datadrive
SUSE
sudo zypper install util-linux
sudo fstrim /datadrive