この記事では、対象地域を検索し、検索結果を地図上に表示する方法について説明します。
対象地域を検索するには、2 つの方法があります。 1 つの方法は、TypeScript REST SDK の @azure-rest/maps-search を使用して検索要求を行うことです。 もう 1 つの方法は、Fetch API を使用して Azure Maps Fuzzy Search API に検索要求を行うことです。 どちらの方法もこの記事で説明します。
REST SDK を使用して検索要求を行う
import * as atlas from "azure-maps-control";
import MapsSearch from "@azure-rest/maps-search";
import "azure-maps-control/dist/atlas.min.css";

const onload = () => {
  // Initialize a map instance.
  const map = new atlas.Map("map", {
    view: "Auto",
    // Add authentication details for connecting to Azure Maps.
    authOptions: {
      // Use Azure Active Directory authentication.
      authType: "aad",
      clientId: "<Your Azure Maps Client ID>",
      aadAppId: "<Your Azure Active Directory Client ID>",
      aadTenant: "<Your Azure Active Directory Tenant ID>"
    }
  });

  map.events.add("load", async () => {
    // Use the access token from the map and create an object that implements the TokenCredential interface.
    const credential = {
      getToken: () => {
        return {
          token: map.authentication.getToken()
        };
      }
    };

    // Create a Search client.
    const client = MapsSearch(credential, "<Your Azure Maps Client ID>");

    // Create a data source and add it to the map.
    const datasource = new atlas.source.DataSource();
    map.sources.add(datasource);

    // Add a layer for rendering point data.
    const resultLayer = new atlas.layer.SymbolLayer(datasource);
    map.layers.add(resultLayer);

    // Search for gas stations near Seattle.
    const response = await client.path("/search/fuzzy/{format}", "json").get({
      queryParameters: {
        query: "gasoline station",
        lat: 47.6101,
        lon: -122.34255
      }
    });

    // Arrays to store bounds for results.
    const bounds = [];

    // Convert the response into Feature and add it to the data source.
    const searchPins = response.body.results.map((result) => {
      const position = [result.position.lon, result.position.lat];
      bounds.push(position);
      return new atlas.data.Feature(new atlas.data.Point(position), {
        position: result.position.lat + ", " + result.position.lon
      });
    });

     // Add the pins to the data source.
    datasource.add(searchPins);

    // Set the camera to the bounds of the pins
    map.setCamera({
      bounds: new atlas.data.BoundingBox.fromLatLngs(bounds),
      padding: 40
    });
  });
};

document.body.onload = onload;
前のコード例では、最初のブロックはマップ オブジェクトを構築し、Microsoft Entra ID を使用する認証メカニズムを設定します。 詳細については、「 マップの作成」をご参照ください。
2 番目のコード ブロックは、アクセス トークンを使用して Azure Maps への HTTP 要求を認証する TokenCredential インターフェイスを実装するオブジェクトを作成します。 次に、資格情報オブジェクトを MapsSearch に渡し、クライアントのインスタンスを作成します。
3 番目のコード ブロックでは、 DataSource クラスを使用してデータ ソース オブジェクトを作成し、それに検索結果を追加します。 シンボル レイヤーでは、テキストまたはアイコンを使用して、DataSource でラップされたポイントベースのデータをマップ上のシンボルとしてレンダリングします。 その後、シンボル レイヤーが作成されます。 データ ソースがシンボル レイヤーに追加され、シンボル レイヤーがマップに追加されます。
4 番目のコード ブロックは、 MapsSearch クライアントで GET 要求を行います。 これにより、Get Search Fuzzy REST APIを介して自由形式のテキスト検索を実行し、関心のあるポイントを検索できます。 Search Fuzzy API への Get 要求は、あいまい入力の任意の組み合わせを処理できます。 その後、応答は Feature オブジェクトに変換され、データ ソースに追加されるため、データは自動的にシンボル レイヤーを介してマップ上にレンダリングされます。
コードの最後のブロックは、Map の setCamera プロパティを使用して、マップのカメラ境界を調整します。
検索リクエスト、データ ソース、シンボル レイヤー、およびカメラの境界は、マップの イベント リスナー 内にあります。 マップが完全に読み込まれた後に結果が表示されるようにする必要があります。
Fetch API を使用して検索要求を行う
import * as atlas from "azure-maps-control";
import "azure-maps-control/dist/atlas.min.css";

const onload = () => {
  // Initialize a map instance.
  const map = new atlas.Map("map", {
    view: "Auto",
    // Add authentication details for connecting to Azure Maps.
    authOptions: {
      // Use Azure Active Directory authentication.
      authType: "aad",
      clientId: "<Your Azure Maps Client ID>",
      aadAppId: "<Your Azure Active Directory Client ID>",
      aadTenant: "<Your Azure Active Directory Tenant ID>"
    }
  });

  map.events.add("load", () => {
    // Create a data source and add it to the map.
    const datasource = new atlas.source.DataSource();
    map.sources.add(datasource);

    // Add a layer for rendering point data.
    const resultLayer = new atlas.layer.SymbolLayer(datasource);
    map.layers.add(resultLayer);

    // Send a request to Azure Maps Search API
    let url = "https://atlas.microsoft.com/search/fuzzy/json?";
    url += "&api-version=1";
    url += "&query=gasoline%20station";
    url += "&lat=47.6101";
    url += "&lon=-122.34255";
    url += "&radius=100000";

    // Parse the API response and create a pin on the map for each result
    fetch(url, {
      headers: {
        Authorization: "Bearer " + map.authentication.getToken(),
        "x-ms-client-id": "<Your Azure Maps Client ID>"
      }
    })
      .then((response) => response.json())
      .then((response) => {
        // Arrays to store bounds for results.
        const bounds = [];

        // Convert the response into Feature and add it to the data source.
        const searchPins = response.results.map((result) => {
          const position = [result.position.lon, result.position.lat];
          bounds.push(position);
          return new atlas.data.Feature(new atlas.data.Point(position), {
            position: result.position.lat + ", " + result.position.lon
          });
        });

        // Add the pins to the data source.
        datasource.add(searchPins);

        // Set the camera to the bounds of the pins
        map.setCamera({
          bounds: new atlas.data.BoundingBox.fromLatLngs(bounds),
          padding: 40
        });
      });
  });
};

document.body.onload = onload;
前のコード例では、最初のコード ブロックでマップ オブジェクトを構築しています。 Microsoft Entra ID を使用するように認証メカニズムを設定します。 詳細については、「 マップの作成」をご参照ください。
コードの 2 番目のブロックでは、 DataSource クラスを使用してデータ ソース オブジェクトを作成し、検索結果を追加します。 シンボル レイヤーでは、テキストまたはアイコンを使用して、DataSource でラップされたポイントベースのデータをマップ上のシンボルとしてレンダリングします。 その後、シンボル レイヤーが作成されます。 データ ソースがシンボル レイヤーに追加され、シンボル レイヤーがマップに追加されます。
コードの 3 番目のブロックは、検索要求を行う URL を作成します。
コードの 4 番目のブロックでは、 Fetch API を使用します。 Fetch API は、Azure Maps のあいまい検索 API に要求を送信して、関心のあるポイントを検索するために使用されます。 あいまい検索 API は、あいまい入力の任意の組み合わせを処理できます。 次に、検索応答を処理および解析し、結果ピンを searchPins 配列に追加します。
最後のコード ブロックは、 BoundingBox オブジェクトを作成します。 結果の配列を使用し、マップの setCameraを使用してマップのカメラ境界を調整します。 その後、結果ピンをレンダリングします。
検索リクエスト、データ ソース、シンボル レイヤー、およびカメラの境界は、マップの イベント リスナー 内で設定され、マップが完全に読み込まれた後に結果が表示されるようにします。
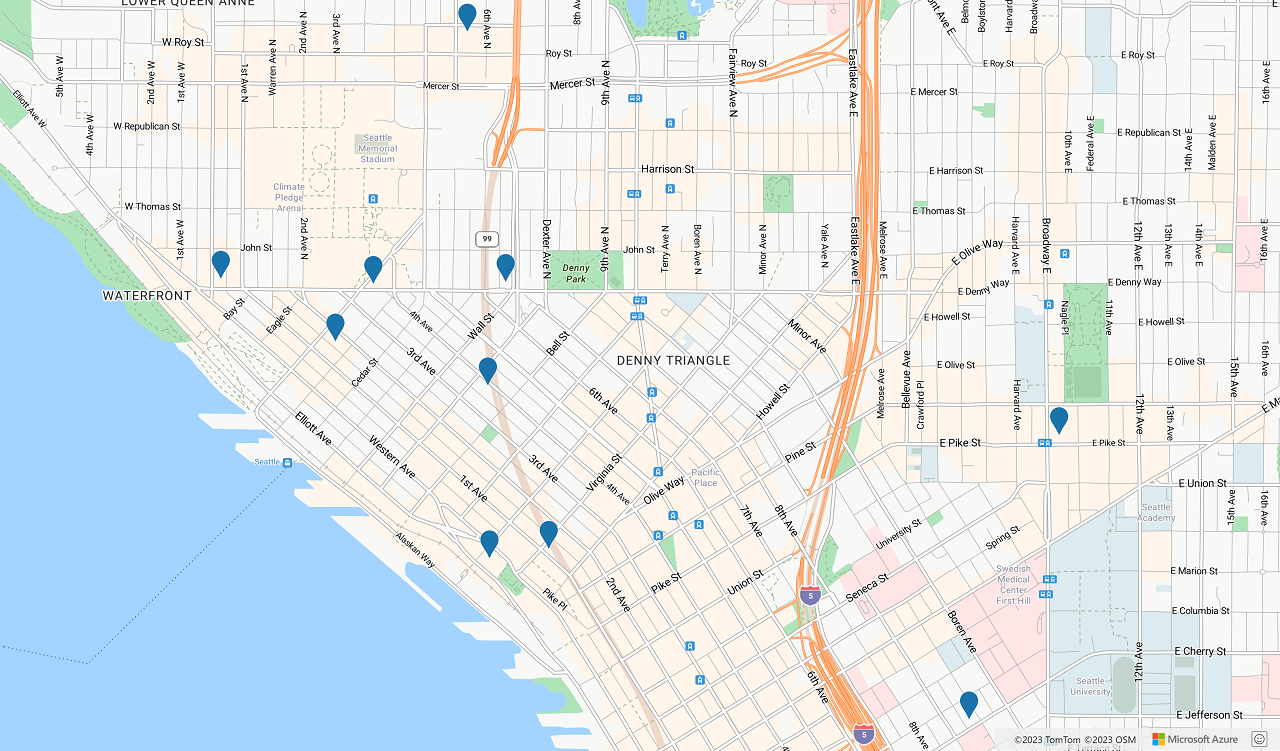
次の図は、2 つのコード サンプルの結果を示すスクリーンショットです。
次のステップ
あいまい検索の詳細については、以下をご覧ください。
この記事で使われているクラスとメソッドの詳細については、次を参照してください。
完全なコードの例については、次の記事を参照してください。