ASP.NET Core の Identity の概要
作成者: Rick Anderson
ASP.NET Core Identity:
- ユーザー インターフェイス (UI) ログイン機能をサポートする API です。
- ユーザー、パスワード、プロファイル データ、ロール、要求、トークン、電子メールの確認などを管理します。
ユーザーは、Identity に格納されているログイン情報を使用してアカウントを作成することができます。あるいは、外部ログイン プロバイダーを使用できます。 サポートされている外部ログイン プロバイダーには、Facebook、Google、Microsoft アカウント、Twitter があります。
すべてのユーザーの認証をグローバルに要求する方法の詳細については、「認証されたユーザーを要求する」を参照してください。
Identity ソース コードは GitHub で入手できます。 Identity をスキャフォールディングし、生成されたファイルを表示してテンプレートと Identity とのやりとりを確認します。
Identity は通常、ユーザー名、パスワード、およびプロファイル データを格納するために SQL Server データベースを使用して構成されます。 別の固定ストア (たとえば、Azure Table Storage) を使用することもできます。
このトピックでは、Identity を使用して、ユーザーの登録、ログイン、およびログアウトを行う方法について学習します。 注: テンプレートでは、ユーザーのユーザー名と電子メールを同じものとして扱います。 Identity を使用するアプリの作成に関する詳細な手順については、「次の手順」を参照してください。
ASP.NET Core Identity は、Microsoft ID プラットフォームとは関係ありません。 Microsoft ID プラットフォームは、
- Azure Active Directory (Azure AD) 開発者プラットフォームが進化したものです。
- ASP.NET Core アプリでの認証と認可のための代替 ID ソリューションです。
ASP.NET Core Identity では、ASP.NET Core Web アプリにユーザー インターフェイス (UI) ログイン機能が追加されます。 Web API と SPA をセキュリティで保護するには、次のいずれかを使用します。
- Microsoft Entra ID
- Azure Active Directory B2C (Azure AD B2C)
- Duende Identity Server
Duende Identity Server は、ASP.NET Core 用の OpenID Connect および OAuth 2.0 フレームワークです。 Duende Identity Server により、次のセキュリティ機能が有効になります。
- サービスとしての認証 (AaaS)
- 複数のアプリケーションの種類でのシングル サインオン/オフ (SSO)
- API のアクセス制御
- Federation Gateway
重要
Duende Software により、Duende Identity Server を実稼働で使用することのライセンス料の支払いが求められる場合があります。 詳細については、「ASP.NET Core 5.0 から 6.0 への移行」を参照してください。
詳細については、Duende Identity Server に関するドキュメント (Duende ソフトウェアの Web サイト) を参照してください。
サンプル コードを表示またはダウンロードします (ダウンロード方法)。
認証を使用して Web アプリを作成する
個々のユーザー アカウントを使用して、ASP.NET Core Web アプリケーション プロジェクトを作成します。
- [ASP.NET Core Web アプリ] テンプレートを選択します。 プロジェクトに WebApp1 という名前を付け、プロジェクトのダウンロードと同じ名前空間を使用します。 [OK] をクリックします。
- [認証の種類] の入力で、[個々のユーザー アカウント] を選択します。
生成されたプロジェクトによって、ASP.NET Core Identity が Razor クラス ライブラリとして指定されます。 IdentityRazor クラス ライブラリによって、Identity 領域を持つエンドポイントが公開されます。 次に例を示します。
- /Identity/Account/Login
- /Identity/Account/Logout
- /Identity/Account/Manage
移行を適用する
移行を適用してデータベースを初期化します。
パッケージ マネージャー コンソール (PMC) で次のコマンドを実行します。
Update-Database
登録とログインをテストする
アプリを実行し、ユーザーを登録します。 ご利用の画面のサイズによっては、ナビゲーション トグル ボタンを選択して [登録] および [ログイン] リンクを表示する必要がある場合があります。
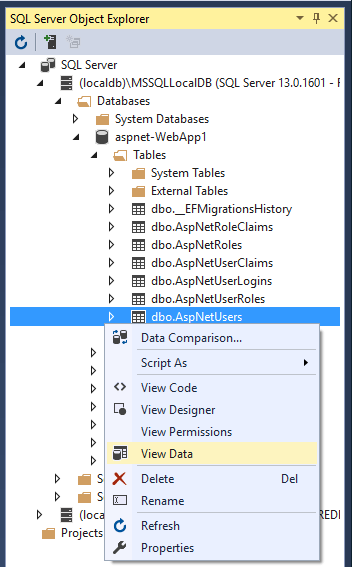
Identity データベースを表示する
- [表示] メニューから [SQL Server オブジェクト エクスプローラー] (SSOX) を選択します。
- (localdb)MSSQLLocalDB(SQL Server 13) に移動します。 dbo.AspNetUsers>View Data を右クリックします。
Identity サービスを構成する
サービスは Program.cs に追加されます。 一般的なパターンは、次の順序でメソッドを呼び出すことです。
Add{Service}builder.Services.Configure{Service}
using Microsoft.AspNetCore.Identity;
using Microsoft.EntityFrameworkCore;
using WebApp1.Data;

var builder = WebApplication.CreateBuilder(args);

var connectionString = builder.Configuration.GetConnectionString("DefaultConnection");
builder.Services.AddDbContext<ApplicationDbContext>(options =>
    options.UseSqlServer(connectionString));
builder.Services.AddDatabaseDeveloperPageExceptionFilter();

builder.Services.AddDefaultIdentity<IdentityUser>(options => options.SignIn.RequireConfirmedAccount = true)
    .AddEntityFrameworkStores<ApplicationDbContext>();
builder.Services.AddRazorPages();

builder.Services.Configure<IdentityOptions>(options =>
{
    // Password settings.
    options.Password.RequireDigit = true;
    options.Password.RequireLowercase = true;
    options.Password.RequireNonAlphanumeric = true;
    options.Password.RequireUppercase = true;
    options.Password.RequiredLength = 6;
    options.Password.RequiredUniqueChars = 1;

    // Lockout settings.
    options.Lockout.DefaultLockoutTimeSpan = TimeSpan.FromMinutes(5);
    options.Lockout.MaxFailedAccessAttempts = 5;
    options.Lockout.AllowedForNewUsers = true;

    // User settings.
    options.User.AllowedUserNameCharacters =
    "abcdefghijklmnopqrstuvwxyzABCDEFGHIJKLMNOPQRSTUVWXYZ0123456789-._@+";
    options.User.RequireUniqueEmail = false;
});

builder.Services.ConfigureApplicationCookie(options =>
{
    // Cookie settings
    options.Cookie.HttpOnly = true;
    options.ExpireTimeSpan = TimeSpan.FromMinutes(5);

    options.LoginPath = "/Identity/Account/Login";
    options.AccessDeniedPath = "/Identity/Account/AccessDenied";
    options.SlidingExpiration = true;
});

var app = builder.Build();

if (app.Environment.IsDevelopment())
{
    app.UseMigrationsEndPoint();
}
else
{
    app.UseExceptionHandler("/Error");
    app.UseHsts();
}

app.UseHttpsRedirection();
app.UseStaticFiles();

app.UseRouting();

app.UseAuthentication();
app.UseAuthorization();

app.MapRazorPages();

app.Run();
前のコードでは、既定のオプション値で Identity を構成します。 サービスは、依存性の挿入を介してアプリで使用できるようになります。
Identity は、UseAuthentication を呼び出すことによって有効になります。 UseAuthentication では、要求パイプラインに認証ミドルウェアを追加します。
テンプレートで生成されたアプリでは、承認は使用されません。 app.UseAuthorization は、アプリで承認が追加された場合に確実に正しい順序で追加されるようにするために含まれています。 UseRouting、UseAuthentication、UseAuthorization は、前のコードに示されている順序で呼び出す必要があります。
IdentityOptions の詳細については、「IdentityOptions」およびアプリケーションの起動に関するページを参照してください。
Register、Login、LogOut、および RegisterConfirmation をスキャフォールディングする
Register、Login、LogOut、および RegisterConfirmation ファイルを追加します。 「承認を使用して Razor プロジェクトに Identity をスキャフォールディングする」の手順に従って、このセクションに示されているコードを生成します。
登録を確認する
ユーザーが Register ページの [登録] ボタンをクリックすると、RegisterModel.OnPostAsync アクションが呼び出されます。 ユーザーは、_userManager オブジェクトで CreateAsync(TUser) によって作成されます。
public async Task<IActionResult> OnPostAsync(string returnUrl = null)
{
    returnUrl = returnUrl ?? Url.Content("~/");
    ExternalLogins = (await _signInManager.GetExternalAuthenticationSchemesAsync())
                                          .ToList();
    if (ModelState.IsValid)
    {
        var user = new IdentityUser { UserName = Input.Email, Email = Input.Email };
        var result = await _userManager.CreateAsync(user, Input.Password);
        if (result.Succeeded)
        {
            _logger.LogInformation("User created a new account with password.");

            var code = await _userManager.GenerateEmailConfirmationTokenAsync(user);
            code = WebEncoders.Base64UrlEncode(Encoding.UTF8.GetBytes(code));
            var callbackUrl = Url.Page(
                "/Account/ConfirmEmail",
                pageHandler: null,
                values: new { area = "Identity", userId = user.Id, code = code },
                protocol: Request.Scheme);

            await _emailSender.SendEmailAsync(Input.Email, "Confirm your email",
                $"Please confirm your account by <a href='{HtmlEncoder.Default.Encode(callbackUrl)}'>clicking here</a>.");

            if (_userManager.Options.SignIn.RequireConfirmedAccount)
            {
                return RedirectToPage("RegisterConfirmation",
                                      new { email = Input.Email });
            }
            else
            {
                await _signInManager.SignInAsync(user, isPersistent: false);
                return LocalRedirect(returnUrl);
            }
        }
        foreach (var error in result.Errors)
        {
            ModelState.AddModelError(string.Empty, error.Description);
        }
    }

    // If we got this far, something failed, redisplay form
    return Page();
}
既定のアカウント検証を無効にする
既定のテンプレートでは、ユーザーは Account.RegisterConfirmation にリダイレクトされ、アカウントを確認するリンクを選択できます。 既定値 Account.RegisterConfirmation は、テスト目的で "のみ" 使用されます。運用アプリでは、自動アカウント検証を無効にしてください。
確認済みのアカウントを必須にして、登録時に即時ログインできないようにするには、/Areas/Identity/Pages/Account/RegisterConfirmation.cshtml.cs に DisplayConfirmAccountLink = false を設定します。
[AllowAnonymous]
public class RegisterConfirmationModel : PageModel
{
    private readonly UserManager<IdentityUser> _userManager;
    private readonly IEmailSender _sender;

    public RegisterConfirmationModel(UserManager<IdentityUser> userManager, IEmailSender sender)
    {
        _userManager = userManager;
        _sender = sender;
    }

    public string Email { get; set; }

    public bool DisplayConfirmAccountLink { get; set; }

    public string EmailConfirmationUrl { get; set; }

    public async Task<IActionResult> OnGetAsync(string email, string returnUrl = null)
    {
        if (email == null)
        {
            return RedirectToPage("/Index");
        }

        var user = await _userManager.FindByEmailAsync(email);
        if (user == null)
        {
            return NotFound($"Unable to load user with email '{email}'.");
        }

        Email = email;
        // Once you add a real email sender, you should remove this code that lets you confirm the account
        DisplayConfirmAccountLink = false;
        if (DisplayConfirmAccountLink)
        {
            var userId = await _userManager.GetUserIdAsync(user);
            var code = await _userManager.GenerateEmailConfirmationTokenAsync(user);
            code = WebEncoders.Base64UrlEncode(Encoding.UTF8.GetBytes(code));
            EmailConfirmationUrl = Url.Page(
                "/Account/ConfirmEmail",
                pageHandler: null,
                values: new { area = "Identity", userId = userId, code = code, returnUrl = returnUrl },
                protocol: Request.Scheme);
        }

        return Page();
    }
}
ログイン
ログイン フォームは次の場合に表示されます。
- [ログイン] リンクが選択されている。
- ユーザーが、アクセスを承認されていない、またはシステムによって認証されていない場合に、制限付きページにアクセスしようとした。
[ログイン] ページのフォームが送信されると、OnPostAsync アクションが呼び出されます。 PasswordSignInAsync は _signInManager オブジェクトで呼び出されます。
public async Task<IActionResult> OnPostAsync(string returnUrl = null)
{
    returnUrl = returnUrl ?? Url.Content("~/");

    if (ModelState.IsValid)
    {
        // This doesn't count login failures towards account lockout
        // To enable password failures to trigger account lockout,
        // set lockoutOnFailure: true
        var result = await _signInManager.PasswordSignInAsync(Input.Email,
                           Input.Password, Input.RememberMe, lockoutOnFailure: true);
        if (result.Succeeded)
        {
            _logger.LogInformation("User logged in.");
            return LocalRedirect(returnUrl);
        }
        if (result.RequiresTwoFactor)
        {
            return RedirectToPage("./LoginWith2fa", new
            {
                ReturnUrl = returnUrl,
                RememberMe = Input.RememberMe
            });
        }
        if (result.IsLockedOut)
        {
            _logger.LogWarning("User account locked out.");
            return RedirectToPage("./Lockout");
        }
        else
        {
            ModelState.AddModelError(string.Empty, "Invalid login attempt.");
            return Page();
        }
    }

    // If we got this far, something failed, redisplay form
    return Page();
}
承認の決定を行う方法に関する詳細については、「ASP.NET Core での認可の概要」を参照してください。
ログアウト
[ログアウト] リンクによって LogoutModel.OnPost アクションが呼び出されます。
using Microsoft.AspNetCore.Authorization;
using Microsoft.AspNetCore.Identity;
using Microsoft.AspNetCore.Mvc;
using Microsoft.AspNetCore.Mvc.RazorPages;
using Microsoft.Extensions.Logging;
using System.Threading.Tasks;

namespace WebApp1.Areas.Identity.Pages.Account
{
    [AllowAnonymous]
    public class LogoutModel : PageModel
    {
        private readonly SignInManager<IdentityUser> _signInManager;
        private readonly ILogger<LogoutModel> _logger;

        public LogoutModel(SignInManager<IdentityUser> signInManager, ILogger<LogoutModel> logger)
        {
            _signInManager = signInManager;
            _logger = logger;
        }

        public void OnGet()
        {
        }

        public async Task<IActionResult> OnPost(string returnUrl = null)
        {
            await _signInManager.SignOutAsync();
            _logger.LogInformation("User logged out.");
            if (returnUrl != null)
            {
                return LocalRedirect(returnUrl);
            }
            else
            {
                return RedirectToPage();
            }
        }
    }
}
前のコードでは、ブラウザーで新しい要求が実行され、ユーザーの ID が更新されるように、コード return RedirectToPage(); をリダイレクトする必要があります。
SignOutAsync により、cookie に格納されているユーザーのクレームがクリアされます。
post は、Pages/Shared/_LoginPartial.cshtml で指定されます。
@using Microsoft.AspNetCore.Identity
@inject SignInManager<IdentityUser> SignInManager
@inject UserManager<IdentityUser> UserManager

<ul class="navbar-nav">
@if (SignInManager.IsSignedIn(User))
{
    <li class="nav-item">
        <a  class="nav-link text-dark" asp-area="Identity" asp-page="/Account/Manage/Index"
                                              title="Manage">Hello @User.Identity.Name!</a>
    </li>
    <li class="nav-item">
        <form class="form-inline" asp-area="Identity" asp-page="/Account/Logout"
                                  asp-route-returnUrl="@Url.Page("/", new { area = "" })"
                                  method="post" >
            <button  type="submit" class="nav-link btn btn-link text-dark">Logout</button>
        </form>
    </li>
}
else
{
    <li class="nav-item">
        <a class="nav-link text-dark" asp-area="Identity" asp-page="/Account/Register">Register</a>
    </li>
    <li class="nav-item">
        <a class="nav-link text-dark" asp-area="Identity" asp-page="/Account/Login">Login</a>
    </li>
}
</ul>
Identity をテストする
既定の Web プロジェクト テンプレートでは、ホーム ページへの匿名アクセスが許可されます。 Identity をテストするには、[Authorize] を追加します。
using Microsoft.AspNetCore.Authorization;
using Microsoft.AspNetCore.Mvc.RazorPages;
using Microsoft.Extensions.Logging;

namespace WebApp1.Pages
{
    [Authorize]
    public class PrivacyModel : PageModel
    {
        private readonly ILogger<PrivacyModel> _logger;

        public PrivacyModel(ILogger<PrivacyModel> logger)
        {
            _logger = logger;
        }

        public void OnGet()
        {
        }
    }
}
サインインしている場合は、サインアウトします。アプリを実行し、Privacy リンクを選択します。 ログイン ページにリダイレクトされます。
Identity を調べる
Identity をさらに詳しく調べるには、次のようにします。
- 完全な Identity UI ソースを作成する
- 各ページのソースを調べて、デバッガーをステップ実行する。
Identity のコンポーネント
Identity に依存するすべての NuGet パッケージは、ASP.NET Core 共有フレームワークに含まれています。
Identity のプライマリ パッケージは Microsoft.AspNetCore.Identity です。 このパッケージには、ASP.NET Core Identity 用のインターフェイスのコア セットが含まれており、Microsoft.AspNetCore.Identity.EntityFrameworkCore によって含められます。
ASP.NET Core Identity への移行
既存の Identity ストアの移行に関する詳細とガイダンスについては、認証と Identity の移行に関するページを参照してください。
パスワードの強度の設定
パスワードの最小要件を設定するサンプルについては、「構成」を参照してください。
AddDefaultIdentity と AddIdentity
AddDefaultIdentity は ASP.NET Core 2.1 で導入されました。 AddDefaultIdentity の呼び出しは次の呼び出しに似ています。
詳細については、AddDefaultIdentity ソースに関するページを参照してください。
静的 Identity アセットを発行しないようにする
静的 Identity アセット (Identity UI 用のスタイルシートと JavaScript ファイル) が Web ルートに発行されるのを防ぐには、次の ResolveStaticWebAssetsInputsDependsOn プロパティと RemoveIdentityAssets ターゲットをアプリのプロジェクト ファイルに追加します。
<PropertyGroup>
  <ResolveStaticWebAssetsInputsDependsOn>RemoveIdentityAssets</ResolveStaticWebAssetsInputsDependsOn>
</PropertyGroup>

<Target Name="RemoveIdentityAssets">
  <ItemGroup>
    <StaticWebAsset Remove="@(StaticWebAsset)" Condition="%(SourceId) == 'Microsoft.AspNetCore.Identity.UI'" />
  </ItemGroup>
</Target>
次の手順
- SQLite を使用する Identity の構成については、こちらの GitHub イシューを参照してください。
- Identity を構成する
- 承認によって保護されたユーザー データでの ASP.NET Core アプリの作成
- ASP.NET Core プロジェクトで Identity へのユーザー データを追加、ダウンロード、削除する
- ASP.NET Core で TOTP 認証アプリ用の QR コードを生成できるようにする
- ASP.NET Core への認証と Identity の移行
- ASP.NET Core でのアカウントの確認とパスワードの回復
- ASP.NET Core での SMS を使用した 2 要素認証
- Web ファームでの ASP.NET Core のホスト
作成者: Rick Anderson
ASP.NET Core Identity:
- ユーザー インターフェイス (UI) ログイン機能をサポートする API です。
- ユーザー、パスワード、プロファイル データ、ロール、要求、トークン、電子メールの確認などを管理します。
ユーザーは、Identity に格納されているログイン情報を使用してアカウントを作成することができます。あるいは、外部ログイン プロバイダーを使用できます。 サポートされている外部ログイン プロバイダーには、Facebook、Google、Microsoft アカウント、Twitter があります。
すべてのユーザーの認証をグローバルに要求する方法の詳細については、「認証されたユーザーを要求する」を参照してください。
Identity ソース コードは GitHub で入手できます。 Identity をスキャフォールディングし、生成されたファイルを表示してテンプレートと Identity とのやりとりを確認します。
Identity は通常、ユーザー名、パスワード、およびプロファイル データを格納するために SQL Server データベースを使用して構成されます。 別の固定ストア (たとえば、Azure Table Storage) を使用することもできます。
このトピックでは、Identity を使用して、ユーザーの登録、ログイン、およびログアウトを行う方法について学習します。 注: テンプレートでは、ユーザーのユーザー名と電子メールを同じものとして扱います。 Identity を使用するアプリの作成に関する詳細な手順については、「次の手順」を参照してください。
- Azure Active Directory (Azure AD) 開発者プラットフォームが進化したものです。
- ASP.NET Core アプリでの認証と認可のための代替 ID ソリューションです。
- ASP.NET Core Identity とは関係ありません。
ASP.NET Core Identity では、ASP.NET Core Web アプリにユーザー インターフェイス (UI) ログイン機能が追加されます。 Web API と SPA をセキュリティで保護するには、次のいずれかを使用します。
- Microsoft Entra ID
- Azure Active Directory B2C (Azure AD B2C)
- Duende IdentityServer。 Duende IdentityServer はサードパーティ製品です。
Duende IdentityServer は、ASP.NET Core 用の OpenID Connect および OAuth 2.0 フレームワークです。 Duende IdentityServer により、次のセキュリティ機能が有効になります。
- サービスとしての認証 (AaaS)
- 複数のアプリケーションの種類でのシングル サインオン/オフ (SSO)
- API のアクセス制御
- Federation Gateway
詳細については、Duende IdentityServer の概要に関するページを参照してください。
その他の認証プロバイダーについて詳しくは、「ASP.NET Core のコミュニティ OSS 認証オプション」を参照してください
サンプル コードを表示またはダウンロードします (ダウンロード方法)。
認証を使用して Web アプリを作成する
個々のユーザー アカウントを使用して、ASP.NET Core Web アプリケーション プロジェクトを作成します。
- [File]>[New]>[Project] の順に選択します。
- [ASP.NET Core Web アプリケーション] を選択します。 プロジェクトに WebApp1 という名前を付け、プロジェクトのダウンロードと同じ名前空間を使用します。 [OK] をクリックします。
- ASP.NET Core Web アプリケーションを選んでから、[認証の変更] を選択します。
- [個々のユーザー アカウント] を選択し、[OK] をクリックします。
生成されたプロジェクトによって、ASP.NET Core Identity が Razor クラス ライブラリとして指定されます。 IdentityRazor クラス ライブラリによって、Identity 領域を持つエンドポイントが公開されます。 次に例を示します。
- /Identity/Account/Login
- /Identity/Account/Logout
- /Identity/Account/Manage
移行を適用する
移行を適用してデータベースを初期化します。
パッケージ マネージャー コンソール (PMC) で次のコマンドを実行します。
PM> Update-Database
登録とログインをテストする
アプリを実行し、ユーザーを登録します。 ご利用の画面のサイズによっては、ナビゲーション トグル ボタンを選択して [登録] および [ログイン] リンクを表示する必要がある場合があります。
Identity データベースを表示する
- [表示] メニューから [SQL Server オブジェクト エクスプローラー] (SSOX) を選択します。
- (localdb)MSSQLLocalDB(SQL Server 13) に移動します。 dbo.AspNetUsers>View Data を右クリックします。
Identity サービスを構成する
サービスは ConfigureServices に追加されます。 一般的なパターンは、すべての Add{Service} メソッドを呼び出した後、すべての services.Configure{Service} メソッドを呼び出すことです。
public void ConfigureServices(IServiceCollection services)
{
    services.AddDbContext<ApplicationDbContext>(options =>
     // options.UseSqlite(
        options.UseSqlServer(
            Configuration.GetConnectionString("DefaultConnection")));
    services.AddDefaultIdentity<IdentityUser>(options => options.SignIn.RequireConfirmedAccount = true)
        .AddEntityFrameworkStores<ApplicationDbContext>();
    services.AddRazorPages();

    services.Configure<IdentityOptions>(options =>
    {
        // Password settings.
        options.Password.RequireDigit = true;
        options.Password.RequireLowercase = true;
        options.Password.RequireNonAlphanumeric = true;
        options.Password.RequireUppercase = true;
        options.Password.RequiredLength = 6;
        options.Password.RequiredUniqueChars = 1;

        // Lockout settings.
        options.Lockout.DefaultLockoutTimeSpan = TimeSpan.FromMinutes(5);
        options.Lockout.MaxFailedAccessAttempts = 5;
        options.Lockout.AllowedForNewUsers = true;

        // User settings.
        options.User.AllowedUserNameCharacters =
        "abcdefghijklmnopqrstuvwxyzABCDEFGHIJKLMNOPQRSTUVWXYZ0123456789-._@+";
        options.User.RequireUniqueEmail = false;
    });

    services.ConfigureApplicationCookie(options =>
    {
        // Cookie settings
        options.Cookie.HttpOnly = true;
        options.ExpireTimeSpan = TimeSpan.FromMinutes(5);

        options.LoginPath = "/Identity/Account/Login";
        options.AccessDeniedPath = "/Identity/Account/AccessDenied";
        options.SlidingExpiration = true;
    });
}
上の強調表示されているコードでは、既定のオプション値で Identity を構成します。 サービスは、依存性の挿入を介してアプリで使用できるようになります。
Identity は、UseAuthentication を呼び出すことによって有効になります。 UseAuthentication では、要求パイプラインに認証ミドルウェアを追加します。
public void Configure(IApplicationBuilder app, IWebHostEnvironment env)
{
    if (env.IsDevelopment())
    {
        app.UseDeveloperExceptionPage();
        app.UseDatabaseErrorPage();
    }
    else
    {
        app.UseExceptionHandler("/Error");
        app.UseHsts();
    }

    app.UseHttpsRedirection();
    app.UseStaticFiles();

    app.UseRouting();

    app.UseAuthentication();
    app.UseAuthorization();

    app.UseEndpoints(endpoints =>
    {
        endpoints.MapRazorPages();
    });
}
public void ConfigureServices(IServiceCollection services)
{
    services.AddDbContext<ApplicationDbContext>(options =>
        // options.UseSqlite(
        options.UseSqlServer(
            Configuration.GetConnectionString("DefaultConnection")));
    services.AddDatabaseDeveloperPageExceptionFilter();
    services.AddDefaultIdentity<IdentityUser>(options => options.SignIn.RequireConfirmedAccount = true)
        .AddEntityFrameworkStores<ApplicationDbContext>();
    services.AddRazorPages();

    services.Configure<IdentityOptions>(options =>
    {
        // Password settings.
        options.Password.RequireDigit = true;
        options.Password.RequireLowercase = true;
        options.Password.RequireNonAlphanumeric = true;
        options.Password.RequireUppercase = true;
        options.Password.RequiredLength = 6;
        options.Password.RequiredUniqueChars = 1;

        // Lockout settings.
        options.Lockout.DefaultLockoutTimeSpan = TimeSpan.FromMinutes(5);
        options.Lockout.MaxFailedAccessAttempts = 5;
        options.Lockout.AllowedForNewUsers = true;

        // User settings.
        options.User.AllowedUserNameCharacters =
        "abcdefghijklmnopqrstuvwxyzABCDEFGHIJKLMNOPQRSTUVWXYZ0123456789-._@+";
        options.User.RequireUniqueEmail = false;
    });

    services.ConfigureApplicationCookie(options =>
    {
        // Cookie settings
        options.Cookie.HttpOnly = true;
        options.ExpireTimeSpan = TimeSpan.FromMinutes(5);

        options.LoginPath = "/Identity/Account/Login";
        options.AccessDeniedPath = "/Identity/Account/AccessDenied";
        options.SlidingExpiration = true;
    });
}
前のコードでは、既定のオプション値で Identity を構成します。 サービスは、依存性の挿入を介してアプリで使用できるようになります。
Identity は、UseAuthentication を呼び出すことによって有効になります。 UseAuthentication では、要求パイプラインに認証ミドルウェアを追加します。
public void Configure(IApplicationBuilder app, IWebHostEnvironment env)
{
    if (env.IsDevelopment())
    {
        app.UseDeveloperExceptionPage();
        app.UseMigrationsEndPoint();
    }
    else
    {
        app.UseExceptionHandler("/Error");
        app.UseHsts();
    }

    app.UseHttpsRedirection();
    app.UseStaticFiles();

    app.UseRouting();

    app.UseAuthentication();
    app.UseAuthorization();

    app.UseEndpoints(endpoints =>
    {
        endpoints.MapRazorPages();
    });
}
テンプレートで生成されたアプリでは、承認は使用されません。 app.UseAuthorization は、アプリで承認が追加された場合に確実に正しい順序で追加されるようにするために含まれています。 UseRouting、UseAuthentication、UseAuthorization、および UseEndpoints は、前のコードに示されている順序で呼び出す必要があります。
IdentityOptions と Startup の詳細については、「IdentityOptions」およびアプリケーションの起動に関するページを参照してください。
Register、Login、LogOut、および RegisterConfirmation をスキャフォールディングする
Register、Login、LogOut、および RegisterConfirmation ファイルを追加します。 「承認を使用して Razor プロジェクトに Identity をスキャフォールディングする」の手順に従って、このセクションに示されているコードを生成します。
登録を確認する
ユーザーが Register ページの [登録] ボタンをクリックすると、RegisterModel.OnPostAsync アクションが呼び出されます。 ユーザーは、_userManager オブジェクトで CreateAsync(TUser) によって作成されます。
public async Task<IActionResult> OnPostAsync(string returnUrl = null)
{
    returnUrl = returnUrl ?? Url.Content("~/");
    ExternalLogins = (await _signInManager.GetExternalAuthenticationSchemesAsync())
                                          .ToList();
    if (ModelState.IsValid)
    {
        var user = new IdentityUser { UserName = Input.Email, Email = Input.Email };
        var result = await _userManager.CreateAsync(user, Input.Password);
        if (result.Succeeded)
        {
            _logger.LogInformation("User created a new account with password.");

            var code = await _userManager.GenerateEmailConfirmationTokenAsync(user);
            code = WebEncoders.Base64UrlEncode(Encoding.UTF8.GetBytes(code));
            var callbackUrl = Url.Page(
                "/Account/ConfirmEmail",
                pageHandler: null,
                values: new { area = "Identity", userId = user.Id, code = code },
                protocol: Request.Scheme);

            await _emailSender.SendEmailAsync(Input.Email, "Confirm your email",
                $"Please confirm your account by <a href='{HtmlEncoder.Default.Encode(callbackUrl)}'>clicking here</a>.");

            if (_userManager.Options.SignIn.RequireConfirmedAccount)
            {
                return RedirectToPage("RegisterConfirmation",
                                      new { email = Input.Email });
            }
            else
            {
                await _signInManager.SignInAsync(user, isPersistent: false);
                return LocalRedirect(returnUrl);
            }
        }
        foreach (var error in result.Errors)
        {
            ModelState.AddModelError(string.Empty, error.Description);
        }
    }

    // If we got this far, something failed, redisplay form
    return Page();
}
既定のアカウント検証を無効にする
既定のテンプレートでは、ユーザーは Account.RegisterConfirmation にリダイレクトされ、アカウントを確認するリンクを選択できます。 既定値 Account.RegisterConfirmation は、テスト目的で "のみ" 使用されます。運用アプリでは、自動アカウント検証を無効にしてください。
確認済みのアカウントを必須にして、登録時に即時ログインできないようにするには、/Areas/Identity/Pages/Account/RegisterConfirmation.cshtml.cs に DisplayConfirmAccountLink = false を設定します。
[AllowAnonymous]
public class RegisterConfirmationModel : PageModel
{
    private readonly UserManager<IdentityUser> _userManager;
    private readonly IEmailSender _sender;

    public RegisterConfirmationModel(UserManager<IdentityUser> userManager, IEmailSender sender)
    {
        _userManager = userManager;
        _sender = sender;
    }

    public string Email { get; set; }

    public bool DisplayConfirmAccountLink { get; set; }

    public string EmailConfirmationUrl { get; set; }

    public async Task<IActionResult> OnGetAsync(string email, string returnUrl = null)
    {
        if (email == null)
        {
            return RedirectToPage("/Index");
        }

        var user = await _userManager.FindByEmailAsync(email);
        if (user == null)
        {
            return NotFound($"Unable to load user with email '{email}'.");
        }

        Email = email;
        // Once you add a real email sender, you should remove this code that lets you confirm the account
        DisplayConfirmAccountLink = false;
        if (DisplayConfirmAccountLink)
        {
            var userId = await _userManager.GetUserIdAsync(user);
            var code = await _userManager.GenerateEmailConfirmationTokenAsync(user);
            code = WebEncoders.Base64UrlEncode(Encoding.UTF8.GetBytes(code));
            EmailConfirmationUrl = Url.Page(
                "/Account/ConfirmEmail",
                pageHandler: null,
                values: new { area = "Identity", userId = userId, code = code, returnUrl = returnUrl },
                protocol: Request.Scheme);
        }

        return Page();
    }
}
ログイン
ログイン フォームは次の場合に表示されます。
- [ログイン] リンクが選択されている。
- ユーザーが、アクセスを承認されていない、またはシステムによって認証されていない場合に、制限付きページにアクセスしようとした。
[ログイン] ページのフォームが送信されると、OnPostAsync アクションが呼び出されます。 PasswordSignInAsync は _signInManager オブジェクトで呼び出されます。
public async Task<IActionResult> OnPostAsync(string returnUrl = null)
{
    returnUrl = returnUrl ?? Url.Content("~/");

    if (ModelState.IsValid)
    {
        // This doesn't count login failures towards account lockout
        // To enable password failures to trigger account lockout,
        // set lockoutOnFailure: true
        var result = await _signInManager.PasswordSignInAsync(Input.Email,
                           Input.Password, Input.RememberMe, lockoutOnFailure: true);
        if (result.Succeeded)
        {
            _logger.LogInformation("User logged in.");
            return LocalRedirect(returnUrl);
        }
        if (result.RequiresTwoFactor)
        {
            return RedirectToPage("./LoginWith2fa", new
            {
                ReturnUrl = returnUrl,
                RememberMe = Input.RememberMe
            });
        }
        if (result.IsLockedOut)
        {
            _logger.LogWarning("User account locked out.");
            return RedirectToPage("./Lockout");
        }
        else
        {
            ModelState.AddModelError(string.Empty, "Invalid login attempt.");
            return Page();
        }
    }

    // If we got this far, something failed, redisplay form
    return Page();
}
承認の決定を行う方法に関する詳細については、「ASP.NET Core での認可の概要」を参照してください。
ログアウト
[ログアウト] リンクによって LogoutModel.OnPost アクションが呼び出されます。
using Microsoft.AspNetCore.Authorization;
using Microsoft.AspNetCore.Identity;
using Microsoft.AspNetCore.Mvc;
using Microsoft.AspNetCore.Mvc.RazorPages;
using Microsoft.Extensions.Logging;
using System.Threading.Tasks;

namespace WebApp1.Areas.Identity.Pages.Account
{
    [AllowAnonymous]
    public class LogoutModel : PageModel
    {
        private readonly SignInManager<IdentityUser> _signInManager;
        private readonly ILogger<LogoutModel> _logger;

        public LogoutModel(SignInManager<IdentityUser> signInManager, ILogger<LogoutModel> logger)
        {
            _signInManager = signInManager;
            _logger = logger;
        }

        public void OnGet()
        {
        }

        public async Task<IActionResult> OnPost(string returnUrl = null)
        {
            await _signInManager.SignOutAsync();
            _logger.LogInformation("User logged out.");
            if (returnUrl != null)
            {
                return LocalRedirect(returnUrl);
            }
            else
            {
                return RedirectToPage();
            }
        }
    }
}
前のコードでは、ブラウザーで新しい要求が実行され、ユーザーの ID が更新されるように、コード return RedirectToPage(); をリダイレクトする必要があります。
SignOutAsync により、cookie に格納されているユーザーのクレームがクリアされます。
post は、Pages/Shared/_LoginPartial.cshtml で指定されます。
@using Microsoft.AspNetCore.Identity
@inject SignInManager<IdentityUser> SignInManager
@inject UserManager<IdentityUser> UserManager

<ul class="navbar-nav">
@if (SignInManager.IsSignedIn(User))
{
    <li class="nav-item">
        <a  class="nav-link text-dark" asp-area="Identity" asp-page="/Account/Manage/Index"
                                              title="Manage">Hello @User.Identity.Name!</a>
    </li>
    <li class="nav-item">
        <form class="form-inline" asp-area="Identity" asp-page="/Account/Logout"
                                  asp-route-returnUrl="@Url.Page("/", new { area = "" })"
                                  method="post" >
            <button  type="submit" class="nav-link btn btn-link text-dark">Logout</button>
        </form>
    </li>
}
else
{
    <li class="nav-item">
        <a class="nav-link text-dark" asp-area="Identity" asp-page="/Account/Register">Register</a>
    </li>
    <li class="nav-item">
        <a class="nav-link text-dark" asp-area="Identity" asp-page="/Account/Login">Login</a>
    </li>
}
</ul>
Identity をテストする
既定の Web プロジェクト テンプレートでは、ホーム ページへの匿名アクセスが許可されます。 Identity をテストするには、[Authorize] を追加します。
using Microsoft.AspNetCore.Authorization;
using Microsoft.AspNetCore.Mvc.RazorPages;
using Microsoft.Extensions.Logging;

namespace WebApp1.Pages
{
    [Authorize]
    public class PrivacyModel : PageModel
    {
        private readonly ILogger<PrivacyModel> _logger;

        public PrivacyModel(ILogger<PrivacyModel> logger)
        {
            _logger = logger;
        }

        public void OnGet()
        {
        }
    }
}
サインインしている場合は、サインアウトします。アプリを実行し、Privacy リンクを選択します。 ログイン ページにリダイレクトされます。
Identity を調べる
Identity をさらに詳しく調べるには、次のようにします。
- 完全な Identity UI ソースを作成する
- 各ページのソースを調べて、デバッガーをステップ実行する。
Identity のコンポーネント
Identity に依存するすべての NuGet パッケージは、ASP.NET Core 共有フレームワークに含まれています。
Identity のプライマリ パッケージは Microsoft.AspNetCore.Identity です。 このパッケージには、ASP.NET Core Identity 用のインターフェイスのコア セットが含まれており、Microsoft.AspNetCore.Identity.EntityFrameworkCore によって含められます。
ASP.NET Core Identity への移行
既存の Identity ストアの移行に関する詳細とガイダンスについては、認証と Identity の移行に関するページを参照してください。
パスワードの強度の設定
パスワードの最小要件を設定するサンプルについては、「構成」を参照してください。
静的 Identity アセットを発行しないようにする
静的 Identity アセット (Identity UI 用のスタイルシートと JavaScript ファイル) が Web ルートに発行されるのを防ぐには、次の ResolveStaticWebAssetsInputsDependsOn プロパティと RemoveIdentityAssets ターゲットをアプリのプロジェクト ファイルに追加します。
<PropertyGroup>
  <ResolveStaticWebAssetsInputsDependsOn>RemoveIdentityAssets</ResolveStaticWebAssetsInputsDependsOn>
</PropertyGroup>

<Target Name="RemoveIdentityAssets">
  <ItemGroup>
    <StaticWebAsset Remove="@(StaticWebAsset)" Condition="%(SourceId) == 'Microsoft.AspNetCore.Identity.UI'" />
  </ItemGroup>
</Target>
次の手順
- ASP.NET Core Identity ソース コード
- AddDefaultIdentity ソース
- SQLite を使用する Identity の構成については、こちらの GitHub イシューを参照してください。
- Identity を構成する
- 承認によって保護されたユーザー データでの ASP.NET Core アプリの作成
- ASP.NET Core プロジェクトで Identity へのユーザー データを追加、ダウンロード、削除する
- ASP.NET Core で TOTP 認証アプリ用の QR コードを生成できるようにする
- ASP.NET Core への認証と Identity の移行
- ASP.NET Core でのアカウントの確認とパスワードの回復
- ASP.NET Core での SMS を使用した 2 要素認証
- Web ファームでの ASP.NET Core のホスト
ASP.NET Core
フィードバック
以下は間もなく提供いたします。2024 年を通じて、コンテンツのフィードバック メカニズムとして GitHub の issue を段階的に廃止し、新しいフィードバック システムに置き換えます。 詳細については、「https://aka.ms/ContentUserFeedback」を参照してください。
フィードバックの送信と表示