重要
2025 年 5 月 1 日より、Azure AD B2C は新規のお客様向けに購入できなくなります。 詳細については、FAQ を参照してください。
「 Azure Active Directory B2C カスタム ポリシーを使用してサインアップとサインイン フロー を設定する」の記事では、Azure Active Directory B2C (Azure AD B2C) を使用してローカル アカウントのサインイン フローを設定します。
この記事では、Facebook などのソーシャル アカウントなど、外部アカウントのサインイン フローを追加します。 この場合、Azure AD B2C を使用すると、ユーザーは外部ソーシャル ID プロバイダー (IdP) からの資格情報を使用してアプリケーションにサインインできます。
ローカル アカウントの場合、ユーザー アカウントは objectIduser 属性を使用して一意に識別されます。 外部 IdP の場合は、alternativeSecurityId ユーザー属性を使用しますが、objectId はまだ存在しています。
[前提条件]
まだお持ちでない場合は、Azure サブスクリプションにリンクされている Azure AD B2C テナントを作成 します。
コンピューターに Visual Studio Code (VS Code) がインストールされている必要があります。
「Azure Active Directory B2C カスタム ポリシーを使用してローカル アカウントのサインアップとサインイン フローを設定する」の手順を完了します。 この記事は、独自の カスタム ポリシーの作成と実行のハウツー ガイド シリーズの一部です。
注
この記事は、 Azure Active Directory B2C での独自のカスタム ポリシーの作成と実行に関するハウツー ガイド シリーズの一部です。 最初の記事からこのシリーズを開始することをお勧めします。
手順 1 - Facebook アプリケーションを作成する
「Facebook アプリケーションを作成する」で説明されている手順を使用して、Facebook アプリ ID とアプリ シークレットを取得します。 Facebook アカウントでのサインアップとサインインの設定に関する記事の前提条件と残りの手順をスキップします。
手順 2 - Facebook ポリシー キーを作成する
「 Facebook キーを作成する 」で説明されている手順に従って、Azure AD B2C テナントにポリシー キーを格納します。 Facebook アカウントでのサインアップとサインインの設定に関する記事の前提条件と残りの手順をスキップします。
手順 3 - Facebook でサインインを構成する
Facebook でサインインを構成するには、次の手順を実行する必要があります。
- その他の要求を宣言する
-
AlternativeSecurityIdの作成など、要求操作に役立つ要求変換をさらに定義します。 - Facebook クレーム プロバイダーを構成する
- Microsoft Entra データベースとの間でソーシャル アカウントの読み取りと書き込みを行う Microsoft Entra 技術プロファイルを構成します。
- セルフアサート技術プロファイル (ユーザーからの追加入力を受け入れるか、ユーザーの詳細を更新する) とそのコンテンツ定義を構成します。
手順 3.1 - その他の要求を宣言する
ContosoCustomPolicy.XML ファイルで、ClaimsSchema セクションを見つけて、次のコードを使用してさらに要求を宣言します。
    <!--<ClaimsSchema>-->
        ...
        <ClaimType Id="issuerUserId">
            <DisplayName>Username</DisplayName>
            <DataType>string</DataType>
            <UserHelpText/>
            <UserInputType>TextBox</UserInputType>
            <Restriction>
                <Pattern RegularExpression="^[a-zA-Z0-9]+[a-zA-Z0-9_-]*$" HelpText="The username you provided is not valid. It must begin with an alphabet or number and can contain alphabets, numbers and the following symbols: _ -" />
            </Restriction>
        </ClaimType>

        <ClaimType Id="identityProvider">
            <DisplayName>Identity Provider</DisplayName>
            <DataType>string</DataType>
            <UserHelpText/>
        </ClaimType>

        <ClaimType Id="authenticationSource">
            <DisplayName>AuthenticationSource</DisplayName>
            <DataType>string</DataType>
            <UserHelpText>Specifies whether the user was authenticated at Social IDP or local account.</UserHelpText>
        </ClaimType>

        <ClaimType Id="upnUserName">
            <DisplayName>UPN User Name</DisplayName>
            <DataType>string</DataType>
            <UserHelpText>The user name for creating user principal name.</UserHelpText>
        </ClaimType>

        <ClaimType Id="alternativeSecurityId">
            <DisplayName>AlternativeSecurityId</DisplayName>
            <DataType>string</DataType>
            <UserHelpText/>
        </ClaimType>

        <ClaimType Id="mailNickName">
            <DisplayName>MailNickName</DisplayName>
            <DataType>string</DataType>
            <UserHelpText>Your mail nick name as stored in the Azure Active Directory.</UserHelpText>
        </ClaimType>

        <ClaimType Id="newUser">
            <DisplayName>User is new or not</DisplayName>
            <DataType>boolean</DataType>
            <UserHelpText/>
        </ClaimType>
    <!--</ClaimsSchema>-->
手順 3.2 - 要求変換を定義する
ContosoCustomPolicy.XML ファイルで、ClaimsTransformations要素を見つけ、次のコードを使用して要求変換を追加します。
   <!--<ClaimsTransformations>-->
       ...
       <ClaimsTransformation Id="CreateRandomUPNUserName" TransformationMethod="CreateRandomString">
           <InputParameters>
               <InputParameter Id="randomGeneratorType" DataType="string" Value="GUID" />
           </InputParameters>
           <OutputClaims>
               <OutputClaim ClaimTypeReferenceId="upnUserName" TransformationClaimType="outputClaim" />
           </OutputClaims>
       </ClaimsTransformation>

       <ClaimsTransformation Id="CreateAlternativeSecurityId" TransformationMethod="CreateAlternativeSecurityId">
           <InputClaims>
               <InputClaim ClaimTypeReferenceId="issuerUserId" TransformationClaimType="key" />
               <InputClaim ClaimTypeReferenceId="identityProvider" TransformationClaimType="identityProvider" />
           </InputClaims>
           <OutputClaims>
               <OutputClaim ClaimTypeReferenceId="alternativeSecurityId" TransformationClaimType="alternativeSecurityId" />
           </OutputClaims>
       </ClaimsTransformation>

       <ClaimsTransformation Id="CreateUserPrincipalName" TransformationMethod="FormatStringClaim">
           <InputClaims>
               <InputClaim ClaimTypeReferenceId="upnUserName" TransformationClaimType="inputClaim" />
           </InputClaims>
           <InputParameters>
               <InputParameter Id="stringFormat" DataType="string" Value="cpim_{0}@{RelyingPartyTenantId}" />
           </InputParameters>
           <OutputClaims>
               <OutputClaim ClaimTypeReferenceId="userPrincipalName" TransformationClaimType="outputClaim" />
           </OutputClaims>
       </ClaimsTransformation>
   <!--</ClaimsTransformations>-->
3 つの要求変換を定義しました。この変換は、 alternativeSecurityId 要求と userPrincipalName 要求の値を生成するために使用します。 これらの ClaimsTransformation は、 手順 3.3 の OAuth2 技術プロファイルで呼び出されます。
手順 3.3 - Facebook クレーム プロバイダーを構成する
ユーザーが Facebook アカウントを使用してサインインできるようにするには、Azure AD B2C がエンドポイントを介して通信できるクレーム プロバイダーとしてアカウントを定義する必要があります。 Facebook アカウントはクレーム プロバイダーとして定義できます。
ContosoCustomPolicy.XML ファイルで、ClaimsProviders要素を探し、次のコードを使用して新しいクレーム プロバイダーを追加します。
    <!--<ClaimsProviders>-->
        ...
        <ClaimsProvider>
            <!-- The following Domain element allows this profile to be used if the request comes with domain_hint
                    query string parameter, e.g. domain_hint=facebook.com  -->
            <Domain>facebook.com</Domain>
            <DisplayName>Facebook</DisplayName>
            <TechnicalProfiles>
                <TechnicalProfile Id="Facebook-OAUTH">
                <!-- The text in the following DisplayName element is shown to the user on the claims provider
                        selection screen. -->
                <DisplayName>Facebook</DisplayName>
                <Protocol Name="OAuth2" />
                <Metadata>
                    <Item Key="ProviderName">facebook</Item>
                    <Item Key="authorization_endpoint">https://www.facebook.com/dialog/oauth</Item>
                    <Item Key="AccessTokenEndpoint">https://graph.facebook.com/oauth/access_token</Item>
                    <Item Key="HttpBinding">GET</Item>
                    <Item Key="UsePolicyInRedirectUri">0</Item>
                    <Item Key="client_id">facebook-app-id</Item>
                    <Item Key="scope">email public_profile</Item>
                    <Item Key="ClaimsEndpoint">https://graph.facebook.com/me?fields=id,first_name,last_name,name,email</Item>
                    <Item Key="AccessTokenResponseFormat">json</Item>
                </Metadata>
                <CryptographicKeys>
                    <Key Id="client_secret" StorageReferenceId="facebook-policy-key" />
                </CryptographicKeys>
                <InputClaims />
                <OutputClaims>
                    <OutputClaim ClaimTypeReferenceId="issuerUserId" PartnerClaimType="id" />
                    <OutputClaim ClaimTypeReferenceId="givenName" PartnerClaimType="first_name" />
                    <OutputClaim ClaimTypeReferenceId="surname" PartnerClaimType="last_name" />
                    <OutputClaim ClaimTypeReferenceId="displayName" PartnerClaimType="name" />
                    <OutputClaim ClaimTypeReferenceId="email" PartnerClaimType="email" />
                    <OutputClaim ClaimTypeReferenceId="identityProvider" DefaultValue="facebook.com" AlwaysUseDefaultValue="true" />
                    <OutputClaim ClaimTypeReferenceId="authenticationSource" DefaultValue="socialIdpAuthentication" AlwaysUseDefaultValue="true" />
                </OutputClaims>
                <OutputClaimsTransformations>
                    <OutputClaimsTransformation ReferenceId="CreateRandomUPNUserName" />
                    <OutputClaimsTransformation ReferenceId="CreateUserPrincipalName" />
                    <OutputClaimsTransformation ReferenceId="CreateAlternativeSecurityId" />
                </OutputClaimsTransformations>
                </TechnicalProfile>
            </TechnicalProfiles>
        </ClaimsProvider>
    <!--</ClaimsProviders>-->
次のように置換します。
-
facebook-app-idFacebookappIDの値を、手順 1 で取得したもので指定します。 -
facebook-policy-keyに、手順 2 で取得した Facebook ポリシー キーの名前を指定します。
コレクションのOutputClaimsTransformations で定義した要求変換に注目してください。
手順 3.4 - Microsoft Entra 技術プロファイルを作成する
ローカル アカウントでのサインインと同様に、ユーザー ソーシャル アカウントを格納または読み取るために Microsoft Entra ID ストレージに接続するために使用する Microsoft Entra Technical Profiles を構成する必要があります。
ContosoCustomPolicy.XMLファイルで、AAD-UserRead技術プロファイルを見つけ、その下に次のコードを使用して新しい技術プロファイルを追加します。<TechnicalProfile Id="AAD-UserWriteUsingAlternativeSecurityId"> <DisplayName>Azure Active Directory technical profile for handling social accounts</DisplayName> <Protocol Name="Proprietary" Handler="Web.TPEngine.Providers.AzureActiveDirectoryProvider, Web.TPEngine, Version=1.0.0.0, Culture=neutral, PublicKeyToken=null" /> <Metadata> <Item Key="Operation">Write</Item> <Item Key="RaiseErrorIfClaimsPrincipalAlreadyExists">true</Item> </Metadata> <CryptographicKeys> <Key Id="issuer_secret" StorageReferenceId="B2C_1A_TokenSigningKeyContainer" /> </CryptographicKeys> <InputClaims> <InputClaim ClaimTypeReferenceId="alternativeSecurityId" PartnerClaimType="alternativeSecurityId" Required="true" /> </InputClaims> <PersistedClaims> <!-- Required claims --> <PersistedClaim ClaimTypeReferenceId="alternativeSecurityId" /> <PersistedClaim ClaimTypeReferenceId="userPrincipalName" /> <PersistedClaim ClaimTypeReferenceId="mailNickName" DefaultValue="unknown" /> <PersistedClaim ClaimTypeReferenceId="displayName" DefaultValue="unknown" /> <!-- Optional claims --> <PersistedClaim ClaimTypeReferenceId="givenName" /> <PersistedClaim ClaimTypeReferenceId="surname" /> </PersistedClaims> <OutputClaims> <OutputClaim ClaimTypeReferenceId="objectId" /> <OutputClaim ClaimTypeReferenceId="newUser" PartnerClaimType="newClaimsPrincipalCreated" /> </OutputClaims> </TechnicalProfile>新しいソーシャル アカウントを Microsoft Entra ID に書き込む新しい Microsoft Entra Technical Profile
AAD-UserWriteUsingAlternativeSecurityIdが追加されました。B2C_1A_TokenSigningKeyContainerを、「署名の構成」で作成したトークン署名キーに置き換えます。
ContosoCustomPolicy.XMLファイルで、次のコードを使用して、AAD-UserWriteUsingAlternativeSecurityId技術プロファイルの後に別の Microsoft Entra 技術プロファイルを追加します。<TechnicalProfile Id="AAD-UserReadUsingAlternativeSecurityId"> <DisplayName>Azure Active Directory</DisplayName> <Protocol Name="Proprietary" Handler="Web.TPEngine.Providers.AzureActiveDirectoryProvider, Web.TPEngine, Version=1.0.0.0, Culture=neutral, PublicKeyToken=null" /> <Metadata> <Item Key="Operation">Read</Item> <Item Key="RaiseErrorIfClaimsPrincipalDoesNotExist">false</Item> </Metadata> <CryptographicKeys> <Key Id="issuer_secret" StorageReferenceId="B2C_1A_TokenSigningKeyContainer" /> </CryptographicKeys> <InputClaims> <InputClaim ClaimTypeReferenceId="alternativeSecurityId" PartnerClaimType="alternativeSecurityId" Required="true" /> </InputClaims> <OutputClaims> <!-- Required claims --> <OutputClaim ClaimTypeReferenceId="objectId" /> <!-- Optional claims --> <OutputClaim ClaimTypeReferenceId="userPrincipalName" /> <OutputClaim ClaimTypeReferenceId="displayName" /> <OutputClaim ClaimTypeReferenceId="givenName" /> <OutputClaim ClaimTypeReferenceId="surname" /> </OutputClaims> </TechnicalProfile>Microsoft Entra ID から新しいソーシャル アカウントを読み取る新しい Microsoft Entra Technical Profile
AAD-UserReadUsingAlternativeSecurityIdが追加されました。 ソーシャル アカウントの一意識別子としてalternativeSecurityIdを使用します。B2C_1A_TokenSigningKeyContainerを、「署名の構成」で作成したトークン署名キーに置き換えます。
手順 3.5 - コンテンツ定義を構成する
ユーザーがサインインした後は、セルフアサート技術プロファイルを使用して、ユーザーからいくつかの情報を収集できます。 そのため、セルフアサート技術プロファイルのコンテンツ定義を構成する必要があります。
ContosoCustomPolicy.XML ファイルで、ContentDefinitions要素を見つけ、次のコードを使用して、ContentDefinitions コレクションに新しいコンテンツ定義を追加します。
    <ContentDefinition Id="socialAccountsignupContentDefinition">
        <LoadUri>~/tenant/templates/AzureBlue/selfAsserted.cshtml</LoadUri>
        <RecoveryUri>~/common/default_page_error.html</RecoveryUri>
        <DataUri>urn:com:microsoft:aad:b2c:elements:contract:selfasserted:2.1.7</DataUri>
        <Metadata>
            <Item Key="DisplayName">Collect information from user page alongside those from social Idp.</Item>
        </Metadata>
    </ContentDefinition>
このコンテンツ定義は、次の手順 (手順 3.6) のセルフアサート技術プロファイルのメタデータとして使用します。
手順 3.6 - セルフアサート技術プロファイルを構成する
この手順で構成するセルフアサート技術プロファイルは、ユーザーから詳細情報を収集したり、ソーシャル アカウントから取得した同様の情報を更新したりするために使用されます。
ContosoCustomPolicy.XML ファイルで、ClaimsProviders セクションを見つけて、次のコードを使用して新しいクレーム プロバイダーを追加します。
    <!--<ClaimsProviders>-->
        ...
        <ClaimsProvider>
            <DisplayName>Self Asserted for social sign in</DisplayName>
            <TechnicalProfiles>
                <TechnicalProfile Id="SelfAsserted-Social">
                    <DisplayName>Collect more info during social signup</DisplayName>
                    <Protocol Name="Proprietary" Handler="Web.TPEngine.Providers.SelfAssertedAttributeProvider, Web.TPEngine, Version=1.0.0.0, Culture=neutral, PublicKeyToken=null" />
                    <Metadata>
                      <Item Key="ContentDefinitionReferenceId">socialAccountsignupContentDefinition</Item>
                    </Metadata>
                    <CryptographicKeys>
                      <Key Id="issuer_secret" StorageReferenceId="B2C_1A_TokenSigningKeyContainer" />
                    </CryptographicKeys>
                    <InputClaims>
                      <!-- These claims ensure that any values retrieved in the previous steps (e.g. from an external IDP) are prefilled.
                           Note that some of these claims may not have any value, for example, if the external IDP did not provide any of
                           these values, or if the claim did not appear in the OutputClaims section of the IDP.
                           In addition, if a claim is not in the InputClaims section, but it is in the OutputClaims section, then its
                           value will not be prefilled, but the user will still be prompted for it (with an empty value). -->
                      <InputClaim ClaimTypeReferenceId="displayName" />
                      <InputClaim ClaimTypeReferenceId="givenName" />
                      <InputClaim ClaimTypeReferenceId="surname" />
                    </InputClaims>
                    <!---User will be asked to input or update these values-->
                    <DisplayClaims>
                        <DisplayClaim ClaimTypeReferenceId="displayName"/>
                        <DisplayClaim ClaimTypeReferenceId="givenName"/>
                        <DisplayClaim ClaimTypeReferenceId="surname"/>
                    </DisplayClaims>

                    <OutputClaims>
                      <!-- These claims are not shown to the user because their value is obtained through the "ValidationTechnicalProfiles"
                           referenced below, or a default value is assigned to the claim. A claim is only shown to the user to provide a
                           value if its value cannot be obtained through any other means. -->
                      <OutputClaim ClaimTypeReferenceId="objectId" />
                      <OutputClaim ClaimTypeReferenceId="newUser" />
                      <!---<OutputClaim ClaimTypeReferenceId="executed-SelfAsserted-Input" DefaultValue="true" />-->

                      <!-- Optional claims. These claims are collected from the user and can be modified. If a claim is to be persisted in the directory after having been
                           collected from the user, it needs to be added as a PersistedClaim in the ValidationTechnicalProfile referenced below, i.e.
                           in AAD-UserWriteUsingAlternativeSecurityId. -->
                      <OutputClaim ClaimTypeReferenceId="displayName" />
                      <OutputClaim ClaimTypeReferenceId="givenName" />
                      <OutputClaim ClaimTypeReferenceId="surname" />
                    </OutputClaims>
                    <ValidationTechnicalProfiles>
                      <ValidationTechnicalProfile ReferenceId="AAD-UserWriteUsingAlternativeSecurityId" />
                    </ValidationTechnicalProfiles>
                  </TechnicalProfile>
            </TechnicalProfiles>
        </ClaimsProvider>
    <!--</ClaimsProviders>-->
追加したクレーム プロバイダーには、自己申告型技術プロファイル (SelfAsserted-Social) が含まれています。 セルフアサート技術プロファイルは、検証技術プロファイルとして AAD-UserWriteUsingAlternativeSecurityId 技術プロファイルを使用します。 そのため、 AAD-UserWriteUsingAlternativeSecurityId 技術プロファイルは、ユーザーが [続行 ] ボタンを選択したときに実行されます ( 手順 7 のスクリーンショットを参照)。
また、メタデータ セクションのsocialAccountsignupContentDefinition で構成したコンテンツ定義 () が追加されていることにも注意してください。
手順 4 - ユーザー体験オーケストレーションの手順を更新する
ContosoCustomPolicy.XML ファイルで、HelloWorldJourneyユーザー体験を見つけ、すべてのオーケストレーション手順を次のコードに示す手順に置き換えます。
    <!--<OrchestrationSteps>-->
        ...
        <OrchestrationStep Order="1" Type="CombinedSignInAndSignUp">
            <ClaimsProviderSelections>
                <ClaimsProviderSelection TargetClaimsExchangeId="FacebookExchange" />
            </ClaimsProviderSelections>
        </OrchestrationStep>

        <OrchestrationStep Order="2" Type="ClaimsExchange">
            <ClaimsExchanges>
                <ClaimsExchange Id="FacebookExchange"
                    TechnicalProfileReferenceId="Facebook-OAUTH" />
            </ClaimsExchanges>
        </OrchestrationStep>

        <!-- For social IDP authentication, attempt to find the user account in the
        directory. -->
        <OrchestrationStep Order="3" Type="ClaimsExchange">
            <ClaimsExchanges>
                <ClaimsExchange Id="AADUserReadUsingAlternativeSecurityId" TechnicalProfileReferenceId="AAD-UserReadUsingAlternativeSecurityId" />
            </ClaimsExchanges>
        </OrchestrationStep>

        <!-- Show self-asserted page only if the directory does not have the user account
        already (i.e. we don't have an objectId).  -->
        <OrchestrationStep Order="4" Type="ClaimsExchange">
            <Preconditions>
                <Precondition Type="ClaimsExist" ExecuteActionsIf="true">
                    <Value>objectId</Value>
                    <Action>SkipThisOrchestrationStep</Action>
                </Precondition>
            </Preconditions>
            <ClaimsExchanges>
                <ClaimsExchange Id="SelfAsserted-Social" TechnicalProfileReferenceId="SelfAsserted-Social" />
            </ClaimsExchanges>
        </OrchestrationStep>

        <OrchestrationStep Order="5" Type="ClaimsExchange">
            <Preconditions>
                <Precondition Type="ClaimsExist" ExecuteActionsIf="true">
                    <Value>objectId</Value>
                    <Action>SkipThisOrchestrationStep</Action>
                </Precondition>
            </Preconditions>
            <ClaimsExchanges>
                <ClaimsExchange Id="AADUserWrite" TechnicalProfileReferenceId="AAD-UserWriteUsingAlternativeSecurityId" />
            </ClaimsExchanges>
        </OrchestrationStep>
        <OrchestrationStep Order="6" Type="SendClaims" CpimIssuerTechnicalProfileReferenceId="JwtIssuer" />
    <!--</OrchestrationSteps>-->
オーケストレーションでは、ユーザーがソーシャル アカウントを使用してサインインできるようにする技術プロファイルへの参照を使用しました。
カスタム ポリシーの実行時:
オーケストレーション手順 1 - この手順には、ユーザーが選択できるサインイン オプションの一覧を示す
ClaimsProviderSelections要素が含まれています。 この場合、FacebookExchangeオプションは 1 つだけであるため、ポリシーを実行すると、TargetClaimsExchangeId属性で示されているように、手順 2 でユーザーが直接 Facebook.com されます。オーケストレーション手順 2 -
Facebook-OAUTH技術プロファイルが実行されるため、ユーザーはサインインするために Facebook にリダイレクトされます。オーケストレーション手順 3 - 手順 3 では、
AAD-UserReadUsingAlternativeSecurityId技術プロファイルが実行され、Microsoft Entra ID ストレージからユーザー ソーシャル アカウントを読み取ろうとします。 ソーシャル アカウントが見つかった場合、objectIdは出力要求として返されます。オーケストレーション手順 4 - この手順は、ユーザーがまだ存在しない場合に実行されます (
objectIdが存在しません)。 ユーザーからより多くの情報を収集したり、ソーシャル アカウントから取得した同様の情報を更新したりするフォームが表示されます。オーケストレーション手順 5 - この手順は、ユーザーがまだ存在しない場合 (
objectIdが存在しない) 場合に実行されるため、AAD-UserWriteUsingAlternativeSecurityId技術プロファイルが実行され、ソーシャル アカウントが Microsoft Entra ID に書き込まれます。オーケストレーション手順 6 - 最後に、手順 6 は、ポリシーの実行の最後に JWT をアセンブルして返します。
手順 5 - 証明書利用者の出力要求を更新する
ContosoCustomPolicy.XML ファイルで、RelyingParty要素を見つけて、すべての出力要求コレクションを次のコードに置き換えます。
    <OutputClaim ClaimTypeReferenceId="displayName" />
    <OutputClaim ClaimTypeReferenceId="givenName" />
    <OutputClaim ClaimTypeReferenceId="surname" />
    <OutputClaim ClaimTypeReferenceId="email" />
    <OutputClaim ClaimTypeReferenceId="objectId" PartnerClaimType="sub"/>
    <OutputClaim ClaimTypeReferenceId="identityProvider" />
ID プロバイダー (identityProvider) を出力要求として追加したので、証明書利用者アプリケーションに返される JWT に含まれます。
手順 6 - ポリシーをアップロードする
「 カスタム ポリシー ファイルをアップロード する」の手順に従って、ポリシー ファイルをアップロードします。 ポータルに既に存在するファイルと同じ名前のファイルをアップロードする場合は、[ カスタム ポリシーが既に存在する場合は上書きする] を選択してください。
手順 7 - ポリシーをテストする
カスタム ポリシーのテストに関する記事の手順に従って、カスタム ポリシーをテストします。
Facebook のサインイン ページにリダイレクトされます。 Facebook の資格情報を入力し、[ ログイン] を選択します。 サインイン オプションを選択できないため、オーケストレーション手順でそのように設定しているので、直接 Facebook にリダイレクトされます。 通常、アプリでは、[ Facebook でサインイン] のようなボタンを追加します。このボタンを選択すると、ポリシーが実行されます。
このポリシーを初めて実行する場合 (ソーシャル アカウントは Microsoft Entra ストレージにまだ存在しません)、次に示すようなスクリーンショットが表示されます。 ソーシャル アカウントは Microsoft Entra ストレージに既に存在するので、後続のポリシー実行ではこの画面は表示されません。
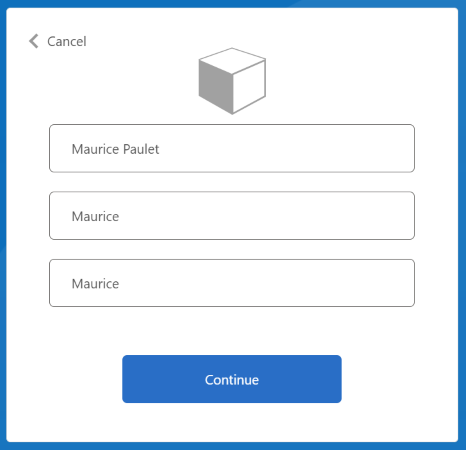
表示名、指定された名前、姓を入力または更新し、[続行] ボタンを選択します。
ポリシーの実行が完了すると、 https://jwt.msにリダイレクトされ、デコードされた JWT が表示されます。 次の JWT スニペットのようになります。
{
  "typ": "JWT",
  "alg": "RS256",
  "kid": "pxLOMWFgP4T..."
}.{
   ...
  "acr": "b2c_1a_contosocustompolicy",
   ...
  "given_name": "Maurice",
  "family_name": "Paulet",
  "name": "Maurice Paulet",
  "email": "maurice.p@contoso.com",
  "idp": "facebook.com"
}.[Signature]
ID プロバイダー ( "idp": "facebook.com") が JWT に含まれていることに注意してください。
ローカル サインインとソーシャル サインインの組み合わせ
この記事では、ユーザー体験オーケストレーション手順では、ユーザーがソーシャル アカウントを使用してサインインできるようにする技術プロファイルのみを参照します。 オーケストレーション手順を変更して、ユーザーがローカル アカウントまたはソーシャル アカウントを使用してサインインできるようにすることができます。 これを行うには、最初のオーケストレーション ステップの ClaimsProviderSelections 要素に、ユーザーが使用できるサインイン オプションが一覧表示されます。
ローカル アカウントとソーシャル アカウントを組み合わせて追加するには、次の手順に従います。
ContosoCustomPolicy.XMLファイルで、AccountTypeInputCollectorセルフアサート技術プロファイルを見つけ、次のコードを使用して出力要求コレクションauthenticationSource要求を追加します。<OutputClaim ClaimTypeReferenceId="authenticationSource" DefaultValue="localIdpAuthentication" AlwaysUseDefaultValue="true" />また、
authenticationSourceセルフアサート技術プロファイルの出力要求コレクションにUserSignInCollector要求を追加してください。UserJourneysセクションで、次のコードを使用してLocalAndSocialSignInAndSignUp新しいユーザー体験を追加します。<!--<UserJourneys>--> ... <UserJourney Id="LocalAndSocialSignInAndSignUp"> <OrchestrationSteps> <!--Orchestration steps will be added here--> </OrchestrationSteps> </UserJourney> <!--</UserJourneys>-->作成したユーザー体験で、
LocalAndSocialSignInAndSignUp、次のコードを使用してオーケストレーション手順を追加します。<!--<UserJourneys> ... <UserJourney Id="LocalAndSocialSignInAndSignUp"> <OrchestrationSteps>--> <OrchestrationStep Order="1" Type="CombinedSignInAndSignUp" ContentDefinitionReferenceId="SignupOrSigninContentDefinition"> <ClaimsProviderSelections> <ClaimsProviderSelection TargetClaimsExchangeId="FacebookExchange" /> <ClaimsProviderSelection ValidationClaimsExchangeId="LocalAccountSigninEmailExchange" /> </ClaimsProviderSelections> <ClaimsExchanges> <ClaimsExchange Id="LocalAccountSigninEmailExchange" TechnicalProfileReferenceId="UserSignInCollector" /> </ClaimsExchanges> </OrchestrationStep> <!-- Check if the user has selected to sign in using one of the social providers --> <OrchestrationStep Order="2" Type="ClaimsExchange"> <Preconditions> <Precondition Type="ClaimsExist" ExecuteActionsIf="true"> <Value>objectId</Value> <Action>SkipThisOrchestrationStep</Action> </Precondition> </Preconditions> <ClaimsExchanges> <ClaimsExchange Id="FacebookExchange" TechnicalProfileReferenceId="Facebook-OAUTH" /> <ClaimsExchange Id="AccountTypeInputCollectorClaimsExchange" TechnicalProfileReferenceId="AccountTypeInputCollector"/> </ClaimsExchanges> </OrchestrationStep> <!--For Local sign in option start--> <OrchestrationStep Order="3" Type="ClaimsExchange"> <Preconditions> <Precondition Type="ClaimsExist" ExecuteActionsIf="true"> <Value>objectId</Value> <Action>SkipThisOrchestrationStep</Action> </Precondition> <Precondition Type="ClaimEquals" ExecuteActionsIf="true"> <Value>accountType</Value> <Value>work</Value> <Action>SkipThisOrchestrationStep</Action> </Precondition> <Precondition Type="ClaimEquals" ExecuteActionsIf="true"> <Value>authenticationSource</Value> <Value>socialIdpAuthentication</Value> <Action>SkipThisOrchestrationStep</Action> </Precondition> </Preconditions> <ClaimsExchanges> <ClaimsExchange Id="GetAccessCodeClaimsExchange" TechnicalProfileReferenceId="AccessCodeInputCollector" /> </ClaimsExchanges> </OrchestrationStep> <OrchestrationStep Order="4" Type="ClaimsExchange"> <Preconditions> <Precondition Type="ClaimsExist" ExecuteActionsIf="true"> <Value>objectId</Value> <Action>SkipThisOrchestrationStep</Action> </Precondition> <Precondition Type="ClaimEquals" ExecuteActionsIf="true"> <Value>authenticationSource</Value> <Value>socialIdpAuthentication</Value> <Action>SkipThisOrchestrationStep</Action> </Precondition> </Preconditions> <ClaimsExchanges> <ClaimsExchange Id="SignUpWithLogonEmailExchange" TechnicalProfileReferenceId="UserInformationCollector" /> </ClaimsExchanges> </OrchestrationStep> <OrchestrationStep Order="5" Type="ClaimsExchange"> <Preconditions> <Precondition Type="ClaimEquals" ExecuteActionsIf="true"> <Value>authenticationSource</Value> <Value>socialIdpAuthentication</Value> <Action>SkipThisOrchestrationStep</Action> </Precondition> </Preconditions> <ClaimsExchanges> <ClaimsExchange Id="AADUserReaderExchange" TechnicalProfileReferenceId="AAD-UserRead"/> </ClaimsExchanges> </OrchestrationStep> <!--For Local sign in option end--> <!--For social sign in option start--> <!-- For social IDP authentication, attempt to find the user account in the directory. --> <OrchestrationStep Order="6" Type="ClaimsExchange"> <Preconditions> <Precondition Type="ClaimEquals" ExecuteActionsIf="true"> <Value>authenticationSource</Value> <Value>localIdpAuthentication</Value> <Action>SkipThisOrchestrationStep</Action> </Precondition> </Preconditions> <ClaimsExchanges> <ClaimsExchange Id="AADUserReadUsingAlternativeSecurityId" TechnicalProfileReferenceId="AAD-UserReadUsingAlternativeSecurityId" /> </ClaimsExchanges> </OrchestrationStep> <!-- Show self-asserted page only if the directory does not have the user account already (i.e. we do not have an objectId). --> <OrchestrationStep Order="7" Type="ClaimsExchange"> <Preconditions> <Precondition Type="ClaimsExist" ExecuteActionsIf="true"> <Value>objectId</Value> <Action>SkipThisOrchestrationStep</Action> </Precondition> <Precondition Type="ClaimEquals" ExecuteActionsIf="true"> <Value>authenticationSource</Value> <Value>localIdpAuthentication</Value> <Action>SkipThisOrchestrationStep</Action> </Precondition> </Preconditions> <ClaimsExchanges> <ClaimsExchange Id="SelfAsserted-Social" TechnicalProfileReferenceId="SelfAsserted-Social" /> </ClaimsExchanges> </OrchestrationStep> <OrchestrationStep Order="8" Type="ClaimsExchange"> <Preconditions> <Precondition Type="ClaimsExist" ExecuteActionsIf="true"> <Value>objectId</Value> <Action>SkipThisOrchestrationStep</Action> </Precondition> <Precondition Type="ClaimEquals" ExecuteActionsIf="true"> <Value>authenticationSource</Value> <Value>localIdpAuthentication</Value> <Action>SkipThisOrchestrationStep</Action> </Precondition> </Preconditions> <ClaimsExchanges> <ClaimsExchange Id="AADUserWrite" TechnicalProfileReferenceId="AAD-UserWriteUsingAlternativeSecurityId" /> </ClaimsExchanges> </OrchestrationStep> <!--For social sign in option end--> <OrchestrationStep Order="9" Type="ClaimsExchange"> <ClaimsExchanges> <ClaimsExchange Id="GetMessageClaimsExchange" TechnicalProfileReferenceId="UserInputMessageClaimGenerator"/> </ClaimsExchanges> </OrchestrationStep> <OrchestrationStep Order="10" Type="SendClaims" CpimIssuerTechnicalProfileReferenceId="JwtIssuer" /> <!-- </OrchestrationSteps> </UserJourney> </UserJourneys>-->最初の手順では、ユーザーが体験、ローカル認証、またはソーシャル認証で選択する必要があるオプションを指定します。 以降の手順では、前提条件を使用して、ユーザーが選択したオプションまたはユーザーが選択した体験のステージを追跡します。 たとえば、
authenticationSource要求を使用して、ローカル認証体験とソーシャル認証体験を区別します。RelyingPartyセクションで、DefaultUserJourneyReferenceIdをLocalAndSocialSignInAndSignUpに変更します。手順 6 と手順 7 の手順を使用して、ポリシーをアップロードして実行します。 ポリシーを実行すると、次のスクリーンショットのような画面が表示されます。
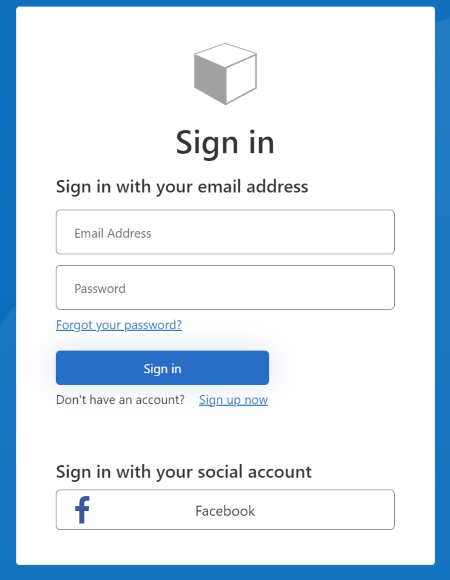
ユーザーがローカル アカウントまたはソーシャル アカウントを使用してサインアップまたはサインインできることを確認できます。