重要
2025 年 5 月 1 日より、Azure AD B2C は新規のお客様向けに購入できなくなります。 詳細については、FAQ を参照してください。
開始する前に
Azure Active Directory B2C (Azure AD B2C) には、アプリケーションとのユーザー操作を定義するための 2 つの方法があります。定義済みのユーザー フローまたは構成可能なカスタム ポリシーです。 カスタム ポリシーは、複雑なシナリオに対処します。 ほとんどのシナリオでは、ユーザー フローをお勧めします。 ユーザー フローとカスタム ポリシーの概要を参照してください
Azure AD B2C 認証を eID-Me と統合する
Azure AD B2C 認証を Bluink eID-Me と統合する方法について説明します。これは、カナダ市民向けの ID 検証と分散型デジタル ID ソリューションです。 eID-Me を使用すると、Azure AD B2C テナントはユーザー ID を検証し、検証済みのサインアップとサインイン ID 要求を取得します。 統合では、セキュリティで保護されたデジタル ID を使用した多要素認証とパスワードレス サインインがサポートされます。 組織は、ID アシュアランス レベル (IAL) 2 と Know Your Customer (KYC) の要件を満たすことができます。
詳細については、bluink.ca: Bluink Ltd にアクセスしてください
[前提条件]
開始するには、次のものが必要です。
- eID-Me の証明書利用者アカウント
- bluink.ca に移動して 詳細を確認 し、デモを依頼する
- Azure サブスクリプション
- お持ちでない場合は、Azure 無料アカウントを取得してください。
- Azure サブスクリプションにリンクされた Azure AD B2C テナント
- eID-Me デジタル ID アプリの試用版または実稼働バージョン
- bluink.ca に移動してeID-MeデジタルIDアプリをダウンロードする
「 チュートリアル: Azure AD B2C でユーザー フローとカスタム ポリシーを作成する」も参照してください。
シナリオの説明
eID-Me は、OpenID Connect (OIDC) ID プロバイダーとして Azure AD B2C と統合されます。 次のコンポーネントは、Azure AD B2C を使用する eID-Me ソリューションで構成されます。
- Azure AD B2C テナント - eID-Me で信頼できるパーティとして構成されている場合、eID-Me はサインアップとサインインのために Azure AD B2C テナントを信頼できます
-
Azure AD B2C テナント アプリケーション - テナントには Azure AD B2C テナント アプリケーションが必要であることが前提です
- アプリケーションは、トランザクション中に Azure AD B2C によって受信された ID 要求を受け取ります
- eID-Me スマートフォン アプリ - Azure AD B2C テナント ユーザーが iOS または Android 用のアプリを必要とする
-
発行された eID-Me デジタル ID - eID-Me の ID プルーフィングから発行されたもの
- ユーザーは、アプリ内のデジタル ウォレットにデジタル ID が発行されます。 有効な ID ドキュメントが必要です。
eID-Me アプリは、トランザクション中にユーザーを認証します。 X509 公開キー認証は、eID-Me デジタル ID の秘密署名キーを使用してパスワードレス MFA を提供します。
次の図は、Azure AD B2C フローの外部で発生する eID-Me ID 証明を示しています。
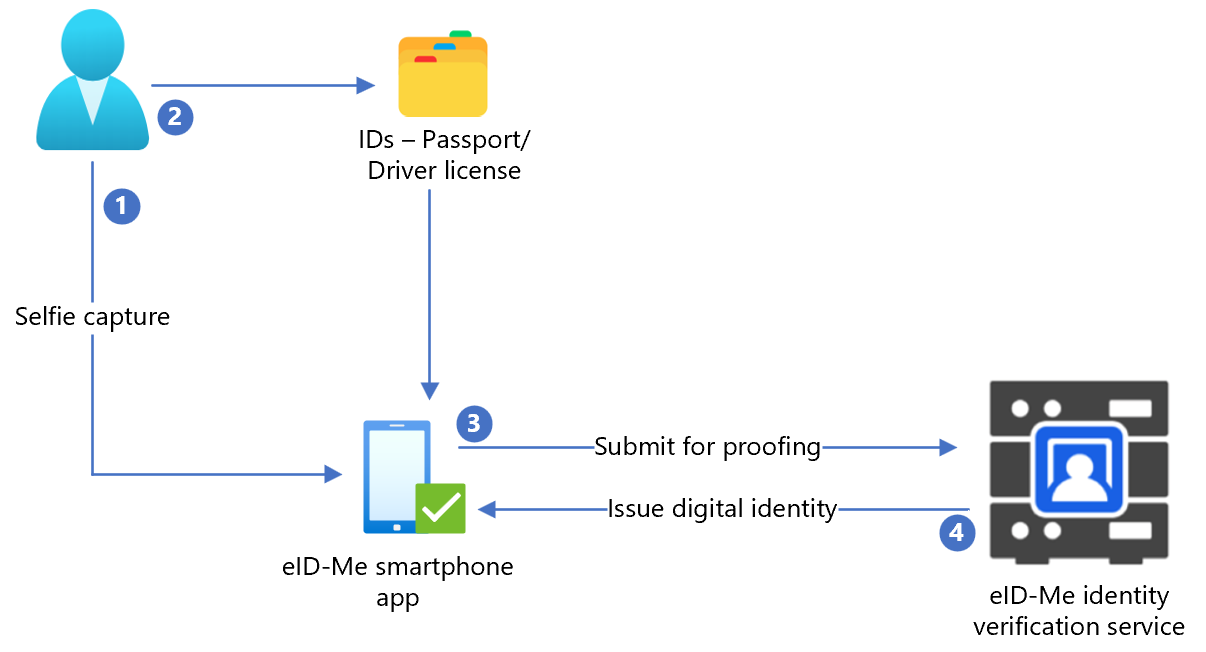
- ユーザーが自分撮りをeID-Meスマートフォンアプリケーションにアップロードします。
- ユーザーは、パスポートや運転免許証などの政府発行の身分証明書をスキャンして、eID-Me スマートフォン アプリケーションにアップロードします。
- eID-Me は、検証のために ID サービスにデータを送信します。
- ユーザーにはデジタル ID が発行され、アプリケーションに保存されます。
次の図は、Azure AD B2C と eID-Me の統合を示しています。
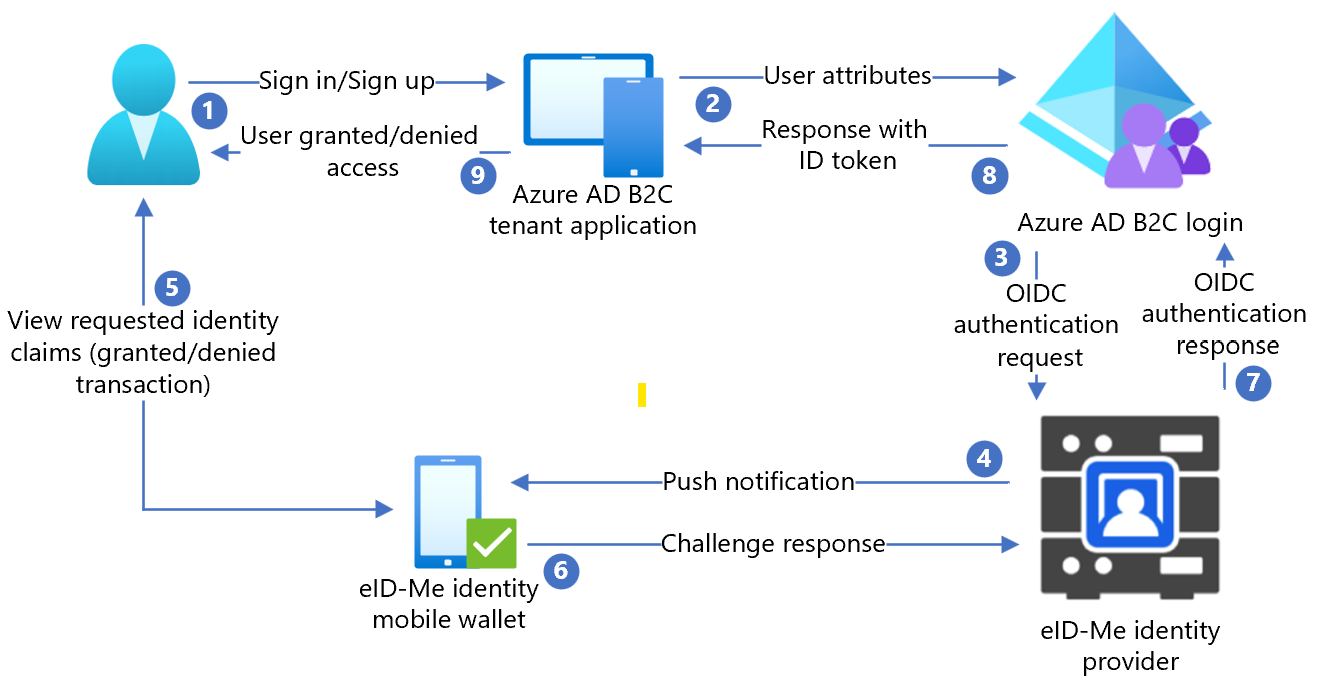
- ユーザーが Azure AD B2C サインイン ページを開き、ユーザー名でサインインまたはサインアップします。
- ユーザーが Azure AD B2C のサインインとサインアップ ポリシーに転送されました。
- Azure AD B2C は、OIDC 承認コード フローを使用して、ユーザーを eID-Me ID ルーターにリダイレクトします。
- ルーターは、認証と承認要求の詳細を含むプッシュ通知をユーザー モバイル アプリに送信します。
- ユーザー認証チャレンジが表示され、ID 要求のプロンプトが表示されます。
- チャレンジ応答はルータに行きます。
- ルーターは、認証結果を使用して Azure AD B2C に応答します。
- Azure AD B2C ID トークンの応答がアプリケーションに送信されます。
- ユーザーはアクセスを許可または拒否されます。
eID-Me の使い方を始めるために
bluink.ca の お問い合わせ ページに移動し、テスト環境または運用環境を構成して Azure AD B2C テナントをリライング パーティとして設定する目的でデモをリクエストします。 テナントは、eID-Me でサインアップするコンシューマーから必要な ID 要求を決定します。
eID-Me でアプリケーションを構成する
テナント アプリケーションを eID-ME 証明書利用者として eID-Me で構成するには、次の情報を指定します。
| プロパティ | 説明 |
|---|---|
| 名前 | Azure AD B2C または別のアプリケーション名 |
| ドメイン | name.onmicrosoft.com |
| リダイレクト URI | https://jwt.ms |
| リダイレクト URI | https://your-B2C-tenant-name.b2clogin.com/your-B2C-tenant-name.onmicrosoft.com/oauth2/authrespたとえば: https://fabrikam.b2clogin.com/fabrikam.onmicrosoft.com/oauth2/authrespカスタム ドメインの場合は、次のように入力します。 https://your-domain-name/your-tenant-name.onmicrosoft.com/oauth2/authresp. |
| アプリケーションのホーム ページ URL | エンド ユーザーに表示されます |
| アプリケーション プライバシー ポリシーの URL | エンド ユーザーに表示されます |
注
信頼先が構成されると、ID-Me はクライアント ID とクライアント シークレットを提供します。 クライアント ID とクライアント シークレットをメモして、Azure AD B2C で ID プロバイダー (IdP) を構成します。
Azure AD B2C に新しい ID プロバイダーを追加する
次の手順では、Azure AD B2C テナントでディレクトリを使用します。
- Azure AD B2C テナントの少なくとも B2C IEF ポリシー管理者として Azure portal にサインインします。
- 上部のメニューで、[ ディレクトリ + サブスクリプション] を選択します。
- テナントを含むディレクトリを選択します。
- Azure portal の左上隅にある [ すべてのサービス] を選択します。
- Azure AD B2C を検索して選択します。
- Dashboard>Azure Active Directory B2C>アイデンティティ プロバイダーに移動します。
- [新しい OpenID Connect プロバイダー] を選択します。
- [] を選択し、[] を追加します。
ID プロバイダーを構成する
ID プロバイダーを構成するには:
- ID プロバイダーの種類>OpenID Connect を選択します。
- ID プロバイダー フォームの [名前] に、 eID-Me パスワードレス または別の名前を入力します。
- [クライアント ID] に、eID-Me のクライアント ID を入力します。
- [クライアント シークレット] に、eID-Me のクライアント シークレットを入力します。
- [スコープ] で、openid 電子メール プロファイルを選択します。
- [ 応答の種類] で、 コードを選択します。
- 応答モードでは、フォームの投稿を選択します。
- [OK] を選択.
- [ この ID プロバイダーの要求をマップする] を選択します。
- ユーザー ID には sub を使用します。
- [表示名] には名前を使用します。
- [指定された名前] には、given_nameを使用します。
- 姓の場合は、family_nameを使用します。
- 電子メールの場合は、電子メールを使用します。
- 保存 を選択します。
多要素認証を構成する
eID-Me は多要素認証子であるため、ユーザー フローの多要素認証構成は必要ありません。
ユーザー フロー ポリシーを作成する
次の手順では、eID-Me は B2C ID プロバイダーの新しい OIDC ID プロバイダーとして表示されます。
- Azure AD B2C テナントの [ ポリシー] で、[ ユーザー フロー] を選択します。
- [ 新しいユーザー フロー] を選択します。
- 「サインアップとサインイン」を選択>バージョン>作成。
- ポリシー名を入力 します。
- ID プロバイダーで、作成した eID-Me ID プロバイダーを選択します。
- [ローカル アカウント] で、[なし] を選択します。 選択すると、電子メールとパスワードの認証が無効になります。
- ユーザー フローを実行する を選択します。
-
返信 URL (
https://jwt.msなど) を入力します。 - ブラウザーが eID-Me サインイン ページにリダイレクトされます。
- ユーザー登録のアカウント名を入力します。
- ユーザーは、eID-Me を使用してモバイル デバイスでプッシュ通知を受け取ります。
- 認証チャレンジが表示されます。
- チャレンジは受け入れられ、ブラウザーは応答 URL にリダイレクトされます。
注
Azure Active Directory B2C (Azure AD B2C) には、アプリケーションとのユーザー操作を定義するための 2 つの方法があります。定義済みのユーザー フローまたは構成可能なカスタム ポリシーです。 カスタム ポリシーは、複雑なシナリオに対処します。 ほとんどのシナリオでは、ユーザー フローをお勧めします。 ユーザー フローとカスタム ポリシーの概要を参照してください
ポリシー キーを作成する
記録したクライアント シークレットを Azure AD B2C テナントに格納します。 次の手順では、Azure AD B2C テナントでディレクトリを使用します。
- Azure portal にサインインします。
- ポータルのツール バーで、[ ディレクトリとサブスクリプション] を選択します。
- ポータルの設定の [ ディレクトリとサブスクリプション ] ページの [ディレクトリ名 ] 一覧で、Azure AD B2C ディレクトリを見つけます。
- [ 切り替え] を選択します。
- Azure portal の左上隅にある [ すべてのサービス] を選択します。
- Azure AD B2C を検索して選択します。
- [概要] ページで、[Identity Experience Framework] を選びます。
- [ポリシー キー] を選択します。
- [] を選択し、[] を追加します。
- [オプション] では、[手動] を選びます。
- ポリシー キーの名前を入力します。 たとえば、
eIDMeClientSecretのようにします。 プレフィックスB2C_1A_がキー名に追加されます。 - [ シークレット] に、指定したクライアント シークレットを入力します。
- [キー使用法] には [署名] を選択します。
- を選択してを作成します。
ID プロバイダーとして eID-Me を構成する
eID-Me をクレーム プロバイダーとして定義して、ユーザーが eID-Me でサインインできるようにします。 Azure AD B2C は、エンドポイントを介して通信します。 エンドポイントは、デバイス上のデジタル ID を使用してユーザー認証を検証するために Azure AD B2C によって使用される要求を提供します。
要求プロバイダーとして eID-Me を定義するには、ポリシー拡張ファイルの ClaimsProvider 要素に追加します。
TrustFrameworkExtensions.xmlを開きます。ClaimsProviders 要素を検索します。 表示されない場合は、ルート要素の下に追加します。
新しい ClaimsProvider を追加します。
   <ClaimsProvider>
   <Domain>eID-Me</Domain>
   <DisplayName>eID-Me</DisplayName>
   <TechnicalProfiles>
     <TechnicalProfile Id="eID-Me-OIDC">
       <!-- The text in the following DisplayName element is shown to the user on the claims provider
selection screen. -->
       <DisplayName>eID-Me for Sign In</DisplayName>
       <Protocol Name="OpenIdConnect" />
       <Metadata>
         <Item Key="ProviderName">https://eid-me.bluink.ca</Item>
         <Item Key="METADATA">https://demoeid.bluink.ca/.well-known/openid-configuration</Item>
         <Item Key="response_types">code</Item>
         <Item Key="scope">openid email profile</Item>
         <Item Key="response_mode">form_post</Item>
         <Item Key="HttpBinding">POST</Item>
         <Item Key="token_endpoint_auth_method">client_secret_post</Item>
         <Item Key="client_id">eid_me_rp_client_id</Item>
         <Item Key="UsePolicyInRedirectUri">false</Item>
       </Metadata>
       <CryptographicKeys>
         <Key Id="client_secret" StorageReferenceId="B2C_1A_eIDMeClientSecret" />
       </CryptographicKeys>
       <InputClaims />
       <OutputClaims>
         <OutputClaim ClaimTypeReferenceId="issuerUserId" PartnerClaimType="sub" />
         <OutputClaim ClaimTypeReferenceId="tenantId" PartnerClaimType="tid" />
         <OutputClaim ClaimTypeReferenceId="givenName" PartnerClaimType="given_name" />
         <OutputClaim ClaimTypeReferenceId="surName" PartnerClaimType="family_name" />
         <OutputClaim ClaimTypeReferenceId="displayName" PartnerClaimType="name" />
         <OutputClaim ClaimTypeReferenceId="email" PartnerClaimType="email" />
         <OutputClaim ClaimTypeReferenceId="IAL" PartnerClaimType="identity_assurance_level_achieved" DefaultValue="unknown IAL" />
         <OutputClaim ClaimTypeReferenceId="authenticationSource" DefaultValue="socialIdpAuthentication" AlwaysUseDefaultValue="true" />
         <OutputClaim ClaimTypeReferenceId="identityProvider" PartnerClaimType="iss" />
         <OutputClaim ClaimTypeReferenceId="locality" PartnerClaimType="locality" DefaultValue="unknown locality" />
         <OutputClaim ClaimTypeReferenceId="region" PartnerClaimType="region" DefaultValue="unknown region" />
       </OutputClaims>
       <OutputClaimsTransformations>
         <OutputClaimsTransformation ReferenceId="CreateRandomUPNUserName" />
         <OutputClaimsTransformation ReferenceId="CreateUserPrincipalName" />
         <OutputClaimsTransformation ReferenceId="CreateAlternativeSecurityId" />
         <OutputClaimsTransformation ReferenceId="CreateSubjectClaimFromAlternativeSecurityId" />
       </OutputClaimsTransformations>
       <UseTechnicalProfileForSessionManagement ReferenceId="SM-SocialLogin" />
     </TechnicalProfile>
   </TechnicalProfiles>
 </ClaimsProvider>
eid_me_rp_client_id に、eID-Me 証明書利用者のクライアント ID を入力します。
保存 を選択します。
サポートされる ID 要求
eID-Me でサポートされる ID 要求をさらに追加できます。
-
TrustFrameworksExtension.xmlを開きます。 -
BuildingBlocks要素を見つけます。
注
よく知られている/openid-configuration の OIDC 識別子を持つ OID リポジトリでサポートされている eID-Me ID 要求リストを検索します。
<BuildingBlocks>
<ClaimsSchema>
 <ClaimType Id="IAL">
     <DisplayName>Identity Assurance Level</DisplayName>
     <DataType>string</DataType>
     <DefaultPartnerClaimTypes>
       <Protocol Name="OpenIdConnect" PartnerClaimType="identity_assurance_level_achieved" />
     </DefaultPartnerClaimTypes>
     <AdminHelpText>The Identity Assurance Level Achieved during proofing of the digital identity.</AdminHelpText>
     <UserHelpText>The Identity Assurance Level Achieved during proofing of the digital identity.</UserHelpText>
     <UserInputType>Readonly</UserInputType>
   </ClaimType>

<ClaimType Id="picture">
     <DisplayName>Portrait Photo</DisplayName>
     <DataType>string</DataType>
     <DefaultPartnerClaimTypes>
       <Protocol Name="OpenIdConnect" PartnerClaimType="thumbnail_portrait" />
     </DefaultPartnerClaimTypes>
     <AdminHelpText>The portrait photo of the user.</AdminHelpText>
     <UserHelpText>Your portrait photo.</UserHelpText>
     <UserInputType>Readonly</UserInputType>
   </ClaimType>

 <ClaimType Id="middle_name">
     <DisplayName>Portrait Photo</DisplayName>
     <DataType>string</DataType>
     <DefaultPartnerClaimTypes>
       <Protocol Name="OpenIdConnect" PartnerClaimType="middle_name" />
     </DefaultPartnerClaimTypes>
     <UserHelpText>Your middle name.</UserHelpText>
     <UserInputType>TextBox</UserInputType>
   </ClaimType>

<ClaimType Id="birthdate">
     <DisplayName>Date of Birth</DisplayName>
     <DataType>string</DataType>
     <DefaultPartnerClaimTypes>
       <Protocol Name="OpenIdConnect" PartnerClaimType="birthdate" />
     </DefaultPartnerClaimTypes>
     <AdminHelpText>The user's date of birth.</AdminHelpText>
     <UserHelpText>Your date of birth.</UserHelpText>
     <UserInputType>TextBox</UserInputType>
   </ClaimType>

 <ClaimType Id="gender">
     <DisplayName>Gender</DisplayName>
     <DataType>string</DataType>
     <DefaultPartnerClaimTypes>
       <Protocol Name="OpenIdConnect" PartnerClaimType="gender" />
     </DefaultPartnerClaimTypes>
     <AdminHelpText>The user's gender.</AdminHelpText>
     <UserHelpText>Your gender.</UserHelpText>
     <UserInputType>TextBox</UserInputType>
   </ClaimType>

 <ClaimType Id="street_address">
     <DisplayName>Locality/City</DisplayName>
     <DataType>string</DataType>
     <DefaultPartnerClaimTypes>
       <Protocol Name="OpenIdConnect" PartnerClaimType="street_address" />
     </DefaultPartnerClaimTypes>
     <AdminHelpText>The user's full street address, which MAY include house number, street name, post office box.</AdminHelpText>
     <UserHelpText>Your street address of residence.</UserHelpText>
     <UserInputType>TextBox</UserInputType>
   </ClaimType>

<ClaimType Id="locality">
     <DisplayName>Locality/City</DisplayName>
     <DataType>string</DataType>
     <DefaultPartnerClaimTypes>
       <Protocol Name="OpenIdConnect" PartnerClaimType="locality" />
     </DefaultPartnerClaimTypes>
     <AdminHelpText>The user's current city or locality of residence.</AdminHelpText>
     <UserHelpText>Your current city or locality of residence.</UserHelpText>
     <UserInputType>TextBox</UserInputType>
   </ClaimType>

   <ClaimType Id="region">
     <DisplayName>Province or Territory</DisplayName>
     <DataType>string</DataType>
     <DefaultPartnerClaimTypes>
       <Protocol Name="OpenIdConnect" PartnerClaimType="region" />
     </DefaultPartnerClaimTypes>
     <AdminHelpText>The user's current province or territory of residence.</AdminHelpText>
     <UserHelpText>Your current province or territory of residence.</UserHelpText>
     <UserInputType>TextBox</UserInputType>
   </ClaimType>

   <ClaimType Id="country">
     <DisplayName>Country</DisplayName>
     <DataType>string</DataType>
     <DefaultPartnerClaimTypes>
       <Protocol Name="OpenIdConnect" PartnerClaimType="country" />
     </DefaultPartnerClaimTypes>
     <AdminHelpText>The user's current country of residence.</AdminHelpText>
     <UserHelpText>Your current country of residence.</UserHelpText>
     <UserInputType>TextBox</UserInputType>
   </ClaimType>

   <ClaimType Id="dl_number">
     <DisplayName>Driver's Licence Number</DisplayName>
     <DataType>string</DataType>
     <DefaultPartnerClaimTypes>
       <Protocol Name="OpenIdConnect" PartnerClaimType="dl_number" />
     </DefaultPartnerClaimTypes>
     <AdminHelpText>The user's driver's licence number.</AdminHelpText>
     <UserHelpText>Your driver's licence number.</UserHelpText>
     <UserInputType>TextBox</UserInputType>
   </ClaimType>

   <ClaimType Id="dl_class">
     <DisplayName>Driver's Licence Class</DisplayName>
     <DataType>string</DataType>
     <DefaultPartnerClaimTypes>
       <Protocol Name="OpenIdConnect" PartnerClaimType="dl_class" />
     </DefaultPartnerClaimTypes>
     <AdminHelpText>The user's driver's licence class.</AdminHelpText>
     <UserHelpText>Your driver's licence class.</UserHelpText>
     <UserInputType>TextBox</UserInputType>
   </ClaimType>
 </ClaimsSchema>
ユーザー体験を追加する
次の手順では、ID プロバイダーは設定されていますが、サインイン ページには設定されていません。 カスタム ユーザー体験がない場合は、テンプレート ユーザー体験をコピーします。
- スターター パックから、
TrustFrameworkBase.xmlファイルを開きます。 - ID= を含む
SignUpOrSignIn内容を見つけてコピーします。 -
TrustFrameworkExtensions.xmlを開きます。 - UserJourneys 要素を見つけます。 要素が表示されない場合は、要素を追加します。
- UserJourney 要素の内容を UserJourneys 要素の子として貼り付けます。
- ユーザー体験 ID の名前を変更します (例: ID=
CustomSignUpSignIn)。
ID プロバイダーをユーザー体験に追加する
新しい ID プロバイダーをユーザー体験に追加します。
- ユーザー体験で、Type=
CombinedSignInAndSignUpまたは Type=ClaimsProviderSelectionのオーケストレーション ステップ要素を見つけます。 通常は、オーケストレーションの最初の手順です。 ClaimsProviderSelections 要素には、ユーザーがサインインする ID プロバイダーの一覧があります。 要素の順序は、ユーザーが表示するサインイン ボタンの順序を制御します。 - ClaimsProviderSelection XML 要素を追加します。
- TargetClaimsExchangeId 値をフレンドリ名に設定します。
- 次のオーケストレーション手順で、 ClaimsExchange 要素を追加します。
- ID をターゲット要求交換 ID 値に設定します。
- vTechnicalProfileReferenceId の値を、作成した技術プロファイル ID に更新します。
次の XML は、ID プロバイダーとの 7 つのユーザー体験オーケストレーション手順を示しています。
 <UserJourney Id="eIDME-SignUpOrSignIn">
   <OrchestrationSteps>
     <OrchestrationStep Order="1" Type="CombinedSignInAndSignUp" ContentDefinitionReferenceId="api.signuporsignin">
       <ClaimsProviderSelections>
         <ClaimsProviderSelection TargetClaimsExchangeId="eIDMeExchange" />
        </ClaimsProviderSelections>
   </OrchestrationStep>
     <!-- Check if the user has selected to sign in using one of the social providers -->
     <OrchestrationStep Order="2" Type="ClaimsExchange">
       <Preconditions>
         <Precondition Type="ClaimsExist" ExecuteActionsIf="true">
           <Value>objectId</Value>
           <Action>SkipThisOrchestrationStep</Action>
         </Precondition>
       </Preconditions>
       <ClaimsExchanges>
         <ClaimsExchange Id="eIDMeExchange" TechnicalProfileReferenceId="eID-Me-OIDC" />
       </ClaimsExchanges>
     </OrchestrationStep>
     <!-- For social IDP authentication, attempt to find the user account in the directory. -->
     <OrchestrationStep Order="3" Type="ClaimsExchange">
       <Preconditions>
         <Precondition Type="ClaimEquals" ExecuteActionsIf="true">
           <Value>authenticationSource</Value>
           <Value>localAccountAuthentication</Value>
           <Action>SkipThisOrchestrationStep</Action>
         </Precondition>
       </Preconditions>
       <ClaimsExchanges>
         <ClaimsExchange Id="AADUserReadUsingAlternativeSecurityId" TechnicalProfileReferenceId="AAD-UserReadUsingAlternativeSecurityId-NoError" />
       </ClaimsExchanges>
     </OrchestrationStep>
     <!-- Show self-asserted page only if the directory does not have the user account already (i.e. we do not have an objectId).  -->
     <OrchestrationStep Order="4" Type="ClaimsExchange">
       <Preconditions>
         <Precondition Type="ClaimsExist" ExecuteActionsIf="true">
           <Value>objectId</Value>
           <Action>SkipThisOrchestrationStep</Action>
         </Precondition>
       </Preconditions>
       <ClaimsExchanges>
         <ClaimsExchange Id="SelfAsserted-Social" TechnicalProfileReferenceId="SelfAsserted-Social" />
       </ClaimsExchanges>
     </OrchestrationStep>
     <!-- This step reads any user attributes that we may not have received when authenticating using ESTS so they can be sent in the token. -->
     <OrchestrationStep Order="5" Type="ClaimsExchange">
       <Preconditions>
         <Precondition Type="ClaimEquals" ExecuteActionsIf="true">
           <Value>authenticationSource</Value>
           <Value>socialIdpAuthentication</Value>
           <Action>SkipThisOrchestrationStep</Action>
         </Precondition>
       </Preconditions>
       <ClaimsExchanges>
         <ClaimsExchange Id="AADUserReadWithObjectId" TechnicalProfileReferenceId="AAD-UserReadUsingObjectId" />
       </ClaimsExchanges>
     </OrchestrationStep>
     <!-- The previous step (SelfAsserted-Social) could have been skipped if there were no attributes to collect
          from the user. So, in that case, create the user in the directory if one does not already exist
          (verified using objectId which would be set from the last step if account was created in the directory. -->
     <OrchestrationStep Order="6" Type="ClaimsExchange">
       <Preconditions>
         <Precondition Type="ClaimsExist" ExecuteActionsIf="true">
           <Value>objectId</Value>
           <Action>SkipThisOrchestrationStep</Action>
         </Precondition>
       </Preconditions>
       <ClaimsExchanges>
         <ClaimsExchange Id="AADUserWrite" TechnicalProfileReferenceId="AAD-UserWriteUsingAlternativeSecurityId" />
       </ClaimsExchanges>
     </OrchestrationStep>
     <OrchestrationStep Order="7" Type="SendClaims" CpimIssuerTechnicalProfileReferenceId="JwtIssuer" />
   </OrchestrationSteps>
   <ClientDefinition ReferenceId="DefaultWeb" />
 </UserJourney>
依存当事者ポリシーを構成する
証明書利用者ポリシーは、Azure AD B2C で実行されるユーザー体験を指定します。 アプリケーションに渡される要求を制御できます。 eID-Me-OIDC-Signup TechnicalProfile 要素の OutputClaims 要素を調整します。 次の例では、アプリケーションはユーザーの郵便番号、地方自治体、地域、IAL、顔写真、ミドルネーム、生年月日を受け取ります。 アカウントが作成されているかどうかを示すブール型の signupConditionsSatisfied 要求を受信します。
 <RelyingParty>
     <DefaultUserJourney ReferenceId="eIDMe-SignUpOrSignIn" />
     <TechnicalProfile Id="PolicyProfile">
       <DisplayName>PolicyProfile</DisplayName>
       <Protocol Name="OpenIdConnect" />
       <OutputClaims>
         <OutputClaim ClaimTypeReferenceId="displayName" />
         <OutputClaim ClaimTypeReferenceId="givenName" />
         <OutputClaim ClaimTypeReferenceId="surname" />
         <OutputClaim ClaimTypeReferenceId="email" />
         <OutputClaim ClaimTypeReferenceId="objectId" PartnerClaimType="sub"/>
         <OutputClaim ClaimTypeReferenceId="identityProvider" />
         <OutputClaim ClaimTypeReferenceId="tenantId" AlwaysUseDefaultValue="true" DefaultValue="{Policy:TenantObjectId}" />
         <OutputClaim ClaimTypeReferenceId="postalCode" PartnerClaimType="postal_code" DefaultValue="unknown postal_code" />
         <OutputClaim ClaimTypeReferenceId="locality" PartnerClaimType="locality" DefaultValue="unknown locality" />
         <OutputClaim ClaimTypeReferenceId="region" PartnerClaimType="region" DefaultValue="unknown region" />
         <OutputClaim ClaimTypeReferenceId="IAL" PartnerClaimType="identity_assurance_level_achieved" DefaultValue="unknown IAL" />
         <OutputClaim ClaimTypeReferenceId="picture" PartnerClaimType="thumbnail_portrait" DefaultValue="unknown portrait" />
         <OutputClaim ClaimTypeReferenceId="middle_name" PartnerClaimType="middle_name" DefaultValue="unknown middle name" />
         <OutputClaim ClaimTypeReferenceId="birthdate" PartnerClaimType="birthdate" DefaultValue="unknown DOB" />
         <OutputClaim ClaimTypeReferenceId="newUser" PartnerClaimType="signupConditionsSatisfied" DefaultValue="false" />
       </OutputClaims>
       <SubjectNamingInfo ClaimType="sub" />
     </TechnicalProfile>
   </RelyingParty>
カスタム ポリシーをアップロードする
次の手順では、Azure AD B2C テナントでディレクトリを使用します。
- Azure portal にサインインします。
- ポータルのツール バーで、[ ディレクトリとサブスクリプション] を選択します。
- ポータルの設定の [ ディレクトリとサブスクリプション ] ページの [ディレクトリ名 ] ボックスの一覧で、Azure AD B2C ディレクトリを見つけます。
- [ 切り替え] を選択します。
- Azure portal で、 [Azure AD B2C] を検索して選択します。
- [ ポリシー] で、[ Identity Experience Framework] を選択します。
- [ カスタム ポリシーのアップロード] を選択します。
- 変更した 2 つのポリシー ファイルを次の順序でアップロードします。
- 拡張機能ポリシー (例:
TrustFrameworkBase.xml - 信頼当事者ポリシー (例:
SignUp.xml
カスタム ポリシーをテストする
- 信頼当事者ポリシーを選択します。例えば、
B2C_1A_signup。 - [ アプリケーション] で、登録した Web アプリケーションを選択します。
-
応答 URL が
https://jwt.ms。 - [今すぐ実行] を選択します。
- サインアップ ポリシーによって eID-Me が呼び出されます。
- サインインの場合は、 eID-Me を選択します。
- ブラウザーが
https://jwt.msにリダイレクトされます。 - Azure AD B2C によって返されるトークンの内容が表示されます。
詳細情報: チュートリアル: Azure AD B2C に Web アプリケーションを登録する