重要
2025 年 5 月 1 日より、Azure AD B2C は新規のお客様向けに購入できなくなります。 詳細については、FAQ を参照してください。
このチュートリアルでは、Azure Active Directory B2C (Azure AD B2C) 認証を xID デジタル ID ソリューションと統合する方法について説明します。 xID アプリは、パスワードレスで安全な多要素認証をユーザーに提供します。 日本政府が発行するデジタルIDカードであるマイナンバーカードは、xID認証されたユーザーIDを検証します。 ユーザーの場合、組織は xID API を使用して検証済みの個人識別情報 (顧客コンテンツ) を取得できます。 さらに、xID アプリは、ユーザーのモバイル デバイスのセキュリティで保護された領域に秘密キーを生成し、デジタル署名デバイスにします。
[前提条件]
Azure サブスクリプション
- お持ちでない場合は、Azure 無料アカウントを取得できます
Azure サブスクリプションにリンクされた Azure AD B2C テナント
xID inc. によって提供された xID クライアント情報
xID クライアント情報については、xid.inc の [お問い合わせ] ページに移動します。
- クライアントID
- クライアント シークレット
- リダイレクト URL
- スコープ
x-id.me に移動して、モバイル デバイスに xID アプリ をインストールします。
- マイ ナンバー カード
- API UAT バージョンを使用する場合は、xID アプリの UAT バージョンを取得します。 参照、 お問い合わせ
シナリオの説明
次の図は、アーキテクチャを示しています。
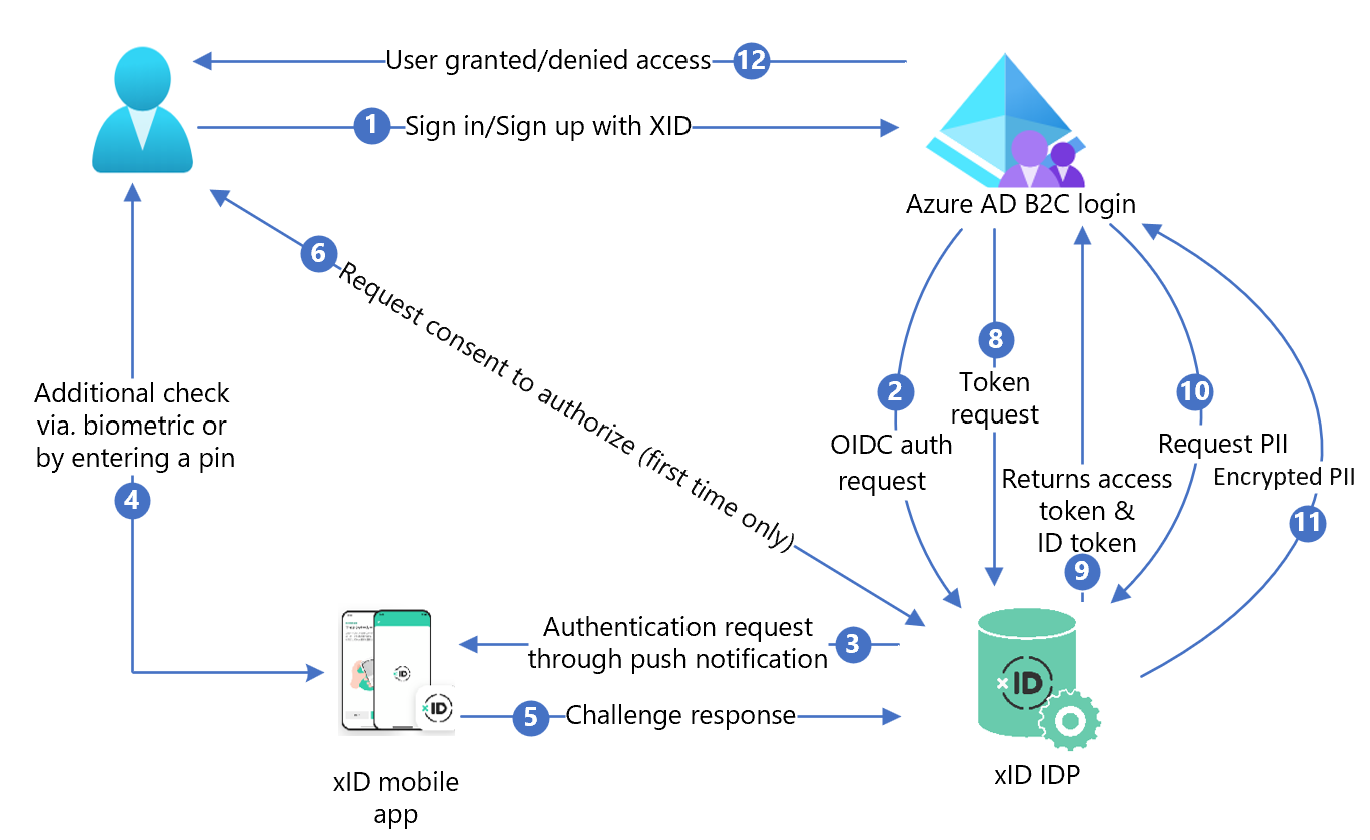
- Azure AD B2C サインイン ページで、ユーザーがサインインまたはサインアップします。
- Azure AD B2C は、OpenID Connect (OIDC) 要求を使用して、ユーザーを xID 承認 API エンドポイントにリダイレクトします。 OIDC エンドポイントにはエンドポイント情報があります。 xID ID プロバイダー (IdP) は、ユーザーを xID 承認サインイン ページにリダイレクトします。 ユーザーが電子メール アドレスを入力します。
- xID IdP は、ユーザーのモバイル デバイスにプッシュ通知を送信します。
- ユーザーが xID アプリを開いたり、要求を確認したり、PIN を入力したり、生体認証を使用したりします。 xID アプリは秘密キーをアクティブ化し、電子署名を作成します。
- xID アプリは、検証のために署名を xID IdP に送信します。
- 同意画面が表示され、サービスに個人情報が提供されます。
- xID IdP は、OAuth 承認コードを Azure AD B2C に返します。
- Azure AD B2C は、承認コードを使用してトークン要求を送信します。
- xID IdP はトークン要求をチェックします。 有効な場合は、OAuth アクセス トークンが返され、ユーザー ID と電子メール アドレスを持つ ID トークンが返されます。
- ユーザーの顧客コンテンツが必要な場合、Azure AD B2C は xID ユーザー データ API を呼び出します。
- xID ユーザー データ API は、暗号化された顧客コンテンツを返します。 ユーザーは、xID クライアント情報を要求するときに作成された秘密キーで暗号化を解除します。
- ユーザーは、顧客アプリケーションへのアクセスを許可または拒否されます。
xID をインストールする
- API ドキュメントを要求するには、要求フォームに入力します。 [お問い合わせ] に移動します。
- メッセージで、Azure AD B2C を使用していることを示します。
- xID 営業担当者から連絡があります。
- xID API ドキュメントの指示に従います。
- xID API クライアントを要求します。
- xID 技術チームは、3 ~ 4 営業日以内にクライアント情報を送信します。
- 次のパターンを使用して、サイトにリダイレクト URI を指定します。 ユーザーは認証後にそれに戻ります。
https://<your-b2c-domain>.b2clogin.com/<your-b2c-domain>.onmicrosoft.com/oauth2/authresp
Azure AD B2C に Web アプリケーションを登録する
管理するテナントにアプリケーションを登録すると、アプリケーションは Azure AD B2C と対話できます。
詳細情報: Active Directory B2C で使用できるアプリケーションの種類
テストでは、デコードされたトークンコンテンツを持つ Microsoft Web アプリケーション https://jwt.ms登録します。これはブラウザーから離れることはありません。
Web アプリケーションを登録する
チュートリアル: Azure Active Directory B2C への Web アプリケーションの登録に関する記事の手順を完了します。
xID ポリシー キーを作成する
xID のクライアント シークレットを Azure AD B2C テナントに格納します。 次の手順では、Azure AD B2C テナントでディレクトリを使用します。
- Azure portal にサインインします。
- ポータルのツール バーで、[ ディレクトリとサブスクリプション] を選択します。
- ポータルの 設定 |[ディレクトリとサブスクリプション ] ページの [ディレクトリ名] 一覧で、Azure AD B2C ディレクトリを見つけます。
- [ 切り替え] を選択します。
- Azure portal の左上隅にある [ すべてのサービス] を選択します。
- Azure AD B2C を検索して選択します。
- [ 概要] で、[ Identity Experience Framework] を選択します。
- [ポリシー キー] を選択します。
- [] を選択し、[] を追加します。
- [オプション] で、[手動] を選択します。
- ポリシー キーの 名前 を入力します。 プレフィックス
B2C_1A_がキー名に追加されます。 - [ シークレット] に、xID のクライアント シークレットを入力します。
- [キー使用法] には [署名] を選択します。
- を選択してを作成します。
xID を ID プロバイダーとして構成する
ユーザーが xID を使用してサインインするには、xID を、Azure AD B2C がエンドポイントを介して通信するクレーム プロバイダーにします。 エンドポイントは、Azure AD B2C がデバイスでデジタル ID で認証されたユーザーを検証するために使用する要求を提供します。
クレーム プロバイダーとして xID を追加する
GitHub からカスタム ポリシー スターター パックを取得し、SocialAccounts スターター パックの XML ファイルを Azure AD B2C テナント名で更新します。
zip ファイル active-directory-b2c-policy-starterpack-main をダウンロードするか、リポジトリを複製します。 Azure-Samples/active-directory-b2c-custom-policy-starterpack をご覧ください。
SocialAccounts ディレクトリ内のファイルで、
yourtenant文字列を Azure AD B2C テナントの名前に置き換えます。 たとえば、yourtenant.onmicrosoft.comがcontoso.onmicrosoft.comになります。SocialAccounts/TrustFrameworkExtensions.xmlを開きます。
ClaimsProviders 要素を検索します。 存在しない場合は、ルート要素の下に追加します。
次の例のような新しい ClaimsProvider を追加します。
 <ClaimsProvider>
   <Domain>X-ID</Domain>
   <DisplayName>X-ID</DisplayName>
   <TechnicalProfiles>
     <TechnicalProfile Id="X-ID-OIDC">
       <DisplayName>X-ID</DisplayName>
       <Description>Login with your X-ID account</Description>
       <Protocol Name="OpenIdConnect" />
       <Metadata>
         <Item Key="METADATA">https://oidc-uat.x-id.io/.well-known/openid-configuration</Item>
         <!-- Update the Client ID below to the X-ID Application ID -->
         <Item Key="client_id">00001111-aaaa-2222-bbbb-3333cccc4444</Item>
         <Item Key="response_types">code</Item>
         <Item Key="scope">openid verification</Item>
         <Item Key="response_mode">query</Item>
         <Item Key="HttpBinding">POST</Item>
         <Item Key="UsePolicyInRedirectUri">false</Item>
         <Item Key="DiscoverMetadataByTokenIssuer">true</Item>
         <Item Key="token_endpoint_auth_method">client_secret_basic</Item>
         <Item Key="ClaimsEndpoint">https://oidc-uat.x-id.io/userinfo</Item>
         <Item Key="ValidTokenIssuerPrefixes">https://oidc-uat.x-id.io/</Item>
       </Metadata>
       <CryptographicKeys>
         <Key Id="client_secret" StorageReferenceId="B2C_1A_XIDSecAppSecret" />
       </CryptographicKeys>
       <OutputClaims>
         <OutputClaim ClaimTypeReferenceId="issuerUserId" PartnerClaimType="sub" />
         <OutputClaim ClaimTypeReferenceId="tenantId" PartnerClaimType="tid" />
         <OutputClaim ClaimTypeReferenceId="email" />
         <OutputClaim ClaimTypeReferenceId="sid" />
         <OutputClaim ClaimTypeReferenceId="userdataid" />
         <OutputClaim ClaimTypeReferenceId="XID_verified" />
         <OutputClaim ClaimTypeReferenceId="email_verified" />
         <OutputClaim ClaimTypeReferenceId="authenticationSource" DefaultValue="socialIdpAuthentication" AlwaysUseDefaultValue="true" />
         <OutputClaim ClaimTypeReferenceId="identityProvider" PartnerClaimType="iss" DefaultValue="https://oidc-uat.x-id.io/" />
         <OutputClaim ClaimTypeReferenceId="identityProviderAccessToken" PartnerClaimType="{oauth2:access_token}" />
       </OutputClaims>
       <OutputClaimsTransformations>
         <OutputClaimsTransformation ReferenceId="CreateRandomUPNUserName" />
         <OutputClaimsTransformation ReferenceId="CreateUserPrincipalName" />
         <OutputClaimsTransformation ReferenceId="CreateAlternativeSecurityId" />
         <OutputClaimsTransformation ReferenceId="CreateSubjectClaimFromAlternativeSecurityId" />
       </OutputClaimsTransformations>
       <UseTechnicalProfileForSessionManagement ReferenceId="SM-SocialLogin" />
     </TechnicalProfile>

   <TechnicalProfile Id="X-ID-Userdata">
     <DisplayName>Userdata (Personal Information)</DisplayName>
     <Protocol Name="Proprietary" Handler="Web.TPEngine.Providers.RestfulProvider, Web.TPEngine, Version=1.0.0.0, Culture=neutral, PublicKeyToken=null" />
     <Metadata>
       <Item Key="ServiceUrl">https://api-uat.x-id.io/v4/verification/userdata</Item>
       <Item Key="SendClaimsIn">Header</Item>
       <Item Key="AuthenticationType">Bearer</Item>
       <Item Key="UseClaimAsBearerToken">identityProviderAccessToken</Item>
       <!-- <Item Key="AllowInsecureAuthInProduction">true</Item> -->
       <Item Key="DebugMode">true</Item>
       <Item Key="DefaultUserMessageIfRequestFailed">Can't process your request right now, please try again later.</Item>
     </Metadata>
     <InputClaims>
       <!-- Claims sent to your REST API -->
       <InputClaim ClaimTypeReferenceId="identityProviderAccessToken" />
     </InputClaims>
     <OutputClaims>
       <!-- Claims parsed from your REST API -->
       <OutputClaim ClaimTypeReferenceId="last_name" />
       <OutputClaim ClaimTypeReferenceId="first_name" />
       <OutputClaim ClaimTypeReferenceId="previous_name" />
       <OutputClaim ClaimTypeReferenceId="year" />
       <OutputClaim ClaimTypeReferenceId="month" />
       <OutputClaim ClaimTypeReferenceId="date" />
       <OutputClaim ClaimTypeReferenceId="prefecture" />
       <OutputClaim ClaimTypeReferenceId="city" />
       <OutputClaim ClaimTypeReferenceId="address" />
       <OutputClaim ClaimTypeReferenceId="sub_char_common_name" />
       <OutputClaim ClaimTypeReferenceId="sub_char_previous_name" />
       <OutputClaim ClaimTypeReferenceId="sub_char_address" />
       <OutputClaim ClaimTypeReferenceId="gender" />
       <OutputClaim ClaimTypeReferenceId="verified_at" />
     </OutputClaims>
     <UseTechnicalProfileForSessionManagement ReferenceId="SM-Noop" />
   </TechnicalProfile>
 </TechnicalProfiles>
 </ClaimsProvider>
xID アプリケーション ID でclient_idを設定します。
保存 を選択します。
ユーザー体験を追加する
サインイン ページに ID プロバイダーを追加します。
- カスタム ユーザー体験がある場合は、「 ユーザー体験に ID プロバイダーを追加する」に移動します。 それ以外の場合は、テンプレート ユーザー体験の複製を作成します。
- スターター パックから、 TrustFrameworkBase.xmlを開きます。
-
を含む
ID=SignUpOrSignIn内容を見つけてコピーします。 - TrustFrameworkExtensions.xml を開き、UserJourneys 要素を見つけます。 存在しない場合は、追加します。
- UserJourney 要素の内容を UserJourneys 要素の子として貼り付けます。
- ユーザージャーニー ID の名前を変更します。 たとえば、
ID=CustomSignUpSignInのように指定します。
ID プロバイダーをユーザー体験に追加する
新しい ID プロバイダーをユーザー体験に追加します。
- ユーザー体験で Type=
CombinedSignInAndSignUp、または Type=ClaimsProviderSelectionのオーケストレーション ステップ要素を見つけます。 通常は、オーケストレーションの最初の手順です。 ClaimsProviderSelections 要素には、サインイン用の ID プロバイダーの一覧があります。 要素の順序は、サインイン ボタンの順序を制御します。 - ClaimsProviderSelection XML 要素を追加します。
- TargetClaimsExchangeId の値をフレンドリ名に設定します。
- ClaimsExchange 要素を追加します。
-
ID をターゲット要求交換 ID の値に設定します。 この変更により、xID ボタンが
X-IDExchangeアクションにリンクされます。 -
TechnicalProfileReferenceId の値を、作成した技術プロファイル ID (
X-ID-OIDC) に更新します。 - 認証されたユーザー
X-ID-Userdataに関する要求を返す xID UserInfo エンドポイントを呼び出すオーケストレーション ステップを追加します。
次の XML は、xID ID プロバイダーを使用したユーザー体験オーケストレーションを示しています。
 <UserJourney Id="CombinedSignInAndSignUp">
   <OrchestrationSteps>

     <OrchestrationStep Order="1" Type="CombinedSignInAndSignUp" ContentDefinitionReferenceId="api.signuporsignin">
       <ClaimsProviderSelections>
         <ClaimsProviderSelection TargetClaimsExchangeId="X-IDExchange" />
       </ClaimsProviderSelections>
     </OrchestrationStep>

     <OrchestrationStep Order="2" Type="ClaimsExchange">
       <ClaimsExchanges>
         <ClaimsExchange Id="X-IDExchange" TechnicalProfileReferenceId="X-ID-OIDC" />
       </ClaimsExchanges>
     </OrchestrationStep>

     <OrchestrationStep Order="3" Type="ClaimsExchange">
       <ClaimsExchanges>
         <ClaimsExchange Id="X-ID-Userdata" TechnicalProfileReferenceId="X-ID-Userdata" />
       </ClaimsExchanges>
     </OrchestrationStep>

     <!-- For social IDP authentication, attempt to find the user account in the directory. -->
     <OrchestrationStep Order="4" Type="ClaimsExchange">
       <ClaimsExchanges>
         <ClaimsExchange Id="AADUserReadUsingAlternativeSecurityId" TechnicalProfileReferenceId="AAD-UserReadUsingAlternativeSecurityId-NoError" />
       </ClaimsExchanges>
     </OrchestrationStep>

     <!-- Show self-asserted page only if the directory does not have the user account already (i.e. we do not have an objectId).  -->
     <OrchestrationStep Order="5" Type="ClaimsExchange">
       <Preconditions>
         <Precondition Type="ClaimsExist" ExecuteActionsIf="true">
           <Value>objectId</Value>
           <Action>SkipThisOrchestrationStep</Action>
         </Precondition>
       </Preconditions>
       <ClaimsExchanges>
         <ClaimsExchange Id="SelfAsserted-Social" TechnicalProfileReferenceId="SelfAsserted-Social" />
       </ClaimsExchanges>
     </OrchestrationStep>

     <!-- The previous step (SelfAsserted-Social) could have been skipped if there were no attributes to collect
          from the user. So, in that case, create the user in the directory if one does not already exist
          (verified using objectId which would be set from the last step if account was created in the directory. -->
     <OrchestrationStep Order="6" Type="ClaimsExchange">
       <Preconditions>
         <Precondition Type="ClaimsExist" ExecuteActionsIf="true">
           <Value>objectId</Value>
           <Action>SkipThisOrchestrationStep</Action>
         </Precondition>
       </Preconditions>
       <ClaimsExchanges>
         <ClaimsExchange Id="AADUserWrite" TechnicalProfileReferenceId="AAD-UserWriteUsingAlternativeSecurityId" />
       </ClaimsExchanges>
     </OrchestrationStep>

     <OrchestrationStep Order="7" Type="SendClaims" CpimIssuerTechnicalProfileReferenceId="JwtIssuer" />

   </OrchestrationSteps>
   <ClientDefinition ReferenceId="DefaultWeb" />
 </UserJourney>
ポリシーの一部として、xID がサポートする ID 要求が含まれています。 要求スキーマは、要求を宣言する場所です。 ClaimsSchema 要素には ClaimType 要素リストがあります。 ClaimType 要素には、要求名である ID 属性が含まれています。
- TrustFrameworksExtension.xmlを開きます。
- BuildingBlocks 要素を見つけます。
- TrustFrameworksExtension.xml ポリシーの ClaimsSchema 要素に次の ClaimType 要素を追加します
 <BuildingBlocks>
    <ClaimsSchema>
      <!-- xID -->
      <ClaimType Id="sid">
        <DisplayName>sid</DisplayName>
        <DataType>string</DataType>
      </ClaimType>
      <ClaimType Id="userdataid">
        <DisplayName>userdataid</DisplayName>
        <DataType>string</DataType>
      </ClaimType>
      <ClaimType Id="xid_verified">
        <DisplayName>xid_verified</DisplayName>
        <DataType>boolean</DataType>
      </ClaimType>
      <ClaimType Id="email_verified">
        <DisplayName>email_verified</DisplayName>
        <DataType>boolean</DataType>
      </ClaimType>
      <ClaimType Id="identityProviderAccessToken">
        <DisplayName>Identity Provider Access Token</DisplayName>
        <DataType>string</DataType>
        <AdminHelpText>Stores the access token of the identity provider.</AdminHelpText>
      </ClaimType>
      <ClaimType Id="last_name">
        <DisplayName>last_name</DisplayName>
        <DataType>string</DataType>
      </ClaimType>
      <ClaimType Id="first_name">
        <DisplayName>first_name</DisplayName>
        <DataType>string</DataType>
      </ClaimType>
      <ClaimType Id="previous_name">
        <DisplayName>previous_name</DisplayName>
        <DataType>string</DataType>
      </ClaimType>
      <ClaimType Id="year">
        <DisplayName>year</DisplayName>
        <DataType>string</DataType>
      </ClaimType>
      <ClaimType Id="month">
        <DisplayName>month</DisplayName>
        <DataType>string</DataType>
      </ClaimType>
      <ClaimType Id="date">
        <DisplayName>date</DisplayName>
        <DataType>string</DataType>
      </ClaimType>
      <ClaimType Id="prefecture">
        <DisplayName>prefecture</DisplayName>
        <DataType>string</DataType>
      </ClaimType>
      <ClaimType Id="city">
        <DisplayName>city</DisplayName>
        <DataType>string</DataType>
      </ClaimType>
      <ClaimType Id="address">
        <DisplayName>address</DisplayName>
        <DataType>string</DataType>
      </ClaimType>
      <ClaimType Id="sub_char_common_name">
        <DisplayName>sub_char_common_name</DisplayName>
        <DataType>string</DataType>
      </ClaimType>
      <ClaimType Id="sub_char_previous_name">
        <DisplayName>sub_char_previous_name</DisplayName>
        <DataType>string</DataType>
      </ClaimType>
      <ClaimType Id="sub_char_address">
        <DisplayName>sub_char_address</DisplayName>
        <DataType>string</DataType>
      </ClaimType>
      <ClaimType Id="verified_at">
        <DisplayName>verified_at</DisplayName>
        <DataType>int</DataType>
      </ClaimType>
      <ClaimType Id="gender">
        <DisplayName>Gender</DisplayName>
        <DataType>string</DataType>
        <DefaultPartnerClaimTypes>
          <Protocol Name="OpenIdConnect" PartnerClaimType="gender" />
        </DefaultPartnerClaimTypes>
        <AdminHelpText>The user's gender.</AdminHelpText>
        <UserHelpText>Your gender.</UserHelpText>
        <UserInputType>TextBox</UserInputType>
      </ClaimType>
      <ClaimType Id="correlationId">
        <DisplayName>correlation ID</DisplayName>
        <DataType>string</DataType>
      </ClaimType>
      <!-- xID -->
    </ClaimsSchema>
  </BuildingBlocks>
依存先パーティーポリシーを構成する
証明書利用者ポリシー ( SignUpSignIn.xmlなど) は、Azure AD B2C が実行するユーザー体験を指定します。
- 依存先で、DefaultUserJourney 要素を見つけてください。
- ID プロバイダーに追加したユーザー ジャーニー ID と一致するように ReferenceId を更新してください。
次の例では、xID ユーザー体験の ReferenceId が CombinedSignInAndSignUp に設定されています。
   <RelyingParty>
        <DefaultUserJourney ReferenceId="CombinedSignInAndSignUp" />
        <TechnicalProfile Id="PolicyProfile">
          <DisplayName>PolicyProfile</DisplayName>
          <Protocol Name="OpenIdConnect" />
          <OutputClaims>
          <OutputClaim ClaimTypeReferenceId="objectId" PartnerClaimType="sub" />
          <OutputClaim ClaimTypeReferenceId="tenantId" AlwaysUseDefaultValue="true" DefaultValue="{Policy:TenantObjectId}" />
          <OutputClaim ClaimTypeReferenceId="correlationId" DefaultValue="{Context:CorrelationId}" />
          <OutputClaim ClaimTypeReferenceId="issuerUserId" />
          <OutputClaim ClaimTypeReferenceId="givenName" PartnerClaimType="first_name" />
          <OutputClaim ClaimTypeReferenceId="surName" PartnerClaimType="last_name" />
          <OutputClaim ClaimTypeReferenceId="previous_name" />
          <OutputClaim ClaimTypeReferenceId="year" />
          <OutputClaim ClaimTypeReferenceId="month" />
          <OutputClaim ClaimTypeReferenceId="date" />
          <OutputClaim ClaimTypeReferenceId="prefecture" />
          <OutputClaim ClaimTypeReferenceId="city" />
          <OutputClaim ClaimTypeReferenceId="address" />
          <OutputClaim ClaimTypeReferenceId="sub_char_common_name" />
          <OutputClaim ClaimTypeReferenceId="sub_char_previous_name" />
          <OutputClaim ClaimTypeReferenceId="sub_char_address" />
          <OutputClaim ClaimTypeReferenceId="gender" />
          <OutputClaim ClaimTypeReferenceId="verified_at" />
          <OutputClaim ClaimTypeReferenceId="email" />
          <OutputClaim ClaimTypeReferenceId="sid" />
          <OutputClaim ClaimTypeReferenceId="userdataid" />
          <OutputClaim ClaimTypeReferenceId="xid_verified" />
          <OutputClaim ClaimTypeReferenceId="email_verified" />
          </OutputClaims>
          <SubjectNamingInfo ClaimType="sub" />
        </TechnicalProfile>
      </RelyingParty>
カスタム ポリシーをアップロードする
次の手順では、Azure AD B2C テナントでディレクトリを使用します。
- Azure portal にサインインします。
- ポータルのツール バーで、[ ディレクトリとサブスクリプション] を選択します。
- ポータルの設定 |ディレクトリ名の一覧の [ディレクトリとサブスクリプション] ページ。 Azure AD B2C ディレクトリを見つけます。
- [ 切り替え] を選択します。
- Azure portal で、Azure AD B2C を検索して選択します。
- [ポリシー] で、[ Identity Experience Framework] を選択します。
- [ カスタム ポリシーのアップロード] を選択します。
- 次の順序でファイルをアップロードします。
- 基本ポリシー ファイル:
TrustFrameworkBase.xml - 拡張機能ポリシー:
TrustFrameworkExtensions.xml - 証明書利用者ポリシー:
SignUpSignIn.xml
カスタム ポリシーをテストする
- Azure AD B2C テナントで、[ ポリシー] で [ Identity Experience Framework] を選択します。
- [ カスタム ポリシー] で、[ CustomSignUpSignIn] を選択します。
- [ アプリケーション] で、登録した Web アプリケーションを選択します。
応答 URL が
https://jwt.ms。 - [今すぐ実行] を選択します。
- ブラウザーが xID サインイン ページにリダイレクトされます。
- ブラウザーが
https://jwt.msにリダイレクトされます。 Azure AD B2C によって返されるトークンの内容が表示されます。