チュートリアル:iOS または macOS アプリからユーザーのサインインを行い、Microsoft Graph を呼び出す

このチュートリアルでは、Microsoft ID プラットフォームと連携してユーザーのサインインを処理し、Microsoft Graph API を呼び出すためのアクセス トークンを取得する iOS アプリまたは macOS アプリを作成します。

このチュートリアルを完了すると、アプリケーションは、個人用の Microsoft アカウント (outlook.com、live.com など) と、Microsoft Entra ID を使用する会社や組織の職場または学校アカウントのサインインを受け入れるようになります。 このチュートリアルは、iOS アプリと macOS アプリの両方に適用されます。 この 2 つのプラットフォームの間では、一部の手順が異なります。

このチュートリアルの内容:

  • Xcode で iOS または macOS アプリ プロジェクトを作成する
  • Microsoft Entra 管理センターでアプリを登録する
  • ユーザーのサインインとサインアウトをサポートするコードを追加する
  • Microsoft Graph API を呼び出すコードを追加する
  • アプリケーションをテストする

前提条件

チュートリアル アプリの動作

Screenshot of how the sample app generated by this tutorial works.

このチュートリアルのアプリによって、ユーザーに代わってサインインし、Microsoft Graph からデータが取得されます。 このデータは、承認を要求し、Microsoft ID プラットフォームによって保護される API (ここでは Microsoft Graph API) を介してアクセスされます。

具体的には次のとおりです。

  • アプリがブラウザーまたは Microsoft Authenticator を介してユーザーをサインインします。
  • エンド ユーザーが、アプリケーションから要求されたアクセス許可を受け入れます。
  • アプリケーションには、Microsoft Graph API 用のアクセス トークンが発行されます。
  • アクセス トークンは、Web API への HTTP 要求に含められます。
  • Microsoft Graph の応答を処理します。

このサンプルでは、Microsoft Authentication Library (MSAL) を使用して認証が実装されます。 MSAL により、トークンが自動的に更新され、デバイス上の他のアプリとの間のシングル サインオン (SSO) が提供されて、アカウントが管理されます。

このチュートリアルで作成するアプリの完成版をダウンロードしたい場合、どちらのバージョンも GitHub から入手できます。

新しいプロジェクトを作成する

  1. Xcode を開き、 [Create a new Xcode project (新しい Xcode プロジェクトを作成)] を選択します。
  2. iOS アプリの場合は、 [iOS]>[単一ビュー アプリ] を選択し、 [次へ] を選択します。
  3. macOS アプリの場合は、 [macOS]>[Cocoa アプリ] を選択し、 [次へ] を選択します。
  4. 製品名を指定します。
  5. [言語][Swift] に設定し、 [次へ] を選択します。
  6. アプリを作成するフォルダーを選択し、 [作成] を選択します。

アプリケーションを登録する

ヒント

この記事の手順は、開始するポータルによって若干異なる場合があります。

  1. アプリケーション開発者以上として Microsoft Entra 管理センターにサインインします。
  2. 複数のテナントにアクセスできる場合は、上部のメニューの [設定] アイコン を使い、[ディレクトリとサブスクリプション] メニューからアプリケーションを登録するテナントに切り替えます。
  3. [ID]>[アプリケーション]>[アプリの登録] を参照します。
  4. [新規登録] を選択します。
  5. アプリケーションの [名前] を入力します。 アプリのユーザーにはこの名前が表示されます。後で変更することもできます。
  6. [サポートされているアカウントの種類] で、[Accounts in any organizational directory (Any Microsoft Entra directory - Multitenant) and personal Microsoft accounts (e.g. Skype, Xbox)](任意の組織ディレクトリ (任意の Microsoft Entra ディレクトリ - マルチテナント) 内のアカウントと、個人用の Microsoft アカウント (Skype、Xbox など)) を選択します。
  7. [登録] を選択します。
  8. [管理] で、 [認証]>[プラットフォームの追加]>[iOS/macOS] の順に選択します。
  9. プロジェクトのバンドル ID を入力します。 コード サンプルをダウンロードすると、バンドル ID は com.microsoft.identitysample.MSALiOS になります。 独自のプロジェクトを作成している場合は、Xcode でそのプロジェクトを選択し、 [全般] タブを開きます。 [ID] セクションにバンドル ID が表示されます。
  10. [構成] をクリックし、後でアプリを構成するときに入力できるように、 [MSAL の構成] ページに表示される [MSAL 構成] を保存しておきます。
  11. [Done] を選択します。

MSAL の追加

次のいずれかの方法を選択して、アプリに MSAL ライブラリをインストールします。

CocoaPods

  1. CocoaPods を使用している場合は、まずプロジェクトの .xcodeproj ファイルと同じフォルダーに podfile という名前の空のファイルを作成してから、MSAL をインストールします。 Podfile に次のコードを追加して保存します:

    use_frameworks!
    
    target '<your-target-here>' do
       pod 'MSAL'
    end
    
  2. <your-target-here> を自分のプロジェクト名に置き換えます。

  3. ターミナル ウィンドウで、作成した podfile を含むフォルダーに移動し、pod install を実行して MSAL ライブラリをインストールします。

  4. Xcode を閉じて <your project name>.xcworkspace を開き、Xcode にプロジェクトを再度読み込みます。

Carthage

Carthage を使用している場合は、Cartfile に追加することで MSAL をインストールします:

github "AzureAD/microsoft-authentication-library-for-objc" "master"

ターミナル ウィンドウから、更新された Cartfile と同じディレクトリで次のコマンドを実行して、Carthage でのプロジェクトの依存関係を更新します。

iOS:

carthage update --platform iOS

macOS:

carthage update --platform macOS

手動

Git サブモジュールを使用するか、最新のリリースをチェックアウトして、アプリケーションでフレームワークとして使用することもできます。

アプリの登録を追加する

次に、アプリ登録をコードに追加します。

最初に、ViewController.swift ファイルの先頭に次の import ステートメントを追加し、AppDelegate.swift または SceneDelegate.swift を追加します:

import MSAL

次に、viewDidLoad()の前に次のコードを ViewController.swift 追加します:

// Update the below to your client ID. The below is for running the demo only
let kClientID = "Your_Application_Id_Here"
let kGraphEndpoint = "https://graph.microsoft.com/" // the Microsoft Graph endpoint
let kAuthority = "https://login.microsoftonline.com/common" // this authority allows a personal Microsoft account and a work or school account in any organization's Azure AD tenant to sign in

let kScopes: [String] = ["user.read"] // request permission to read the profile of the signed-in user

var accessToken = String()
var applicationContext : MSALPublicClientApplication?
var webViewParameters : MSALWebviewParameters?
var currentAccount: MSALAccount?

変更する値は、kClientID に割り当てるアプリケーション ID の値だけです。 この値は、このチュートリアルの最初のアプリケーションを登録する手順で保存した、MSAL 構成データの一部です。

Xcode プロジェクト設定の構成

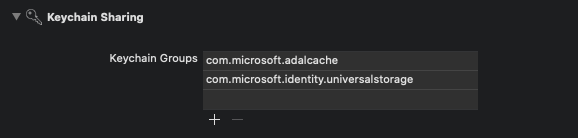
新しいキーチェーン グループをプロジェクトの [Signing & Capabilities]\(署名と機能\) に追加します。 このキーチェーン グループは、iOS の場合は com.microsoft.adalcache、macOS の場合は com.microsoft.identity.universalstorage にする必要があります。

Xcode UI displaying how the keychain group should be set up.

iOS のみ: URL スキームを構成する

この手順では、サインイン後にユーザーがアプリにリダイレクトできるように、CFBundleURLSchemes を登録します。 なお、LSApplicationQueriesSchemes では、アプリでの Microsoft Authenticator の使用も許可されます。

Xcode で、Info.plist をソース コード ファイルとして開き、<dict> セクション内に以下を追加します。 [BUNDLE_ID] を、前に使用した値に置き換えます。 コードをダウンロードした場合、バンドル識別子は com.microsoft.identitysample.MSALiOS です。 独自のプロジェクトを作成している場合は、Xcode でそのプロジェクトを選択し、 [全般] タブを開きます。 [ID] セクションにバンドル ID が表示されます。

<key>CFBundleURLTypes</key>
<array>
    <dict>
        <key>CFBundleURLSchemes</key>
        <array>
            <string>msauth.[BUNDLE_ID]</string>
        </array>
    </dict>
</array>
<key>LSApplicationQueriesSchemes</key>
<array>
    <string>msauthv2</string>
    <string>msauthv3</string>
</array>

macOS のみ: App Sandboxを構成する

  1. [Xcode プロジェクトの設定] >[機能] タブ > [App Sandbox] に移動します。
  2. [発信接続 (クライアント)] チェックボックスをオンにします。

アプリの UI の作成

ここで、次のコードを ViewController クラスに追加して、Microsoft Graph API を呼び出すボタン、サインアウトするボタン、および出力を表示するためのテキスト ビューを含む UI を作成します:

iOS UI

var loggingText: UITextView!
var signOutButton: UIButton!
var callGraphButton: UIButton!
var usernameLabel: UILabel!

func initUI() {

    usernameLabel = UILabel()
    usernameLabel.translatesAutoresizingMaskIntoConstraints = false
    usernameLabel.text = ""
    usernameLabel.textColor = .darkGray
    usernameLabel.textAlignment = .right

    self.view.addSubview(usernameLabel)

    usernameLabel.topAnchor.constraint(equalTo: view.topAnchor, constant: 50.0).isActive = true
    usernameLabel.rightAnchor.constraint(equalTo: view.rightAnchor, constant: -10.0).isActive = true
    usernameLabel.widthAnchor.constraint(equalToConstant: 300.0).isActive = true
    usernameLabel.heightAnchor.constraint(equalToConstant: 50.0).isActive = true

    // Add call Graph button
    callGraphButton  = UIButton()
    callGraphButton.translatesAutoresizingMaskIntoConstraints = false
    callGraphButton.setTitle("Call Microsoft Graph API", for: .normal)
    callGraphButton.setTitleColor(.blue, for: .normal)
    callGraphButton.addTarget(self, action: #selector(callGraphAPI(_:)), for: .touchUpInside)
    self.view.addSubview(callGraphButton)

    callGraphButton.centerXAnchor.constraint(equalTo: view.centerXAnchor).isActive = true
    callGraphButton.topAnchor.constraint(equalTo: view.topAnchor, constant: 120.0).isActive = true
    callGraphButton.widthAnchor.constraint(equalToConstant: 300.0).isActive = true
    callGraphButton.heightAnchor.constraint(equalToConstant: 50.0).isActive = true

    // Add sign out button
    signOutButton = UIButton()
    signOutButton.translatesAutoresizingMaskIntoConstraints = false
    signOutButton.setTitle("Sign Out", for: .normal)
    signOutButton.setTitleColor(.blue, for: .normal)
    signOutButton.setTitleColor(.gray, for: .disabled)
    signOutButton.addTarget(self, action: #selector(signOut(_:)), for: .touchUpInside)
    self.view.addSubview(signOutButton)

    signOutButton.centerXAnchor.constraint(equalTo: view.centerXAnchor).isActive = true
    signOutButton.topAnchor.constraint(equalTo: callGraphButton.bottomAnchor, constant: 10.0).isActive = true
    signOutButton.widthAnchor.constraint(equalToConstant: 150.0).isActive = true
    signOutButton.heightAnchor.constraint(equalToConstant: 50.0).isActive = true

    let deviceModeButton = UIButton()
    deviceModeButton.translatesAutoresizingMaskIntoConstraints = false
    deviceModeButton.setTitle("Get device info", for: .normal);
    deviceModeButton.setTitleColor(.blue, for: .normal);
    deviceModeButton.addTarget(self, action: #selector(getDeviceMode(_:)), for: .touchUpInside)
    self.view.addSubview(deviceModeButton)

    deviceModeButton.centerXAnchor.constraint(equalTo: view.centerXAnchor).isActive = true
    deviceModeButton.topAnchor.constraint(equalTo: signOutButton.bottomAnchor, constant: 10.0).isActive = true
    deviceModeButton.widthAnchor.constraint(equalToConstant: 150.0).isActive = true
    deviceModeButton.heightAnchor.constraint(equalToConstant: 50.0).isActive = true

    // Add logging textfield
    loggingText = UITextView()
    loggingText.isUserInteractionEnabled = false
    loggingText.translatesAutoresizingMaskIntoConstraints = false

    self.view.addSubview(loggingText)

    loggingText.topAnchor.constraint(equalTo: deviceModeButton.bottomAnchor, constant: 10.0).isActive = true
    loggingText.leftAnchor.constraint(equalTo: self.view.leftAnchor, constant: 10.0).isActive = true
    loggingText.rightAnchor.constraint(equalTo: self.view.rightAnchor, constant: -10.0).isActive = true
    loggingText.bottomAnchor.constraint(equalTo: self.view.bottomAnchor, constant: 10.0).isActive = true
}

func platformViewDidLoadSetup() {

    NotificationCenter.default.addObserver(self,
                        selector: #selector(appCameToForeGround(notification:)),
                        name: UIApplication.willEnterForegroundNotification,
                        object: nil)

}

@objc func appCameToForeGround(notification: Notification) {
    self.loadCurrentAccount()
}

macOS UI


var callGraphButton: NSButton!
var loggingText: NSTextView!
var signOutButton: NSButton!

var usernameLabel: NSTextField!

func initUI() {

    usernameLabel = NSTextField()
    usernameLabel.translatesAutoresizingMaskIntoConstraints = false
    usernameLabel.stringValue = ""
    usernameLabel.isEditable = false
    usernameLabel.isBezeled = false
    self.view.addSubview(usernameLabel)

    usernameLabel.topAnchor.constraint(equalTo: view.topAnchor, constant: 30.0).isActive = true
    usernameLabel.rightAnchor.constraint(equalTo: view.rightAnchor, constant: -10.0).isActive = true

    // Add call Graph button
    callGraphButton  = NSButton()
    callGraphButton.translatesAutoresizingMaskIntoConstraints = false
    callGraphButton.title = "Call Microsoft Graph API"
    callGraphButton.target = self
    callGraphButton.action = #selector(callGraphAPI(_:))
    callGraphButton.bezelStyle = .rounded
    self.view.addSubview(callGraphButton)

    callGraphButton.centerXAnchor.constraint(equalTo: view.centerXAnchor).isActive = true
    callGraphButton.topAnchor.constraint(equalTo: view.topAnchor, constant: 50.0).isActive = true
    callGraphButton.heightAnchor.constraint(equalToConstant: 34.0).isActive = true

    // Add sign out button
    signOutButton = NSButton()
    signOutButton.translatesAutoresizingMaskIntoConstraints = false
    signOutButton.title = "Sign Out"
    signOutButton.target = self
    signOutButton.action = #selector(signOut(_:))
    signOutButton.bezelStyle = .texturedRounded
    self.view.addSubview(signOutButton)

    signOutButton.centerXAnchor.constraint(equalTo: view.centerXAnchor).isActive = true
    signOutButton.topAnchor.constraint(equalTo: callGraphButton.bottomAnchor, constant: 10.0).isActive = true
    signOutButton.heightAnchor.constraint(equalToConstant: 34.0).isActive = true
    signOutButton.isEnabled = false

    // Add logging textfield
    loggingText = NSTextView()
    loggingText.translatesAutoresizingMaskIntoConstraints = false

    self.view.addSubview(loggingText)

    loggingText.topAnchor.constraint(equalTo: signOutButton.bottomAnchor, constant: 10.0).isActive = true
    loggingText.leftAnchor.constraint(equalTo: self.view.leftAnchor, constant: 10.0).isActive = true
    loggingText.rightAnchor.constraint(equalTo: self.view.rightAnchor, constant: -10.0).isActive = true
    loggingText.bottomAnchor.constraint(equalTo: self.view.bottomAnchor, constant: -10.0).isActive = true
    loggingText.widthAnchor.constraint(equalToConstant: 500.0).isActive = true
    loggingText.heightAnchor.constraint(equalToConstant: 300.0).isActive = true
}

func platformViewDidLoadSetup() {}

次に、ViewController クラス内でも、viewDidLoad() メソッドを次のように置き換えます。

    override func viewDidLoad() {

        super.viewDidLoad()

        initUI()

        do {
            try self.initMSAL()
        } catch let error {
            self.updateLogging(text: "Unable to create Application Context \(error)")
        }

        self.loadCurrentAccount()
        self.platformViewDidLoadSetup()
    }

MSAL の使用

MSAL の初期化

initMSAL メソッドを ViewController クラスに追加します:

    func initMSAL() throws {

        guard let authorityURL = URL(string: kAuthority) else {
            self.updateLogging(text: "Unable to create authority URL")
            return
        }

        let authority = try MSALAADAuthority(url: authorityURL)

        let msalConfiguration = MSALPublicClientApplicationConfig(clientId: kClientID, redirectUri: nil, authority: authority)
        self.applicationContext = try MSALPublicClientApplication(configuration: msalConfiguration)
        self.initWebViewParams()
    }

まだ ViewController クラス内にあり、initMSAL メソッドの後に initWebViewParams メソッドを追加します:

iOS コード:

func initWebViewParams() {
        self.webViewParameters = MSALWebviewParameters(authPresentationViewController: self)
    }

macOS コード:

func initWebViewParams() {
        self.webViewParameters = MSALWebviewParameters()
    }

サインイン コールバックを処理する (iOS のみ)

AppDelegate.swift ファイルを開きます。 サインイン後のコールバックを処理するには、次のように appDelegate クラスに MSALPublicClientApplication.handleMSALResponse を追加します。

// Inside AppDelegate...
func application(_ app: UIApplication, open url: URL, options: [UIApplication.OpenURLOptionsKey : Any] = [:]) -> Bool {

        return MSALPublicClientApplication.handleMSALResponse(url, sourceApplication: options[UIApplication.OpenURLOptionsKey.sourceApplication] as? String)
}

Xcode 11 を使用している場合は、代わりに MSAL コールバックを SceneDelegate.swift に配置する必要があります。 以前の iOS との互換性を保持するために UISceneDelegate と UIApplicationDelegate の両方をサポートしている場合は、MSAL コールバックを両方のファイルに配置する必要があります。

func scene(_ scene: UIScene, openURLContexts URLContexts: Set<UIOpenURLContext>) {

        guard let urlContext = URLContexts.first else {
            return
        }

        let url = urlContext.url
        let sourceApp = urlContext.options.sourceApplication

        MSALPublicClientApplication.handleMSALResponse(url, sourceApplication: sourceApp)
    }

トークンの取得

これで、アプリケーションの UI 処理ロジックを実装し、MSAL を介して対話的にトークンを取得できるようになりました。

MSAL では、トークンを取得するための主要なメソッドとして acquireTokenSilently()acquireTokenInteractively() が公開されています。

  • acquireTokenSilently() では、ユーザーのサインインが行われ、アカウントが存在すればユーザーとの対話なしにトークンが取得されます。 acquireTokenSilently() では、いずれかの MSAL アカウント列挙 API を使用して取得できる有効な MSALAccount が必要です。 このチュートリアルでは、applicationContext.getCurrentAccount(with: msalParameters, completionBlock: {}) を使用して現在のアカウントを取得します。

  • ユーザーをサインインしようとすると、acquireTokenInteractively() によって常に UI が表示されます。 ブラウザーでセッション Cookie を使用するか、または Microsoft 認証システムでアカウントを使用して、対話型の SSO エクスペリエンスが提供される場合もあります。

以下のコードを ViewController クラスに追加します。

    func getGraphEndpoint() -> String {
        return kGraphEndpoint.hasSuffix("/") ? (kGraphEndpoint + "v1.0/me/") : (kGraphEndpoint + "/v1.0/me/");
    }

    @objc func callGraphAPI(_ sender: AnyObject) {

        self.loadCurrentAccount { (account) in

            guard let currentAccount = account else {

                // We check to see if we have a current logged in account.
                // If we don't, then we need to sign someone in.
                self.acquireTokenInteractively()
                return
            }

            self.acquireTokenSilently(currentAccount)
        }
    }

    typealias AccountCompletion = (MSALAccount?) -> Void

    func loadCurrentAccount(completion: AccountCompletion? = nil) {

        guard let applicationContext = self.applicationContext else { return }

        let msalParameters = MSALParameters()
        msalParameters.completionBlockQueue = DispatchQueue.main

        applicationContext.getCurrentAccount(with: msalParameters, completionBlock: { (currentAccount, previousAccount, error) in

            if let error = error {
                self.updateLogging(text: "Couldn't query current account with error: \(error)")
                return
            }

            if let currentAccount = currentAccount {

                self.updateLogging(text: "Found a signed in account \(String(describing: currentAccount.username)). Updating data for that account...")

                self.updateCurrentAccount(account: currentAccount)

                if let completion = completion {
                    completion(self.currentAccount)
                }

                return
            }

            self.updateLogging(text: "Account signed out. Updating UX")
            self.accessToken = ""
            self.updateCurrentAccount(account: nil)

            if let completion = completion {
                completion(nil)
            }
        })
    }

対話形式でのユーザー トークンの取得

以下のコード スニペットでは、MSALInteractiveTokenParameters オブジェクトを作成して acquireToken を呼び出すことによって、トークンを初めて取得します。 次に、以下を行うコードを追加します。

  1. スコープを指定して MSALInteractiveTokenParameters を作成する。
  2. 作成されたパラメーターを使用して acquireToken() を呼び出す。
  3. エラーを処理する。 詳細については、iOS および macOS 用の MSAL のエラー処理に関するガイドを参照してください。
  4. 正常なケースを処理する。

次のコードを ViewController クラスに追加します。

func acquireTokenInteractively() {

    guard let applicationContext = self.applicationContext else { return }
    guard let webViewParameters = self.webViewParameters else { return }

    // #1
    let parameters = MSALInteractiveTokenParameters(scopes: kScopes, webviewParameters: webViewParameters)
    parameters.promptType = .selectAccount

    // #2
    applicationContext.acquireToken(with: parameters) { (result, error) in

        // #3
        if let error = error {

            self.updateLogging(text: "Could not acquire token: \(error)")
            return
        }

        guard let result = result else {

            self.updateLogging(text: "Could not acquire token: No result returned")
            return
        }

        // #4
        self.accessToken = result.accessToken
        self.updateLogging(text: "Access token is \(self.accessToken)")
        self.updateCurrentAccount(account: result.account)
        self.getContentWithToken()
    }
}

MSALInteractiveTokenParameterspromptType プロパティによって、認証および同意プロンプトの動作が構成されます。 サポートされている値を次に示します。

  • .promptIfNecessary (既定値) - 必要な場合にのみ、ユーザーに対してメッセージが表示されます。 SSO のエクスペリエンスは、Web ビュー内に Cookie があるかどうかと、アカウントの種類によって決まります。 複数のユーザーがサインインしている場合は、アカウントの選択エクスペリエンスが表示されます。 "これは既定の動作です"。
  • .selectAccount - ユーザーが指定されていない場合、認証 Web ビューには、現在サインインしているアカウントの一覧が表示され、ユーザーを選択できます。
  • .login - Web ビューで認証を行うことをユーザーに求めます。 この値を指定した場合、一度にサインインできるアカウントは 1 つだけです。
  • .consent - 要求の現在のスコープ セットに同意することをユーザーに求めます。

トークンの自動取得

更新されたトークンを自動で取得するには、次のコードを ViewController クラスに追加します。 これにより、MSALSilentTokenParameters オブジェクトが作成され、acquireTokenSilent() が呼び出されます。


    func acquireTokenSilently(_ account : MSALAccount!) {

        guard let applicationContext = self.applicationContext else { return }

        /**

         Acquire a token for an existing account silently

         - forScopes:           Permissions you want included in the access token received
         in the result in the completionBlock. Not all scopes are
         guaranteed to be included in the access token returned.
         - account:             An account object that we retrieved from the application object before that the
         authentication flow will be locked down to.
         - completionBlock:     The completion block that will be called when the authentication
         flow completes, or encounters an error.
         */

        let parameters = MSALSilentTokenParameters(scopes: kScopes, account: account)

        applicationContext.acquireTokenSilent(with: parameters) { (result, error) in

            if let error = error {

                let nsError = error as NSError

                // interactionRequired means we need to ask the user to sign-in. This usually happens
                // when the user's Refresh Token is expired or if the user has changed their password
                // among other possible reasons.

                if (nsError.domain == MSALErrorDomain) {

                    if (nsError.code == MSALError.interactionRequired.rawValue) {

                        DispatchQueue.main.async {
                            self.acquireTokenInteractively()
                        }
                        return
                    }
                }

                self.updateLogging(text: "Could not acquire token silently: \(error)")
                return
            }

            guard let result = result else {

                self.updateLogging(text: "Could not acquire token: No result returned")
                return
            }

            self.accessToken = result.accessToken
            self.updateLogging(text: "Refreshed Access token is \(self.accessToken)")
            self.updateSignOutButton(enabled: true)
            self.getContentWithToken()
        }
    }

Microsoft Graph API を呼び出す

トークンを取得したら、アプリでそれを HTTP ヘッダーで使用して、許可された要求を Microsoft Graph に対して行うことができます。

ヘッダー キー value
承認 Bearer <access-token>

以下のコードを ViewController クラスに追加します。

    func getContentWithToken() {

        // Specify the Graph API endpoint
        let graphURI = getGraphEndpoint()
        let url = URL(string: graphURI)
        var request = URLRequest(url: url!)

        // Set the Authorization header for the request. We use Bearer tokens, so we specify Bearer + the token we got from the result
        request.setValue("Bearer \(self.accessToken)", forHTTPHeaderField: "Authorization")

        URLSession.shared.dataTask(with: request) { data, response, error in

            if let error = error {
                self.updateLogging(text: "Couldn't get graph result: \(error)")
                return
            }

            guard let result = try? JSONSerialization.jsonObject(with: data!, options: []) else {

                self.updateLogging(text: "Couldn't deserialize result JSON")
                return
            }

            self.updateLogging(text: "Result from Graph: \(result))")

            }.resume()
    }

Microsoft Graph API の詳細については、Microsoft Graph API に関するページを参照してください。

サインアウトに MSAL を使用する

次に、サインアウトのサポートを追加します。

重要

MSAL でサインアウトすると、ユーザーに関する既知の情報がすべてアプリケーションから削除されるほか、デバイス構成で許可されている場合、デバイスのアクティブなセッションも削除されます。 必要に応じて、ブラウザーからユーザーをサインアウトさせることもできます。

サインアウト機能を追加するには、ViewController クラスの内部に次のコードを追加します。

@objc func signOut(_ sender: AnyObject) {

        guard let applicationContext = self.applicationContext else { return }

        guard let account = self.currentAccount else { return }

        do {

            /**
             Removes all tokens from the cache for this application for the provided account

             - account:    The account to remove from the cache
             */

            let signoutParameters = MSALSignoutParameters(webviewParameters: self.webViewParameters!)
            signoutParameters.signoutFromBrowser = false // set this to true if you also want to signout from browser or webview

            applicationContext.signout(with: account, signoutParameters: signoutParameters, completionBlock: {(success, error) in

                if let error = error {
                    self.updateLogging(text: "Couldn't sign out account with error: \(error)")
                    return
                }

                self.updateLogging(text: "Sign out completed successfully")
                self.accessToken = ""
                self.updateCurrentAccount(account: nil)
            })

        }
    }

トークンのキャッシュの有効化

MSAL では、既定でアプリのトークンが iOS または macOS のキーチェーンにキャッシュされます。

トークンのキャッシュを有効化するには:

  1. アプリケーションが正しく署名されていることを確認します。
  2. [Xcode プロジェクトの設定] > [機能] タブ > [Enable Keychain Sharing](キーチェーン共有を有効にする) に移動します。
  3. + を選択し、次のいずれかのキーチェーン グループを入力します。
    • iOS: com.microsoft.adalcache
    • macOS: com.microsoft.identity.universalstorage

ヘルパー メソッドの追加

次のヘルパー メソッドを ViewController クラスに追加して、サンプルを完成させます。

iOS UI:


    func updateLogging(text : String) {

        if Thread.isMainThread {
            self.loggingText.text = text
        } else {
            DispatchQueue.main.async {
                self.loggingText.text = text
            }
        }
    }

    func updateSignOutButton(enabled : Bool) {
        if Thread.isMainThread {
            self.signOutButton.isEnabled = enabled
        } else {
            DispatchQueue.main.async {
                self.signOutButton.isEnabled = enabled
            }
        }
    }

    func updateAccountLabel() {

        guard let currentAccount = self.currentAccount else {
            self.usernameLabel.text = "Signed out"
            return
        }

        self.usernameLabel.text = currentAccount.username
    }

    func updateCurrentAccount(account: MSALAccount?) {
        self.currentAccount = account
        self.updateAccountLabel()
        self.updateSignOutButton(enabled: account != nil)
    }

macOS UI:

    func updateLogging(text : String) {

        if Thread.isMainThread {
            self.loggingText.string = text
        } else {
            DispatchQueue.main.async {
                self.loggingText.string = text
            }
        }
    }

    func updateSignOutButton(enabled : Bool) {
        if Thread.isMainThread {
            self.signOutButton.isEnabled = enabled
        } else {
            DispatchQueue.main.async {
                self.signOutButton.isEnabled = enabled
            }
        }
    }

     func updateAccountLabel() {

         guard let currentAccount = self.currentAccount else {
            self.usernameLabel.stringValue = "Signed out"
            return
        }

        self.usernameLabel.stringValue = currentAccount.username ?? ""
        self.usernameLabel.sizeToFit()
     }

     func updateCurrentAccount(account: MSALAccount?) {
        self.currentAccount = account
        self.updateAccountLabel()
        self.updateSignOutButton(enabled: account != nil)
    }

iOS の場合のみ: 追加のデバイス情報を取得する

デバイスが共有として構成されているかどうかなどの現在のデバイス構成を読み取るには、次のコードを使用します。

    @objc func getDeviceMode(_ sender: AnyObject) {

        if #available(iOS 13.0, *) {
            self.applicationContext?.getDeviceInformation(with: nil, completionBlock: { (deviceInformation, error) in

                guard let deviceInfo = deviceInformation else {
                    self.updateLogging(text: "Device info not returned. Error: \(String(describing: error))")
                    return
                }

                let isSharedDevice = deviceInfo.deviceMode == .shared
                let modeString = isSharedDevice ? "shared" : "private"
                self.updateLogging(text: "Received device info. Device is in the \(modeString) mode.")
            })
        } else {
            self.updateLogging(text: "Running on older iOS. GetDeviceInformation API is unavailable.")
        }
    }

マルチアカウント アプリケーション

このアプリは、シングル アカウントのシナリオを対象にビルドされています。 MSAL ではマルチアカウントのシナリオもサポートされますが、アプリで追加の作業が必要となります。 トークンを必要とする各アクションに使用するアカウントをユーザーが選択するための UI を作成する必要があります。 あるいは、MSAL のすべてのアカウントに対してクエリを実行することで、使用するアカウントを選択するヒューリスティックをアプリで実装することもできます。 例については、accountsFromDeviceForParameters:completionBlock:API を参照してください。

アプリをテストする

アプリをビルドし、テスト デバイスまたはシミュレーターに展開します。 サインインして、Microsoft Entra ID または個人用 Microsoft アカウントのトークンを取得できるようになります。

ユーザーは、アプリに初めてサインインするときに、Microsoft Identity から、要求されたアクセス許可に同意するよう求められます。 ほとんどのユーザーは同意できますが、一部の Microsoft Entra テナントではユーザーによる同意が無効になっており、全ユーザーに代わって管理者が同意を行う必要があります。 このシナリオをサポートするには、アプリのスコープを登録します。

サインインした後、Microsoft Graph の /me エンドポイントから返されたデータがアプリに表示されます。

次の手順

保護された Web API を呼び出すモバイル アプリを作成するには、複数のパートで構成される次のシナリオ シリーズを参照してください。