Azure OpenAI では、 Azure OpenAI Batch の入力ファイルと出力ファイルに対する Azure Blob Storage の使用がサポートされるようになりました。 独自のストレージを使用することで、ファイルの数に関するバッチ制限の対象になりません。
リージョンのサポート
- オーストラリアイースト
- イーストアス
- ドイツ中西部
- northcentralus
- polandcentral
- swedencentral
- スイスノース
- eastus2
- ウェストユーエス
Azure Blob Storage の構成
[前提条件]
- Azure Blob Storage アカウント。
- デプロイの種類が
Global-BatchまたはDataZoneBatchのモデルがデプロイされた Azure OpenAI リソース。 このプロセスのヘルプについては、「リソース作成とモデル デプロイのガイド」を参照してください。
マネージド ID
Azure OpenAI リソースが Azure Blob Storage アカウントに安全にアクセスするには、 システム割り当てマネージド ID を使用してリソースを設定する必要があります。
注
現在、ユーザー割り当てマネージド ID はサポートされていません。
https://portal.azure.com にサインインします。
Azure OpenAI リソースを見つけて、>リソース管理>を選択し、アイデンティティ>の下の システム割り当て>のステータスを オンに設定します。


ロールベースのアクセス制御
Azure OpenAI リソースがシステム割り当てマネージド ID 用に構成されたら、Azure Blob Storage アカウントへのアクセス権を付与する必要があります。
https://portal.azure.comから Azure Blob Storage リソースを見つけて選択します。
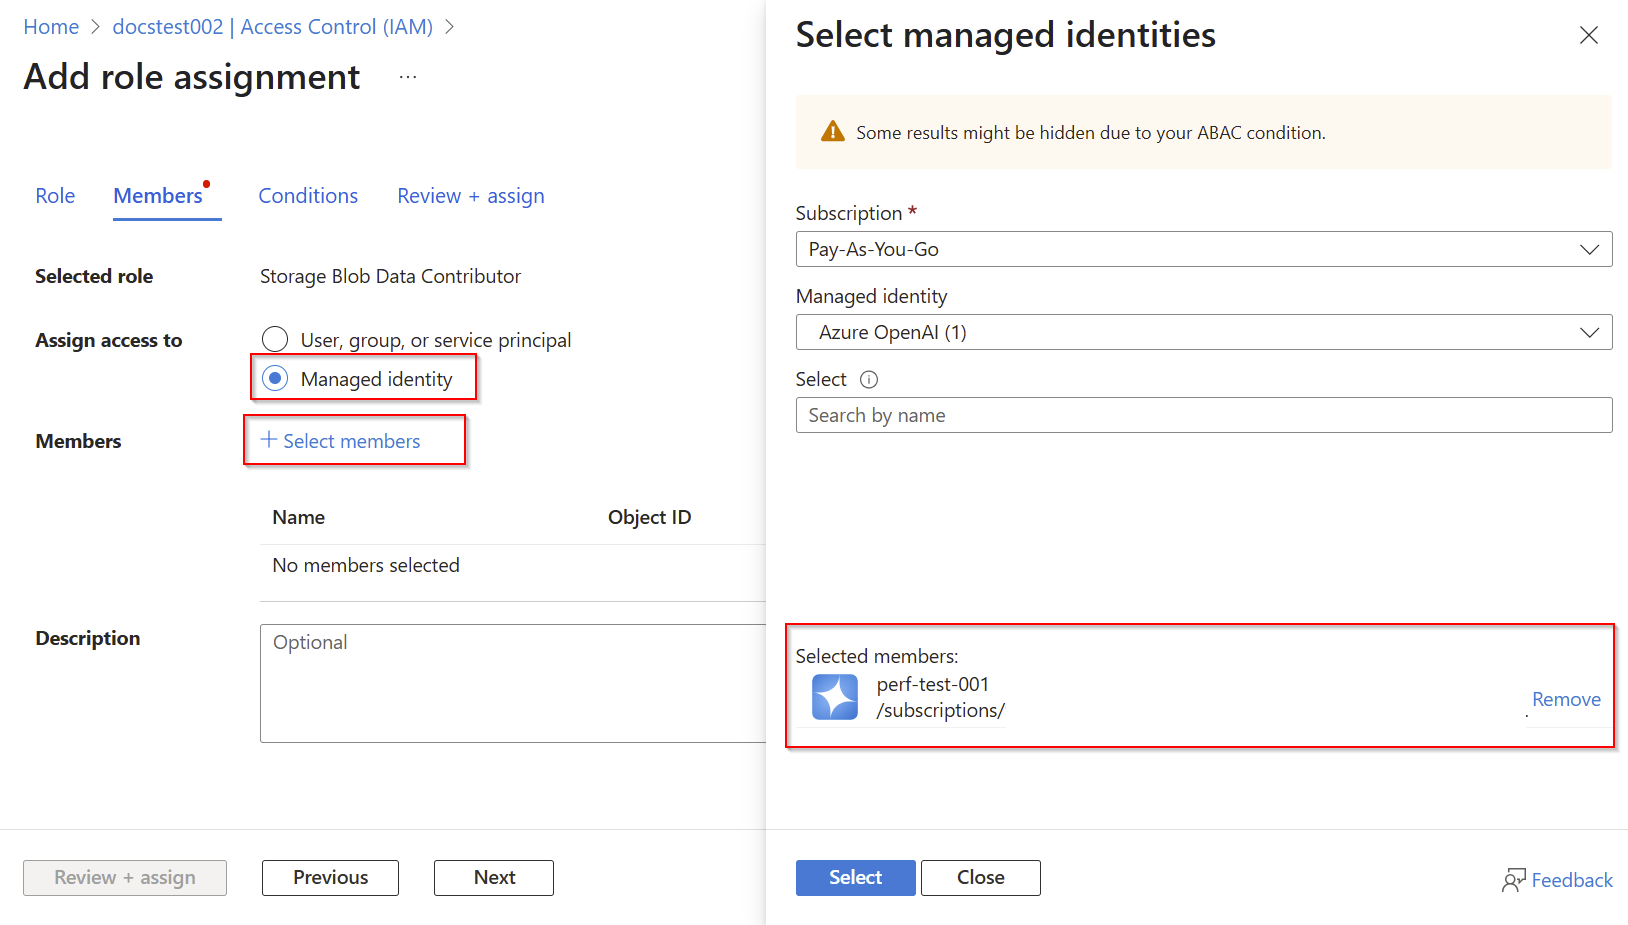
アクセス制御 (IAM)>追加>ロール割り当ての追加 を選択します。

ストレージ BLOB データ共同作成者を検索>[次へ] を選択します。
[マネージド ID]>[+メンバーの選択] を選択> Azure OpenAI リソースのマネージド ID を選択します。


より詳細なアクセスにカスタム ロールを使用する場合は、次のアクセス許可が必要です。
入力データ:
Microsoft.Storage/storageAccounts/blobServices/containers/blobs/read
出力データ/フォルダー:
Microsoft.Storage/storageAccounts/blobServices/containers/blobs/readMicrosoft.Storage/storageAccounts/blobServices/containers/blobs/write
コンテナーを作成する
この例では、 batch-input という名前の 2 つのコンテナーと batch-outputを作成します。 これらの名前は任意にできますが、代替名を使用する場合は、次の手順で例を調整する必要があります。
[データ ストレージ] の下にコンテナーを作成するには>[+コンテナー] を選択>コンテナーに名前を付けます。

コンテナーが作成されたら、各コンテナーの >設定>およびプロパティ>を選択して、URL をコピーし取得します。
この場合、次のようになります。
https://{AZURE-BLOB-STORAGE-RESOURCE-NAME}.blob.core.windows.net/batch-inputhttps://{AZURE-BLOB-STORAGE-RESOURCE-NAME}.blob.core.windows.net/batch-output
入力ファイルを作成する
この記事では、 test.jsonl という名前のファイルを作成し、以下の内容をファイルにコピーします。 グローバル バッチ デプロイ名を変更してファイルの各行に追加する必要があります。
{"custom_id": "task-0", "method": "POST", "url": "/chat/completions", "body": {"model": "REPLACE-WITH-MODEL-DEPLOYMENT-NAME", "messages": [{"role": "system", "content": "You are an AI assistant that helps people find information."}, {"role": "user", "content": "When was Microsoft founded?"}]}}
{"custom_id": "task-1", "method": "POST", "url": "/chat/completions", "body": {"model": "REPLACE-WITH-MODEL-DEPLOYMENT-NAME", "messages": [{"role": "system", "content": "You are an AI assistant that helps people find information."}, {"role": "user", "content": "When was the first XBOX released?"}]}}
{"custom_id": "task-2", "method": "POST", "url": "/chat/completions", "body": {"model": "REPLACE-WITH-MODEL-DEPLOYMENT-NAME", "messages": [{"role": "system", "content": "You are an AI assistant that helps people find information."}, {"role": "user", "content": "What is Altair Basic?"}]}}
トレーニング ファイルをアップロードする
Azure Blob Storage アカウントから、前に作成した バッチ入力 コンテナーを開きます。
[ アップロード] を選択し、 test.jsonl ファイルを選択します。

バッチ ジョブの一部として jsonl ファイルを処理している間は、ファイルに変更を加えることはできません。 バッチ ジョブの実行中にファイルが変更された場合、ジョブは失敗します。
バッチ ジョブを作成する
注
metadata は現在、この機能ではサポートされていません。
import os
from datetime import datetime
from openai import AzureOpenAI
from azure.identity import DefaultAzureCredential, get_bearer_token_provider

token_provider = get_bearer_token_provider(
    DefaultAzureCredential(), "https://cognitiveservices.azure.com/.default"
)

client = AzureOpenAI(
  azure_endpoint = os.getenv("AZURE_OPENAI_ENDPOINT"),
  azure_ad_token_provider=token_provider,
  api_version="2025-04-01-preview"
)

batch_response = client.batches.create(
    input_file_id=None,
    endpoint="/chat/completions",
    completion_window="24h",
      extra_body={
        "input_blob": "https://{AZURE-BLOB-STORAGE-RESOURCE-NAME}.blob.core.windows.net/batch-input/test.jsonl",
        "output_folder": {
                "url": "https://{AZURE-BLOB-STORAGE-RESOURCE-NAME}.blob.core.windows.net/batch-output",
        }
    }
)

# Save batch ID for later use
batch_id = batch_response.id

print(batch_response.model_dump_json(indent=2))
アウトプット:
{
  "id": "batch_b632a805-797b-49ed-9c9c-86eb4057f2a2",
  "completion_window": "24h",
  "created_at": 1747516485,
  "endpoint": "/chat/completions",
  "input_file_id": null,
  "object": "batch",
  "status": "validating",
  "cancelled_at": null,
  "cancelling_at": null,
  "completed_at": null,
  "error_file_id": null,
  "errors": null,
  "expired_at": null,
  "expires_at": 1747602881,
  "failed_at": null,
  "finalizing_at": null,
  "in_progress_at": null,
  "metadata": null,
  "output_file_id": null,
  "request_counts": {
    "completed": 0,
    "failed": 0,
    "total": 0
  },
  "error_blob": "",
  "input_blob": "https://docstest002.blob.core.windows.net/batch-input/test.jsonl",
  "output_blob": ""
}
Azure OpenAI バッチの使用に関する包括的なガイドで説明したように、以前と同じ方法で状態を監視できます。
import time
import datetime

status = "validating"
while status not in ("completed", "failed", "canceled"):
    time.sleep(60)
    batch_response = client.batches.retrieve(batch_id)
    status = batch_response.status
    print(f"{datetime.datetime.now()} Batch Id: {batch_id},  Status: {status}")

if batch_response.status == "failed":
    for error in batch_response.errors.data:
        print(f"Error code {error.code} Message {error.message}")
アウトプット:
2025-05-17 17:16:56.950427 Batch Id: batch_b632a805-797b-49ed-9c9c-86eb4057f2a2,  Status: validating
2025-05-17 17:17:57.532054 Batch Id: batch_b632a805-797b-49ed-9c9c-86eb4057f2a2,  Status: validating
2025-05-17 17:18:58.156793 Batch Id: batch_b632a805-797b-49ed-9c9c-86eb4057f2a2,  Status: in_progress
2025-05-17 17:19:58.739708 Batch Id: batch_b632a805-797b-49ed-9c9c-86eb4057f2a2,  Status: in_progress
2025-05-17 17:20:59.398508 Batch Id: batch_b632a805-797b-49ed-9c9c-86eb4057f2a2,  Status: finalizing
2025-05-17 17:22:00.242371 Batch Id: batch_b632a805-797b-49ed-9c9c-86eb4057f2a2,  Status: completed
statusがcompletedされたら、output_blob パスを取得できます。
print(batch_response.model_dump_json(indent=2))
アウトプット:
{
  "id": "batch_b632a805-797b-49ed-9c9c-86eb4057f2a2",
  "completion_window": "24h",
  "created_at": 1747516485,
  "endpoint": "/chat/completions",
  "input_file_id": null,
  "object": "batch",
  "status": "completed",
  "cancelled_at": null,
  "cancelling_at": null,
  "completed_at": 1747516883,
  "error_file_id": null,
  "errors": null,
  "expired_at": null,
  "expires_at": 1747602881,
  "failed_at": null,
  "finalizing_at": 1747516834,
  "in_progress_at": 1747516722,
  "metadata": null,
  "output_file_id": null,
  "request_counts": {
    "completed": 3,
    "failed": 0,
    "total": 3
  },
  "error_blob": "https://docstest002.blob.core.windows.net/batch-output/{GUID}/errors.jsonl",
  "input_blob": "https://docstest002.blob.core.windows.net/batch-input/test.jsonl",
  "output_blob": "https://docstest002.blob.core.windows.net/batch-output/{GUID}/results.jsonl"
}
バッチ ジョブが完了したら、Azure portal の Azure Blob Storage インターフェイスを使用して error_blob と output_blob をダウンロードするか、プログラムでダウンロードできます。
注
error_blob、および output_blob パスは、対応するファイルが作成されていない場合でも、常に応答で返されます。 この場合、エラーが発生しなかったため、 errors.jsonl は作成されませんでしたが、 results.jsonl のみが存在します。
pip install azure-identity azure-storage-blob
Azure Blob Storage へのプログラムによるアクセス権を Azure OpenAI リソースに付与している間、結果をダウンロードするには、以下のスクリプトを実行しているユーザー アカウントにもアクセス権を付与する必要があることに注意してください。 ファイルをダウンロードする場合は、 Storage Blob Data Reader アクセスで十分です。
# Import required libraries
from azure.identity import DefaultAzureCredential
from azure.storage.blob import BlobServiceClient

# Define storage account and container information
storage_account_name = "docstest002" # replace with your storage account name
container_name = "batch-output"

# Define the blob paths to download
blob_paths = [
    "{REPLACE-WITH-YOUR-GUID}/results.jsonl",
]

credential = DefaultAzureCredential()
account_url = f"https://{storage_account_name}.blob.core.windows.net"
blob_service_client = BlobServiceClient(account_url=account_url, credential=credential)
container_client = blob_service_client.get_container_client(container_name)

for blob_path in blob_paths:
    blob_client = container_client.get_blob_client(blob_path)

    file_name = blob_path.split("/")[-1]

    print(f"Downloading {file_name}...")
    with open(file_name, "wb") as file:
        download_stream = blob_client.download_blob()
        file.write(download_stream.readall())

    print(f"Downloaded {file_name} successfully!")
こちらも参照ください
Azure OpenAI Batch の詳細については、 包括的なバッチ ガイドを参照してください。