この記事では、Azure Automation アカウントに対してユーザー割り当てマネージド ID を追加し、それを使用して他のリソースにアクセスする方法を説明します。 マネージド ID と Azure Automation の連携方法の詳細については、マネージド ID に関する記事を参照してください。
注
Automation アカウントに対してマネージド ID (システムまたはユーザー割り当て) が作成されている場合、Hybrid Runbook Worker でユーザー割り当てマネージド ID を使用することはできません。 マネージド ID が Automation アカウントに割り当てられていない場合は、割り当てられたマネージド ID を持つ Azure VM である Hybrid Runbook Worker で VM のシステムまたはユーザー割り当てマネージド ID を使用できます。
Azure サブスクリプションをお持ちでない場合は、開始する前に 無料アカウント を作成してください。
前提条件
Azure Automation アカウント。 手順については、「Azure Automation アカウントを作成する」をご覧ください。
ユーザー割り当てマネージド ID と、その ID を使用して Runbook によって管理されるターゲット Azure リソースは、別の Azure サブスクリプションに存在することができます。
Azure アカウント モジュールの最新バージョン。 現在 2.2.8 です。 (このバージョンの詳細は Az.Accounts をご覧ください。)
Automation Runbook からアクセスする必要がある Azure リソース。 このリソースには、ユーザー割り当てマネージド ID に対して定義されたロールが必要です。これにより、Automation Runbook はリソースへのアクセスを認証できます。 ロールを追加するには、対応する Microsoft Entra テナントのリソースの所有者である必要があります。
Azure ロールを割り当てるには、
Microsoft.Authorization/roleAssignments/writeのアクセス許可 (ユーザー アクセス管理者や所有者など) が必要です。
Azure Automation アカウントのユーザー割り当てマネージド ID を追加する
Azure portal、PowerShell、Azure REST API、または ARM テンプレートを使用して、Azure Automation アカウントのユーザー割り当てマネージド ID を追加できます。 関連する PowerShell の例として、最初に Connect-AzAccount コマンドレットを使用して、Azure に対話的にサインインし、指示に従います。
# Sign in to your Azure subscription
$sub = Get-AzSubscription -ErrorAction SilentlyContinue
if(-not($sub))
{
    Connect-AzAccount
}

# If you have multiple subscriptions, set the one to use
# Select-AzSubscription -SubscriptionId "<SUBSCRIPTIONID>"
次に、例全体で使用される一連の変数を初期化します。 以下の値を修正し、実行します。
$subscriptionID = "subscriptionID"
$resourceGroup = "resourceGroupName"
$automationAccount = "automationAccountName"
$userAssignedOne = "userAssignedIdentityOne"
$userAssignedTwo = "userAssignedIdentityTwo"
Azure portal を使用して追加する
次の手順に従います。
Azure portal にサインインします。
Azure Portal で、Automation アカウントに移動します。
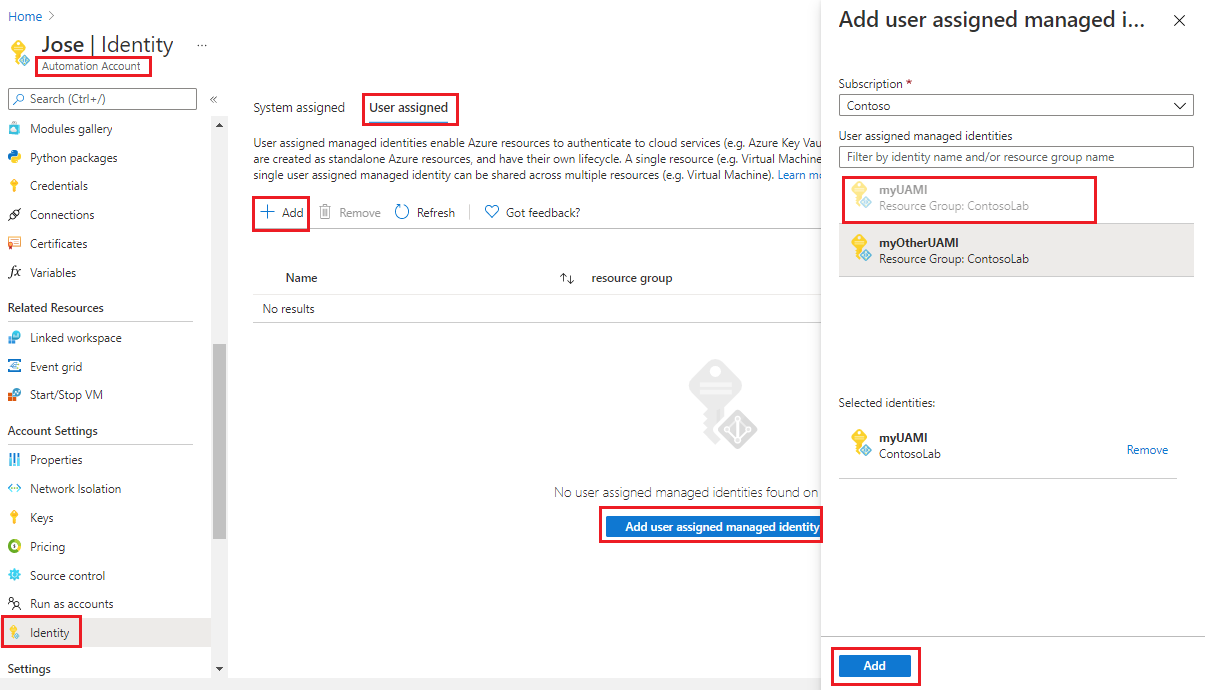
[アカウント設定] で、[ID] を選択します。
[ユーザー割り当て] タブを選択し、[追加] を選択します。
既存のユーザー割り当てマネージド ID を選択し、[追加] を選択します。 [ユーザー割り当て] タブに自動的に戻ります。
PowerShell を使用して追加する
ユーザー割り当てマネージド ID を追加するには、PowerShell コマンドレット Set-AzAutomationAccount を使用します。 まず、既存のシステム割り当てマネージド ID があるかどうかを検討する必要があります。 次の例では、既存の Automation アカウントにユーザー割り当てマネージド ID を 2 つ追加します。システム割り当てマネージド ID が存在する場合は無効になります。
$output = Set-AzAutomationAccount `
    -ResourceGroupName $resourceGroup `
    -Name $automationAccount `
    -AssignUserIdentity "/subscriptions/$subscriptionID/resourcegroups/$resourceGroup/providers/Microsoft.ManagedIdentity/userAssignedIdentities/$userAssignedOne", `
        "/subscriptions/$subscriptionID/resourcegroups/$resourceGroup/providers/Microsoft.ManagedIdentity/userAssignedIdentities/$userAssignedTwo"

$output
システム割り当てマネージド ID を保持するには、以下を使用します。
$output = Set-AzAutomationAccount `
    -ResourceGroupName $resourceGroup `
    -Name $automationAccount `
    -AssignUserIdentity "/subscriptions/$subscriptionID/resourcegroups/$resourceGroup/providers/Microsoft.ManagedIdentity/userAssignedIdentities/$userAssignedOne", `
        "/subscriptions/$subscriptionID/resourcegroups/$resourceGroup/providers/Microsoft.ManagedIdentity/userAssignedIdentities/$userAssignedTwo" `
    -AssignSystemIdentity

$output
出力は次のようになります。
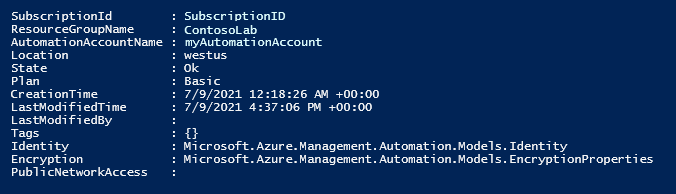
その他の出力については、$output.identity | ConvertTo-Json を実行します。
REST API を使用して追加する
構文と手順の例を次に示します。
構文
次に示す本文の構文のサンプルを使用すると、システム割り当てマネージド ID がまだ有効になっていない場合は有効になり、既存の Automation アカウントに既存の 2 つのユーザー割り当てマネージド ID が割り当てられます。
PATCH
{
  "identity": {
    "type": "SystemAssigned, UserAssigned",
    "userAssignedIdentities": {
      "/subscriptions/00a000aa-00a0-00aa-00aa-0a0aa000aa00/resourceGroups/resource-group-name/providers/Microsoft.ManagedIdentity/userAssignedIdentities/firstIdentity": {},
      "/subscriptions/00a000aa-00a0-00aa-00aa-0a0aa000aa00/resourceGroups/resource-group-name/providers/Microsoft.ManagedIdentity/userAssignedIdentities/secondIdentity": {}
    }
  }
}
API の構文は次のとおりです。
https://management.azure.com/subscriptions/00a000aa-00a0-00aa-00aa-0a0aa000aa00/resourceGroups/resource-group-name/providers/Microsoft.Automation/automationAccounts/automation-account-name?api-version=2020-01-13-preview
例
次の手順に従います。
上記の本文の構文を、
body_ua.jsonという名前のファイルに変更します。 ローカル コンピューターまたは Azure ストレージ アカウントにファイルを保存します。以下の変数値を変更してから実行します。
$file = "path\body_ua.json"この例では、PowerShell コマンドレット Invoke-RestMethod を使用して、PATCH 要求を対象の Automation アカウントに送信します。
# build URI
$URI = "https://management.azure.com/subscriptions/$subscriptionID/resourceGroups/$resourceGroup/providers/Microsoft.Automation/automationAccounts/$automationAccount`?api-version=2020-01-13-preview"

# build body
$body = Get-Content $file

# obtain access token
$azContext = Get-AzContext
$azProfile = [Microsoft.Azure.Commands.Common.Authentication.Abstractions.AzureRmProfileProvider]::Instance.Profile
$profileClient = New-Object -TypeName Microsoft.Azure.Commands.ResourceManager.Common.RMProfileClient -ArgumentList ($azProfile)
$token = $profileClient.AcquireAccessToken($azContext.Subscription.TenantId)
$authHeader = @{
    'Content-Type'='application/json'
    'Authorization'='Bearer ' + $token.AccessToken
}

# Invoke the REST API
$response = Invoke-RestMethod -Uri $URI -Method PATCH -Headers $authHeader -Body $body

# Review output
$response.identity | ConvertTo-Json
出力は次のようになります。
{
"type": "SystemAssigned, UserAssigned",
"principalId": "00a000aa-00a0-00aa-00aa-0a0aa000aa00",
"tenantId": "00a000aa-00a0-00aa-00aa-0a0aa000aa00",
"userAssignedIdentities":  {
    "/subscriptions/ContosoID/resourcegroups/ContosoLab/providers/Microsoft.ManagedIdentity/userAssignedIdentities/ContosoUAMI1":  {
            "PrincipalId":  "00a000aa-00a0-00aa-00aa-0a0aa000aa00",
            "ClientId":  "00001111-aaaa-2222-bbbb-3333cccc4444"
                },
    "/subscriptions/ContosoID/resourcegroups/ContosoLab/providers/Microsoft.ManagedIdentity/userAssignedIdentities/ContosoUAMI2":  {
            "PrincipalId":  "00a000aa-00a0-00aa-00aa-0a0aa000aa00",
            "ClientId":  "00001111-aaaa-2222-bbbb-3333cccc4444"
                }
    }
}
ARM テンプレートを使用して追加する
構文と手順の例を次に示します。
テンプレート構文
次に示すテンプレートの構文のサンプルを使用すると、システム割り当てマネージド ID がまだ有効になっていない場合は有効になり、既存の Automation アカウントに既存の 2 つのユーザー割り当てマネージド ID が割り当てられます。
{
  "$schema": "https://schema.management.azure.com/schemas/2019-04-01/deploymentTemplate.json#",
  "contentVersion": "1.0.0.0",
  "parameters": {
    "automationAccountName": {
     "defaultValue": "YourAutomationAccount",
      "type": "String",
      "metadata": {
        "description": "Automation account name"
      }
    },
    "userAssignedOne": {
     "defaultValue": "userAssignedOne",
      "type": "String",
      "metadata": {
        "description": "User-assigned managed identity"
      }
	  },
    "userAssignedTwo": {
     "defaultValue": "userAssignedTwo",
      "type": "String",
      "metadata": {
        "description": "User-assigned managed identity"
      }
	  }
   },
  "resources": [
    {
      "type": "Microsoft.Automation/automationAccounts",
      "apiVersion": "2020-01-13-preview",
      "name": "[parameters('automationAccountName')]",
      "location": "[resourceGroup().location]",
      "identity": {
        "type": "SystemAssigned, UserAssigned",
        "userAssignedIdentities": {
          "[resourceID('Microsoft.ManagedIdentity/userAssignedIdentities/',parameters('userAssignedOne'))]": {},
          "[resourceID('Microsoft.ManagedIdentity/userAssignedIdentities/',parameters('userAssignedTwo'))]": {}
        }
      },
      "properties": {
        "sku": {
          "name": "Basic"
        },
        "encryption": {
          "keySource": "Microsoft.Automation",
          "identity": {}
        }
      }
    }
  ]
}
例
次の手順に従います。
テンプレートをコピーし、
template_ua.jsonという名前のファイルに貼り付けます。 ローカル コンピューターまたは Azure ストレージ アカウントにファイルを保存します。以下の変数値を変更してから実行します。
$templateFile = "path\template_ua.json"PowerShell コマンドレット New-AzResourceGroupDeployment を使用してテンプレートをデプロイします。
New-AzResourceGroupDeployment `
    -Name "UserAssignedDeployment" `
    -ResourceGroupName $resourceGroup `
    -TemplateFile $templateFile `
    -automationAccountName $automationAccount `
    -userAssignedOne $userAssignedOne `
    -userAssignedTwo $userAssignedTwo
コマンドは出力を生成しません。ただし、次のコードを使用して確認できます。
(Get-AzAutomationAccount `
-ResourceGroupName $resourceGroup `
-Name $automationAccount).Identity | ConvertTo-Json
出力は、上記の REST API の例に示されている出力のようになります。
ユーザー割り当てマネージド ID にロールを割り当てる
Azure Key Vault など、Microsoft Entra ID によって保護されているその他のリソースにアクセスするために、Automation アカウントはそのユーザー割り当てマネージド ID を使用してトークンを取得できます。 これらのトークンは、アプリケーションの特定のユーザーを表すものではありません。 代わりに、それらは、リソースにアクセスしているアプリケーションを表します。 たとえば、今回の場合、トークンは Automation アカウントを表します。
ユーザー割り当てマネージド ID を認証に使用するには、その ID を使用する予定の Azure リソースに対する ID のアクセスを先に設定します。 このタスクを完了するには、ターゲットの Azure リソース上でその ID に適切な役割を割り当てます。
最小特権の原則に従って、Runbook を実行するのに必要なアクセス許可のみを慎重に割り当てます。 たとえば、Automation アカウントが Azure VM の開始または停止を行うためにのみ必要な場合は、その実行アカウントまたはマネージド ID に割り当てられるアクセス許可は、VM の開始または停止のためのみのものである必要があります。 同様に、Runbook が BLOB ストレージから読み取りを行う場合は、読み取り専用アクセス許可を割り当てます。
この例では、Azure PowerShell を使用して、サブスクリプションの共同作成者ロールをターゲットの Azure リソースに割り当てる方法を示します。 共同作成者ロールは例として使用されており、実際には必要な場合も必要ない場合もあります。 代わりに、Azure portal で、対象の Azure リソースにロールを割り当てることもできます。
New-AzRoleAssignment `
    -ObjectId <automation-Identity-object-id> `
    -Scope "/subscriptions/<subscription-id>" `
    -RoleDefinitionName "Contributor"
ユーザー マネージド ID へのロールの割り当てを確認する
Automation アカウントのユーザー割り当てマネージド ID に対してロールを確認するには、次の手順に従います。
Azure portal にサインインします。
Automation アカウントに移動します。
[アカウント設定] で、[ID]、[ユーザー割り当て] を選択します。
[ユーザー割り当て ID 名] をクリックします。
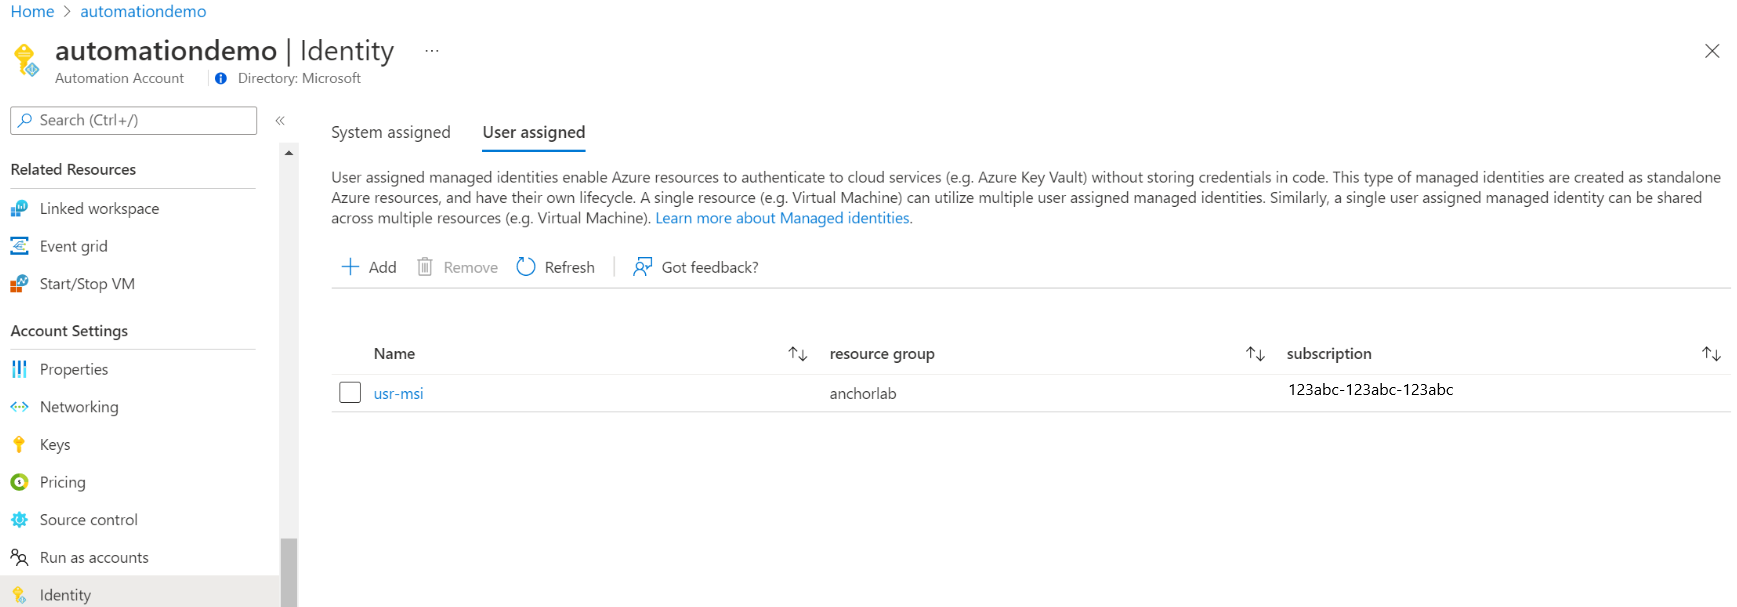
選択したユーザー割り当てマネージド ID に、既にロールが割り当てられている場合は、ロールの割り当てのリストが表示されます。 このリストでは、自分が読み取りアクセス許可を認められているすべてのロールの割り当てが表示されます。
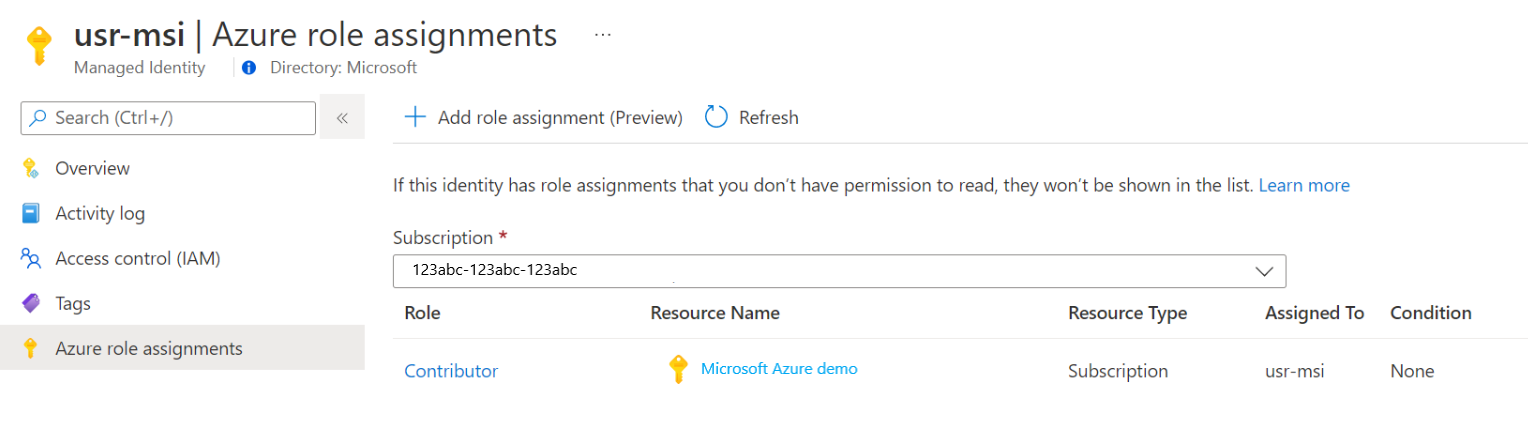
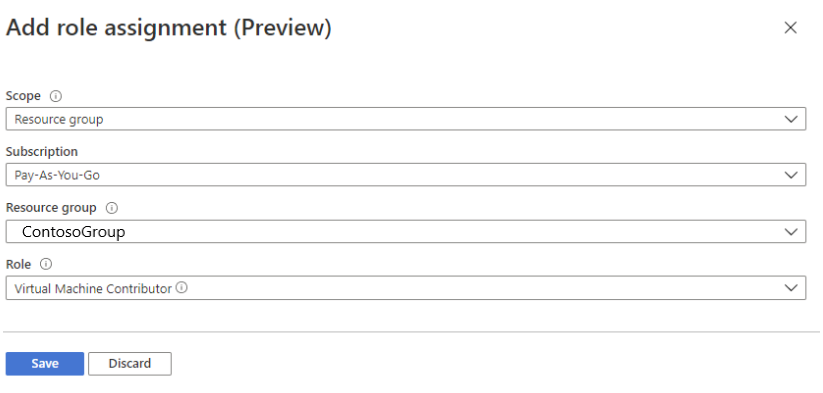
サブスクリプションを変更するには、[サブスクリプション] ドロップダウン リスト をクリックし、適切なサブスクリプションを選択します。
[ロールの割り当ての追加 (プレビュー)] をクリックします。
ドロップダウン リストで、役割の割り当てが適用されるリソースのセット、サブスクリプション、リソース グループ、役割、スコープを選択します。
ロールの割り当てがない場合、選択したスコープの書き込み権限をインライン メッセージとして表示できます。[ロール] ボックスの一覧で、[仮想マシン共同作成者] のロールを選択します。
[保存] をクリックします。


数分後に、選択されたスコープで、マネージド ID にロールが割り当てられます。
ユーザー割り当てマネージド ID を使用してアクセスを認証する
Automation アカウントのユーザー割り当てマネージド ID を有効にし、ID がターゲット リソースにアクセスできるようにした後、マネージド ID をサポートするリソースに対して Runbook 内でその ID を指定できます。 ID をサポートするには、Az コマンドレットの Connect-AzAccount を使用します。
# Ensures you do not inherit an AzContext in your runbook
Disable-AzContextAutosave -Scope Process

# Connect to Azure with user-assigned managed identity
$AzureContext = (Connect-AzAccount -Identity -AccountId <user-assigned-identity-ClientId>).context

# set and store context
$AzureContext = Set-AzContext -SubscriptionName $AzureContext.Subscription -DefaultProfile $AzureContext
Azure コマンドレットを使用せずにアクセス トークンを生成する
HTTP エンドポイントに対して、次のことを確認してください。
- メタデータ ヘッダーが存在し、"true" に設定されている必要があります。
- リソースを GET 要求の場合はクエリ パラメーターとして、POST 要求の場合はフォーム データとして、要求と共に渡す必要があります。
- 環境変数 IDENTITY_HEADER の値を X-IDENTITY-HEADER に設定します。
- Post 要求のコンテンツ タイプは
application/x-www-form-urlencodedである必要があります。
HTTP Get を使ってユーザー割り当てマネージド ID のアクセス トークンを取得する
$resource= "?resource=https://management.azure.com/"
$client_id="&client_id=<ClientId of USI>"
$url = $env:IDENTITY_ENDPOINT + $resource + $client_id
$Headers = New-Object "System.Collections.Generic.Dictionary[[String],[String]]"
$Headers.Add("Metadata", "True")
$headers.Add("X-IDENTITY-HEADER", $env:IDENTITY_HEADER)
$accessToken = Invoke-RestMethod -Uri $url -Method 'GET' -Headers $Headers
Write-Output $accessToken.access_token
HTTP Post を使ってユーザー割り当てマネージド ID のアクセス トークンを取得する
$url = $env:IDENTITY_ENDPOINT
$headers = New-Object "System.Collections.Generic.Dictionary[[String],[String]]"
$headers.Add("Metadata", "True")
$headers.Add("X-IDENTITY-HEADER", $env:IDENTITY_HEADER)
$body = @{'resource'='https://management.azure.com/'
'client_id'='<ClientId of USI>'}
$accessToken = Invoke-RestMethod $url -Method 'POST' -Headers $headers -ContentType 'application/x-www-form-urlencoded' -Body $body
Write-Output $accessToken.access_token
Azure PowerShell でユーザー割り当てマネージド ID を使用する
Write-Output "Connecting to azure via  Connect-AzAccount -Identity -AccountId <ClientId of USI>"
Connect-AzAccount -Identity -AccountId <ClientId of USI>
Write-Output "Successfully connected with Automation account's Managed Identity"
Write-Output "Trying to fetch value from key vault using User Assigned Managed identity. Make sure you have given correct access to Managed Identity"
$secret = Get-AzKeyVaultSecret -VaultName '<KVname>' -Name '<KeyName>'
$ssPtr = [System.Runtime.InteropServices.Marshal]::SecureStringToBSTR($secret.SecretValue)
try {
  $secretValueText = [System.Runtime.InteropServices.Marshal]::PtrToStringBSTR($ssPtr)
    Write-Output $secretValueText
} finally {
    [System.Runtime.InteropServices.Marshal]::ZeroFreeBSTR($ssPtr)
}
Python Runbook でユーザー割り当てマネージド ID を使用する
#!/usr/bin/env python3
import os
import requests

resource = "?resource=https://management.azure.com/"
client_id = "&client_id=<ClientId of USI>"
endPoint = os.getenv('IDENTITY_ENDPOINT')+ resource +client_id
identityHeader = os.getenv('IDENTITY_HEADER')
payload={}
headers = {
  'X-IDENTITY-HEADER': identityHeader,
  'Metadata': 'True'
}
response = requests.request("GET", endPoint, headers=headers, data=payload)
print(response.text)
次のステップ
Runbook が正常に完了しない場合は、「Azure Automation マネージド ID に関する問題のトラブルシューティング」を参照してください。
マネージド ID を無効にする必要がある場合は、「Azure Automation アカウントのマネージド ID を無効にする」を参照してください。
Azure Automation アカウントのセキュリティの概要については、Automation アカウントの認証の概要に関する記事を参照してください。