この記事では、ルート要求を行い、マップ上にルートを表示する方法について説明します。
これを行うには 2 つの方法があります。 最初の方法は、TypeScript REST SDK @azure-rest/maps-route を使用して Get Route Directions API に対してクエリを実行することです。 2 つ目の方法は、 Fetch API を使用して Get Route Directions API に検索要求を行う方法です。 どちらの方法もこの記事で説明します。
REST SDK を使用してルートのクエリを実行する
import * as atlas from "azure-maps-control";
import MapsRoute, { toColonDelimitedLatLonString } from "@azure-rest/maps-route";
import "azure-maps-control/dist/atlas.min.css";

const onload = () => {
  // Initialize a map instance.
  const map = new atlas.Map("map", {
    view: "Auto",
    // Add authentication details for connecting to Azure Maps.
    authOptions: {
      // Use Azure Active Directory authentication.
      authType: "aad",
      clientId: "<Your Azure Maps Client ID>",
      aadAppId: "<Your Azure Active Directory Client ID>",
      aadTenant: "<Your Azure Active Directory Tenant ID>"
    }
  });

  map.events.add("load", async () => {
    // Use the access token from the map and create an object that implements the TokenCredential interface.
    const credential = {
      getToken: () => {
        return {
          token: map.authentication.getToken()
        };
      }
    };

    // Create a Route client.
    const client = MapsRoute(credential, "<Your Azure Maps Client ID>");

    // Create a data source and add it to the map.
    const dataSource = new atlas.source.DataSource();
    map.sources.add(dataSource);

    // Create the GeoJSON objects which represent the start and end points of the route.
    const startPoint = new atlas.data.Feature(new atlas.data.Point([-122.130137, 47.644702]), {
      title: "Redmond",
      icon: "pin-blue"
    });

    const endPoint = new atlas.data.Feature(new atlas.data.Point([-122.3352, 47.61397]), {
      title: "Seattle",
      icon: "pin-round-blue"
    });

    // Add the data to the data source.
    dataSource.add([startPoint, endPoint]);

    // Create a layer for rendering the route line under the road labels.
    map.layers.add(
      new atlas.layer.LineLayer(dataSource, null, {
        strokeColor: "#2272B9",
        strokeWidth: 5,
        lineJoin: "round",
        lineCap: "round"
      }),
      "labels"
    );

    // Create a layer for rendering the start and end points of the route as symbols.
    map.layers.add(
      new atlas.layer.SymbolLayer(dataSource, null, {
        iconOptions: {
          image: ["get", "icon"],
          allowOverlap: true,
          ignorePlacement: true
        },
        textOptions: {
          textField: ["get", "title"],
          offset: [0, 1.2]
        },
        filter: ["any", ["==", ["geometry-type"], "Point"], ["==", ["geometry-type"], "MultiPoint"]] //Only render Point or MultiPoints in this layer.
      })
    );

    // Get the coordinates of the start and end points.
    const coordinates = [
      [startPoint.geometry.coordinates[1], startPoint.geometry.coordinates[0]],
      [endPoint.geometry.coordinates[1], endPoint.geometry.coordinates[0]]
    ];

    // Get the route directions between the start and end points.
    const response = await client.path("/route/directions/{format}", "json").get({
      queryParameters: {
        query: toColonDelimitedLatLonString(coordinates)
      }
    });

    // Get the GeoJSON feature collection of the route.
    const data = getFeatures(response.body.routes);

    // Add the route data to the data source.
    dataSource.add(data);

    // Update the map view to center over the route.
    map.setCamera({
      bounds: data.bbox,
      padding: 40
    });
  });
};

/**
 * Helper function to convert a route response into a GeoJSON FeatureCollection.
 */
const getFeatures = (routes) => {
  const bounds = [];
  const features = routes.map((route, index) => {
    const multiLineCoords = route.legs.map((leg) => {
      return leg.points.map((coord) => {
        const position = [coord.longitude, coord.latitude];
        bounds.push(position);
        return position;
      });
    });

    // Include all properties on the route object except legs.
    // Legs is used to create the MultiLineString, so we only need the summaries.
    // The legSummaries property replaces the legs property with just summary data.
    const props = {
      ...route,
      legSummaries: route.legs.map((leg) => leg.summary),
      resultIndex: index
    };
    delete props.legs;

    return {
      type: "Feature",
      geometry: {
        type: "MultiLineString",
        coordinates: multiLineCoords
      },
      properties: props
    };
  });

  return {
    type: "FeatureCollection",
    features: features,
    bbox: new atlas.data.BoundingBox.fromLatLngs(bounds)
  };
};

document.body.onload = onload;
前のコード例では、最初のブロックはマップ オブジェクトを構築し、Microsoft Entra ID を使用する認証メカニズムを設定します。 手順については、「 マップの作成 」を参照してください。
2 番目のコード ブロックは、アクセス トークンを使用して Azure Maps への HTTP 要求を認証する TokenCredential インターフェイスを実装するオブジェクトを作成します。 その後、資格情報オブジェクトを MapsRoute に渡し、クライアントのインスタンスを作成します。
3 番目のコード ブロックでは、 DataSource オブジェクトが作成され、マップに追加されます。
4 番目のコード ブロックでは、開始ポイントオブジェクトと終了 ポイント オブジェクトが作成され、dataSource オブジェクトに追加されます。
線は LineString の フィーチャー です。 LineLayer は、DataSource でラップされた線オブジェクトをマップ上の線としてレンダリングします。 4 番目のコード ブロックは、マップに線レイヤーを作成して追加します。 LinestringLayerOptions の線レイヤーのプロパティを参照してください。
シンボル レイヤーは、テキストまたはアイコンを使用して、DataSource にラップされたポイントベースのデータをレンダリングします。 テキストまたはアイコンは、マップ上にシンボルとしてレンダリングされます。 5 番目のコード ブロックでは、シンボル レイヤーが作成され、マップに追加されます。
6 番目のコード ブロックは、 MapsRoute クライアントの一部である Azure Maps ルーティング サービスに対してクエリを実行します。 GET 要求は、始点と終点の間のルートを取得するために使用されます。 その後、応答から GeoJSON 機能コレクションが getFeatures() ヘルパー関数を使用して抽出され、データソースに追加されます。 その後、応答がマップ上のルートとしてレンダリングされます。 マップに線を追加する方法の詳細については、「マップ に線を追加する」を参照してください。
コードの最後のブロックは、マップの setCamera プロパティを使用してマップの境界を設定します。
ルート クエリ、データ ソース、シンボル、線レイヤー、カメラの境界は、 イベント リスナー内に作成されます。 このコード構造により、マップが完全に読み込まれた後にのみ結果が表示されます。
Fetch API を使用してルートにクエリを実行する
import * as atlas from "azure-maps-control";
import "azure-maps-control/dist/atlas.min.css";

const onload = () => {
  // Initialize a map instance.
  const map = new atlas.Map("map", {
    view: "Auto",
    // Add authentication details for connecting to Azure Maps.
    authOptions: {
      // Use Azure Active Directory authentication.
      authType: "aad",
      clientId: "<Your Azure Maps Client ID>",
      aadAppId: "<Your Azure Active Directory Client ID>",
      aadTenant: "<Your Azure Active Directory Tenant ID>"
    }
  });

  map.events.add("load", async () => {
    // Create a data source and add it to the map.
    const dataSource = new atlas.source.DataSource();
    map.sources.add(dataSource);

    // Create the GeoJSON objects which represent the start and end points of the route.
    const startPoint = new atlas.data.Feature(new atlas.data.Point([-122.130137, 47.644702]), {
      title: "Redmond",
      icon: "pin-blue"
    });

    const endPoint = new atlas.data.Feature(new atlas.data.Point([-122.3352, 47.61397]), {
      title: "Seattle",
      icon: "pin-round-blue"
    });

    // Add the data to the data source.
    dataSource.add([startPoint, endPoint]);

    // Create a layer for rendering the route line under the road labels.
    map.layers.add(
      new atlas.layer.LineLayer(dataSource, null, {
        strokeColor: "#2272B9",
        strokeWidth: 5,
        lineJoin: "round",
        lineCap: "round"
      }),
      "labels"
    );

    // Create a layer for rendering the start and end points of the route as symbols.
    map.layers.add(
      new atlas.layer.SymbolLayer(dataSource, null, {
        iconOptions: {
          image: ["get", "icon"],
          allowOverlap: true,
          ignorePlacement: true
        },
        textOptions: {
          textField: ["get", "title"],
          offset: [0, 1.2]
        },
        filter: ["any", ["==", ["geometry-type"], "Point"], ["==", ["geometry-type"], "MultiPoint"]] //Only render Point or MultiPoints in this layer.
      })
    );

    // Send a request to the route API
    let url = "https://atlas.microsoft.com/route/directions/json?";
    url += "&api-version=1.0";
    url +=
      "&query=" +
      startPoint.geometry.coordinates[1] +
      "," +
      startPoint.geometry.coordinates[0] +
      ":" +
      endPoint.geometry.coordinates[1] +
      "," +
      endPoint.geometry.coordinates[0];

    // Process request
    fetch(url, {
      headers: {
        Authorization: "Bearer " + map.authentication.getToken(),
        "x-ms-client-id": "<Your Azure Maps Client ID>"
      }
    })
      .then((response) => response.json())
      .then((response) => {
        const bounds = [];
        const route = response.routes[0];

        // Create an array to store the coordinates of each turn
        let routeCoordinates = [];
        route.legs.forEach((leg) => {
          const legCoordinates = leg.points.map((point) => {
            const position = [point.longitude, point.latitude];
            bounds.push(position);
            return position;
          });
          // Add each turn coordinate to the array
          routeCoordinates = routeCoordinates.concat(legCoordinates);
        });

        // Add route line to the dataSource
        dataSource.add(new atlas.data.Feature(new atlas.data.LineString(routeCoordinates)));

        // Update the map view to center over the route.
        map.setCamera({
          bounds: new atlas.data.BoundingBox.fromLatLngs(bounds),
          padding: 40
        });
      });
  });
};

document.body.onload = onload;
前のコード例では、コードの最初のブロックがマップ オブジェクトを構築し、Microsoft Entra ID を使用する認証メカニズムを設定します。 手順については、「 マップの作成 」を参照してください。
2 番目のコード ブロックは、 DataSource オブジェクトを作成してマップに追加します。
3 番目のコード ブロックは、ルートの始点と終点を作成します。 次に、データ ソースに追加します。 詳細については、「 マップにピンを追加する」を参照してください。
LineLayer は、DataSource でラップされた線オブジェクトをマップ上の線としてレンダリングします。 4 番目のコード ブロックは、マップに線レイヤーを作成して追加します。 LineLayerOptions で線レイヤーのプロパティを表示します。
シンボル レイヤーでは、テキストまたはアイコンを使用して、DataSource でラップされたポイントベースのデータをマップ上のシンボルとしてレンダリングします。 5 番目のコード ブロックでは、シンボル レイヤーが作成され、マップに追加されます。 SymbolLayerOptions のシンボル レイヤーのプロパティを参照してください。
次のコード ブロックでは 、Fetch API を使用して ルート方向の取得に対する検索要求を行います。 その後、応答が解析されます。 応答が成功した場合、緯度と経度の情報を使用して、それらのポイントを接続して配列を 1 行作成します。 その後、ライン データがデータ ソースに追加され、マップ上にルートがレンダリングされます。 詳細については、「 マップに線を追加する」を参照してください。
コードの最後のブロックは、マップの setCamera プロパティを使用してマップの境界を設定します。
ルート クエリ、データ ソース、シンボル、線レイヤー、カメラの境界は、 イベント リスナー内に作成されます。 ここでも、マップが完全に読み込まれた後に結果が表示されるようにします。
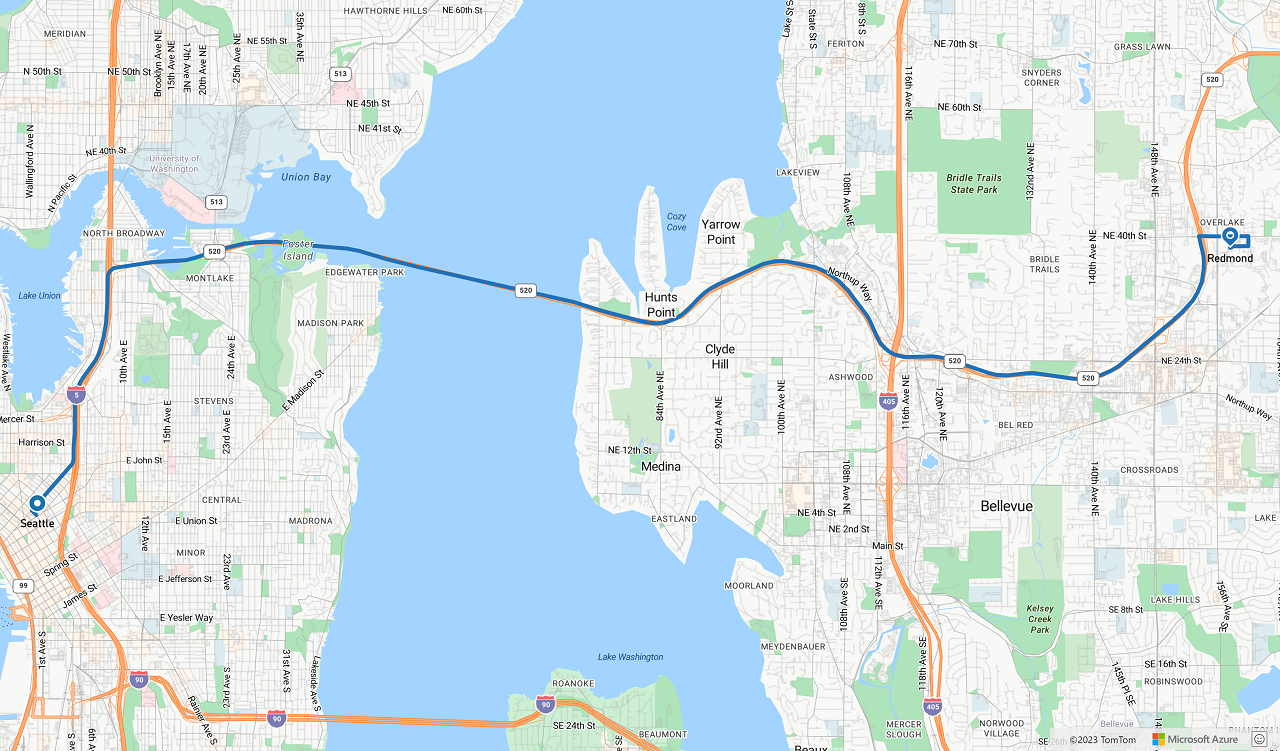
次の図は、2 つのコード サンプルの結果を示すスクリーンショットです。
次のステップ
この記事で使われているクラスとメソッドの詳細については、次を参照してください。
完全なコードの例については、次の記事を参照してください。