このチュートリアルでは、Azure Maps を使用してシンプルなストア ロケーターを作成する手順を紹介します。
このチュートリアルで学習する内容は次のとおりです。
- Azure マップ コントロール API を使用して新しい Web ページを作成する。
- ファイルからカスタム データを読み込んで地図上に表示する。
- Azure Maps Search サービスを使用して住所を検索したりクエリを入力したりする。
- ユーザーの場所をブラウザーから取得して地図上に表示する。
- 複数のレイヤーを組み合わせて独自の記号を地図上で作成する。
- データ ポイントをクラスター化する。
- 地図にズーム コントロールを追加する。
Prerequisites
- このチュートリアルでは Visual Studio Code が推奨されていますが、任意の適切な統合開発環境 (IDE) を使用できます。
- Azure Maps アカウント
- サブスクリプション キー
Note
Azure Maps での認証の詳細については、「Azure Maps での認証の管理」を参照してください。
Sample code
このチュートリアルでは、Contoso Coffee という架空の会社のストア ロケーターを作成する方法を、追加の機能を使用してストア ロケーターを拡張するためのヒントと共に示します。
このチュートリアルで作成している内容のライブ サンプルについては、Azure Maps コード サンプルのサイトで Simple Store Locator を参照してください。
このチュートリアルにより簡単に従って取り組むには、次のリソースをダウンロードしてください。
- Simple Store Locator のソース コード。
- ストア ロケーター データセットにインポートするために使用する店舗所在地データ。
- マップ画像。
ストア ロケーター機能
このセクションでは、このチュートリアルで作成した Contoso Coffee ストア ロケーター アプリケーションで実際に使用している Azure Maps 機能の一覧を示します。
ユーザー インターフェイスの機能
- ヘッダーのストア ロゴ
- パンとズームをサポートするマップ
- ユーザーの現在の場所を検索するための [My Location] (現在位置) ボタン
- デバイスの画面の幅に基づいて調整されるページ レイアウト
- 検索ボックスと検索ボタン
Functionality features
- ユーザーが
keypressキーを押すと、検索ボックスに追加された イベントによって検索がトリガーされます。 - マップを動かすと、マップの中心から個々の所在地までの距離が再計算されます。 結果リストが更新され、最も近い所在地がマップの一番上に表示されます。
- ユーザーが結果リストでいずれかの結果を選択すると、選択した場所がマップの中央に移動し、その場所についての情報がポップアップ ウィンドウに表示されます。
- ユーザーが特定の場所を選択すると、マップによってポップアップ ウィンドウがトリガーされます。
- ユーザーが地図を縮小すると、一連の所在地がクラスターとしてグループ化されます。 各クラスターは、内側に番号が付いた円で表されます。 クラスターは、ユーザーがズーム レベルを変更すると、それに従ってグループを形成したり分離したりします。
- クラスターを選択すると、マップ上で 2 レベル拡大表示され、クラスターの位置が中心に来ます。
ストア ロケーターの設計
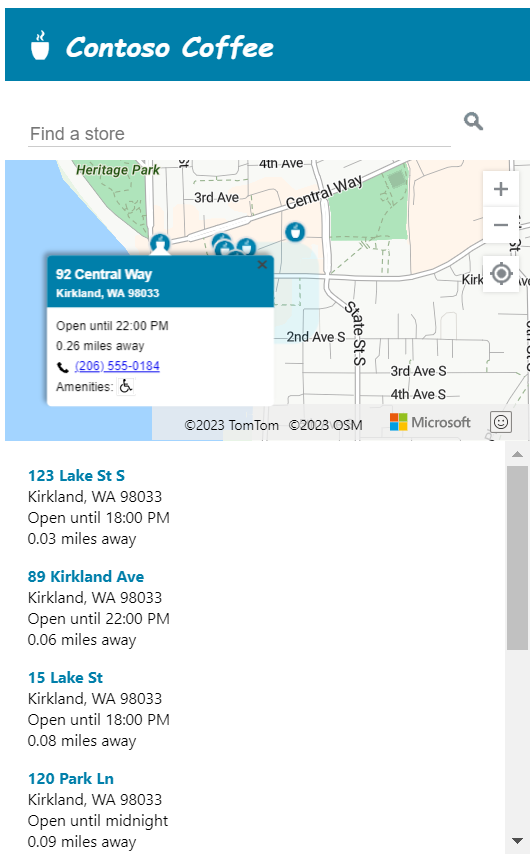
次のスクリーンショットは、Contoso Coffee ストア ロケーター アプリケーションの一般的なレイアウトを示しています。 ライブ サンプルを表示して操作するには、Azure Maps コード サンプルのサイトで Simple Store Locator サンプル アプリケーションを参照してください。

このストア ロケーターには、その実用性を最大化するために、ユーザーの画面幅が 700 ピクセルよりも狭いときに調整されるレスポンシブ レイアウトを採用しています。 レスポンシブ レイアウトにより、モバイル デバイスなどの小さな画面でも使いやすいストア ロケーターとなっています。 次のスクリーンショットは、小さな画面レイアウトのサンプルを示しています。

店舗所在地のデータセットを作成する
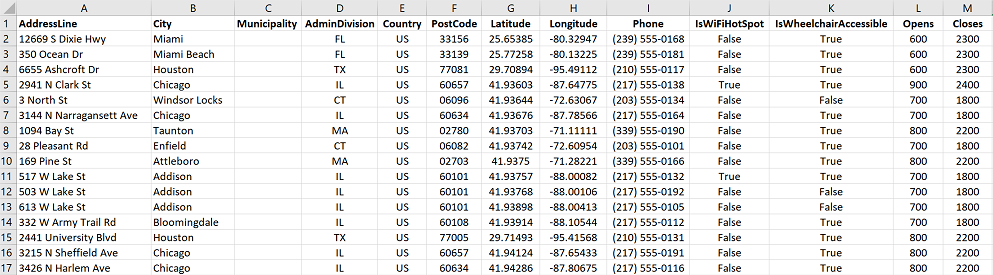
このセクションでは、マップに表示するストアのデータセットを作成する方法について説明します。 Contoso Coffee ロケーターのデータセットは、Excel ブック内に作成されます。 このデータセットには、米国、カナダ、イギリス、フランス、ドイツ、イタリア、オランダ、デンマーク、スペインの 9 つの国または地域に点在する Contoso Coffee コーヒー ショップ 10,213 店舗の所在地が含まれています。 実際のデータのスクリーンショットを次に示します。
GitHub の "Azure Maps コード サンプル" リポジトリの data フォルダーから、Contoso Coffee ロケーター サンプル アプリケーションの完全なデータセットを含む Excel ファイルをダウンロードします。
このデータの上記のスクリーンショットから、次のことが確認できます。
- 所在地情報は、AddressLine、City、Municipality (郡)、AdminDivision (州)、PostCode (郵便番号)、Country の 6 つの列に格納されています。
- Latitude 列と Longitude 列には、Contoso Coffee の各所在地に対応する座標が格納されています。 座標情報がない場合は、Search Service を使用して所在地の座標を特定できます。
- その他いくつかの列に、コーヒー ショップに関連したメタデータが格納されています。電話番号、ブール型列、店舗の開店時間と閉店時間 (24 時間形式) です。 ブール型列は、Wi-Fi と車椅子の利用の可否に使用されます。 実際の場所データとの関係がより強いメタデータを格納する列を独自に作成してもかまいません。
Contoso Coffee 店舗所在地データセットを読み込む
Contoso Coffee ショップ ロケーター データセットは小さいため、アプリケーションの読み込み時にブラウザーがダウンロードする、タブ区切りのテキスト ファイルに変換できます。
Tip
データセットがクライアントのダウンロードには大きすぎる、または頻繁に更新される場合は、データセットをデータベースに格納することもできます。 データがデータベースに読み込まれた後、データのクエリを受け入れる Web サービスを設定し、その結果をユーザーのブラウザーに送信できます。
データをタブ区切りテキスト ファイルに変換する
Contoso Coffee の店舗所在地データを Excel ブックからタブ区切りテキスト ファイルに変換するには、次の手順を実行します。
Excel ブックの ContosoCoffee.xlsx をダウンロードして、Excel で開きます。
[ファイル] > [名前を付けて保存...] を選択します。
[ファイルの種類] ボックスの一覧から [テキスト (タブ区切り)(*.txt)] を選択します。
このファイルに ContosoCoffee という名前を付けます。
![[ファイルの種類] ダイアログ ボックスのスクリーンショット。](media/tutorial-create-store-locator/data-delimited-text.png)
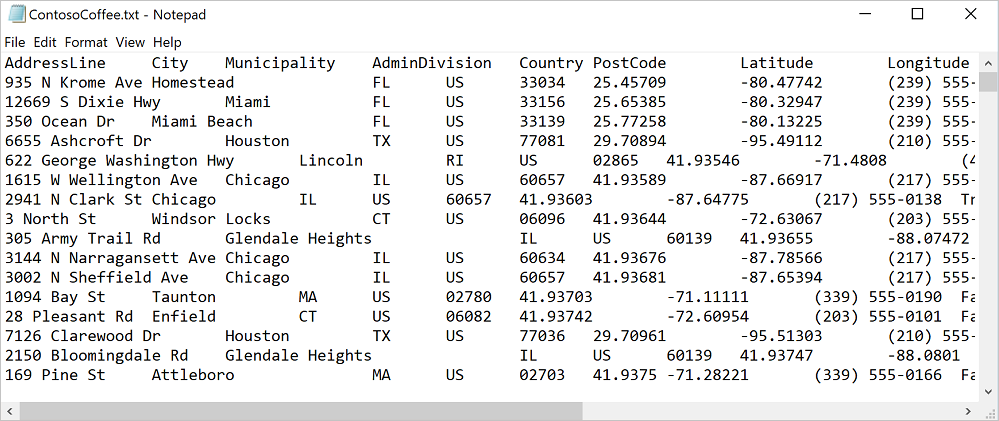
テキスト ファイルをメモ帳で開いた場合、次のテキストのようになります。
プロジェクトのセットアップ
Visual Studio Code、または選択した開発環境を開きます。
[ファイル] > [ワークスペースを開く...] を選択します。
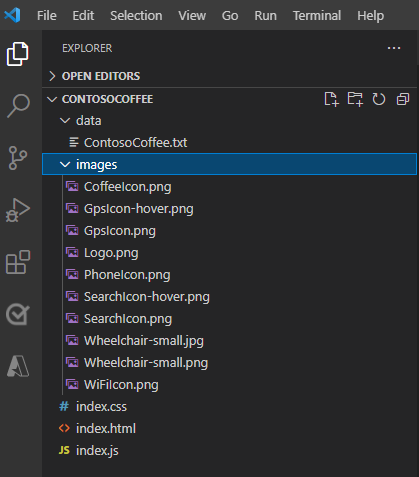
ContosoCoffee という名前の新しいフォルダーを作成します。
エクスプローラーで [ContosoCoffee] を選択します。
アプリケーションのレイアウト、スタイル、ロジックを定義する次の 3 つのファイルを作成します。
- index.html
- index.css
- index.js
data という名前のフォルダーを作成します。
以前に Excel ブック ContosoCoffee.xlsx で作成した ContosoCoffee.txt ファイルを data フォルダーに追加します。
images という名前の別のフォルダーを作成します。
まだダウンロードしていない場合は、GitHub リポジトリのイメージ ディレクトリから 10 個のマップ画像をダウンロードして、images フォルダーに追加します。
ワークスペース フォルダーは次のスクリーンショットのようになります。

HTML ファイルを作成する
HTML ファイルを作成するには、次の手順を実行します。
metaのheadに次の タグを追加します。<meta charset="utf-8"> <meta http-equiv="x-ua-compatible" content="IE=Edge"> <meta name="viewport" content="width=device-width, initial-scale=1, shrink-to-fit=no">Azure Maps Web コントロールの JavaScript ファイルと CSS ファイルへの参照を追加します。
<!-- Add references to the Azure Maps Map control JavaScript and CSS files. -->
<link rel="stylesheet" href="https://atlas.microsoft.com/sdk/javascript/mapcontrol/3/atlas.min.css" type="text/css">
<script src="https://atlas.microsoft.com/sdk/javascript/mapcontrol/3/atlas.min.js"></script>
index.js と index.css への参照を追加します。
<!-- Add references to the store locator JavaScript and CSS files. -->
<link rel="stylesheet" href="index.css" type="text/css">
<script src="index.js"></script>
ドキュメントの本文に、
headerタグを追加します。headerタグ内にロゴと会社名を追加します。<header> <img src="images/Logo.png" /> <span>Contoso Coffee</span> </header>mainタグを追加し、テキスト ボックスと検索ボタンを備えた検索パネルを作成します。 さらに、地図、リスト パネル、[My Location](現在位置) GPS ボタンに対応するdiv参照を追加します。<main> <div class="searchPanel"> <div> <input id="searchTbx" type="search" placeholder="Find a store" /> <button id="searchBtn" title="Search"></button> </div> </div> <div id="listPanel"></div> <div id="myMap"></div> <button id="myLocationBtn" title="My Location"></button> </main>
完了すると、index.html は、チュートリアルのサンプル コードの Simple Store Locator.html のようになります。
CSS スタイルを定義する
次の手順で、CSS スタイルを定義します。 アプリケーション コンポーネントのレイアウトとアプリケーションの外観は、CSS スタイルによって定義されます。
Open index.css.
次の css コードを追加します。
Note
@mediaスタイルは、画面幅が 700 ピクセルよりも狭いときに使用される代替スタイルのオプションを定義します。html, body { padding: 0; margin: 0; font-family: Gotham, Helvetica, sans-serif; overflow-x: hidden; } header { width: calc(100vw - 10px); height: 30px; padding: 15px 0 20px 20px; font-size: 25px; font-style: italic; font-family: "Comic Sans MS", cursive, sans-serif; line-height: 30px; font-weight: bold; color: white; background-color: #007faa; } header span { vertical-align: middle; } header img { height: 30px; vertical-align: middle; } .searchPanel { position: relative; width: 350px; } .searchPanel div { padding: 20px; } .searchPanel input { width: calc(100% - 50px); font-size: 16px; border: 0; border-bottom: 1px solid #ccc; } #listPanel { position: absolute; top: 135px; left: 0px; width: 350px; height: calc(100vh - 135px); overflow-y: auto; } #myMap { position: absolute; top: 65px; left: 350px; width: calc(100vw - 350px); height: calc(100vh - 65px); } .statusMessage { margin: 10px; } #myLocationBtn, #searchBtn { margin: 0; padding: 0; border: none; border-collapse: collapse; width: 32px; height: 32px; text-align: center; cursor: pointer; line-height: 32px; background-repeat: no-repeat; background-size: 20px; background-position: center center; z-index: 200; } #myLocationBtn { position: absolute; top: 150px; right: 10px; box-shadow: 0px 0px 4px rgba(0,0,0,0.16); background-color: white; background-image: url("images/GpsIcon.png"); } #myLocationBtn:hover { background-image: url("images/GpsIcon-hover.png"); } #searchBtn { background-color: transparent; background-image: url("images/SearchIcon.png"); } #searchBtn:hover { background-image: url("images/SearchIcon-hover.png"); } .listItem { height: 50px; padding: 20px; font-size: 14px; } .listItem:hover { cursor: pointer; background-color: #f1f1f1; } .listItem-title { color: #007faa; font-weight: bold; } .storePopup { min-width: 150px; } .storePopup .popupTitle { border-top-left-radius: 4px; border-top-right-radius: 4px; padding: 8px; height: 30px; background-color: #007faa; color: white; font-weight: bold; } .storePopup .popupSubTitle { font-size: 10px; line-height: 12px; } .storePopup .popupContent { font-size: 11px; line-height: 18px; padding: 8px; } .storePopup img { vertical-align:middle; height: 12px; margin-right: 5px; } /* Adjust the layout of the page when the screen width is fewer than 700 pixels. */ @media screen and (max-width: 700px) { .searchPanel { width: 100vw; } #listPanel { top: 385px; width: 100%; height: calc(100vh - 385px); } #myMap { width: 100vw; height: 250px; top: 135px; left: 0px; } #myLocationBtn { top: 220px; } } .mapCenterIcon { display: block; width: 10px; height: 10px; border-radius: 50%; background: orange; border: 2px solid white; cursor: pointer; box-shadow: 0 0 0 rgba(0, 204, 255, 0.4); animation: pulse 3s infinite; } @keyframes pulse { 0% { box-shadow: 0 0 0 0 rgba(0, 204, 255, 0.4); } 70% { box-shadow: 0 0 0 50px rgba(0, 204, 255, 0); } 100% { box-shadow: 0 0 0 0 rgba(0, 204, 255, 0); } }
この時点でアプリケーションを実行すると、ヘッダー、検索ボックス、および検索ボタンが表示されます。 ただし、マップはまだ読み込まれていないので表示されません。 検索を実行しようとしても何も起こりません。 次のセクションでは、ストア ロケーターのすべての機能にアクセスするために必要な JavaScript ロジックを追加する方法について説明します。
JavaScript コードを追加する
Contoso Coffee の店舗所在地アプリの JavaScript コードは、次のプロセスを有効にします。
ページが読み込みプロセスを完了するまで待機するための という
readyを追加します。 ページの読み込みが完了すると、イベント ハンドラーは、マップの読み込みを監視し、[検索] ボタンと [My Location](現在位置) ボタンに機能を提供するために、より多くのイベント リスナーを作成します。ユーザーが [検索] ボタンを選択するか、検索ボックスに場所を入力して Enter キーを押すと、ユーザーのクエリに対するあいまい検索が開始されます。 コードは、検索結果を特定の国または地域に限定するために、それらの国または地域の ISO 2 値の配列を
countrySetオプションに渡します。 検索の国/地域を限定することで、返される結果の精度向上につながります。検索が完了すると、最初の場所の結果がマップの中心点として使用されます。 ユーザーが [My Location](現在位置) ボタンを選択すると、コードはブラウザーに組み込まれた HTML5 Geolocation API を使用して、ユーザーの位置を取得します。 コードは位置を取得した後、ユーザーの位置を中心にマップを中央に配置します。
JavaScript を追加するには、次の手順を実行します。
Open index.js.
設定を更新しやすいようグローバル オプションを追加します。 マップ、ポップアップ ウィンドウ、データ ソース、アイコン レイヤー、および HTML マーカーの変数を定義します。 検索領域の中心を示すように HTML マーカーを設定します。 また、Azure Maps Search サービス クライアントのインスタンスを定義します。
//The maximum zoom level to cluster data point data on the map.
var maxClusterZoomLevel = 11;

//The URL to the store location data.
var storeLocationDataUrl = 'data/ContosoCoffee.txt';

//The URL to the icon image.
var iconImageUrl = 'images/CoffeeIcon.png';

//An array of country region ISO2 values to limit searches to.
var countrySet = ['US', 'CA', 'GB', 'FR','DE','IT','ES','NL','DK'];

//
var map, popup, datasource, iconLayer, centerMarker;

// Used in function updateListItems
var listItemTemplate = '<div class="listItem" onclick="itemSelected(\'{id}\')"><div class="listItem-title">{title}</div>{city}<br />Open until {closes}<br />{distance} miles away</div>';
次の初期化コードを追加します。
<Your Azure Maps Key>を実際の Azure Maps サブスクリプション キーに必ず置き換えてください。Tip
ポップアップ ウィンドウを使用するときは、単一の
Popupインスタンスを作成し、その内容と位置を更新することによって再利用することをお勧めします。 コードに追加するPopupインスタンスごとに、ページに複数の DOM 要素が追加されます。 ページ上の DOM 要素が増えるほど、ブラウザーで追跡する必要のあるものが増えます。 項目が多すぎると、ブラウザーが低速化する可能性があります。function initialize() { //Initialize a map instance. map = new atlas.Map('myMap', { center: [-90, 40], zoom: 2, //Add your Azure Maps subscription key to the map SDK. authOptions: { authType: 'subscriptionKey', subscriptionKey: '<Your Azure Maps Key>' } }); //Create a pop-up window, but leave it closed so we can update it and display it later. popup = new atlas.Popup(); //If the user selects the search button, geocode the value the user passed in. document.getElementById('searchBtn').onclick = performSearch; //If the user presses Enter in the search box, perform a search. document.getElementById('searchTbx').onkeyup = function(e) { if (e.keyCode === 13) { performSearch(); } }; //If the user selects the My Location button, use the Geolocation API to get the user's location. Center and zoom the map on that location. document.getElementById('myLocationBtn').onclick = setMapToUserLocation; //Wait until the map resources are ready. map.events.add('ready', function() { //Add your maps post load functionality. }); } function performSearch() { var query = document.getElementById('searchTbx').value; //Pass in the array of country/region ISO2 for which we want to limit the search to. var url = `https://atlas.microsoft.com/search/fuzzy/json?api-version=1.0&countrySet=${countrySet}&query=${query}&view=Auto`; //Perform a fuzzy search on the users query. fetch(url, { headers: { "Subscription-Key": map.authentication.getToken() } }) .then((response) => response.json()) .then((response) => { if (Array.isArray(response.results) && response.results.length > 0) { var result = response.results[0]; var bbox = [ result.viewport.topLeftPoint.lon, result.viewport.btmRightPoint.lat, result.viewport.btmRightPoint.lon, result.viewport.topLeftPoint.lat ]; //Set the camera to the bounds of the first result. map.setCamera({ bounds: bbox, padding: 40 }); } else { document.getElementById('listPanel').innerHTML = '<div class="statusMessage">Unable to find the location you searched for.</div>'; } }); } function setMapToUserLocation() { //Request the user's location. navigator.geolocation.getCurrentPosition(function(position) { //Convert the geolocation API position into a longitude/latitude position value the map can understand and center the map over it. map.setCamera({ center: [position.coords.longitude, position.coords.latitude], zoom: maxClusterZoomLevel + 1 }); }, function(error) { //If an error occurs when trying to access the users position information, display an error message. switch (error.code) { case error.PERMISSION_DENIED: alert('User denied the request for geolocation.'); break; case error.POSITION_UNAVAILABLE: alert('Position information is unavailable.'); break; case error.TIMEOUT: alert('The request to get user position timed out.'); break; case error.UNKNOWN_ERROR: alert('An unknown error occurred.'); break; } }); } //Initialize the application when the page is loaded. window.onload = initialize;マップの
readyイベント ハンドラーに、検索エリアの中心を表示する HTML マーカーとズーム コントロールを追加します。//Add a zoom control to the map. map.controls.add(new atlas.control.ZoomControl(), { position: 'top-right' }); //Add an HTML marker to the map to indicate the center to use for searching. centerMarker = new atlas.HtmlMarker({ htmlContent: '<div class="mapCenterIcon"></div>', position: map.getCamera().center }); map.markers.add(centerMarker);マップの
readyイベント ハンドラーで、データ ソースを追加します。 そのうえで、データセットの読み込みと解析のための呼び出しを行います。 データ ソースでは、クラスタリングを有効にしてください。 データ ソースでのクラスタリングにより、重なり合うポイントがまとめて 1 つのクラスターにグループ化されます。 ユーザーが拡大操作を実行すると、クラスターは個々のポイントに分かれます。 この動作により、ユーザー エクスペリエンスとパフォーマンスが向上します。//Create a data source, add it to the map, and then enable clustering. datasource = new atlas.source.DataSource(null, { cluster: true, clusterMaxZoom: maxClusterZoomLevel - 1 }); map.sources.add(datasource); //Load all the store data now that the data source has been defined. loadStoreData();マップの
readyイベント ハンドラーにデータセットを読み込んだ後、データをレンダリングするための一連のレイヤーを定義します。 バブル レイヤーでは、クラスター化されたデータ ポイントがレンダリングされます。 シンボル レイヤーは、バブル レイヤー上の各クラスターに含まれるポイントの数をレンダリングします。 2 つ目のシンボル レイヤーでは、地図上の個々の場所のカスタム アイコンをレンダリングします。ユーザーが地図上のクラスターまたはアイコンにマウス ポインターを重ねたときにマウス カーソルを変化させるために、バブル レイヤーとアイコン レイヤーに
mouseoverイベントとmouseoutイベントを追加します。 クラスターのバブル レイヤーには、clickイベントを追加します。 いずれかのクラスターをユーザーが選択すると、このclickイベントによって地図が 2 レベル拡大され、クラスターが中心に来るように地図が配置されます。 アイコン レイヤーにはclickイベントを追加します。 ユーザーが個々の所在地アイコンを選択すると、コーヒー ショップの詳細を表示するポップアップ ウィンドウがこのclickイベントによって表示されます。 地図には、その移動が完了するタイミングを監視するためのイベントを追加します。 このイベントが発生したら、リスト パネル内の項目を更新します。//Create a bubble layer to render clustered data points. var clusterBubbleLayer = new atlas.layer.BubbleLayer(datasource, null, { radius: 12, color: '#007faa', strokeColor: 'white', strokeWidth: 2, filter: ['has', 'point_count'] //Only render data points that have a point_count property; clusters have this property. }); //Create a symbol layer to render the count of locations in a cluster. var clusterLabelLayer = new atlas.layer.SymbolLayer(datasource, null, { iconOptions: { image: 'none' //Hide the icon image. }, textOptions: { textField: ['get', 'point_count_abbreviated'], size: 12, font: ['StandardFont-Bold'], offset: [0, 0.4], color: 'white' } }); map.layers.add([clusterBubbleLayer, clusterLabelLayer]); //Load a custom image icon into the map resources. map.imageSprite.add('myCustomIcon', iconImageUrl).then(function() { //Create a layer to render a coffee cup symbol above each bubble for an individual location. iconLayer = new atlas.layer.SymbolLayer(datasource, null, { iconOptions: { //Pass in the ID of the custom icon that was loaded into the map resources. image: 'myCustomIcon', //Optionally, scale the size of the icon. font: ['SegoeUi-Bold'], //Anchor the center of the icon image to the coordinate. anchor: 'center', //Allow the icons to overlap. allowOverlap: true }, filter: ['!', ['has', 'point_count']] //Filter out clustered points from this layer. }); map.layers.add(iconLayer); //When the mouse is over the cluster and icon layers, change the cursor to a pointer. map.events.add('mouseover', [clusterBubbleLayer, iconLayer], function() { map.getCanvasContainer().style.cursor = 'pointer'; }); //When the mouse leaves the item on the cluster and icon layers, change the cursor back to the default (grab). map.events.add('mouseout', [clusterBubbleLayer, iconLayer], function() { map.getCanvasContainer().style.cursor = 'grab'; }); //Add a click event to the cluster layer. When the user selects a cluster, zoom into it by two levels. map.events.add('click', clusterBubbleLayer, function(e) { map.setCamera({ center: e.position, zoom: map.getCamera().zoom + 2 }); }); //Add a click event to the icon layer and show the shape that was selected. map.events.add('click', iconLayer, function(e) { showPopup(e.shapes[0]); }); //Add an event to monitor when the map has finished rendering. map.events.add('render', function() { //Update the data in the list. updateListItems(); }); });コーヒー ショップのデータセットが必要な場合は、まずそれをダウンロードする必要があります。 ダウンロードしたら、そのファイルを行に分割する必要があります。 先頭行には、ヘッダー情報が格納されています。 ここでは、コードをたどりやすいように、ヘッダーを解析してオブジェクトに格納しています。それを使用することで、各プロパティのセル インデックスを検索することができます。 先頭行の後、残りの行をループで処理しながらポイント フィーチャーを作成します。 そのポイント フィーチャーをデータ ソースに追加します。 最後に、リスト パネルを更新します。
function loadStoreData() {

//Download the store location data.
fetch(storeLocationDataUrl)
    .then(response => response.text())
    .then(function(text) {

        //Parse the tab-delimited file data into GeoJSON features.
        var features = [];

        //Split the lines of the file.
        var lines = text.split('\n');

        //Grab the header row.
        var row = lines[0].split('\t');

        //Parse the header row and index each column to make the code for parsing each row easier to follow.
        var header = {};
        var numColumns = row.length;
        for (var i = 0; i < row.length; i++) {
            header[row[i]] = i;
        }

        //Skip the header row and then parse each row into a GeoJSON feature.
        for (var i = 1; i < lines.length; i++) {
            row = lines[i].split('\t');

            //Ensure that the row has the correct number of columns.
            if (row.length >= numColumns) {

                features.push(new atlas.data.Feature(new atlas.data.Point([parseFloat(row[header['Longitude']]), parseFloat(row[header['Latitude']])]), {
                    AddressLine: row[header['AddressLine']],
                    City: row[header['City']],
                    Municipality: row[header['Municipality']],
                    AdminDivision: row[header['AdminDivision']],
                    Country: row[header['Country']],
                    PostCode: row[header['PostCode']],
                    Phone: row[header['Phone']],
                    StoreType: row[header['StoreType']],
                    IsWiFiHotSpot: (row[header['IsWiFiHotSpot']].toLowerCase() === 'true') ? true : false,
                    IsWheelchairAccessible: (row[header['IsWheelchairAccessible']].toLowerCase() === 'true') ? true : false,
                    Opens: parseInt(row[header['Opens']]),
                    Closes: parseInt(row[header['Closes']])
                }));
            }
        }

        //Add the features to the data source.
        datasource.add(new atlas.data.FeatureCollection(features));

        //Initially, update the list items.
        updateListItems();
    });
}
リスト パネルが更新されると距離が計算されます。 これは、地図の中心から現在のマップ ビュー内のすべてのポイント フィーチャーまでの距離となります。 その後、距離でフィーチャーが並べ替えられます。 HTML が生成され、個々の場所がリスト パネルに表示されます。
var listItemTemplate = '<div class="listItem" onclick="itemSelected(\'{id}\')"><div class="listItem-title">{title}</div>{city}<br />Open until {closes}<br />{distance} miles away</div>';

function updateListItems() {
    //Hide the center marker.
    centerMarker.setOptions({
        visible: false
    });

    //Get the current camera and view information for the map.
    var camera = map.getCamera();
    var listPanel = document.getElementById('listPanel');

    //Check to see if the user is zoomed out a substantial distance. If they are, tell them to zoom in and to perform a search or select the My Location button.
    if (camera.zoom < maxClusterZoomLevel) {
        //Close the pop-up window; clusters might be displayed on the map.
        popup.close();
        listPanel.innerHTML = '<div class="statusMessage">Search for a location, zoom the map, or select the My Location button to see individual locations.</div>';
    } else {
        //Update the location of the centerMarker property.
        centerMarker.setOptions({
            position: camera.center,
            visible: true
        });

        //List the ten closest locations in the side panel.
        var html = [], properties;

        /*
        Generating HTML for each item that looks like this:
        <div class="listItem" onclick="itemSelected('id')">
            <div class="listItem-title">1 Microsoft Way</div>
            Redmond, WA 98052<br />
            Open until 9:00 PM<br />
            0.7 miles away
        </div>
        */

        //Get all the shapes that have been rendered in the bubble layer.
        var data = map.layers.getRenderedShapes(map.getCamera().bounds, [iconLayer]);

        //Create an index of the distances of each shape.
        var distances = {};

        data.forEach(function (shape) {
            if (shape instanceof atlas.Shape) {

                //Calculate the distance from the center of the map to each shape and store in the index. Round to 2 decimals.
                distances[shape.getId()] = Math.round(atlas.math.getDistanceTo(camera.center, shape.getCoordinates(), 'miles') * 100) / 100;
            }
        });

        //Sort the data by distance.
        data.sort(function (x, y) {
            return distances[x.getId()] - distances[y.getId()];
        });

        data.forEach(function(shape) {
            properties = shape.getProperties();
            html.push('<div class="listItem" onclick="itemSelected(\'', shape.getId(), '\')"><div class="listItem-title">',
            properties['AddressLine'],
            '</div>',
            //Get a formatted addressLine2 value that consists of City, Municipality, AdminDivision, and PostCode.
            getAddressLine2(properties),
            '<br />',

            //Convert the closing time to a format that is easier to read.
            getOpenTillTime(properties),
            '<br />',

            //Get the distance of the shape.
            distances[shape.getId()],
            ' miles away</div>');
        });

        listPanel.innerHTML = html.join('');

        //Scroll to the top of the list panel in case the user has scrolled down.
        listPanel.scrollTop = 0;
    }
}

//This converts a time that's in a 24-hour format to an AM/PM time or noon/midnight string.
function getOpenTillTime(properties) {
    var time = properties['Closes'];
    var t = time / 100;
    var sTime;

    if (time === 1200) {
        sTime = 'noon';
    } else if (time === 0 || time === 2400) {
        sTime = 'midnight';
    } else {
        sTime = Math.round(t) + ':';

        //Get the minutes.
        t = (t - Math.round(t)) * 100;

        if (t === 0) {
            sTime += '00';
        } else if (t < 10) {
            sTime += '0' + t;
        } else {
            sTime += Math.round(t);
        }

        if (time < 1200) {
            sTime += ' AM';
        } else {
            sTime += ' PM';
        }
    }

    return 'Open until ' + sTime;
}

//Create an addressLine2 string that contains City, Municipality, AdminDivision, and PostCode.
function getAddressLine2(properties) {
    var html = [properties['City']];

    if (properties['Municipality']) {
        html.push(', ', properties['Municipality']);
    }

    if (properties['AdminDivision']) {
        html.push(', ', properties['AdminDivision']);
    }

    if (properties['PostCode']) {
        html.push(' ', properties['PostCode']);
    }

    return html.join('');
}
リスト パネル内の項目がユーザーによって選択されたら、その項目に関連した図形がデータ ソースから取得されます。 図形に格納されているプロパティ情報に基づいてポップアップ ウィンドウが生成されます。 マップは、その図形が中心に来るように配置されます。 マップの幅が 700 ピクセル未満である場合は、ポップアップ ウィンドウが隠れないよう、マップ ビューがオフセットされます。
//When a user selects a result in the side panel, look up the shape by its ID value and display the pop-up window.
function itemSelected(id) {
    //Get the shape from the data source by using its ID.
    var shape = datasource.getShapeById(id);
    showPopup(shape);

    //Center the map over the shape on the map.
    var center = shape.getCoordinates();
    var offset;

    //If the map is fewer than 700 pixels wide, then the layout is set for small screens.
    if (map.getCanvas().width < 700) {
        //When the map is small, offset the center of the map relative to the shape so that there is room for the popup to appear.
        offset = [0, -80];
    }

    map.setCamera({
        center: center,
        centerOffset: offset
    });
}

function showPopup(shape) {
    var properties = shape.getProperties();

    /* Generating HTML for the pop-up window that looks like this:

        <div class="storePopup">
            <div class="popupTitle">
                3159 Tongass Avenue
                <div class="popupSubTitle">Ketchikan, AK 99901</div>
            </div>
            <div class="popupContent">
                Open until 22:00 PM<br/>
                <img title="Phone Icon" src="images/PhoneIcon.png">
                <a href="tel:1-800-XXX-XXXX">1-800-XXX-XXXX</a>
                <br>Amenities:
                <img title="Wi-Fi Hotspot" src="images/WiFiIcon.png">
                <img title="Wheelchair Accessible" src="images/WheelChair-small.png">
            </div>
        </div>
    */

     //Calculate the distance from the center of the map to the shape in miles, round to 2 decimals.
    var distance = Math.round(atlas.math.getDistanceTo(map.getCamera().center, shape.getCoordinates(), 'miles') * 100)/100;

    var html = ['<div class="storePopup">'];
    html.push('<div class="popupTitle">',
        properties['AddressLine'],
        '<div class="popupSubTitle">',
        getAddressLine2(properties),
        '</div></div><div class="popupContent">',

        //Convert the closing time to a format that's easier to read.
        getOpenTillTime(properties),

        //Add the distance information.
        '<br/>', distance,
        ' miles away',
        '<br /><img src="images/PhoneIcon.png" title="Phone Icon"/><a href="tel:',
        properties['Phone'],
        '">',
        properties['Phone'],
        '</a>'
    );

    if (properties['IsWiFiHotSpot'] || properties['IsWheelchairAccessible']) {
        html.push('<br/>Amenities: ');

        if (properties['IsWiFiHotSpot']) {
            html.push('<img src="images/WiFiIcon.png" title="Wi-Fi Hotspot"/>');
        }

        if (properties['IsWheelchairAccessible']) {
            html.push('<img src="images/WheelChair-small.png" title="Wheelchair Accessible"/>');
        }
    }

    html.push('</div></div>');

    //Update the content and position of the pop-up window for the specified shape information.
    popup.setOptions({

        //Create a table from the properties in the feature.
        content:  html.join(''),
        position: shape.getCoordinates()
    });

    //Open the pop-up window.
    popup.open(map);
}
これで、完全に機能するストア ロケーターができあがりました。 Web ブラウザーで index.html ファイルを開きます。 クラスターがマップに表示されたら、次のいずれかの方法を使用して場所を検索できます。
- 検索ボックス。
- [My Location] (現在位置) ボタンの選択
- クラスターの選択
- マップをズームインして、個々の場所を表示する。
ユーザーが初めて [My Location](現在位置) ボタンを選択すると、ユーザーの位置情報へのアクセス許可を求めるセキュリティ警告がブラウザーに表示されます。 ユーザーが位置情報の共有に同意した場合、その場所が地図で拡大表示され、付近のコーヒー ショップが表示されます。

コーヒー ショップの所在地を含んだエリアを十分拡大表示すると、クラスターが個々の所在地に分かれます。 地図上のいずれかのアイコンを選択するか、サイド パネル内の項目を選択すると、ポップアップ ウィンドウが表示されます。 ポップアップには、選択した場所に関する情報が表示されます。

ブラウザー ウィンドウのサイズを幅 700 ピクセル未満に変更するか、アプリケーションをモバイル デバイスで開いた場合、小さい画面用に合わせてレイアウトが変化します。
このチュートリアルでは、Azure Maps を使用して基本的なストア ロケーターを作成する方法を学習しました。 このチュートリアルで作成するストア ロケーターには、必要な機能がすべて備わっているものと思われます。 次のように、ストア ロケーターに機能を追加したり、より高度な機能を使用したりすれば、ユーザー エクスペリエンスの独自性を高めることができます。
- 検索ボックスの入力補完を有効にする。
- 多言語のサポートを追加する。
- ユーザーがルートに沿って場所をフィルター処理できるようにする。
- フィルターを設定する機能を追加する。
- クエリ文字列を使用して検索の初期値を指定できるようにする。 このオプションをストア ロケーターに実装すれば、ユーザーが検索をブックマークに登録したり共有したりできるようになります。 このページに対し、別のページから検索を渡す簡単な方法としても利用できます。
- ストア ロケーターを Azure App Service Web アプリとしてデプロイする。
- データベースにデータを格納して、付近の所在地を検索する。 詳細については、SQL Server の空間データ型の概要と空間データに対するニアレストネイバーのクエリに関するページを参照してください。
Additional information
- 完成したコードについては、GitHub の Simple Store Locator のチュートリアルを参照してください。
- このサンプルをライブで表示するには、Azure Maps コード サンプル のサイトで Simple Store Locator をご覧ください。
- 「ズーム レベルとタイル グリッド」を使用して、Azure Maps の対象範囲と機能の詳細を確認できます。
- また、データドリブンのスタイルの式を使用して、ビジネス ロジックに適用することもできます。
Next steps
他のコード例や対話型のコーディング エクスペリエンスについては、以下を参照してください。