Web チャットのカスタマイズ
適用対象: SDK v4
この記事では、ご利用のボットに合わせて Web チャットのサンプルをカスタマイズする方法について詳しく説明します。
Web チャットを Web サイトに統合する
Web チャットの概要では、Web チャット コントロールを Web サイトに統合する方法について説明します。
スタイルのカスタマイズ
Web チャット コントロールには、色、サイズ、要素の配置、カスタム要素の追加、ホスティング Web ページの操作など、豊富なカスタマイズ オプションが用意されています。 Web チャット UI をカスタマイズする方法の例をいくつか次に示します。
ファイル内の Web チャット で変更できるすべての設定の完全な一覧をStyleOptions.ts確認できます。 Web チャットの既定値は defaultStyleOptions.ts ファイルにあります
これらの設定では、スタイル セットが生成されます。これは glamor で強化された CSS ルールのセットです。 ファイル内のスタイル セットで生成された CSS スタイルの完全な一覧を createStyleSet.ts 見つけることができます。
Web チャット コンテナーのサイズを設定する
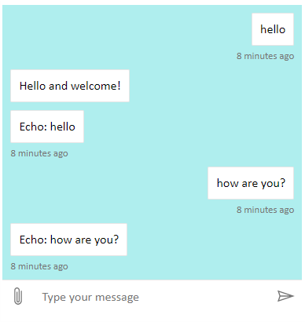
Web チャット コンテナーのサイズを調整するには、スタイル セットのrootHeight および プロパティをrootWidth使用します。 次の例では、コントローラーのサイズを表示するようにコンテナーの背景色も設定します。
<!DOCTYPE html>
<head>
    <script src="https://cdn.botframework.com/botframework-webchat/latest/webchat.js"></script>
</head>
<body>
  <div style="height: 60%; width: 40%; margin-top:5%; margin-left:10%" id="webchat" role="main"></div>
  <script>
     // Set  the CSS rules.
     const styleSet = window.WebChat.createStyleSet({
         rootHeight: '100%',
         rootWidth: '50%',
         backgroundColor: 'paleturquoise'
      });

    window.WebChat.renderWebChat({
      directLine: window.WebChat.createDirectLine({
          token: '<Your Direct Line token>'}),
      styleSet
    }, document.getElementById('webchat'));

  </script>
</body>
警告
ホスティング Web ページでは、Direct Line キーをプレーンな視野で使用しないでください。 ボットをWeb チャットに接続する方法の運用埋め込みオプション セクションで説明されているようにトークンを使用します。
チャットバブルのフォントと色を変更する
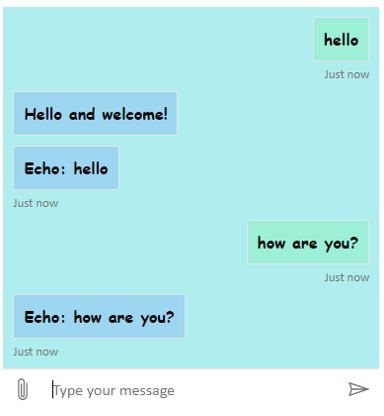
Web チャット コントロールをホストしている Web ページのスタイルに合わせて、チャット バブルで使用される背景色とフォントをカスタマイズできます。 次のコード スニペットは、その方法を示しています。
<!DOCTYPE html>
<head>
    <script src="https://cdn.botframework.com/botframework-webchat/latest/webchat.js"></script>
</head>
<body>
  <div style="height: 60%; width: 40%; margin-top:5%; margin-left:10%" id="webchat" role="main"></div>
  <script>

     // Set  the CSS rules.
     const styleSet = window.WebChat.createStyleSet({
         bubbleBackground: 'rgba(0, 0, 255, .1)',
         bubbleFromUserBackground: 'rgba(0, 255, 0, .1)',
         rootHeight: '100%',
         rootWidth: '50%',
         backgroundColor: 'paleturquoise'
      });

      // After generated, you can modify the CSS rules.
      // Change font family and weight.
      styleSet.textContent = {
         ...styleSet.textContent,
         fontFamily: "'Comic Sans MS', 'Arial', sans-serif",
         fontWeight: 'bold'
      };
    window.WebChat.renderWebChat({
      directLine: window.WebChat.createDirectLine({
          token: '<Your Direct Line token>'}),
      styleSet
    }, document.getElementById('webchat'));

  </script>
</body>
ボットとユーザーアバターを変更する
Web チャットはアバターをサポートしており、 プロパティで と userAvatarInitials をstyleOptions設定botAvatarInitialsしてカスタマイズできます。
![]()
<!DOCTYPE html>
<head>
    <script src="https://cdn.botframework.com/botframework-webchat/latest/webchat.js"></script>
</head>
<body>
  <div style="height: 60%; width: 40%; margin-top:5%; margin-left:10%" id="webchat" role="main"></div>
  <script>

     // Set  the CSS rules.
     const styleSet = window.WebChat.createStyleSet({
         bubbleBackground: 'rgba(0, 0, 255, .1)',
         bubbleFromUserBackground: 'rgba(0, 255, 0, .1)',
         rootHeight: '100%',
         rootWidth: '50%',
         backgroundColor: 'paleturquoise'
      });

      // After generated, you can modify the CSS rules.
      // Change font family and weight.
      styleSet.textContent = {
         ...styleSet.textContent,
         fontFamily: "'Comic Sans MS', 'Arial', sans-serif",
         fontWeight: 'bold'
      };

    // Set the avatar options.
     const avatarOptions = {
         botAvatarInitials: 'BF',
         userAvatarInitials: 'WC'
         };

    window.WebChat.renderWebChat({
      directLine: window.WebChat.createDirectLine({
          token: '<Your Direct Line token>'}),
      styleSet,
      styleOptions: avatarOptions
    }, document.getElementById('webchat'));

  </script>
</body>
コントロールの botAvatarInitials 左側に表示されるボットのアバターイニシャルを設定するには、 プロパティを使用します。
プロパティを userAvatarInitials 使用して、右側に表示されるユーザーのアバターのイニシャルを設定します。
および userAvatarImage プロパティをbotAvatarImage使用して、ボットとユーザーアバターの画像 URL を提供します。 コントロールは、次に示すように、イニシャルの代わりにこれらを表示します。
const avatarOptions = {
   botAvatarImage: '<URL to your bot avatar image>',
   botAvatarInitials: 'BF',
   userAvatarImage: '<URL to your user avatar image>',
   userAvatarInitials: 'WC'
};
![]()
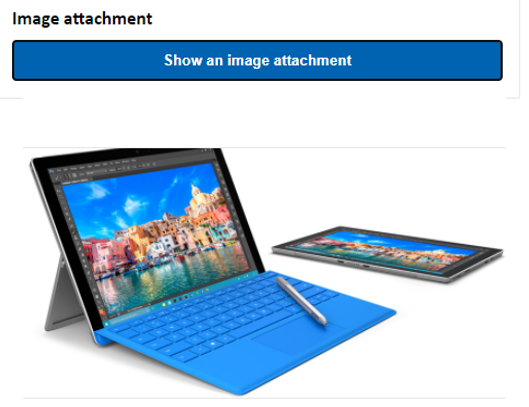
アクティビティまたは添付ファイルのレンダリングをカスタマイズする
最新バージョンのWeb チャットでは、Web チャットがすぐに使用できないアクティビティや添付ファイルをレンダリングすることもできます。 アクティビティと添付ファイルのレンダーは、Redux ミドルウェアの後にモデル化される、カスタマイズ可能なパイプラインを通じて送信されます。 パイプラインは十分に柔軟なので、次のタスクを簡単に行うことができます。
- 既存のアクティビティ/添付ファイルを装飾する
- 新しいアクティビティ/添付ファイルを追加する
- 既存のアクティビティ/添付ファイルを置き換える (または削除する)
- ミドルウェアをまとめてデイジー チェーン
GitHub リポジトリを添付ファイルとして表示する
たとえば、GitHub リポジトリ カードのデッキを表示する場合は、GitHub リポジトリの新しいReact コンポーネントを作成し、ミドルウェアとして追加できます。 次の図とコード スニペットは、 customization-card-components サンプルのサンプルからのものです。
既定のメッセージを入力したときの出力を次に示します: sample:github-repository。

「 ヘルプ 」と入力すると、選択できるすべてのカードの選択を取得できます。 これは多くの例の 1 つです。
import ReactWebChat from 'botframework-webchat';
import ReactDOM from 'react-dom';

// Create a new React component that accept render a GitHub repository attachment
const GitHubRepositoryAttachment = props => (
   <div
      style={{
         fontFamily: "'Calibri', 'Helvetica Neue', Arial, sans-serif",
         margin: 20,
         textAlign: 'center'
      }}
   >
      <svg
         height="64"
         viewBox="0 0 16 16"
         version="1.1"
         width="64"
         aria-hidden="true"
      >
         <path
            fillRule="evenodd"
            d="M8 0C3.58 0 0 3.58 0 8c0 3.54 2.29 6.53 5.47 7.59.4.07.55-.17.55-.38 0-.19-.01-.82-.01-1.49-2.01.37-2.53-.49-2.69-.94-.09-.23-.48-.94-.82-1.13-.28-.15-.68-.52-.01-.53.63-.01 1.08.58 1.23.82.72 1.21 1.87.87 2.33.66.07-.52.28-.87.51-1.07-1.78-.2-3.64-.89-3.64-3.95 0-.87.31-1.59.82-2.15-.08-.2-.36-1.02.08-2.12 0 0 .67-.21 2.2.82.64-.18 1.32-.27 2-.27.68 0 1.36.09 2 .27 1.53-1.04 2.2-.82 2.2-.82.44 1.1.16 1.92.08 2.12.51.56.82 1.27.82 2.15 0 3.07-1.87 3.75-3.65 3.95.29.25.54.73.54 1.48 0 1.07-.01 1.93-.01 2.2 0 .21.15.46.55.38A8.013 8.013 0 0 0 16 8c0-4.42-3.58-8-8-8z"
         />
      </svg>
      <p>
         <a
            href={`https://github.com/${encodeURI(props.owner)}/${encodeURI(
               props.repo
            )}`}
            target="_blank"
         >
            {props.owner}/<br />
            {props.repo}
         </a>
      </p>
   </div>
);

// Creating a new middleware pipeline that will render <GitHubRepositoryAttachment> for specific type of attachment
const attachmentMiddleware = () => next => card => {
   switch (card.attachment.contentType) {
      case 'application/vnd.microsoft.botframework.samples.github-repository':
         return (
            <GitHubRepositoryAttachment
               owner={card.attachment.content.owner}
               repo={card.attachment.content.repo}
            />
         );

      default:
         return next(card);
   }
};

ReactDOM.render(
   <ReactWebChat
      // Prepending the new middleware pipeline
      attachmentMiddleware={attachmentMiddleware}
      directLine={window.WebChat.createDirectLine({ token })}
   />,
   document.getElementById('webchat')
);
このサンプルでは、GitHubRepositoryAttachment と呼ばれる新しい React コンポーネントを追加します。
const GitHubRepositoryAttachment = props => (
   <div
      style={{
         fontFamily: "'Calibri', 'Helvetica Neue', Arial, sans-serif",
         margin: 20,
         textAlign: 'center'
      }}
   >
      <svg
         height="64"
         viewBox="0 0 16 16"
         version="1.1"
         width="64"
         aria-hidden="true"
      >
         <path
            fillRule="evenodd"
            d="M8 0C3.58 0 0 3.58 0 8c0 3.54 2.29 6.53 5.47 7.59.4.07.55-.17.55-.38 0-.19-.01-.82-.01-1.49-2.01.37-2.53-.49-2.69-.94-.09-.23-.48-.94-.82-1.13-.28-.15-.68-.52-.01-.53.63-.01 1.08.58 1.23.82.72 1.21 1.87.87 2.33.66.07-.52.28-.87.51-1.07-1.78-.2-3.64-.89-3.64-3.95 0-.87.31-1.59.82-2.15-.08-.2-.36-1.02.08-2.12 0 0 .67-.21 2.2.82.64-.18 1.32-.27 2-.27.68 0 1.36.09 2 .27 1.53-1.04 2.2-.82 2.2-.82.44 1.1.16 1.92.08 2.12.51.56.82 1.27.82 2.15 0 3.07-1.87 3.75-3.65 3.95.29.25.54.73.54 1.48 0 1.07-.01 1.93-.01 2.2 0 .21.15.46.55.38A8.013 8.013 0 0 0 16 8c0-4.42-3.58-8-8-8z"
         />
      </svg>
      <p>
         <a
            href={`https://github.com/${encodeURI(props.owner)}/${encodeURI(
               props.repo
            )}`}
            target="_blank"
         >
            {props.owner}/<br />
            {props.repo}
         </a>
      </p>
   </div>
);
その後、ボットでコンテンツの種類 application/vnd.microsoft.botframework.samples.github-repository の添付ファイルを送信するときに、新しい React コンポーネントをレンダリングするミドルウェアを作成します。 それ以外の場合は、これは next(card) を呼び出すことにより、ミドルウェア上で続行されます。
const attachmentMiddleware = () => next => card => {
   switch (card.attachment.contentType) {
      case 'application/vnd.microsoft.botframework.samples.github-repository':
         return (
            <GitHubRepositoryAttachment
               owner={card.attachment.content.owner}
               repo={card.attachment.content.repo}
            />
         );

      default:
         return next(card);
   }
};
ボットから送信されたアクティビティは、次のようになります。
{
   "type": "message",
   "from": {
      "role": "bot"
   },
   "attachmentLayout": "carousel",
   "attachments": [
      {
         "contentType": "application/vnd.microsoft.botframework.samples.github-repository",
         "content": {
            "owner": "Microsoft",
            "repo": "BotFramework-WebChat"
         }
      },
      {
         "contentType": "application/vnd.microsoft.botframework.samples.github-repository",
         "content": {
            "owner": "Microsoft",
            "repo": "BotFramework-Emulator"
         }
      },
      {
         "contentType": "application/vnd.microsoft.botframework.samples.github-repository",
         "content": {
            "owner": "Microsoft",
            "repo": "BotFramework-DirectLineJS"
         }
      }
   ]
}