話者認識とは
重要
Azure AI Speech の話者認識は、2025 年 9 月 30 日に廃止されます。 この日付以降、お使いのアプリケーションでは話者認識を使用できなくなります。
話者認識は、オーディオ クリップで誰が話しているのかを判断するのに役立ちます。 このサービスでは、音声生物測定学を使用して、独自の音声特性によって話者を確認および識別できます。
1 人の話者のオーディオ トレーニング データを提供すると、話者の声の固有の特性に基づいて登録プロファイルが作成されます。 その後、このプロファイルに対してオーディオ音声サンプルをクロスチェックして、話者が同じ人物であることを確認できます (話者認証)。 また、登録されている話者プロファイルの "グループ" に対してオーディオ音声サンプルをクロスチェックして、グループ内のプロファイルと一致するかどうかを確認することもできます (話者識別)。
話者認証
話者認証では、パスフレーズまたは自由形式の音声入力のいずれかを使用して、登録済みの話者の ID を確認するプロセスを合理化します。 たとえば、コール センターでの顧客 ID の検証や、連絡先がいない施設へのアクセスに使用できます。
話者認証のしくみ
次のフローチャートは、このしくみを視覚的に示しています。
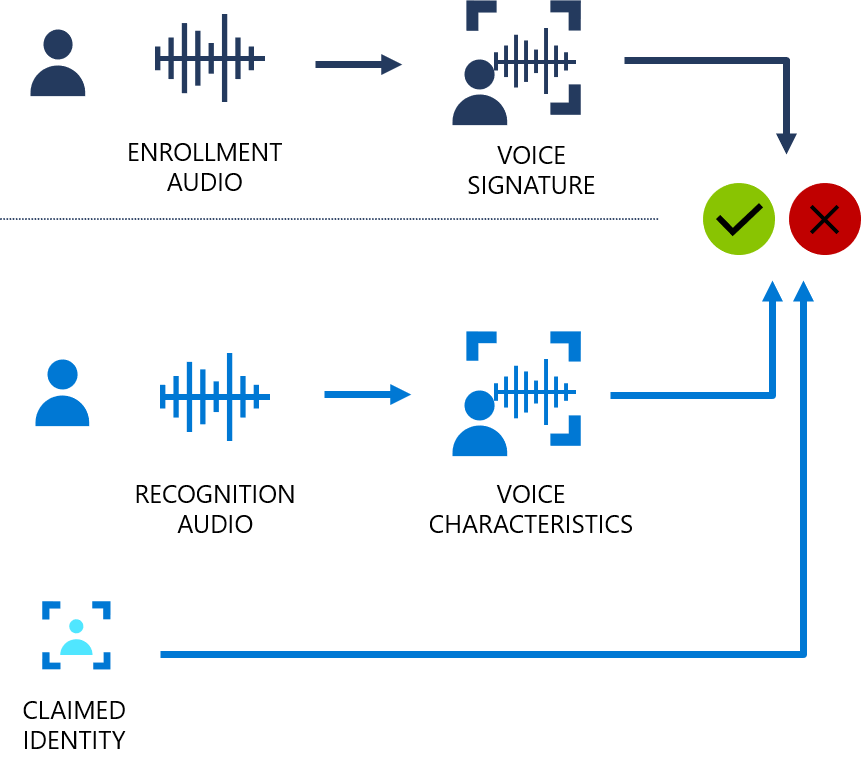
話者認証には、テキストに依存する種類とテキストに依存しない種類があります。 "テキストに依存する" 検証は、登録フェーズと検証フェーズの両方で、話者が同じパスフレーズを選択して使用する必要があることを意味します。 "テキストに依存しない" 検証は、話者が登録および検証のフレーズで日常的な言語で話すことができることを意味します。
テキストに依存する検証の場合、事前定義されたフレーズのセットに含まれるパスフレーズを話すことによって話者の声が登録されます。 声の特徴がオーディオ録音から抽出され一意の音声シグネチャが形成されます。選択したパスフレーズも認識されます。 音声シグネチャとパスフレーズを一緒に使用して、話者を確認します。
テキストに依存しない検証では、アクティブな登録が有効な場合の初期アクティブ化フレーズの他には、登録時の話者の発言内容に関する制限はありません。 確認する音声のサンプルに制限はありません。これは、類似性をスコア付けする音声の特徴だけを抽出するためです。
この API の目的は、音声がライブ ユーザーの声か、声を真似たものか、登録済み話者の記録かを判断することではありません。
話者識別
話者識別を使用すると、登録されている話者のグループ内で不明な話者の ID を判別できます。 話者識別により、音声を個々の話者に帰属させ、次のような複数の話者がいるシナリオから価値を引き出すことができます。
- リモート ミーティングの生産性向上のためのソリューションをサポートする。
- 複数ユーザーのデバイスのパーソナル化を構築する。
話者識別のしくみ
話者識別の登録はテキストに依存しません。 アクティブな登録が有効な場合の初期アクティブ化のフレーズの他には、オーディオでの話者の発言内容に関する制限はありません。 話者認証と同様に、登録フェーズでは、話者の声が記録され、声の特徴が抽出されて一意の音声シグネチャが形成されます。 識別フェーズでは、入力音声のサンプルが、指定された登録済みの音声のリスト (各要求で最大 50) と比較されます。
データのセキュリティとプライバシー
登録用の音声オーディオや音声シグネチャの特徴を含む話者登録データは、セキュリティで保護されたシステムに格納されます。 登録用の音声オーディオは、アルゴリズムがアップグレードされたときにのみ使用されます。その際は、特徴を再度抽出する必要があります。 認識フェーズ中にサービスに送信される音声録音や抽出された声の特徴は、サービスに保持されません。
データが保持される期間は開発者が制御します。 開発者は、API 呼び出しによって個々の話者の登録データを作成、更新、および削除できます。 サブスクリプションが削除されると、そのサブスクリプションに関連付けられているすべての話者登録データも削除されます。
Azure AI サービス リソース全般に言えることですが、話者認識機能を使用する開発者は、顧客データに関する Microsoft のポリシーに留意する必要があります。 ユーザーから適切な許可を得ていることを確認する必要があります。 詳細については、話者認識のデータとプライバシーに関する記事を参照してください。 詳細については、Microsoft トラスト センターの Azure AI サービスのページを参照してください。
一般的な質問と解決策
| Question | 解決策 |
|---|---|
| どのような状況で話者認識を使用するのでしょうか。 | たとえば、コール センターでの顧客認証、音声ベースの患者のチェックイン、会議の文字起こし、マルチユーザー デバイスのパーソナル化などが良い例です。 |
| 識別と認証の違いは何ですか。 | 識別とは、話者のグループの内、どのメンバーが話しているかを検出するプロセスです。 認証では、話者が既知の "登録されている" 音声と一致することを確認します。 |
| どの言語がサポートされていますか。 | 話者認識の言語のサポートに関するページを参照してください。 |
| どの Azure リージョンがサポートされていますか。 | 話者認識のリージョンのサポートに関するページを参照してください。 |
| サポートされているオーディオ形式は何ですか。 | モノラル 16 ビット、16 kHz PCM エンコード済み WAV。 |
| 1 人の話者を複数回登録できますか。 | はい。テキスト依存の認証では、話者を最大 50 回登録できます。 テキストに依存しない認証、または話者識別では、最大 300 秒の音声を登録できます。 |
| Azure に格納されるデータは何ですか。 | 登録音声は、音声プロファイルが削除されるまでサービスに格納されます。 認識音声サンプルは保持または保存されません。 |
責任ある AI
AI システムには、テクノロジだけでなく、それを使用する人、それによって影響を受ける人、それがデプロイされる環境も含まれます。 「透過性のためのメモ」を読み、システムでの責任ある AI の使用とデプロイについて確認してください。