Azure Communication Services の グループ通話のヒーロー サンプルは、Communication Services Calling Web SDK を使用して、グループ通話エクスペリエンスを構築する方法を示しています。
このサンプル クイックスタートでは、サンプルをローカル コンピューターで実行し、独自の Azure Communication Services リソースを使用してサンプルを Azure にデプロイする前に、サンプルがどのように機能するかについて説明します。
コードをダウンロードする
GitHub でこのサンプルのプロジェクトを見つけてください。 Teams の相互運用機能および通話レコーディングなど、現在パブリック プレビュー中の機能を含むサンプルのバージョンは、別のブランチにあります。
概要
このサンプルには、クライアント側アプリケーションとサーバー側アプリケーションの両方があります。 クライアント側アプリケーションは、Microsoft の Fluent UI フレームワークを使用する React/Redux Web アプリケーションです。 このアプリケーションは、クライアント側アプリケーションが Azure に接続するのを助ける ASP.NET Core のサーバー側アプリケーションに要求を送信します。
サンプルは次のようになります。
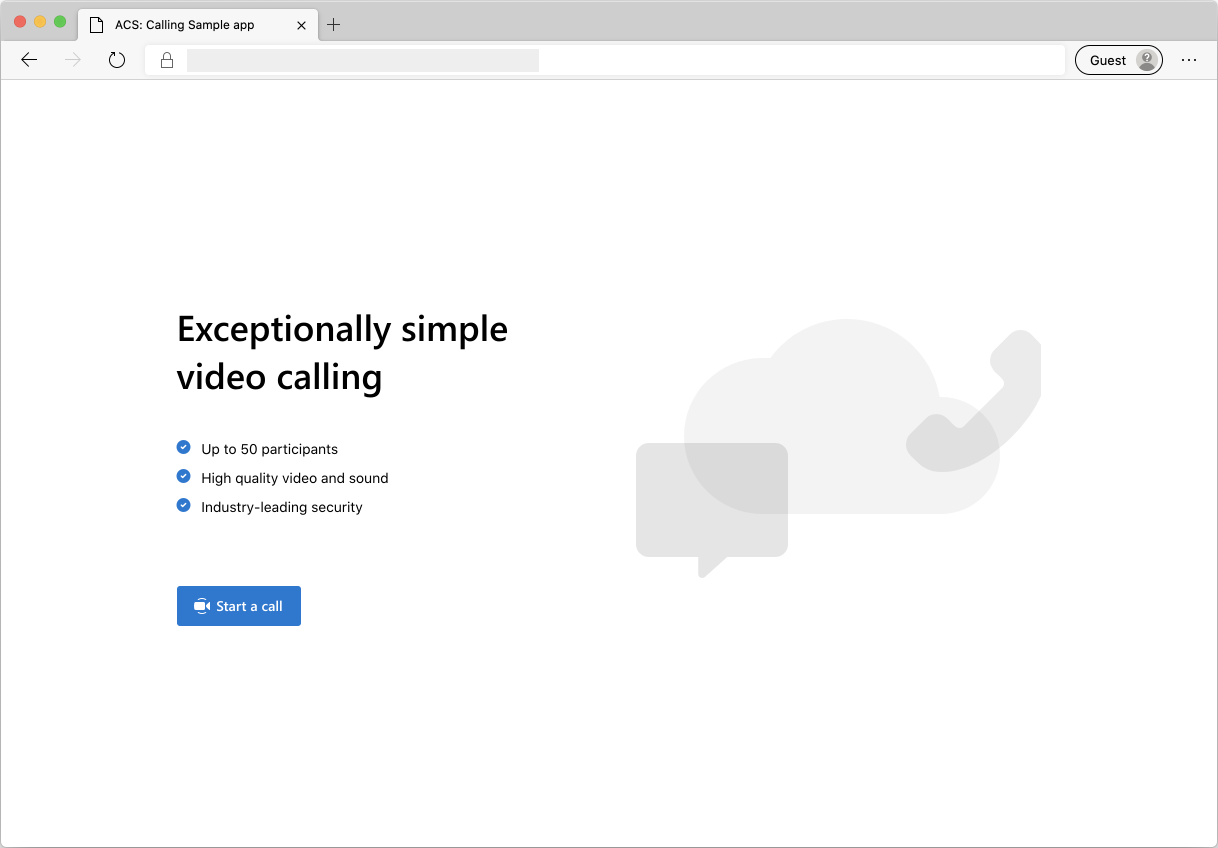
[Start a Chat](通話を開始) ボタンを押すと、サーバー側アプリケーションからユーザー アクセス トークンがフェッチされます。 このトークンは、クライアント アプリを Azure Communication Services に接続するために使用されます。 トークンの取得後、使用するカメラとマイクを指定するように求められます。 切り替えコントロールを使用して、これらのデバイスを無効または有効にできます。
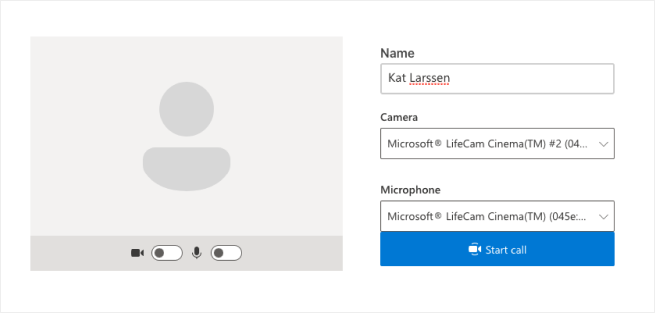
表示名とデバイスを構成すると、通話セッションに参加できるようになります。 その後、メインの通話キャンバスが表示され、通話のコア エクスペリエンスが提供されます。

通話のメイン画面のコンポーネントは以下のとおりです。
- メディア ギャラリー: 参加者が表示されるメイン領域。 参加者のカメラが有効になっている場合は、そのビデオ フィードがここに表示されます。 各参加者の表示名とビデオ ストリーム (ある場合) がタイル表示されます。
- ヘッダー:ここには通話のメイン コントロールがあり、設定と参加者のサイド バーの切り替え、ビデオとマイクのオン/オフ切り替え、画面の共有、通話の終了を行えます。
- サイド バー: ヘッダーのコントロールを使用して、参加者と設定情報の表示を切り替えます。 このコンポーネントは、右上隅にある 'X' を使用して閉じることができます。 参加者のサイド バーには参加者の一覧と、チャットするユーザーをさらに招待するためのリンクが表示されます。 [設定] サイドバーでは、マイクとカメラの設定を構成できます。
以下で、サンプルを設定するための前提条件と手順について詳しく説明します。
前提条件
- アクティブなサブスクリプションが含まれる Azure アカウント。 詳細については、無料アカウントの作成に関するページをご覧ください。
- Node.js (12.18.4 以上)
- Visual Studio Code (安定したビルド)
- Azure Communication Services リソース。 詳細については、Azure Communication Services リソースの作成に関するページを参照してください。 このクイックスタートで使用するリソースの接続文字列を記録する必要があります。
サンプルを初めて実行する前に行う手順
PowerShell、Windows ターミナル、コマンド プロンプト、またはそれと同等のインスタンスを開き、サンプルの複製先のディレクトリに移動します。
git clone https://github.com/Azure-Samples/communication-services-web-calling-hero.gitAzure portal から、または Azure CLI を使用して
Connection Stringを取得します。az communication list-key --name "<acsResourceName>" --resource-group "<resourceGroup>"接続文字列の詳細については、Azure Communication リソースの作成に関するページを参照してください。
Connection Stringを取得したら、samples/Server/appsetting.json ファイルに接続文字列を追加します。 変数ResourceConnectionStringに接続文字列を入力します。Azure portal から、または Azure CLI を使用して
Endpoint stringを取得します。az communication list-key --name "<acsResourceName>" --resource-group "<resourceGroup>"エンドポイント文字列の詳細については、Azure Communication リソースの作成に関するページをご覧ください。
Endpoint Stringを取得したら、samples/Server/appsetting.json ファイルにエンドポイント文字列を追加します。 変数EndpointUrlにエンドポイント文字列を入力します
ローカルの実行
依存関係のインストール
npm run setup通話アプリを起動します
npm run startこれにより、Web サイト ファイルを提供するポート 3000 上のクライアント サーバーと、通話参加者のトークンの作成などの機能を実行するポート 8080 上の API サーバーが開きます。
トラブルシューティング
アプリに [サポートされていないブラウザー] 画面が表示されますが、サポートされているブラウザーを使用しています。
アプリが localhost 以外のホスト名で提供されている場合は、http ではなく https 経由でトラフィックを提供する必要があります。
Azure に発行する
npm run setupnpm run buildnpm run package- Azure 拡張機能を使用し、Calling/dist ディレクトリを App Service にデプロイします
リソースをクリーンアップする
Communication Services サブスクリプションをクリーンアップして解除する場合は、リソースまたはリソース グループを削除できます。 リソース グループを削除すると、それに関連付けられている他のリソースも削除されます。 詳細については、リソースのクリーンアップに関する記事を参照してください。
次の手順
詳細については、次の記事を参照してください。
- Calling SDK の使用法について理解する
- 通話のしくみの詳細について確認する
その他の情報
- サンプル - その他のサンプルと例については、「サンプルの概要」ページを参照してください。
- Redux - クライアント側の状態管理
- FluentUI - Microsoft が提供する UI ライブラリ
- React - ユーザー インターフェイスを構築するためのライブラリ
- ASP.NET Core - Web アプリケーションを構築するためのフレームワーク
Azure Communication Services の iOS 用のグループ通話のヒーロー サンプルは、Communication Services Calling iOS SDK を使用して、音声とビデオを含むグループ通話エクスペリエンスを構築する方法を示しています。 このサンプル クイックスタートでは、サンプルを設定して実行する方法について説明します。 背景情報については、サンプルの概要を参照してください。
コードをダウンロードする
GitHub でこのサンプルのプロジェクトを見つけてください。
概要
このサンプルはネイティブ iOS アプリケーションであり、音声通話とビデオ通話の両機能を備えた通話エクスペリエンスを実現するために、Azure Communication Services iOS SDK が使用されています。 このアプリケーションは、サーバー側コンポーネントを使用してアクセス トークンをプロビジョニングします。それを使用して、Azure Communication Services SDK が初期化されます。 サーバー側コンポーネントを構成する際は、Azure Functions を使用した信頼できるサービスについてのチュートリアルに従ってください。
サンプルは次のようになります。
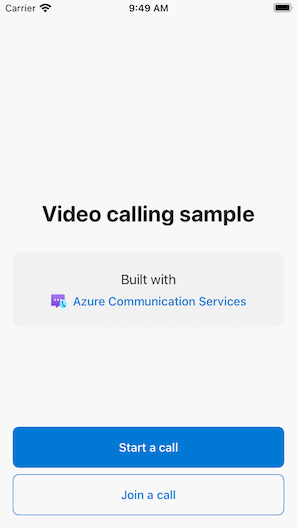
[新しい通話の開始] ボタンを押すと、iOS アプリケーションから、通話に使用する表示名を入力するように求められます。
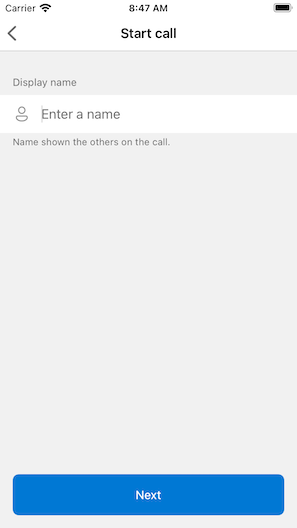
[通話を開始] 画面で [次へ] をタップすると、iOS 共有シートを使用して通話のグループ ID を共有できます。
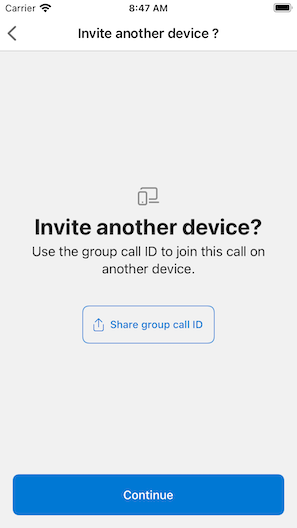
このアプリケーションでは、既存の通話の ID または Teams ID リンクを指定することで、Azure Communication Services の既存の通話に参加することもできます。
![サンプル アプリケーションの [通話に参加] 画面を示すスクリーンショット。](media/calling/join-call-ios.png)
通話に参加すると、カメラとマイクへのアクセスをアプリケーションに許可するよう求められます (まだ許可していない場合)。 すべての AVFoundation ベースのアプリと同様に、真のオーディオとビデオの機能は実際のハードウェアでのみ使用できるということに留意してください。
表示名を構成して通話に参加すると、メインの通話キャンバスが表示され、通話のコア エクスペリエンスが提供されます。
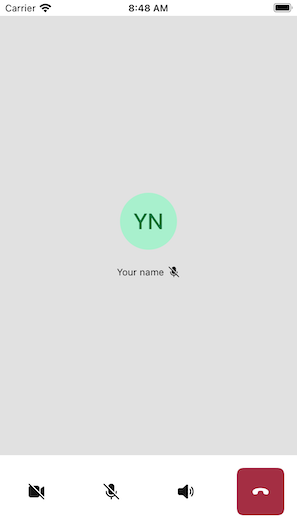
通話のメイン画面のコンポーネントは以下のとおりです。
- メディア ギャラリー: 参加者が表示されるメイン領域。 参加者のカメラが有効になっている場合は、そのビデオ フィードがここに表示されます。 参加者ごとに個別のタイルがあり、その表示名とビデオ ストリーム (存在する場合) が表示されます。 ギャラリーでは複数の参加者がサポートされており、通話への参加者が追加または削除されると更新されます。
- アクション バー: 主要な通話コントロールが配置される場所です。 これらのコントロールを使用して、ビデオとマイクのオンとオフを切り替えたり、画面を共有したり、通話を終了したりすることができます。
以下で、サンプルを設定するための前提条件と手順について詳しく説明します。
前提条件
- アクティブなサブスクリプションが含まれる Azure アカウント。 詳細については、アカウントの無料作成に関するページを参照してください。
- Xcode を実行しており、有効な開発者証明書がキーチェーンにインストールされている Mac。
- Azure Communication Services リソース。 詳細については、Azure Communication Services リソースの作成に関するページを参照してください。
- 認証エンドポイントを実行してアクセス トークンをフェッチする Azure 関数。
サンプルをローカルで実行する
グループ通話サンプルは、XCode を使用してローカルで実行することができます。 開発者は、各自の物理デバイスまたはエミュレーターを使用してアプリケーションをテストできます。
サンプルを初めて実行する前
-
pod installを実行して依存関係をインストールします。 - XCode で
AzureCalling.xcworkspaceを開きます。 - ルートに
AppSettings.xcconfigという名前のテキスト ファイルを作成して、次の値を設定します。communicationTokenFetchUrl = <your authentication endpoint, without the https:// component>
サンプルを実行する
任意のシミュレーターまたはデバイスで AzureCalling ターゲットを使用して、XCode でサンプルをビルドして実行します。
(省略可) 認証エンドポイントのセキュリティを確保する
このサンプルはデモンストレーション上、既定では、パブリックにアクセスできるエンドポイントを使用して、Azure Communication Services のアクセス トークンをフェッチします。 運用のシナリオでは、セキュリティを確保した独自のエンドポイントを使用して独自のトークンをプロビジョニングすることをお勧めします。
別途構成を行うことにより、このサンプルは、Microsoft Entra ID (Microsoft Entra ID) で保護されたエンドポイントへの接続をサポートし、Azure Communication Services のアクセス トークンをフェッチするアプリにユーザー ログインを要求することができます。 以下の手順を参照してください。
- アプリで Microsoft Entra 認証を有効にします。
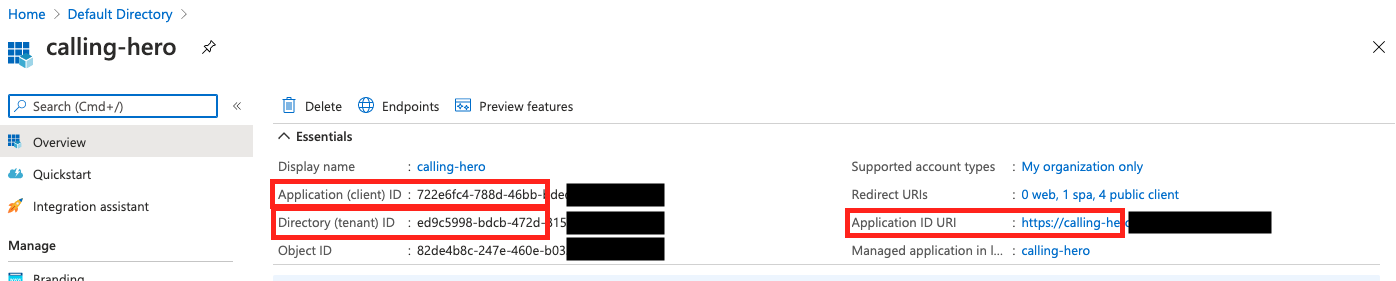
- Microsoft Entra の [アプリの登録] で、登録したアプリの概要ページに移動します。
Application (client) ID、Directory (tenant) ID、Application ID URIを書き留めておきます。
- ルートに
AppSettings.xcconfigファイルを作成し (まだ存在しない場合)、次の値を追加します。communicationTokenFetchUrl = <Application ID URI, without the https:// component> aadClientId = <Application (client) ID> aadTenantId = <Directory (tenant) ID>
リソースをクリーンアップする
Communication Services サブスクリプションをクリーンアップして解除する場合は、リソースまたはリソース グループを削除できます。 リソース グループを削除すると、それに関連付けられている他のリソースも削除されます。 詳細については、リソースのクリーンアップに関する記事を参照してください。
次の手順
詳細については、次の記事を参照してください。
- Calling SDK の使用法について理解する
- 通話のしくみの詳細について確認する
その他の情報
- Azure Communication GitHub - 他の例や情報は公式 GitHub ページで見つかります。
- サンプル - その他のサンプルと例については、「サンプルの概要」ページを参照してください。
- Azure Communication の通話機能 - Calling iOS SDK の詳細 - Azure Communication iOS Calling SDK
Azure Communication Services の Android 用のグループ通話のヒーロー サンプルは、Communication Services Calling Android SDK を使用して、音声とビデオを含むグループ通話エクスペリエンスを構築する方法を示しています。 このサンプル クイックスタートでは、サンプルを設定して実行する方法について説明します。 背景情報については、サンプルの概要を参照してください。
コードをダウンロードする
GitHub でこのサンプルのプロジェクトを見つけてください。
概要
このサンプルはネイティブ Android アプリケーションであり、音声通話とビデオ通話の両機能を備えた通話エクスペリエンスを実現するために、Azure Communication Services Android UI クライアント ライブラリが使用されています。 このアプリケーションは、サーバー側コンポーネントを使用してアクセス トークンをプロビジョニングします。それを使用して、Azure Communication Services SDK が初期化されます。 サーバー側コンポーネントを構成する際は、Azure Functions を使用した信頼できるサービスについてのチュートリアルに従ってください。
サンプルは次のようになります。
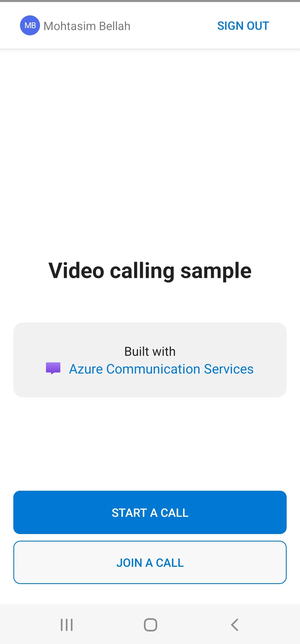
[新しい通話の開始] ボタンを押すと、Android アプリケーションから、通話に使用する表示名を入力するように求められます。
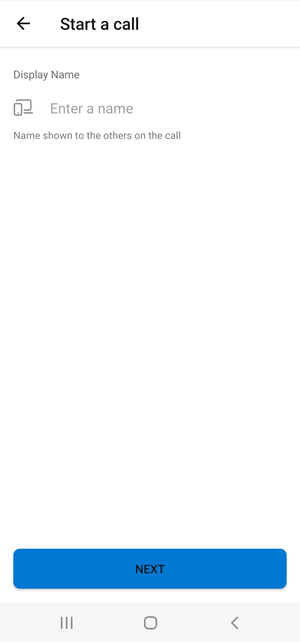
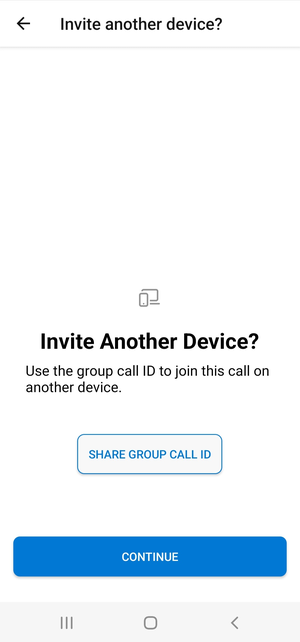
[通話を開始] ページで [次へ] をタップすると、"グループ通話 ID" を共有できます。
このアプリケーションでは、既存の通話の ID または Teams 会議 ID リンクと表示名を指定することで、Azure Communication Services の既存の通話に参加できます。
![サンプル アプリケーションの [通話に参加] 画面を示すスクリーンショット。](media/calling/join-call-android.png)
通話に参加すると、カメラとマイクへのアクセスをアプリケーションに許可するよう求められます (まだ許可していない場合)。 メインの通話キャンバスが表示され、通話のコア エクスペリエンスが提供されます。
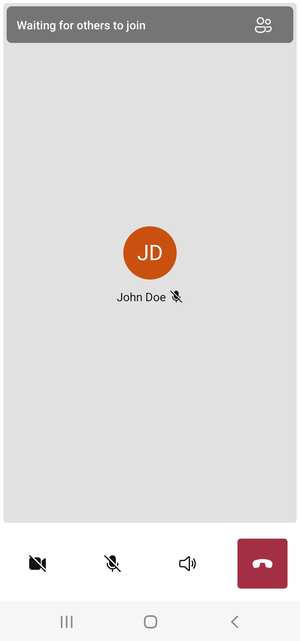
通話のメイン画面のコンポーネントは以下のとおりです。
- メディア ギャラリー: 参加者が表示されるメイン領域。 参加者のカメラが有効になっている場合は、そのビデオ フィードがここに表示されます。 参加者ごとに個別のタイルがあり、その表示名とビデオ ストリーム (存在する場合) が表示されます。 ギャラリーでは複数の参加者がサポートされており、通話への参加者が追加または削除されると更新されます。
- アクション バー: 主要な通話コントロールが配置される場所です。 これらのコントロールを使用して、ビデオとマイクのオンとオフを切り替えたり、画面を共有したり、通話を終了したりすることができます。
以下で、サンプルを設定するための前提条件と手順について詳しく説明します。
前提条件
- アクティブなサブスクリプションが含まれる Azure アカウント。 詳細については、アカウントの無料作成に関するページを参照してください。
- お使いのコンピューターで実行されている Android Studio
- Azure Communication Services リソース。 詳細については、Azure Communication Services リソースの作成に関するページを参照してください。
- 認証エンドポイントを実行してアクセス トークンをフェッチする Azure 関数。
サンプルをローカルで実行する
グループ通話サンプルは、Android Studio を使用してローカルで実行することができます。 開発者は、各自の物理デバイスまたはエミュレーターを使用してアプリケーションをテストできます。
サンプルを初めて実行する前
- Android Studio を開き、
Open an Existing Projectを選択します - サンプルのダウンロードされたリリース内の
AzureCallingフォルダーを開きます。 - app/assets を展開して
appSettings.propertiesを更新します。 キーcommunicationTokenFetchUrlの値を、前提条件として設定された認証エンドポイントの URL に設定します。
サンプルを実行する
Android Studio でサンプルをビルドして実行します。
(省略可) 認証エンドポイントのセキュリティを確保する
このサンプルはデモンストレーション上、既定では、パブリックにアクセスできるエンドポイントを使用して、Azure Communication Services トークンをフェッチします。 運用のシナリオでは、セキュリティを確保した独自のエンドポイントを使用して独自のトークンをプロビジョニングすることをお勧めします。
別途構成を行うことにより、このサンプルは、Microsoft Entra ID (Microsoft Entra ID) で保護されたエンドポイントへの接続をサポートし、Azure Communication Services トークンをフェッチするアプリにユーザー ログインを要求することができます。 以下の手順を参照してください。
アプリで Microsoft Entra 認証を有効にします。
Microsoft Entra の [アプリの登録] で、登録したアプリの概要ページに移動します。
Package name、Signature hash、MSAL Configurationを書き留めておきます。
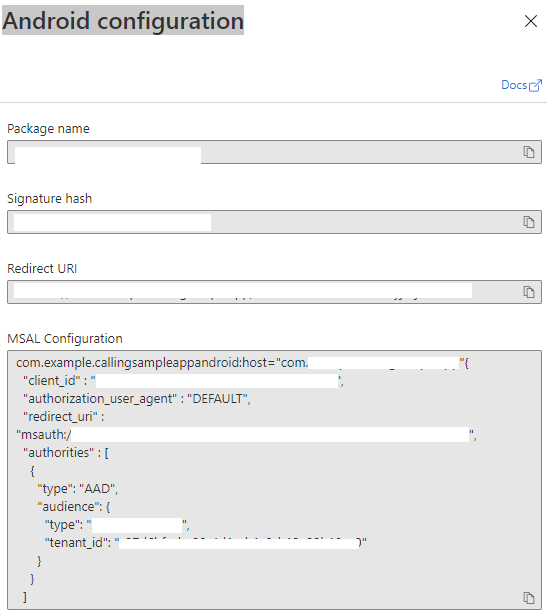
AzureCalling/app/src/main/res/raw/auth_config_single_account.jsonを編集し、isAADAuthEnabledを設定して Microsoft Entra ID を有効にします。AndroidManifest.xmlを編集し、android:pathをキーストア署名ハッシュに設定します。 (省略可能。現在の値では、バンドルされた debug.keystore からのハッシュが使用されます。別のキーストアを使用する場合は、これを更新する必要があります)<activity android:name="com.microsoft.identity.client.BrowserTabActivity"> <intent-filter> <action android:name="android.intent.action.VIEW" /> <category android:name="android.intent.category.DEFAULT" /> <category android:name="android.intent.category.BROWSABLE" /> <data android:host="com.azure.samples.communication.calling" android:path="/Signature hash" <!-- do not remove /. The current hash in AndroidManifest.xml is for debug.keystore. --> android:scheme="msauth" /> </intent-filter> </activity>MSAL Android の構成を Azure portal からコピーし、
AzureCalling/app/src/main/res/raw/auth_config_single_account.jsonに貼り付けます。 Include "account_mode": "SINGLE"{ "client_id": "", "authorization_user_agent": "DEFAULT", "redirect_uri": "", "account_mode" : "SINGLE", "authorities": [ { "type": "AAD", "audience": { "type": "AzureADMyOrg", "tenant_id": "" } } ] }AzureCalling/app/src/main/res/raw/auth_config_single_account.jsonを編集し、キーcommunicationTokenFetchUrlの値を、セキュリティで保護されている認証エンドポイントの URL に設定します。AzureCalling/app/src/main/res/raw/auth_config_single_account.jsonを編集し、Azure Active DirectoryExpose an APIスコープのキーaadScopesの値を設定しますユーザー情報をフェッチする Graph API エンドポイントとして、
AzureCalling/app/assets/appSettings.propertiesでgraphURLの値を設定します。AzureCalling/app/src/main/assets/appSettings.propertiesを編集して、サイレント ログインを有効にするようにキーtenantの値を設定します。これにより、アプリケーションの再起動中にユーザーを何度も認証する必要がなくなります。
リソースをクリーンアップする
Communication Services サブスクリプションをクリーンアップして解除する場合は、リソースまたはリソース グループを削除できます。 リソース グループを削除すると、それに関連付けられている他のリソースも削除されます。 詳細については、リソースのクリーンアップに関する記事を参照してください。
次の手順
詳細については、次の記事を参照してください。
- Calling SDK の使用法について理解する
- 通話のしくみの詳細について確認する
その他の情報
- Azure Communication GitHub - 他の例や情報は公式 GitHub ページで見つかります。
- サンプル - その他のサンプルと例については、「サンプルの概要」ページを参照してください。
- Azure Communication の通話機能 - Calling Android SDK の詳細 - Azure Communication Android Calling SDK
Azure Communication Services の Windows 用のグループ通話のヒーロー サンプルは、Communication Services Calling Windows SDK を使用して、音声とビデオを含むグループ通話エクスペリエンスを構築する方法を示しています。 このサンプルでは、サンプルを設定して実行する方法について説明します。 背景情報については、サンプルの概要を参照してください。
このクイックスタートでは、Windows 用の Azure Communication Services Calling SDK を使用して 1 対 1 のビデオ通話を開始する方法について説明します。
UWP サンプル コード
前提条件
このチュートリアルを完了するには、次の前提条件を用意しておく必要があります。
アクティブなサブスクリプションが含まれる Azure アカウント。 無料でアカウントを作成できます。
[ユニバーサル Windows プラットフォーム開発] ワークロードを指定した Visual Studio 2022 のインストール。
デプロイ済みの Communication Services リソース。 Communication Services リソースを作成します。 このクイックスタートで使用する接続文字列を記録する必要があります。
Azure Communication Service のユーザー アクセス トークン。 Azure CLI を使用し、接続文字列を指定してコマンドを実行して、ユーザーとアクセス トークンを作成することもできます。
az communication identity token issue --scope voip --connection-string "yourConnectionString"詳細については、「Azure CLI を使用してアクセス トークンを作成および管理する」を参照してください。
設定
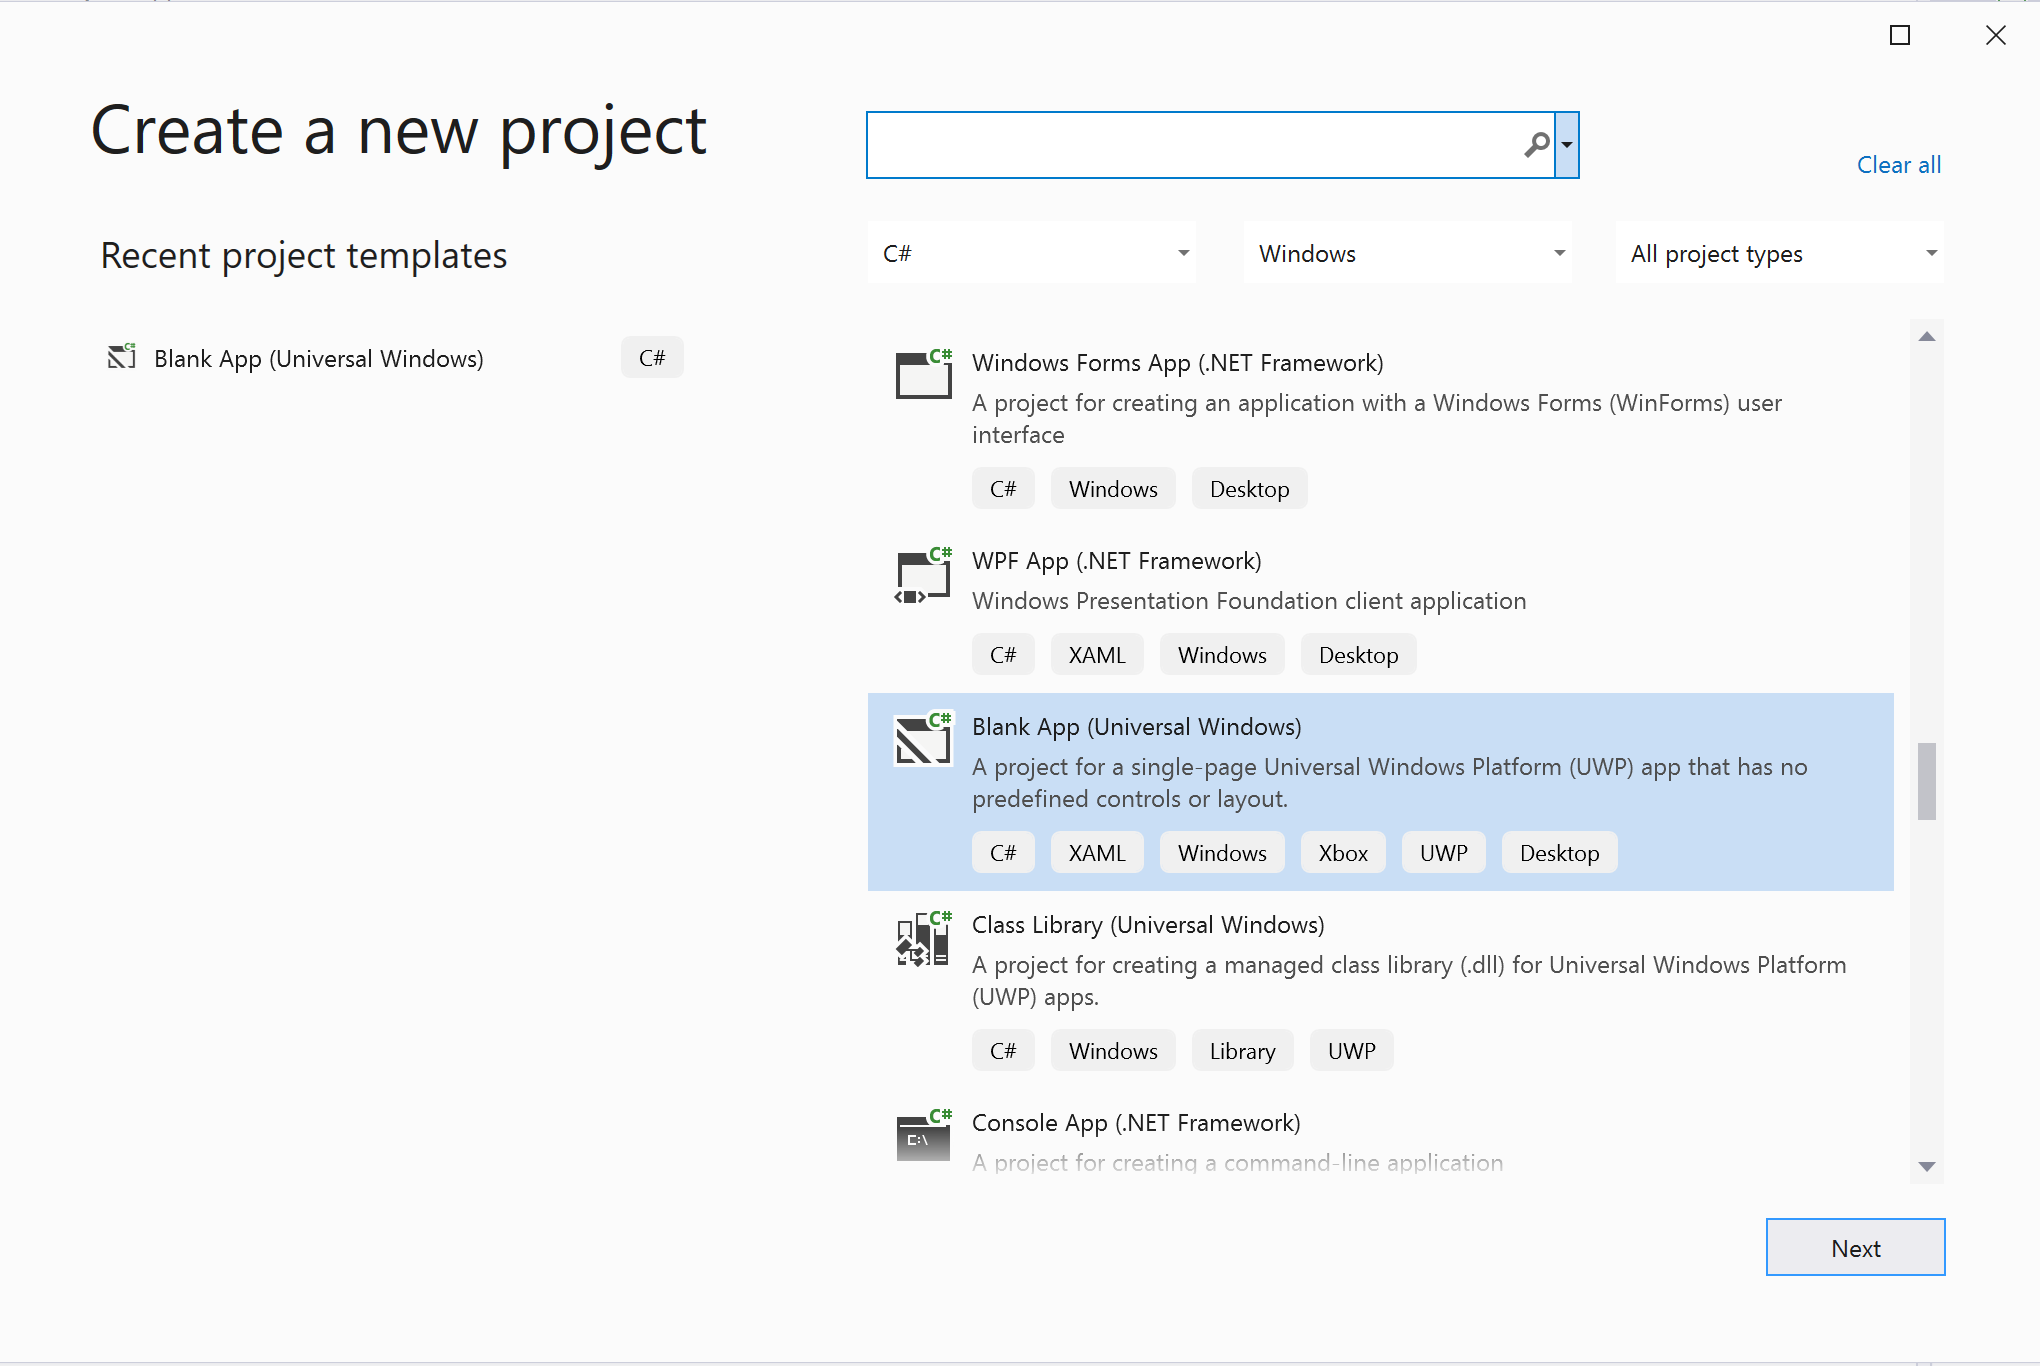
プロジェクトの作成
Visual Studio の [空白のアプリ (ユニバーサル Windows)] テンプレートを使用して新しいプロジェクトを作成し、シングルページ ユニバーサル Windows プラットフォーム (UWP) アプリをセットアップします。
パッケージをインストールする
プロジェクトを右クリックし、Manage Nuget Packages に移動して、Azure.Communication.Calling.WindowsClient1.2.0-beta.1 以上のバージョンをインストールします。 [プレリリースを含める] がオンになっていることを確認します。
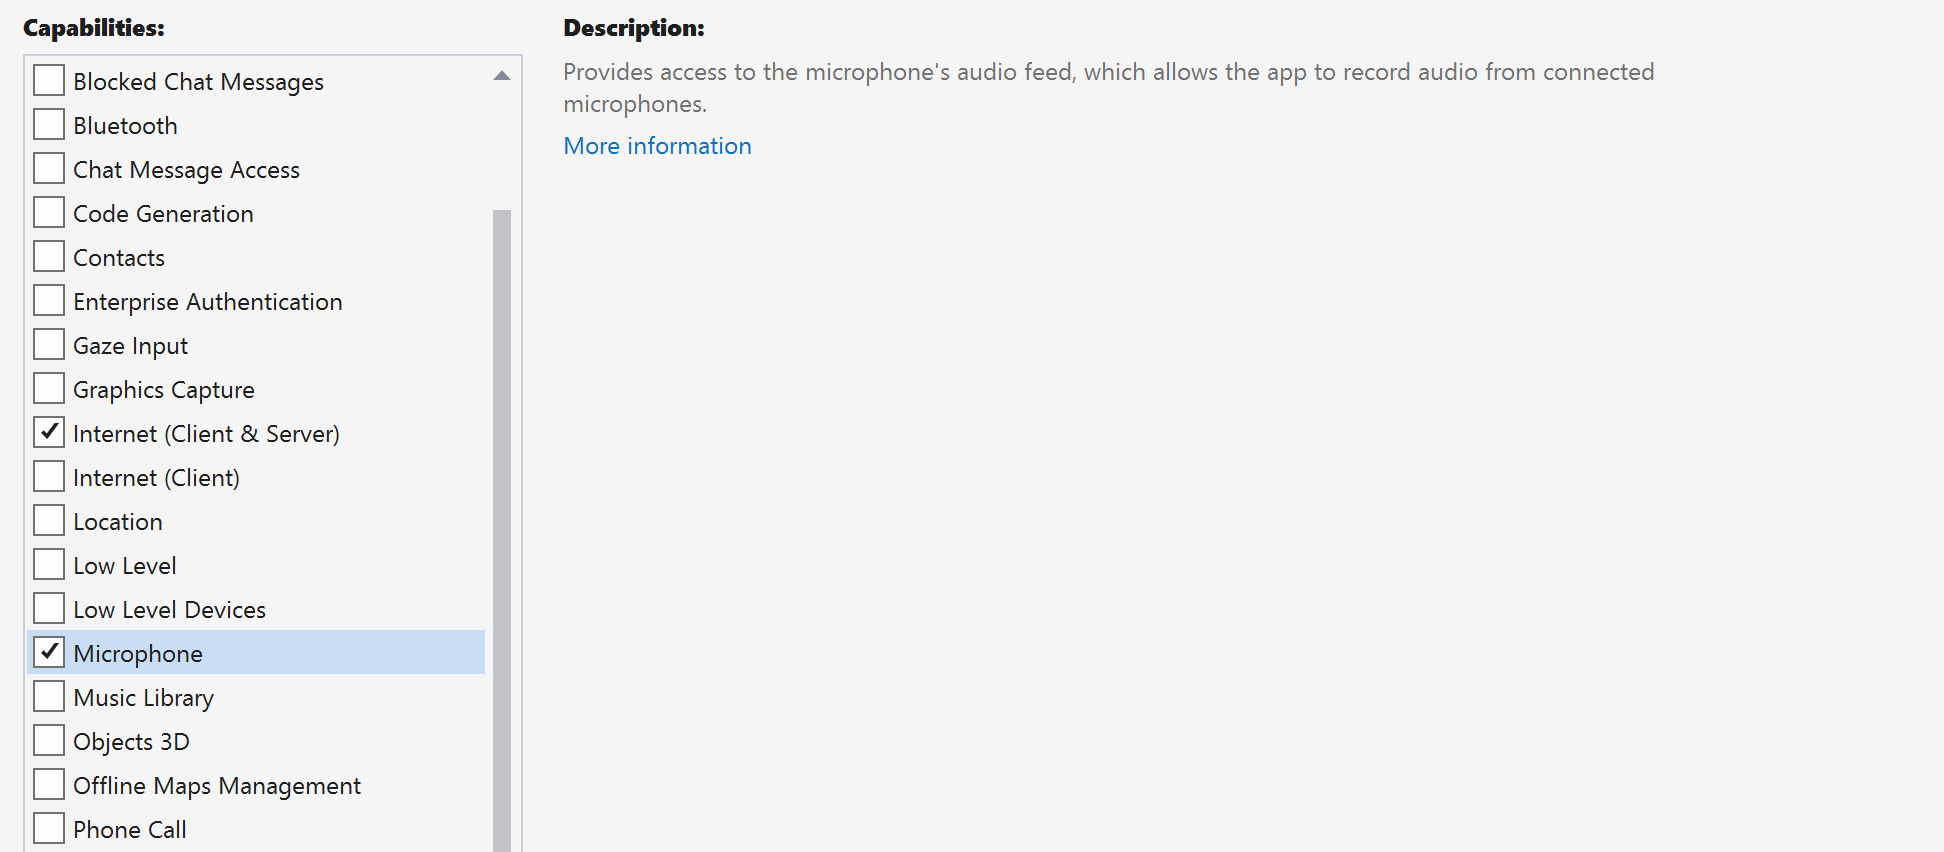
アクセスの要求
[Package.appxmanifest] に移動し、[Capabilities](機能) をクリックします。
インターネットへのインバウンド アクセスとアウトバウンド アクセスを取得するには、[Internet (Client & Server)](インターネット (クライアント & サーバー)) チェック ボックスをオンにします。
マイクの音声フィードにアクセスするには、[Microphone](マイク) チェック ボックスをオンにします。
デバイスのカメラにアクセスするには、[WebCam](Web カメラ) チェック ボックスをオンにします。
右クリックして [コードの表示] を選択し、Package.appxmanifest に次のコードを追加します。
<Extensions>
<Extension Category="windows.activatableClass.inProcessServer">
<InProcessServer>
<Path>RtmMvrUap.dll</Path>
<ActivatableClass ActivatableClassId="VideoN.VideoSchemeHandler" ThreadingModel="both" />
</InProcessServer>
</Extension>
</Extensions>
アプリのフレームワークを設定する
ロジックをアタッチするには、基本的なレイアウトを構成する必要があります。 発信通話を行うには、呼び出し先のユーザー ID を指定するための TextBox が必要です。 また、[Start Call](通話を開始) ボタンと [Hang Up](通話終了) ボタンも必要となります。
さらに、ローカル ビデオをプレビューすると共に、もう一方の参加者のリモート ビデオをレンダリングする必要があります。 そのため、ビデオ ストリームを表示するための要素が 2 つ必要となります。
プロジェクトの MainPage.xaml を開き、その内容を次の実装に置き換えます。
<Page
    x:Class="CallingQuickstart.MainPage"
    xmlns="http://schemas.microsoft.com/winfx/2006/xaml/presentation"
    xmlns:x="http://schemas.microsoft.com/winfx/2006/xaml"
    xmlns:local="using:CallingQuickstart"
    xmlns:d="http://schemas.microsoft.com/expression/blend/2008"
    xmlns:mc="http://schemas.openxmlformats.org/markup-compatibility/2006"
    mc:Ignorable="d"
    Background="{ThemeResource ApplicationPageBackgroundThemeBrush}">

    <Grid x:Name="MainGrid" HorizontalAlignment="Stretch">
        <Grid.RowDefinitions>
            <RowDefinition Height="*"/>
            <RowDefinition Height="Auto"/>
            <RowDefinition Height="200*"/>
            <RowDefinition Height="60*"/>
            <RowDefinition Height="Auto"/>
        </Grid.RowDefinitions>

        <Grid Grid.Row="0" x:Name="AppTitleBar" Background="LightSeaGreen">
            <!-- Width of the padding columns is set in LayoutMetricsChanged handler. -->
            <!-- Using padding columns instead of Margin ensures that the background paints the area under the caption control buttons (for transparent buttons). -->
            <TextBlock x:Name="QuickstartTitle" Text="Calling Quickstart sample title bar" Style="{StaticResource CaptionTextBlockStyle}" Padding="4,4,0,0"/>
        </Grid>

        <TextBox Grid.Row="1" x:Name="CalleeTextBox" PlaceholderText="Who would you like to call?" TextWrapping="Wrap" VerticalAlignment="Center" />

        <Grid Grid.Row="2" Background="LightGray">
            <Grid.RowDefinitions>
                <RowDefinition/>
            </Grid.RowDefinitions>
            <Grid.ColumnDefinitions>
                <ColumnDefinition Width="*"/>
                <ColumnDefinition Width="*"/>
            </Grid.ColumnDefinitions>
            <MediaPlayerElement x:Name="LocalVideo" HorizontalAlignment="Center" Stretch="UniformToFill" Grid.Column="0" VerticalAlignment="Center" AutoPlay="True" />
            <MediaPlayerElement x:Name="RemoteVideo" HorizontalAlignment="Center" Stretch="UniformToFill" Grid.Column="1" VerticalAlignment="Center" AutoPlay="True" />
        </Grid>
        <StackPanel Grid.Row="3" Orientation="Vertical" Grid.RowSpan="2">
            <StackPanel Orientation="Horizontal" Margin="10">
                <TextBlock VerticalAlignment="Center">Cameras:</TextBlock>
                <ComboBox x:Name="CameraList" HorizontalAlignment="Left" Grid.Column="0" DisplayMemberPath="Name" SelectionChanged="CameraList_SelectionChanged" Margin="10"/>
            </StackPanel>
            <StackPanel Orientation="Horizontal">
                <Button x:Name="CallButton" Content="Start/Join call" Click="CallButton_Click" VerticalAlignment="Center" Margin="10,0,0,0" Height="40" Width="123"/>
                <Button x:Name="HangupButton" Content="Hang up" Click="HangupButton_Click" VerticalAlignment="Center" Margin="10,0,0,0" Height="40" Width="123"/>
                <CheckBox x:Name="MuteLocal" Content="Mute" Margin="10,0,0,0" Click="MuteLocal_Click" Width="74"/>
                <CheckBox x:Name="BackgroundBlur" Content="Background blur" Width="142" Margin="10,0,0,0" Click="BackgroundBlur_Click"/>
            </StackPanel>
        </StackPanel>
        <TextBox Grid.Row="4" x:Name="Stats" Text="" TextWrapping="Wrap" VerticalAlignment="Center" Height="30" Margin="0,2,0,0" BorderThickness="2" IsReadOnly="True" Foreground="LightSlateGray" />
    </Grid>
</Page>
App.xaml.cs を開き (右クリックして [コードの表示] を選択)、次の行を先頭に追加します。
using CallingQuickstart;
MainPage.xaml.cs を開き (右クリックして [コードの表示] を選択)、内容を次の実装に置き換えます。
using Azure.Communication.Calling.WindowsClient;
using System;
using System.Collections.Generic;
using System.Linq;
using System.Threading.Tasks;
using Windows.ApplicationModel;
using Windows.ApplicationModel.Core;
using Windows.Media.Core;
using Windows.Networking.PushNotifications;
using Windows.UI;
using Windows.UI.ViewManagement;
using Windows.UI.Xaml;
using Windows.UI.Xaml.Controls;
using Windows.UI.Xaml.Media;
using Windows.UI.Xaml.Navigation;

namespace CallingQuickstart
{
    public sealed partial class MainPage : Page
    {
        private const string authToken = "<Azure Communication Services auth token>";

        private CallClient callClient;
        private CallTokenRefreshOptions callTokenRefreshOptions;
        private CallAgent callAgent;
        private CommunicationCall call = null;

        private LocalOutgoingAudioStream micStream;
        private LocalOutgoingVideoStream cameraStream;

        #region Page initialization
        public MainPage()
        {
            this.InitializeComponent();

            // Hide default title bar.
            var coreTitleBar = CoreApplication.GetCurrentView().TitleBar;
            coreTitleBar.ExtendViewIntoTitleBar = true;

            QuickstartTitle.Text = $"{Package.Current.DisplayName} - Ready";
            Window.Current.SetTitleBar(AppTitleBar);

            CallButton.IsEnabled = true;
            HangupButton.IsEnabled = !CallButton.IsEnabled;
            MuteLocal.IsChecked = MuteLocal.IsEnabled = !CallButton.IsEnabled;

            ApplicationView.PreferredLaunchViewSize = new Windows.Foundation.Size(800, 600);
            ApplicationView.PreferredLaunchWindowingMode = ApplicationViewWindowingMode.PreferredLaunchViewSize;
        }

        protected override async void OnNavigatedTo(NavigationEventArgs e)
        {
            await InitCallAgentAndDeviceManagerAsync();

            base.OnNavigatedTo(e);
        }
#endregion

        private async Task InitCallAgentAndDeviceManagerAsync()
        {
            // Initialize call agent and Device Manager
        }

        private async void Agent_OnIncomingCallAsync(object sender, IncomingCall incomingCall)
        {
            // Accept an incoming call
        }

        private async void CallButton_Click(object sender, RoutedEventArgs e)
        {
            // Start a call with video
        }

        private async void HangupButton_Click(object sender, RoutedEventArgs e)
        {
            // End the current call
        }

        private async void Call_OnStateChangedAsync(object sender, PropertyChangedEventArgs args)
        {
            var call = sender as CommunicationCall;

            if (call != null)
            {
                var state = call.State;

                await Dispatcher.RunAsync(Windows.UI.Core.CoreDispatcherPriority.Normal, () =>
                {
                    QuickstartTitle.Text = $"{Package.Current.DisplayName} - {state.ToString()}";
                    Window.Current.SetTitleBar(AppTitleBar);

                    HangupButton.IsEnabled = state == CallState.Connected || state == CallState.Ringing;
                    CallButton.IsEnabled = !HangupButton.IsEnabled;
                    MuteLocal.IsEnabled = !CallButton.IsEnabled;
                });

                switch (state)
                {
                    case CallState.Connected:
                        {
                            break;
                        }
                    case CallState.Disconnected:
                        {
                            break;
                        }
                    default: break;
                }
            }
        }

        private async void CameraList_SelectionChanged(object sender, SelectionChangedEventArgs e)
        {
            // Handle camera selection
        }
    }
}
オブジェクト モデル
Azure Communication Services Calling SDK の主な機能のいくつかは、次のクラスとインターフェイスによって処理されます。
| 名前 | 説明 |
|---|---|
CallClient |
CallClient は、通話クライアント ライブラリへのメイン エントリ ポイントです。 |
CallAgent |
CallAgent は、通話を開始して参加するために使用します。 |
CommunicationCall |
CommunicationCall は、開始した、または参加した通話の管理に使用されます。 |
CallTokenCredential |
CallTokenCredential は、CallAgent をインスタンス化するためのトークン資格情報として使用されます。 |
CommunicationUserIdentifier |
CommunicationUserIdentifier はユーザーの ID を表すために使用され、オプション CommunicationUserIdentifier、PhoneNumberIdentifier、CallingApplication のいずれかになります。 |
クライアントを認証する
CallAgent を初期化するには、ユーザー アクセス トークンが必要です。 通常、このトークンは、アプリケーション固有の認証を使用してサービスから生成されます。 ユーザー アクセス トークンの詳細については、ユーザー アクセス トークンのガイドを参照してください。
クイック スタートでは、<AUTHENTICATION_TOKEN> を Azure Communication Service リソース用に生成されたユーザー アクセス トークンに置き換えます。
トークンが与えられたら、それを使用して CallAgent インスタンスを初期化します。これで、通話を開始したり受信したりできます。 また、デバイス上のカメラにアクセスするには、デバイス マネージャーのインスタンスを取得する必要があります。
次のコードを InitCallAgentAndDeviceManagerAsync 関数に追加します。
this.callClient = new CallClient(new CallClientOptions() {
    Diagnostics = new CallDiagnosticsOptions() {
        AppName = "CallingQuickstart",
        AppVersion="1.0",
        Tags = new[] { "Calling", "ACS", "Windows" }
        }
    });

// Set up local video stream using the first camera enumerated
var deviceManager = await this.callClient.GetDeviceManagerAsync();
var camera = deviceManager?.Cameras?.FirstOrDefault();
var mic = deviceManager?.Microphones?.FirstOrDefault();
micStream = new LocalOutgoingAudioStream();

CameraList.ItemsSource = deviceManager.Cameras.ToList();

if (camera != null)
{
    CameraList.SelectedIndex = 0;
}

callTokenRefreshOptions = new CallTokenRefreshOptions(false);
callTokenRefreshOptions.TokenRefreshRequested += OnTokenRefreshRequestedAsync;

var tokenCredential = new CallTokenCredential(authToken, callTokenRefreshOptions);

var callAgentOptions = new CallAgentOptions()
{
    DisplayName = "Contoso",
    //https://github.com/lukes/ISO-3166-Countries-with-Regional-Codes/blob/master/all/all.csv
    EmergencyCallOptions = new EmergencyCallOptions() { CountryCode = "840" }
};


try
{
    this.callAgent = await this.callClient.CreateCallAgentAsync(tokenCredential, callAgentOptions);
    //await this.callAgent.RegisterForPushNotificationAsync(await this.RegisterWNS());
    this.callAgent.CallsUpdated += OnCallsUpdatedAsync;
    this.callAgent.IncomingCallReceived += OnIncomingCallAsync;

}
catch(Exception ex)
{
    if (ex.HResult == -2147024809)
    {
        // E_INVALIDARG
        // Handle possible invalid token
    }
}
ビデオ通話を開始する
ビデオ通話を開始するには、実装を CallButton_Click に追加します。 デバイス マネージャーのインスタンスを使用してカメラを列挙し、LocalOutgoingVideoStream を構築する必要があります。
LocalVideoStream を使用して VideoOptions を設定し、startCallOptions を使用してそれを渡すことで、通話の初期オプションを設定する必要があります。
LocalOutgoingVideoStream を MediaElement にアタッチして、ローカル ビデオのプレビューを表示できます。
var callString = CalleeTextBox.Text.Trim();

if (!string.IsNullOrEmpty(callString))
{
    if (callString.StartsWith("8:")) // 1:1 Azure Communication Services call
    {
        call = await StartAcsCallAsync(callString);
    }
    else if (callString.StartsWith("+")) // 1:1 phone call
    {
        call = await StartPhoneCallAsync(callString, "+12133947338");
    }
    else if (Guid.TryParse(callString, out Guid groupId))// Join group call by group guid
    {
        call = await JoinGroupCallByIdAsync(groupId);
    }
    else if (Uri.TryCreate(callString, UriKind.Absolute, out Uri teamsMeetinglink)) //Teams meeting link
    {
        call = await JoinTeamsMeetingByLinkAsync(teamsMeetinglink);
    }
}

if (call != null)
{
    call.RemoteParticipantsUpdated += OnRemoteParticipantsUpdatedAsync;
    call.StateChanged += OnStateChangedAsync;
}
さまざまな種類の通話 (1:1 Azure Communication Services 通話、1:1 通話、Azure Communication Services Group 通話、Teams 会議参加など) を開始するか、通話に参加するためのメソッドを追加します。
private async Task<CommunicationCall> StartAcsCallAsync(string acsCallee)
{
    var options = await GetStartCallOptionsAsync();
    var call = await this.callAgent.StartCallAsync( new [] { new UserCallIdentifier(acsCallee) }, options);
    return call;
}

private async Task<CommunicationCall> StartPhoneCallAsync(string acsCallee, string alternateCallerId)
{
    var options = await GetStartCallOptionsAsync();
    options.AlternateCallerId = new PhoneNumberCallIdentifier(alternateCallerId);

    var call = await this.callAgent.StartCallAsync( new [] { new PhoneNumberCallIdentifier(acsCallee) }, options);
    return call;
}

private async Task<CommunicationCall> JoinGroupCallByIdAsync(Guid groupId)
{
    var joinCallOptions = await GetJoinCallOptionsAsync();

    var groupCallLocator = new GroupCallLocator(groupId);
    var call = await this.callAgent.JoinAsync(groupCallLocator, joinCallOptions);
    return call;
}

private async Task<CommunicationCall> JoinTeamsMeetingByLinkAsync(Uri teamsCallLink)
{
    var joinCallOptions = await GetJoinCallOptionsAsync();

    var teamsMeetingLinkLocator = new TeamsMeetingLinkLocator(teamsCallLink.AbsoluteUri);
    var call = await callAgent.JoinAsync(teamsMeetingLinkLocator, joinCallOptions);
    return call;
}

private async Task<StartCallOptions> GetStartCallOptionsAsync()
{
    return new StartCallOptions() {
        OutgoingAudioOptions = new OutgoingAudioOptions() { IsOutgoingAudioMuted = true, OutgoingAudioStream = micStream  },
        OutgoingVideoOptions = new OutgoingVideoOptions() { OutgoingVideoStreams = new OutgoingVideoStream[] { cameraStream } }
    };
}

private async Task<JoinCallOptions> GetJoinCallOptionsAsync()
{
    return new JoinCallOptions() {
        OutgoingAudioOptions = new OutgoingAudioOptions() { IsOutgoingAudioMuted = true },
        OutgoingVideoOptions = new OutgoingVideoOptions() { OutgoingVideoStreams = new OutgoingVideoStream[] { cameraStream } }
    };
}
CameraList_SelectionChanged メソッドで選択したカメラに応じて LocalVideoStream を作成するコードを追加します。
var selectedCamera = CameraList.SelectedItem as VideoDeviceDetails;
cameraStream = new LocalOutgoingVideoStream(selectedCamera);

 var localUri = await cameraStream.StartPreviewAsync();
await Dispatcher.RunAsync(Windows.UI.Core.CoreDispatcherPriority.Normal, () =>
{
    LocalVideo.Source = MediaSource.CreateFromUri(localUri);
});

if (call != null)
{
    await call?.StartVideoAsync(cameraStream);
}
電話の着信を受け入れる
ビデオ通話の着信に応答するには実装を OnIncomingCallAsync に追加し、LocalVideoStream を acceptCallOptions に渡します。
var incomingCall = args.IncomingCall;

var acceptCallOptions = new AcceptCallOptions() {
    IncomingVideoOptions = new IncomingVideoOptions()
    {
        IncomingVideoStreamKind = VideoStreamKind.RemoteIncoming
    }
};

_ = await incomingCall.AcceptAsync(acceptCallOptions);
リモート参加者とリモート ビデオ ストリーム
リモート参加者は全員、通話インスタンスの RemoteParticipants コレクションを通じて利用できます。 通話が接続済み (CallState.Connected) になると、通話のリモート参加者にアクセスし、リモート ビデオ ストリームを処理できます。
Note
ユーザーが通話に参加すると、RemoteParticipants コレクションを通じて現在のリモート参加者にアクセスできます。
RemoteParticipantsUpdated イベントはこれらの既存の参加者にはトリガーされません。 このイベントは、ユーザーが既に通話に参加している間に、リモート参加者が通話に参加または離脱した場合にのみトリガーされます。
private async void Call_OnVideoStreamsUpdatedAsync(object sender, RemoteVideoStreamsEventArgs args)
{
    foreach (var remoteVideoStream in args.AddedRemoteVideoStreams)
    {
        await Dispatcher.RunAsync(Windows.UI.Core.CoreDispatcherPriority.Normal, async () =>
        {
            RemoteVideo.Source = await remoteVideoStream.Start();
        });
    }

    foreach (var remoteVideoStream in args.RemovedRemoteVideoStreams)
    {
        remoteVideoStream.Stop();
    }
}

private async void Agent_OnCallsUpdatedAsync(object sender, CallsUpdatedEventArgs args)
{
    var removedParticipants = new List<RemoteParticipant>();
    var addedParticipants = new List<RemoteParticipant>();

    foreach(var call in args.RemovedCalls)
    {
        removedParticipants.AddRange(call.RemoteParticipants.ToList<RemoteParticipant>());
    }

    foreach (var call in args.AddedCalls)
    {
        addedParticipants.AddRange(call.RemoteParticipants.ToList<RemoteParticipant>());
    }

    await OnParticipantChangedAsync(removedParticipants, addedParticipants);
}

private async Task OnParticipantChangedAsync(IEnumerable<RemoteParticipant> removedParticipants, IEnumerable<RemoteParticipant> addedParticipants)
{
    foreach (var participant in removedParticipants)
    {
        foreach(var incomingVideoStream in  participant.IncomingVideoStreams)
        {
            var remoteVideoStream = incomingVideoStream as RemoteIncomingVideoStream;
            if (remoteVideoStream != null)
            {
                await remoteVideoStream.StopPreviewAsync();
            }
        }
        participant.VideoStreamStateChanged -= OnVideoStreamStateChanged;
    }

    foreach (var participant in addedParticipants)
    {
        participant.VideoStreamStateChanged += OnVideoStreamStateChanged;
    }
}

private void OnVideoStreamStateChanged(object sender, VideoStreamStateChangedEventArgs e)
{
    CallVideoStream callVideoStream = e.CallVideoStream;

    switch (callVideoStream.StreamDirection)
    {
        case StreamDirection.Outgoing:
            OnOutgoingVideoStreamStateChanged(callVideoStream as OutgoingVideoStream);
            break;
        case StreamDirection.Incoming:
            OnIncomingVideoStreamStateChanged(callVideoStream as IncomingVideoStream);
            break;
    }
}

private async void OnIncomingVideoStreamStateChanged(IncomingVideoStream incomingVideoStream)
{
    switch (incomingVideoStream.State)
    {
        case VideoStreamState.Available:
        {
            switch (incomingVideoStream.Kind)
            {
                case VideoStreamKind.RemoteIncoming:
                    var remoteVideoStream = incomingVideoStream as RemoteIncomingVideoStream;
                    var uri = await remoteVideoStream.StartPreviewAsync();

                    await Dispatcher.RunAsync(Windows.UI.Core.CoreDispatcherPriority.Normal, () =>
                    {
                        RemoteVideo.Source = MediaSource.CreateFromUri(uri);
                    });
                    break;

                case VideoStreamKind.RawIncoming:
                    break;
            }
            break;
        }
        case VideoStreamState.Started:
            break;
        case VideoStreamState.Stopping:
            break;
        case VideoStreamState.Stopped:
            if (incomingVideoStream.Kind == VideoStreamKind.RemoteIncoming)
            {
                var remoteVideoStream = incomingVideoStream as RemoteIncomingVideoStream;
                await remoteVideoStream.StopPreviewAsync();
            }
            break;
        case VideoStreamState.NotAvailable:
            break;
    }

}
リモート ビデオをレンダリングする
それぞれのリモート ビデオ ストリームを MediaElement にアタッチします。
private async Task AddVideoStreamsAsync(IReadOnlyList<RemoteVideoStream> remoteVideoStreams)
{
    foreach (var remoteVideoStream in remoteVideoStreams)
    {
        var remoteUri = await remoteVideoStream.Start();

        await Dispatcher.RunAsync(Windows.UI.Core.CoreDispatcherPriority.Normal, () =>
        {
            RemoteVideo.Source = remoteUri;
            RemoteVideo.Play();
        });
    }
}
通話状態の更新
通話が切断されたらビデオ レンダラーをクリーンアップし、リモート参加者が最初に通話に参加する状況に対応する必要があります。
private async void Call_OnStateChanged(object sender, PropertyChangedEventArgs args)
{
    switch (((Call)sender).State)
    {
        case CallState.Disconnected:
            await Dispatcher.RunAsync(Windows.UI.Core.CoreDispatcherPriority.Normal, () =>
            {
                LocalVideo.Source = null;
                RemoteVideo.Source = null;
            });
            break;

        case CallState.Connected:
            foreach (var remoteParticipant in call.RemoteParticipants)
            {
                String remoteParticipantMRI = remoteParticipant.Identifier.ToString();
                remoteParticipantDictionary.TryAdd(remoteParticipantMRI, remoteParticipant);
                await AddVideoStreams(remoteParticipant.VideoStreams);
                remoteParticipant.OnVideoStreamsUpdated += Call_OnVideoStreamsUpdated;
            }
            break;

        default:
            break;
    }
}
通話を終了する
[Hang Up](通話終了) ボタンがクリックされたら、現在の通話を終了します。 作成した callAgent との通話を終わらせるには実装を HangupButton_Click に追加し、参加者更新と呼び出し状態のイベント ハンドラーを破棄します。
var call = this.callAgent?.Calls?.FirstOrDefault();
if (call != null)
{
    try
    {
        await call.HangUpAsync(new HangUpOptions() { ForEveryone = true });
    }
    catch(Exception ex)
    {
    }
}
コードの実行
コードは、Visual Studio でビルドして実行できます。 ソリューションのプラットフォームに関しては、ARM64、x64、x86 がサポートされます。
発信ビデオ通話を行うには、テキスト フィールドにユーザー ID を指定し、[Start Call](通話を開始) ボタンをクリックします。
注: エコー ボットはビデオ ストリーミングに対応していないので、8:echo123 を呼び出すとビデオ ストリームが停止します。
ユーザー ID の詳細については、ユーザー アクセス トークンのガイドを参照してください。
WinUI 3 サンプル コード
前提条件
このチュートリアルを完了するには、次の前提条件を用意しておく必要があります。
アクティブなサブスクリプションが含まれる Azure アカウント。 無料でアカウントを作成できます。
Visual Studio 2022 と Windows App SDK バージョン 1.2 プレビュー 2 をインストールします。
WinUI 3 アプリの作成方法の基本的理解。 「初めての WinUI 3 (Windows App SDK) プロジェクトを作成する」から始めることをお勧めします。
デプロイ済みの Communication Services リソース。 Communication Services リソースを作成します。 このクイックスタートで使用する接続文字列を記録する必要があります。
Azure Communication Service のユーザー アクセス トークン。 Azure CLI を使用し、接続文字列を指定してコマンドを実行して、ユーザーとアクセス トークンを作成することもできます。
az communication identity token issue --scope voip --connection-string "yourConnectionString"詳細については、「Azure CLI を使用してアクセス トークンを作成および管理する」を参照してください。
設定
プロジェクトの作成
Visual Studio で、Blank App, Packaged (WinUI 3 in Desktop) テンプレートでプロジェクトを新規作成し、シングルページの WinUI 3 アプリを設定します。

パッケージをインストールする
プロジェクトを右クリックし、Manage Nuget Packages に移動して、Azure.Communication.Calling.WindowsClient1.0.0 以上のバージョンをインストールします。 [プレリリースを含める] がオンになっていることを確認します。
アクセスの要求
次のコードを app.manifest に追加します。
<file name="RtmMvrMf.dll">
    <activatableClass name="VideoN.VideoSchemeHandler" threadingModel="both" xmlns="urn:schemas-microsoft-com:winrt.v1" />
</file>
アプリのフレームワークを設定する
ロジックをアタッチするには、基本的なレイアウトを構成する必要があります。 発信通話を行うには、呼び出し先のユーザー ID を指定するための TextBox が必要です。 また、[Start Call](通話を開始) ボタンと [Hang Up](通話終了) ボタンも必要となります。
さらに、ローカル ビデオをプレビューすると共に、もう一方の参加者のリモート ビデオをレンダリングする必要があります。 そのため、ビデオ ストリームを表示するための要素が 2 つ必要となります。
プロジェクトの MainWindow.xaml を開き、その内容を次の実装に置き換えます。
<Page
    x:Class="CallingQuickstart.MainPage"
    xmlns="http://schemas.microsoft.com/winfx/2006/xaml/presentation"
    xmlns:x="http://schemas.microsoft.com/winfx/2006/xaml"
    xmlns:local="using:CallingQuickstart"
    xmlns:d="http://schemas.microsoft.com/expression/blend/2008"
    xmlns:mc="http://schemas.openxmlformats.org/markup-compatibility/2006"
    mc:Ignorable="d">

    <Grid x:Name="MainGrid">
        <Grid.RowDefinitions>
            <RowDefinition Height="32"/>
            <RowDefinition Height="Auto"/>
            <RowDefinition Height="200*"/>
            <RowDefinition Height="60*"/>
            <RowDefinition Height="Auto"/>
        </Grid.RowDefinitions>

        <Grid Grid.Row="0" x:Name="AppTitleBar" Background="LightSeaGreen">
            <!-- Width of the padding columns is set in LayoutMetricsChanged handler. -->
            <!-- Using padding columns instead of Margin ensures that the background paints the area under the caption control buttons (for transparent buttons). -->
            <TextBlock x:Name="QuickstartTitle" Text="Calling Quickstart sample title bar" Style="{StaticResource CaptionTextBlockStyle}" Padding="4,4,0,0"/>
        </Grid>

        <TextBox Grid.Row="1" x:Name="CalleeTextBox" PlaceholderText="Who would you like to call?" TextWrapping="Wrap" VerticalAlignment="Center" />

        <Grid Grid.Row="2" Background="LightGray">
            <Grid.RowDefinitions>
                <RowDefinition/>
            </Grid.RowDefinitions>
            <Grid.ColumnDefinitions>
                <ColumnDefinition Width="*"/>
                <ColumnDefinition Width="*"/>
            </Grid.ColumnDefinitions>
            <MediaPlayerElement x:Name="LocalVideo" HorizontalAlignment="Center" Stretch="UniformToFill" Grid.Column="0" VerticalAlignment="Center" AutoPlay="True" />
            <MediaPlayerElement x:Name="RemoteVideo" HorizontalAlignment="Center" Stretch="UniformToFill" Grid.Column="1" VerticalAlignment="Center" AutoPlay="True" />
        </Grid>
        <StackPanel Grid.Row="3" Orientation="Vertical" Grid.RowSpan="2">
            <StackPanel Orientation="Horizontal" Margin="10">
                <TextBlock VerticalAlignment="Center">Cameras:</TextBlock>
                <ComboBox x:Name="CameraList" HorizontalAlignment="Left" Grid.Column="0" DisplayMemberPath="Name" SelectionChanged="CameraList_SelectionChanged" Margin="10"/>
            </StackPanel>
            <StackPanel Orientation="Horizontal">
                <Button x:Name="CallButton" Content="Start/Join call" Click="CallButton_Click" VerticalAlignment="Center" Margin="10,0,0,0" Height="40" Width="123"/>
                <Button x:Name="HangupButton" Content="Hang up" Click="HangupButton_Click" VerticalAlignment="Center" Margin="10,0,0,0" Height="40" Width="123"/>
                <CheckBox x:Name="MuteLocal" Content="Mute" Margin="10,0,0,0" Click="MuteLocal_Click" Width="74"/>
                <CheckBox x:Name="BackgroundBlur" Content="Background blur" Width="142" Margin="10,0,0,0" Click="BackgroundBlur_Click"/>
            </StackPanel>
        </StackPanel>
        <TextBox Grid.Row="4" x:Name="Stats" Text="" TextWrapping="Wrap" VerticalAlignment="Center" Height="30" Margin="0,2,0,0" BorderThickness="2" IsReadOnly="True" Foreground="LightSlateGray" />
    </Grid>
</Page>
App.xaml.cs を開き (右クリックして [コードの表示] を選択)、次の行を先頭に追加します。
using CallingQuickstart;
MainWindow.xaml.cs を開き (右クリックして [コードの表示] を選択)、内容を次の実装に置き換えます。
using Azure.Communication.Calling.WindowsClient;
using Azure.WinRT.Communication;
using Microsoft.UI.Xaml;
using System;
using System.Collections.Generic;
using System.Linq;
using System.Threading.Tasks;
using Windows.Media.Core;

namespace CallingQuickstart
{
    public sealed partial class MainWindow : Window
    {
        CallAgent callAgent;
        Call call;
        DeviceManager deviceManager;
        Dictionary<string, RemoteParticipant> remoteParticipantDictionary = new Dictionary<string, RemoteParticipant>();

        public MainWindow()
        {
            this.InitializeComponent();
            Task.Run(() => this.InitCallAgentAndDeviceManagerAsync()).Wait();
        }

        private async Task InitCallAgentAndDeviceManagerAsync()
        {
            // Initialize call agent and Device Manager
        }

        private async void Agent_OnIncomingCallAsync(object sender, IncomingCall incomingCall)
        {
            // Accept an incoming call
        }

        private async void CallButton_Click(object sender, RoutedEventArgs e)
        {
            // Start a call with video
        }

        private async void HangupButton_Click(object sender, RoutedEventArgs e)
        {
            // End the current call
        }

        private async void Call_OnStateChangedAsync(object sender, PropertyChangedEventArgs args)
        {
            var state = (sender as Call)?.State;
            this.DispatcherQueue.TryEnqueue(() => {
                State.Text = state.ToString();
            });
        }
    }
}
オブジェクト モデル
Azure Communication Services Calling SDK の主な機能のいくつかは、次のクラスとインターフェイスによって処理されます。
| 名前 | 説明 |
|---|---|
CallClient |
CallClient は、通話クライアント ライブラリへのメイン エントリ ポイントです。 |
CallAgent |
CallAgent は、通話を開始して参加するために使用します。 |
CommunicationCall |
CommunicationCall は、開始した、または参加した通話の管理に使用されます。 |
CallTokenCredential |
CallTokenCredential は、CallAgent をインスタンス化するためのトークン資格情報として使用されます。 |
CommunicationUserIdentifier |
CommunicationUserIdentifier はユーザーの ID を表すために使用され、オプション CommunicationUserIdentifier、PhoneNumberIdentifier、CallingApplication のいずれかになります。 |
クライアントを認証する
CallAgent を初期化するには、ユーザー アクセス トークンが必要です。 通常、このトークンは、アプリケーション固有の認証を使用してサービスから生成されます。 ユーザー アクセス トークンの詳細については、ユーザー アクセス トークンのガイドを参照してください。
クイック スタートでは、<AUTHENTICATION_TOKEN> を Azure Communication Service リソース用に生成されたユーザー アクセス トークンに置き換えます。
トークンが与えられたら、それを使用して CallAgent インスタンスを初期化します。これで、通話を開始したり受信したりできます。 また、デバイス上のカメラにアクセスするには、デバイス マネージャーのインスタンスを取得する必要があります。
次のコードを InitCallAgentAndDeviceManagerAsync 関数に追加します。
var callClient = new CallClient();
this.deviceManager = await callClient.GetDeviceManagerAsync();

var tokenCredential = new CallTokenCredential("<AUTHENTICATION_TOKEN>");
var callAgentOptions = new CallAgentOptions()
{
    DisplayName = "<DISPLAY_NAME>"
};

this.callAgent = await callClient.CreateCallAgentAsync(tokenCredential, callAgentOptions);
this.callAgent.OnCallsUpdated += Agent_OnCallsUpdatedAsync;
this.callAgent.OnIncomingCall += Agent_OnIncomingCallAsync;
ビデオ通話を開始する
ビデオ通話を開始するには、実装を CallButton_Click に追加します。 デバイス マネージャーのインスタンスを使用してカメラを列挙し、LocalVideoStream を構築する必要があります。
LocalVideoStream を使用して VideoOptions を設定し、startCallOptions を使用してそれを渡すことで、通話の初期オプションを設定する必要があります。
LocalVideoStream を MediaPlayerElement にアタッチして、ローカル ビデオのプレビューを表示できます。
var startCallOptions = new StartCallOptions();

if (this.deviceManager.Cameras?.Count > 0)
{
    var videoDeviceInfo = this.deviceManager.Cameras?.FirstOrDefault();
    if (videoDeviceInfo != null)
    {
        var selectedCamera = CameraList.SelectedItem as VideoDeviceDetails;
        cameraStream = new LocalOutgoingVideoStream(selectedCamera);

        var localUri = await cameraStream.StartPreviewAsync();
        await Dispatcher.RunAsync(Windows.UI.Core.CoreDispatcherPriority.Normal, () =>
        {
            LocalVideo.Source = MediaSource.CreateFromUri(localUri);
        });

        startCallOptions.VideoOptions = new OutgoingVideoOptions(new[] { cameraStream });
    }
}

var callees = new ICommunicationIdentifier[1]
{
    new CommunicationUserIdentifier(CalleeTextBox.Text.Trim())
};

this.call = await this.callAgent.StartCallAsync(callees, startCallOptions);
this.call.OnRemoteParticipantsUpdated += Call_OnRemoteParticipantsUpdatedAsync;
this.call.OnStateChanged += Call_OnStateChangedAsync;
電話の着信を受け入れる
ビデオ通話の着信に応答するには実装を Agent_OnIncomingCallAsync に追加し、LocalVideoStream を acceptCallOptions に渡します。
var acceptCallOptions = new AcceptCallOptions();

if (this.deviceManager.Cameras?.Count > 0)
{
    var videoDeviceInfo = this.deviceManager.Cameras?.FirstOrDefault();
    if (videoDeviceInfo != null)
    {
        var selectedCamera = CameraList.SelectedItem as VideoDeviceDetails;
        cameraStream = new LocalOutgoingVideoStream(selectedCamera);

        var localUri = await cameraStream.StartPreviewAsync();
        await Dispatcher.RunAsync(Windows.UI.Core.CoreDispatcherPriority.Normal, () =>
        {
            LocalVideo.Source = MediaSource.CreateFromUri(localUri);
        });

        acceptCallOptions.VideoOptions = new OutgoingVideoOptions(new[] { localVideoStream });
    }
}

call = await incomingCall.AcceptAsync(acceptCallOptions);
リモート参加者とリモート ビデオ ストリーム
リモート参加者は全員、通話インスタンスの RemoteParticipants コレクションを通じて利用できます。 通話の接続後、通話のリモート参加者にアクセスし、リモート ビデオ ストリームを処理できます。
Note
ユーザーが通話に参加すると、RemoteParticipants コレクションを通じて現在のリモート参加者にアクセスできます。
OnRemoteParticipantsUpdated イベントはこれらの既存の参加者にはトリガーされません。 このイベントは、ユーザーが既に通話に参加している間に、リモート参加者が通話に参加または離脱した場合にのみトリガーされます。
private async void Call_OnVideoStreamsUpdatedAsync(object sender, RemoteVideoStreamsEventArgs args)
{
    foreach (var remoteVideoStream in args.AddedRemoteVideoStreams)
    {
        this.DispatcherQueue.TryEnqueue(async () => {
            RemoteVideo.Source = MediaSource.CreateFromUri(await remoteVideoStream.Start());
            RemoteVideo.MediaPlayer.Play();
        });
    }

    foreach (var remoteVideoStream in args.RemovedRemoteVideoStreams)
    {
        remoteVideoStream.Stop();
    }
}

private async void Agent_OnCallsUpdatedAsync(object sender, CallsUpdatedEventArgs args)
{
    foreach (var call in args.AddedCalls)
    {
        foreach (var remoteParticipant in call.RemoteParticipants)
        {
            var remoteParticipantMRI = remoteParticipant.Identifier.ToString();
            this.remoteParticipantDictionary.TryAdd(remoteParticipantMRI, remoteParticipant);
            await AddVideoStreamsAsync(remoteParticipant.VideoStreams);
            remoteParticipant.OnVideoStreamsUpdated += Call_OnVideoStreamsUpdatedAsync;
        }
    }
}

private async void Call_OnRemoteParticipantsUpdatedAsync(object sender, ParticipantsUpdatedEventArgs args)
{
    foreach (var remoteParticipant in args.AddedParticipants)
    {
        String remoteParticipantMRI = remoteParticipant.Identifier.ToString();
        this.remoteParticipantDictionary.TryAdd(remoteParticipantMRI, remoteParticipant);
        await AddVideoStreamsAsync(remoteParticipant.VideoStreams);
        remoteParticipant.OnVideoStreamsUpdated += Call_OnVideoStreamsUpdatedAsync;
    }

    foreach (var remoteParticipant in args.RemovedParticipants)
    {
        String remoteParticipantMRI = remoteParticipant.Identifier.ToString();
        this.remoteParticipantDictionary.Remove(remoteParticipantMRI);
    }
}
リモート ビデオをレンダリングする
それぞれのリモート ビデオ ストリームを MediaPlayerElement にアタッチします。
private async Task AddVideoStreamsAsync(IReadOnlyList<RemoteVideoStream> remoteVideoStreams)
{
    foreach (var remoteVideoStream in remoteVideoStreams)
    {
        var remoteUri = await remoteVideoStream.Start();

        this.DispatcherQueue.TryEnqueue(() => {
            RemoteVideo.Source = MediaSource.CreateFromUri(remoteUri);
            RemoteVideo.MediaPlayer.Play();
        });
    }
}
通話状態の更新
通話が切断されたらビデオ レンダラーをクリーンアップし、リモート参加者が最初に通話に参加する状況に対応する必要があります。
private async void Call_OnStateChanged(object sender, PropertyChangedEventArgs args)
{
    switch (((Call)sender).State)
    {
        case CallState.Disconnected:
            this.DispatcherQueue.TryEnqueue(() => { =>
            {
                LocalVideo.Source = null;
                RemoteVideo.Source = null;
            });
            break;

        case CallState.Connected:
            foreach (var remoteParticipant in call.RemoteParticipants)
            {
                String remoteParticipantMRI = remoteParticipant.Identifier.ToString();
                remoteParticipantDictionary.TryAdd(remoteParticipantMRI, remoteParticipant);
                await AddVideoStreams(remoteParticipant.VideoStreams);
                remoteParticipant.OnVideoStreamsUpdated += Call_OnVideoStreamsUpdated;
            }
            break;

        default:
            break;
    }
}
通話を終了する
[Hang Up](通話終了) ボタンがクリックされたら、現在の通話を終了します。 作成した callAgent との通話を終わらせるには実装を HangupButton_Click に追加し、参加者更新と呼び出し状態のイベント ハンドラーを破棄します。
this.call.OnRemoteParticipantsUpdated -= Call_OnRemoteParticipantsUpdatedAsync;
this.call.OnStateChanged -= Call_OnStateChangedAsync;
await this.call.HangUpAsync(new HangUpOptions());
コードの実行
コードは、Visual Studio でビルドして実行できます。 ソリューションのプラットフォームに関しては、ARM64、x64、x86 がサポートされます。
発信ビデオ通話を行うには、テキスト フィールドにユーザー ID を指定し、[Start Call](通話を開始) ボタンをクリックします。
注: エコー ボットはビデオ ストリーミングに対応していないので、8:echo123 を呼び出すとビデオ ストリームが停止します。
ユーザー ID の詳細については、ユーザー アクセス トークンのガイドを参照してください。