AI エージェントを構築し、Databricks Apps を使用してデプロイします。 Databricks Apps を使用すると、エージェントコード、サーバー構成、デプロイワークフローを完全に制御できます。 この方法は、カスタム サーバーの動作、Git ベースのバージョン管理、またはローカル IDE 開発が必要な場合に最適です。
ヒント
エージェントがAzure Databricksホスト型ツールのみを使用し、ツール呼び出し間にカスタム ロジックを必要としない場合は、Supervisor API (Beta) を使用してAzure Databricksエージェント ループを管理できます。
すべての会話 エージェント テンプレート には、追加のセットアップを必要とせず、組み込みのチャット UI (上記) が含まれています。 チャット UI では、ストリーミング応答、マークダウン レンダリング、Databricks 認証、およびオプションの常設チャット履歴がサポートされます。
必要条件
ワークスペースで Databricks Apps を有効にします。 Databricks Apps ワークスペースと開発環境を設定するを参照してください。
手順 1. エージェント アプリ テンプレートを複製する
Databricks アプリ テンプレート リポジトリから事前構築済みのエージェント テンプレートを使用して作業を開始します。
このチュートリアルでは、次の agent-openai-agents-sdk テンプレートを使用します。
- OpenAI Agent SDK を使用して作成されたエージェント
- 会話型 REST API と対話型チャット UI を使用したエージェント アプリケーションのスターター コード
- MLflow を使用してエージェントを評価するコード
テンプレートを設定するには、次のいずれかのパスを選択します。
ワークスペース UI
ワークスペース UI を使用してアプリ テンプレートをインストールします。 これにより、アプリがインストールされ、ワークスペース内のコンピューティング リソースにデプロイされます。 その後、アプリケーション ファイルをローカル環境に同期して、さらに開発することができます。
Databricks ワークスペースで、[ + 新規>App] をクリックします。
[ エージェント>Agent - OpenAI Agents SDK] をクリックします。
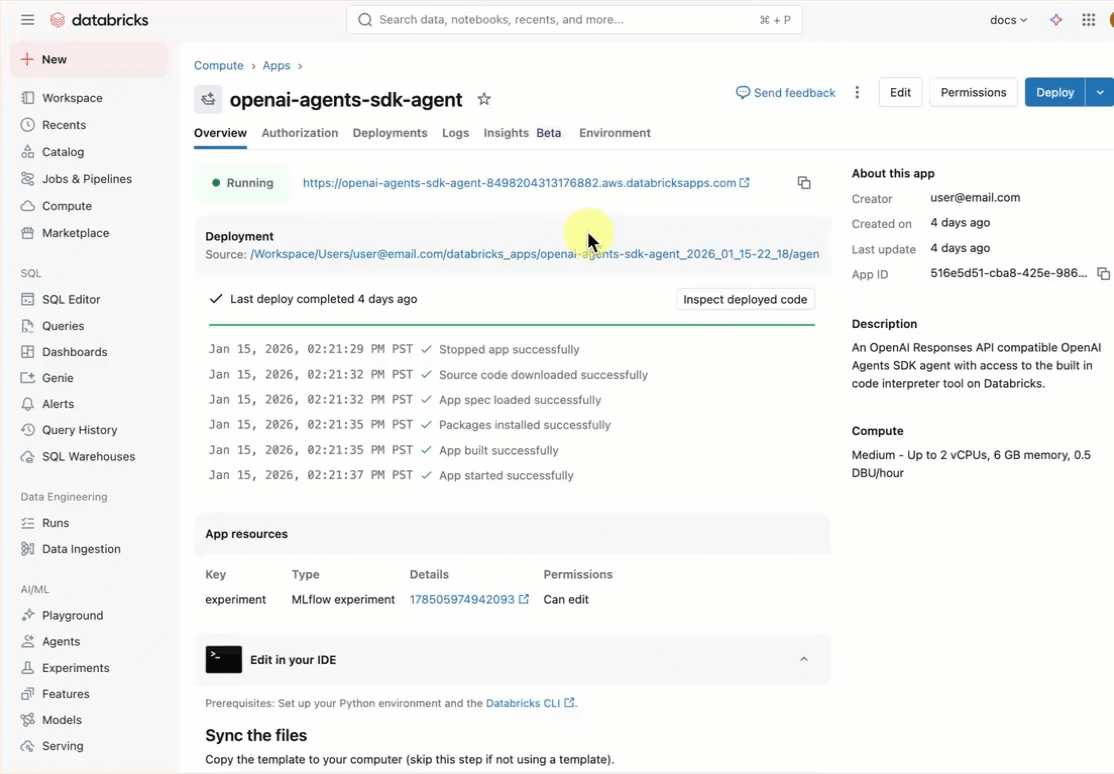
openai-agents-templateという名前の新しい MLflow 実験を作成し、残りの設定を完了してテンプレートをインストールします。アプリを作成したら、アプリの URL をクリックしてチャット UI を開きます。
アプリを作成したら、ソース コードをローカル コンピューターにダウンロードしてカスタマイズします。
Sync the files で最初のコマンドをコピーする
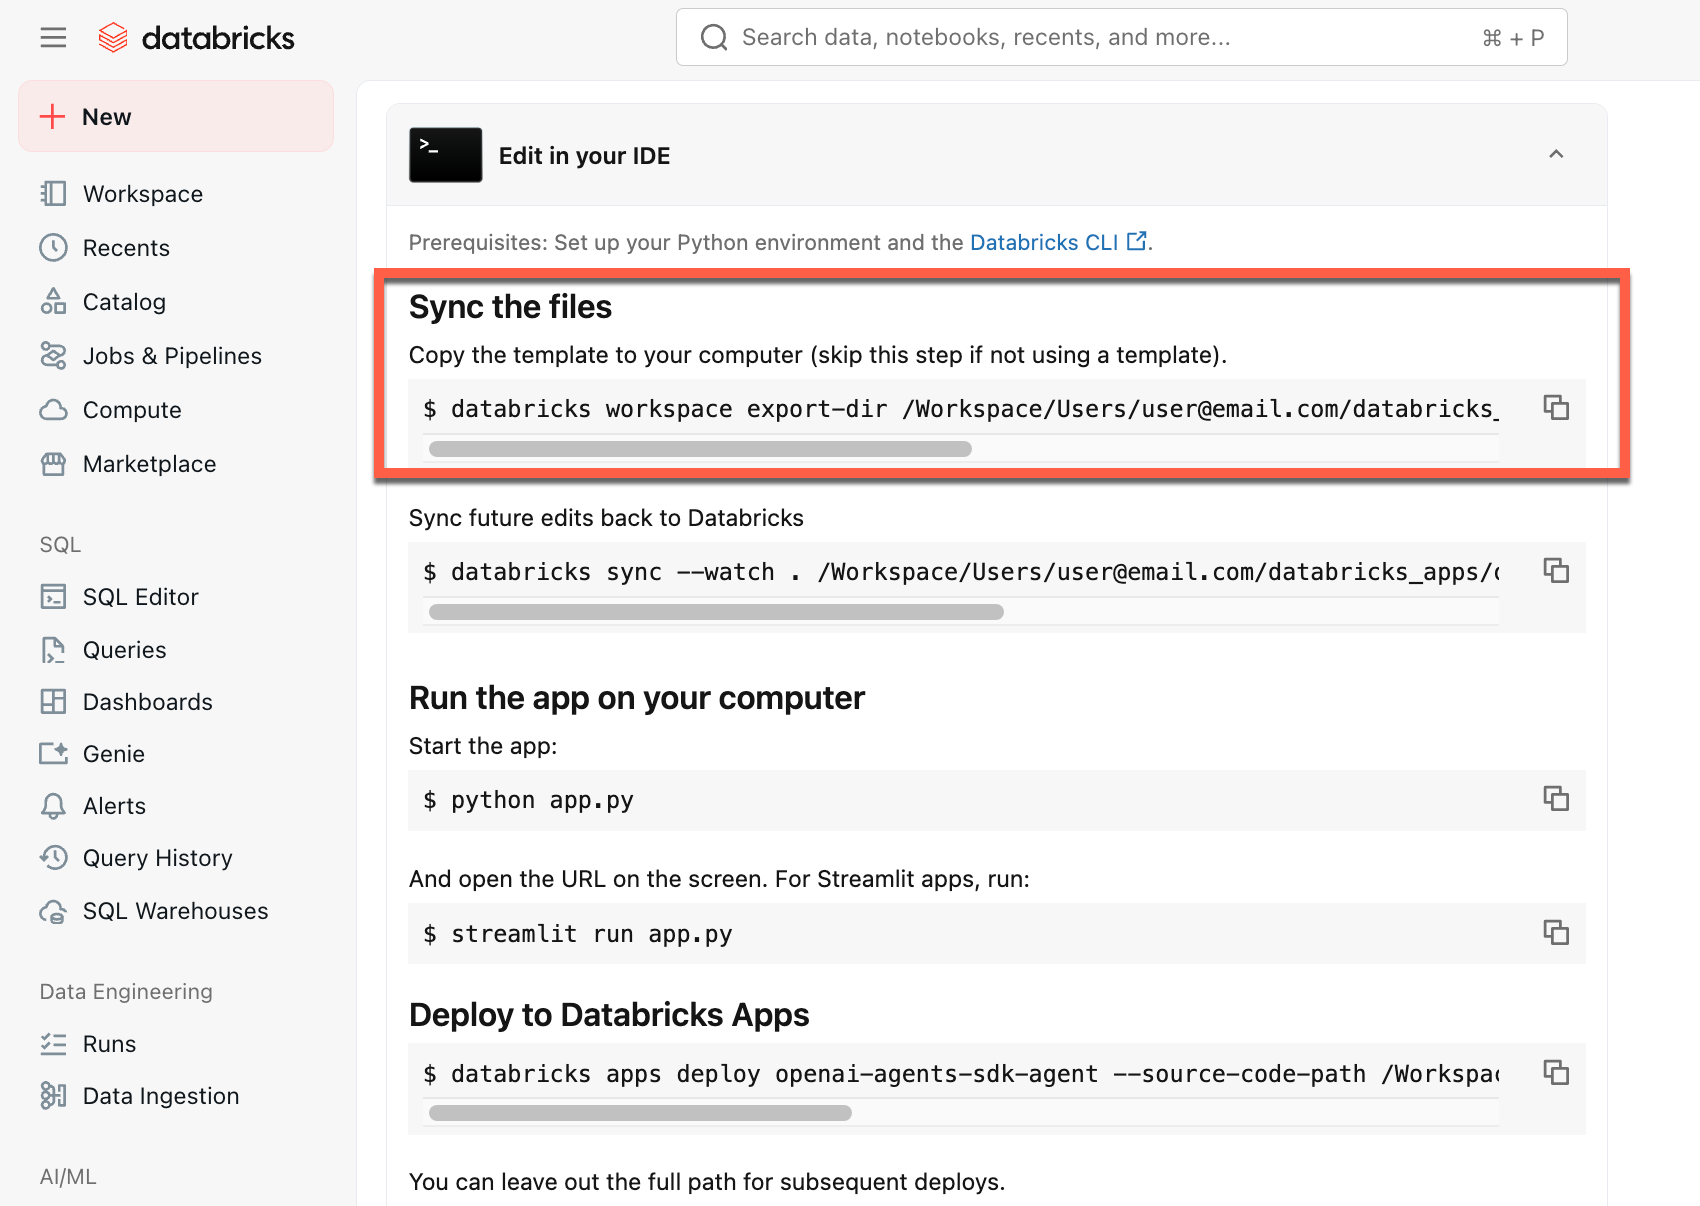
ローカル ターミナルで、コピーしたコマンドを実行します。
GitHubから複製する
ローカル環境から開始するには、エージェント テンプレート リポジトリを複製し、 agent-openai-agents-sdk ディレクトリを開きます。
git clone https://github.com/databricks/app-templates.git
cd app-templates/agent-openai-agents-sdk
ステップ 2. エージェント アプリケーションを理解する
エージェント テンプレートは、これらの主要コンポーネントを使用した運用対応アーキテクチャを示しています。 各コンポーネントの詳細については、次のセクションを開きます。

各コンポーネントの詳細については、次のセクションを開きます。
 組み込みのチャット UI
エージェント テンプレートは、 チャット アプリ テンプレート をフロントエンドとして自動的にフェッチして実行します。 このチャット UI は、同じ Databricks Apps デプロイにバンドルされ、エージェントと共に提供されるため、追加のセットアップは必要ありません。
プロジェクトでチャット UI を直接カスタマイズできます。 常設チャット履歴やユーザー フィードバック収集を有効にする方法など、チャット アプリの機能の詳細については、「 Databricks Apps でチャット UI を構築して共有する」を参照してください。
 MLflow AgentServer
組み込みのトレースと可観測性を使用してエージェント要求を処理する非同期 FastAPI サーバー。
AgentServer は、エージェントに対してクエリを実行するための/invocations エンドポイントを提供し、要求ルーティング、ログ記録、およびエラー処理を自動的に管理します。

ResponsesAgent インターフェイス
Databricks では、エージェントを構築するために MLflow ResponsesAgent をお勧めします。
ResponsesAgent を使用すると、任意のサードパーティ フレームワークを使用してエージェントを構築し、それを Databricks AI 機能と統合して、堅牢なログ記録、トレース、評価、デプロイ、監視機能を実現できます。

ResponsesAgentを作成する方法については、MLflow ドキュメントの例である ResponsesAgent for Model Serving を参照してください。
ResponsesAgent には、次の利点があります。
高度なエージェント機能
- マルチエージェントのサポート
- ストリーミング出力: 出力をより小さなチャンクでストリーミングします。
- 包括的なツール呼び出しメッセージ履歴: 品質と会話管理を向上させるために、中間ツール呼び出しメッセージを含む複数のメッセージを返します。
- ツール呼び出しの確認のサポート
- 実行時間の長いツールのサポート
開発、デプロイ、監視の合理化
-
任意のフレームワークを使用してエージェントを作成する:
ResponsesAgentインターフェイスを使用して既存のエージェントをラップして、AI Playground、Agent Evaluation、Agent Monitoring とのすぐに使用できる互換性を実現します。 - Typed オーサリングインターフェース: IDE とノートブックのオートコンプリートを活用し、型付き Python クラスを使用してエージェントコードを記述します。
- 自動トレース: MLflow は、評価と表示を容易にするために、ストリーム応答をトレースに自動的に集計します。
-
OpenAI
Responsesスキーマと互換性があります。 OpenAI: Responses と ChatCompletion を参照してください。
-
任意のフレームワークを使用してエージェントを作成する:
 OpenAI Agents SDK
テンプレートでは、会話管理とツール オーケストレーションのエージェント フレームワークとして OpenAI Agents SDK が使用されます。 任意のフレームワークを使用してエージェントを作成できます。 キーは、MLflow ResponsesAgent インターフェイスでエージェントをラップすることです。
 MCP (モデル コンテキスト プロトコル) サーバー
このテンプレートは Databricks MCP サーバーに接続して、エージェントにツールとデータ ソースへのアクセスを許可します。 Databricks のモデル コンテキスト プロトコル (MCP) を参照してください。
AI コーディング アシスタントを使用してエージェントを作成する
Databricks では、Claude、Cursor、Copilotなどの AI コーディング アシスタントを使用してエージェントを作成することをお勧めします。 提供されているエージェント スキル ( /.claude/skills) と AGENTS.md ファイルを使用して、AI アシスタントがプロジェクトの構造、使用可能なツール、ベスト プラクティスを理解するのに役立ちます。 エージェントは、これらのファイルを自動的に読み取って、Databricks Apps を開発してデプロイできます。
ステップ 3。 エージェントにツールを追加する
MCP サーバーに接続して、データベースのクエリ、ドキュメントの検索、外部 API の呼び出しなどのエージェント機能を提供します。 エージェント テンプレートには、既定の MCP サーバー接続が含まれています。 さらにツールを追加するには、エージェント コードで追加の MCP サーバーを構成し、 databricks.ymlで必要なアクセス許可を付与します。
サポートされているツールの種類とコード例については、 AI エージェント ツールを参照してください。
ローカル Python関数ツールの定義
外部データ ソースや API を必要としない操作の場合は、エージェント コードでツールを直接定義します。 これらのツールはエージェントと同じプロセスで実行され、データ変換、計算、またはユーティリティ操作に役立ちます。
OpenAI Agents SDK
OpenAI Agents SDK の @function_tool デコレーターを使用します。
from agents import Agent, function_tool

@function_tool
def get_current_time() -> str:
    """Get the current date and time."""
    from datetime import datetime
    return datetime.now().isoformat()

agent = Agent(
    name="My agent",
    instructions="You are a helpful assistant.",
    model="databricks-claude-sonnet-4-5",
    tools=[get_current_time],
)
LangGraph
LangChain の @tool デコレーターを使用します。
from langchain_core.tools import tool
from langgraph.prebuilt import create_react_agent
from databricks_langchain import ChatDatabricks

@tool
def get_current_time() -> str:
    """Get the current date and time."""
    from datetime import datetime
    return datetime.now().isoformat()

agent = create_react_agent(
    ChatDatabricks(endpoint="databricks-claude-sonnet-4-5"),
    tools=[get_current_time],
)
ローカル関数ツールは、エージェント プロセス内で実行されるため、 databricks.yml でリソース許可を必要としません。
高度なオーサリングに関するトピック
ストリーミング応答
ストリーミング応答
ストリーミングを使用すると、エージェントは完全な応答を待つ代わりに、リアルタイム チャンクで応答を送信できます。
ResponsesAgentを使用してストリーミングを実装するには、一連のデルタ イベントの後に最終的な完了イベントを出力します。
-
デルタ イベントを出力する: 同じ
output_text.deltaを持つ複数のitem_idイベントを送信して、テキスト チャンクをリアルタイムでストリーミングします。 -
完了イベントで終了: 完全な最終出力テキストを含むデルタ イベントと同じ
response.output_item.doneを使用して、最終的なitem_idイベントを送信します。
各デルタ イベントは、テキストのチャンクをクライアントにストリーミングします。 最後に完了したイベントには、完全な応答テキストが含まれており、Databricks に次のことを行うことを通知します。
- MLflow トレースを使用してエージェントの出力をトレースする
- AI Gateway 推論テーブルでストリーミングされた応答を集計する
- AI Playground UI に完全な出力を表示する
ストリームエラーの伝達
モザイク AI は、 databricks_output.errorの最後のトークンでストリーミング中に発生したすべてのエラーを伝達します。 このエラーを適切に処理して表示するのは、呼び出し元のクライアント次第です。
{
  "delta": …,
  "databricks_output": {
    "trace": {...},
    "error": {
      "error_code": BAD_REQUEST,
      "message": "TimeoutException: Tool XYZ failed to execute."
    }
  }
}
カスタム入力と出力
カスタム入力と出力
シナリオによっては、 client_type や session_idなどの追加のエージェント入力や、今後の対話のためにチャット履歴に含めてはならない取得ソース リンクなどの出力が必要になる場合があります。
これらのシナリオでは、MLflow ResponsesAgent は、 custom_inputs および custom_outputsフィールドをネイティブにサポートします。 上記のフレームワークの例の request.custom_inputs を使用して、カスタム入力にアクセスできます。
エージェント評価レビュー アプリでは、追加の入力フィールドを持つエージェントのトレースのレンダリングはサポートされていません。
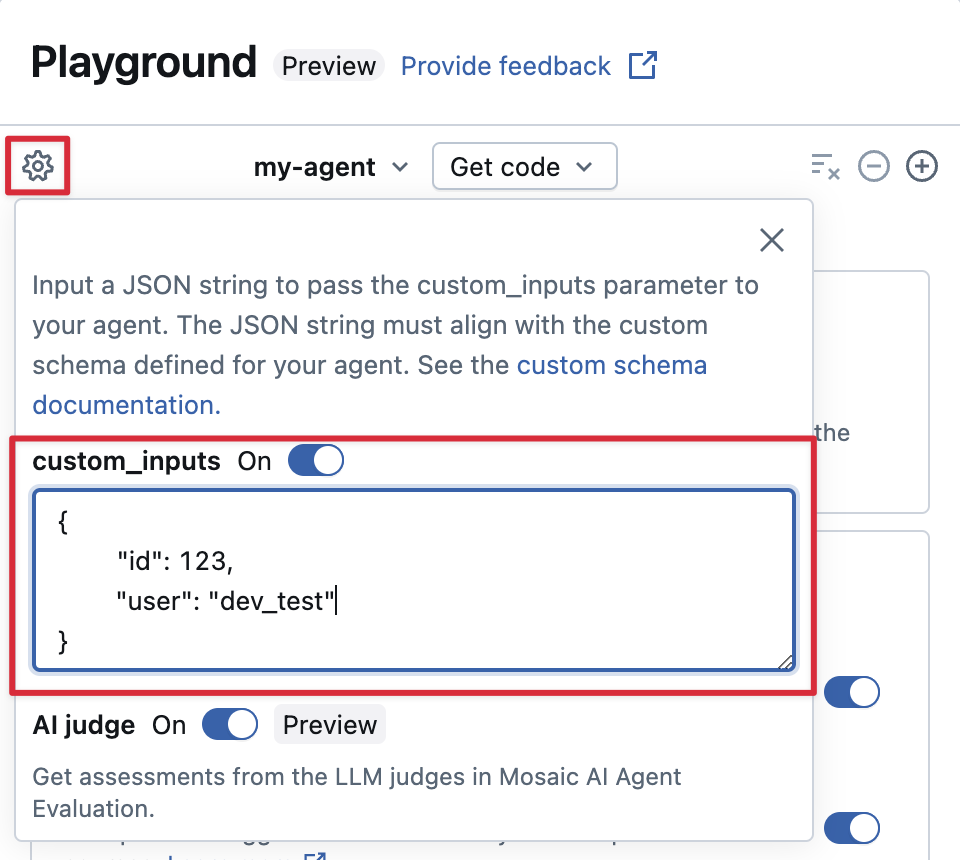
AI プレイグラウンドで custom_inputs を提供し、アプリを確認する
エージェントが custom_inputs フィールドを使用して追加の入力を受け入れる場合は、 AI Playground と レビュー アプリの両方でこれらの入力を手動で指定できます。
AI プレイグラウンドまたはエージェントレビューアプリにある歯車アイコン
 を選択します。
custom_inputsを有効にします。
エージェントの定義された入力スキーマに一致する JSON オブジェクトを指定します。
カスタム取得スキーマ
カスタム取得スキーマ
AI エージェントは、一般的に、ベクター検索インデックスから非構造化データを検索してクエリを実行するために、レトリバーを使用します。 レトリバー ツールの例については、「 エージェントを非構造化データに接続する」を参照してください。
次のような Databricks 製品の機能を有効にするには、 MLflow RETRIEVER スパン を使用してエージェント内でこれらのレトリバーをトレースします。
- AI Playground UI で取得したソース ドキュメントへのリンクを自動的に表示する
- エージェント評価における検索の根拠と関連性の判断を自動的に実行する
注
Databricks では、 databricks_langchain.VectorSearchRetrieverTool や databricks_openai.VectorSearchRetrieverTool などの Databricks AI Bridge パッケージによって提供されるレトリバー ツールを使用することをお勧めします。これは、既に MLflow レトリバー スキーマに準拠しているためです。
「AI Bridge を使用してローカルでレトリバーを開発する」を参照してください。
エージェントにカスタム スキーマを含むレトリバー スパンが含まれている場合は、コードでエージェントを定義するときに mlflow.models.set_retriever_schema を呼び出します。 これにより、取得元の出力列が MLflow の予期されるフィールド (primary_key、 text_column、 doc_uri) にマップされます。
import mlflow
# Define the retriever's schema by providing your column names
# For example, the following call specifies the schema of a retriever that returns a list of objects like
# [
#     {
#         'document_id': '9a8292da3a9d4005a988bf0bfdd0024c',
#         'chunk_text': 'MLflow is the largest open source AI engineering platform for agents, LLMs, and ML models...',
#         'doc_uri': 'https://mlflow.org/docs/latest/index.html',
#         'title': 'MLflow: The Largest Open Source AI Engineering Platform'
#     },
#     {
#         'document_id': '7537fe93c97f4fdb9867412e9c1f9e5b',
#         'chunk_text': 'A great way to get started with MLflow is to use the autologging feature. Autologging automatically logs your model...',
#         'doc_uri': 'https://mlflow.org/docs/latest/getting-started/',
#         'title': 'Getting Started with MLflow'
#     },
# ...
# ]
mlflow.models.set_retriever_schema(
    # Specify the name of your retriever span
    name="mlflow_docs_vector_search",
    # Specify the output column name to treat as the primary key (ID) of each retrieved document
    primary_key="document_id",
    # Specify the output column name to treat as the text content (page content) of each retrieved document
    text_column="chunk_text",
    # Specify the output column name to treat as the document URI of each retrieved document
    doc_uri="doc_uri",
    # Specify any other columns returned by the retriever
    other_columns=["title"],
)
注
doc_uri列は、レトリバーのパフォーマンスを評価する際に特に重要です。
doc_uri は、レトリバーによって返されるドキュメントの主な識別子であり、地上真偽評価セットと比較できます。
評価セット (MLflow 2) を参照してください。
ステップ 4. エージェント アプリをローカルで実行する
ローカル環境を設定します。
uv(Python パッケージ マネージャー)、nvm(ノード バージョン マネージャー)、および Databricks CLI をインストールします。-
uvインストール -
nvmインストール - ノード 20 LTS を使用するには、次を実行します。
nvm use 20 -
databricks CLIインストール
-
ディレクトリを
agent-openai-agents-sdkフォルダーに変更します。提供されているクイック スタート スクリプトを実行して依存関係をインストールし、環境を設定して、アプリを起動します。
uv run quickstart
uv run start-app
ブラウザーで、 http://localhost:8000 に移動して組み込みのチャット UI を開き、エージェントとのチャットを開始します。
手順 5. 認証を構成する
Azure Databricks リソースにアクセスするには、エージェントに認証が必要です。 Databricks Apps には、アプリ承認 (サービス プリンシパル) とユーザー承認 (ユーザー代理) の 2 つの認証方法が用意されています。 ワークスペース UI を使用して構成するか、宣言型オートメーション バンドルを使用して databricks.yml で宣言的に構成できます。 エージェント テンプレートには databricks.ymlが付属しているため、テンプレートから開始するときにパスが既定になります。
サポートされているすべてのリソースの種類、アクセス許可の値、エンド ツー エンドの databricks.yml チュートリアルなど、完全なリファレンスについては、「 AI エージェントの認証」を参照してください。
アプリの承認 (既定)
アプリの承認では、Azure Databricksがアプリ用に自動的に作成するサービス プリンシパルが使用されます。 すべてのユーザーが同じアクセス許可を共有します。
オプション 1: ワークスペース UI
- アプリのホーム ページで [ 編集] をクリックします。
- [構成] ステップに移動します。
- [ アプリ リソース ] セクションで、
Can Editアクセス許可を持つ MLflow 実験リソースを追加します。 - その他のリソース (Vector Search インデックス、Genie スペース、サービス エンドポイント、SQL ウェアハウス、Unity カタログ関数、Lakebase) については、[ + リソースの追加] をクリックし、各アクセス許可を設定します。
オプション 2: 宣言型オートメーション バンドル
エージェントがresources.apps.<app>.resourcesのdatabricks.ymlで使用するすべてのリソースを宣言します。 バンドルをデプロイして、宣言されたアクセス許可をサービス プリンシパルに付与します。
resources:
  apps:
    my_agent:
      name: 'my-agent'
      source_code_path: ./
      resources:
        - name: 'experiment'
          experiment:
            experiment_id: '<experiment-id>'
            permission: 'CAN_EDIT'
        - name: 'llm'
          serving_endpoint:
            name: 'databricks-claude-sonnet-4-5'
            permission: 'CAN_QUERY'
databricks bundle deploy
databricks bundle run my_agent
リソースの種類の完全な一覧については、「 アプリの承認」を参照してください。
ユーザーの承認
ユーザー承認を使用すると、エージェントは各ユーザーの個々のアクセス許可を使用して動作できます。 これは、ユーザーごとのアクセス制御または監査証跡が必要な場合に使用します。
エージェントに次のコードを追加します。
from agent_server.utils import get_user_workspace_client

# In your agent code (inside @invoke or @stream)
user_workspace = get_user_workspace_client()

# Access resources with the user's permissions
response = user_workspace.serving_endpoints.query(name="my-endpoint", inputs=inputs)
Important
アプリの起動時ではなく、get_user_workspace_client()または@invoke関数内の@streamを初期化します。 ユーザー資格情報は、要求を処理するときにのみ存在します。
スコープを宣言して、エージェントがユーザーの代わりに呼び出すことができる api Azure Databricksを構成します。
オプション 1: ワークスペース UI
- Azure Databricks UI で、アプリの Authorization 設定に移動します。
- [ ユーザーの承認] で、[ + スコープの追加] をクリックし、スコープを選択します。
- アプリを保存して再起動します。
オプション 2: 宣言型オートメーション バンドル
user_api_scopesのアプリのdatabricks.ymlの下にスコープを追加します。
resources:
  apps:
    my_agent:
      name: 'my-agent'
      source_code_path: ./
      user_api_scopes:
        - sql
        - dashboards.genie
        - serving.serving-endpoints
databricks bundle deploy
databricks bundle run my_agent
使用可能なスコープの一覧と完全なセットアップ手順については、「 ユーザー承認」を参照してください。
ステップ 6. エージェントを評価する
テンプレートには、エージェント評価コードが含まれています。 詳細については、agent_server/evaluate_agent.py を参照してください。 ターミナルで次を実行して、エージェントの応答の関連性と安全性を評価します。
uv run agent-evaluate
ステップ 7. エージェントを Databricks Apps にデプロイする
認証を構成したら、エージェントを Databricks にデプロイします。 Databricks CLI がインストールされ、構成されていることを確認します。
リポジトリをローカルに複製した場合は、デプロイする前に Databricks アプリを作成します。 ワークスペース UI を使用してアプリを作成した場合は、アプリと MLflow の実験が既に構成されているため、この手順をスキップします。
databricks apps create agent-openai-agents-sdkローカル ファイルをワークスペースに同期します。 「 アプリのデプロイ」を参照してください。
DATABRICKS_USERNAME=$(databricks current-user me | jq -r .userName)
databricks sync . "/Users/$DATABRICKS_USERNAME/agent-openai-agents-sdk"
Databricks アプリをデプロイします。
databricks apps deploy agent-openai-agents-sdk --source-code-path /Workspace/Users/$DATABRICKS_USERNAME/agent-openai-agents-sdk
今後エージェントを更新するには、エージェントを同期して再デプロイします。
手順 8. デプロイされたエージェントに対してクエリを実行する
次の例では、OAuth トークンを使用してクイック curl 要求を使用します。 Databricks Apps では、個人用アクセス トークン (AT) はサポートされていません。
Databricks OpenAI クライアントと REST API を含むクエリ メソッドの完全な一覧については、「Azure Databricks にデプロイされたエージェントの
Databricks CLI を使用して OAuth トークンを生成します。
databricks auth login --host <https://host.databricks.com>
databricks auth token
トークンを使用してエージェントにクエリを実行します。
curl -X POST <app-url.databricksapps.com>/invocations \
   -H "Authorization: Bearer <oauth token>" \
   -H "Content-Type: application/json" \
   -d '{ "input": [{ "role": "user", "content": "hi" }], "stream": true }'
制限事項
- 中サイズと大きなコンピューティング サイズのみがサポートされます。 Databricks アプリのコンピューティング リソースの構成を参照してください。
- 現在、MLflow Review App Chat UI では、Databricks Apps にデプロイされたエージェントはサポートされていません。 既存のトレースを評価するには、デプロイ方法に関係なく機能する ラベル付けセッションを使用します。 Databricks では、レビューとフィードバックのサポートを チャットボット テンプレートに直接組み込んでいます。