このクイックスタートでは、Azure Resource Manager テンプレート (ARM テンプレート) または Bicep ファイルを使用してワークフロー自動化を作成する方法について説明します。 ワークフローの自動化では、Microsoft Defender for Cloud によって特定のセキュリティ アラートが受信されると、ロジック アプリがトリガーされます。
前提条件
Azure サブスクリプションをお持ちでない場合は、開始する前に 無料アカウント を作成してください。
Microsoft Defender for Cloud のワークフロー自動化機能を使用するために必要なロールとアクセス許可の一覧については、ワークフローの自動化に関するページを参照してください。
このクイックスタートの例では、既存のロジック アプリがあることを前提としています。 この例をデプロイするには、ロジック アプリ名とリソース グループを含むパラメーターを渡します。 ロジック アプリのデプロイの詳細については、「クイックスタート: Bicep を使用してマルチテナント Azure Logic Apps で従量課金ロジック アプリ ワークフローを作成してデプロイする」または「クイックスタート: ARM テンプレートを使用してマルチテナント Azure Logic Apps で従量課金ロジック アプリ ワークフローを作成してデプロイする」を参照してください。
ARM テンプレートのチュートリアル
Azure Resource Manager テンプレートは JavaScript Object Notation (JSON) ファイルであり、プロジェクトのインフラストラクチャと構成が定義されています。 このテンプレートでは、宣言型の構文が使用されています。 デプロイしようとしているものを、デプロイを作成する一連のプログラミング コマンドを記述しなくても記述できます。
環境が前提条件を満たしていて、ARM テンプレートの使用に慣れている場合は、 [Azure へのデプロイ] ボタンを選択します。 Azure portal でテンプレートが開きます。

テンプレートを確認する
このクイックスタートで使用されるテンプレートは Azure クイックスタート テンプレートからのものです。
{
  "$schema": "https://schema.management.azure.com/schemas/2019-04-01/deploymentTemplate.json#",
  "contentVersion": "1.0.0.0",
  "metadata": {
    "_generator": {
      "name": "bicep",
      "version": "0.5.6.12127",
      "templateHash": "5191074894407113732"
    }
  },
  "parameters": {
    "automationName": {
      "type": "string",
      "maxLength": 24,
      "minLength": 3
    },
    "location": {
      "type": "string",
      "defaultValue": "[resourceGroup().location]",
      "metadata": {
        "description": "Location for the automation"
      }
    },
    "logicAppName": {
      "type": "string",
      "minLength": 3
    },
    "logicAppResourceGroupName": {
      "type": "string",
      "minLength": 3
    },
    "subscriptionId": {
      "type": "string",
      "defaultValue": "[subscription().subscriptionId]",
      "metadata": {
        "description": "The Azure resource GUID id of the subscription"
      }
    },
    "alertSettings": {
      "type": "object",
      "metadata": {
        "description": "The alert settings object used for deploying the automation"
      }
    }
  },
  "variables": {
    "automationDescription": "automation description for subscription {0}",
    "scopeDescription": "automation scope for subscription {0}"
  },
  "resources": [
    {
      "type": "Microsoft.Security/automations",
      "apiVersion": "2019-01-01-preview",
      "name": "[parameters('automationName')]",
      "location": "[parameters('location')]",
      "properties": {
        "description": "[format(variables('automationDescription'), parameters('subscriptionId'))]",
        "isEnabled": true,
        "actions": [
          {
            "actionType": "LogicApp",
            "logicAppResourceId": "[resourceId('Microsoft.Logic/workflows', parameters('logicAppName'))]",
            "uri": "[listCallbackURL(resourceId(parameters('subscriptionId'), parameters('logicAppResourceGroupName'), 'Microsoft.Logic/workflows/triggers', parameters('logicAppName'), 'manual'), '2019-05-01').value]"
          }
        ],
        "scopes": [
          {
            "description": "[format(variables('scopeDescription'), parameters('subscriptionId'))]",
            "scopePath": "[subscription().id]"
          }
        ],
        "sources": [
          {
            "copy": [
              {
                "name": "ruleSets",
                "count": "[length(range(0, length(parameters('alertSettings').alertSeverityMapping)))]",
                "input": {
                  "rules": [
                    {
                      "propertyJPath": "[parameters('alertSettings').alertSeverityMapping[range(0, length(parameters('alertSettings').alertSeverityMapping))[copyIndex('ruleSets')]].jpath]",
                      "propertyType": "String",
                      "expectedValue": "[parameters('alertSettings').alertSeverityMapping[range(0, length(parameters('alertSettings').alertSeverityMapping))[copyIndex('ruleSets')]].expectedValue]",
                      "operator": "[parameters('alertSettings').alertSeverityMapping[range(0, length(parameters('alertSettings').alertSeverityMapping))[copyIndex('ruleSets')]].operator]"
                    },
                    {
                      "propertyJPath": "Severity",
                      "propertyType": "String",
                      "expectedValue": "[parameters('alertSettings').alertSeverityMapping[range(0, length(parameters('alertSettings').alertSeverityMapping))[copyIndex('ruleSets')]].severity]",
                      "operator": "Equals"
                    }
                  ]
                }
              }
            ],
            "eventSource": "Alerts"
          }
        ]
      }
    }
  ]
}
関連リソース
- Microsoft.Security/automations: 特定の文字列を含む Microsoft Defender for Cloud のアラートを受信したときにロジック アプリをトリガーする自動化。
- Microsoft.Logic/workflows: トリガー可能な空のロジック アプリ。
その他の Defender for Cloud クイックスタート テンプレートについては、コミュニティ提供のテンプレートを参照してください。
テンプレートのデプロイ
PowerShell:
New-AzResourceGroup -Name <resource-group-name> -Location <resource-group-location> #use this command when you need to create a new resource group for your deployment New-AzResourceGroupDeployment -ResourceGroupName <resource-group-name> -TemplateUri https://raw.githubusercontent.com/Azure/azure-quickstart-templates/master/quickstarts/microsoft.security/securitycenter-create-automation-for-alertnamecontains/azuredeploy.jsonCLI:
az group create --name <resource-group-name> --location <resource-group-location> #use this command when you need to create a new resource group for your deployment az deployment group create --resource-group <my-resource-group> --template-uri https://raw.githubusercontent.com/Azure/azure-quickstart-templates/master/quickstarts/microsoft.security/securitycenter-create-automation-for-alertnamecontains/azuredeploy.jsonポータル:
このデプロイ オプションの詳細については、「デプロイ ボタンを使用して GitHub リポジトリからテンプレートをデプロイする」をご覧ください。
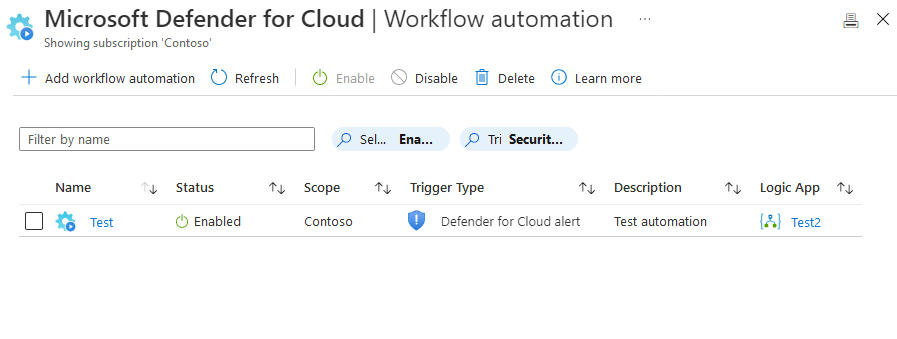
デプロイされているリソースを確認する
Azure portal を使用して、ワークフローの自動化がデプロイされていることを確認します。
Azure portal にサインインします。
「Microsoft Defender for Cloud」を検索して選択します。
[フィルター] を選択します。
新しいワークフロー自動化をデプロイした特定のサブスクリプションを選択します。
Microsoft Defender for Cloud のメニューから [ワークフローの自動化] を開き、新しい自動化を確認します。
ヒント
サブスクリプションに多数のワークフロー自動化がある場合は、 [名前でフィルター] オプションを使用します。

リソースをクリーンアップする
ワークフローの自動化が不要になったら、Azure portal を使用して削除します。
Azure portal にサインインします。
「Microsoft Defender for Cloud」を検索して選択します。
[フィルター] を選択します。
新しいワークフロー自動化をデプロイした特定のサブスクリプションを選択します。
Microsoft Defender for Cloud のメニューから [ワークフローの自動化] を開き、削除する自動化を見つけます。
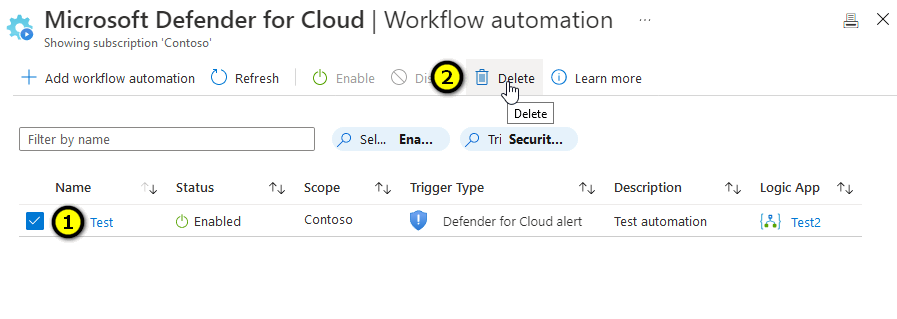
削除する項目のチェック ボックスをオンにします。
ツール バーから [削除] を選択します。

Bicep のチュートリアル
Bicep は、宣言型の構文を使用して Azure リソースをデプロイするドメイン固有言語 (DSL) です。 簡潔な構文、信頼性の高いタイプ セーフ、およびコードの再利用のサポートが提供されます。 Bicep により、Azure のコード ソリューションとしてのインフラストラクチャに最適な作成エクスペリエンスが実現します。
Bicep ファイルを確認する
このクイックスタートで使用される Bicep ファイルは、Azure クイックスタート テンプレートからのものです。
@minLength(3)
@maxLength(24)
param automationName string

@description('Location for the automation')
param location string = resourceGroup().location

@minLength(3)
param logicAppName string

@minLength(3)
param logicAppResourceGroupName string

@description('The Azure resource GUID id of the subscription')
param subscriptionId string = subscription().subscriptionId

@description('The alert settings object used for deploying the automation')
param alertSettings object

var automationDescription = 'automation description for subscription {0}'
var scopeDescription = 'automation scope for subscription {0}'

resource automation 'Microsoft.Security/automations@2019-01-01-preview' = {
  name: automationName
  location: location
  properties: {
    description: format(automationDescription, subscriptionId)
    isEnabled: true
    actions: [
      {
        actionType: 'LogicApp'
        logicAppResourceId: resourceId('Microsoft.Logic/workflows', logicAppName)
        uri: listCallbackURL(resourceId(subscriptionId, logicAppResourceGroupName, 'Microsoft.Logic/workflows/triggers', logicAppName, 'manual'), '2019-05-01').value
      }
    ]
    scopes: [
      {
        description: format(scopeDescription, subscriptionId)
        scopePath: subscription().id
      }
    ]
    sources: [
      {
        eventSource: 'Alerts'
        ruleSets: [for j in range(0, length(alertSettings.alertSeverityMapping)): {
          rules: [
            {
              propertyJPath: alertSettings.alertSeverityMapping[j].jpath
              propertyType: 'String'
              expectedValue: alertSettings.alertSeverityMapping[j].expectedValue
              operator: alertSettings.alertSeverityMapping[j].operator
            }
            {
              propertyJPath: 'Severity'
              propertyType: 'String'
              expectedValue: alertSettings.alertSeverityMapping[j].severity
              operator: 'Equals'
            }
          ]
        }]
      }
    ]
  }
}
関連リソース
- Microsoft.Security/automations: 特定の文字列を含む Microsoft Defender for Cloud のアラートを受信したときにロジック アプリをトリガーする自動化。
- Microsoft.Logic/workflows: トリガー可能な空のロジック アプリ。
その他の Defender for Cloud クイックスタート テンプレートについては、コミュニティ提供のテンプレートを参照してください。
Bicep ファイルをデプロイする
Bicep ファイルを main.bicep としてローカル コンピューターに保存します。
Azure CLI または Azure PowerShell のどちらかを使用して Bicep ファイルをデプロイします。
az group create --name exampleRG --location eastus az deployment group create --resource-group exampleRG --template-file main.bicep --parameters automationName=<automation-name> logicAppName=<logic-name> logicAppResourceGroupName=<group-name> alertSettings={alert-settings}次のパラメーターを入力する必要があります。
- automationName: <automation-name> は自動化の名前に置き換えます。 最小長は 3 文字で、最大長は 24 文字です。
- logicAppName: <logic-name> はロジック アプリの名前に置き換えます。 最小長は 3 文字です。
- logicAppResourceGroupName: <group-name> は、リソースが配置されているリソース グループの名前に置き換えます。 最小長は 3 文字です。
- alertSettings: {alert-settings} は、自動化のデプロイに使用されるアラート設定オブジェクトに置き換えます。
注意
デプロイが完了すると、デプロイが成功したことを示すメッセージが表示されます。
デプロイされているリソースを確認する
Azure portal、Azure CLI、または Azure PowerShell を使用して、リソースグループ内のデプロイ済みリソースをリスト表示します。
az resource list --resource-group exampleRG
リソースをクリーンアップする
不要になったら、Azure portal、Azure CLI、または Azure PowerShell を使用して、リソース グループとそのすべてのリソースを削除します。
az group delete --name exampleRG
次のステップ
ARM テンプレートまたは Bicep ファイルの作成手順について説明したチュートリアルについては、以下を参照してください。