このクイック スタートでは、Go コンパイラとツールをインストールし、Visual Studio Code をインストールして Go コードを記述し、Go の作成中にサポートを提供する Go for Visual Studio Code 拡張機能をインストールします。 構成したら、アプリケーションを作成して実行し、デバッグ ツールを使用して実行を一時停止し、変数の値を観察します。
1. Go をインストールする
公式ページから Go をインストールします。 これにより、Go 開発時にさまざまな一般的なタスクを実行するためのコンパイラ、標準ライブラリ、および多くのツールがインストールされます。 Go をインストールするには、次の手順に従います。
- Web ブラウザーで、 go.dev/doc/install に移動します。
- オペレーティング システムのバージョンをダウンロードします。
- ダウンロードしたら、インストーラーを実行します。
- コマンド プロンプトを開き、
go version実行して Go がインストールされたことを確認します。
2. Visual Studio Code をインストールする
次に、基本的なコード編集機能を提供する Visual Studio Code をインストールします。 Visual Studio Code をインストールするには、次の手順に従います。
- Web ブラウザーを開き、 code.visualstudio.com に移動します。
- オペレーティング システムのバージョンをダウンロードします。 Visual Studio Code は、Windows、Linux、macOS をサポートしています。
- ダウンロードしたら、インストーラーを実行します。
3. Go 拡張機能をインストールする
Go for Visual Studio Code 拡張機能をインストールして構成します。 Visual Studio Code と Go 拡張機能は、IntelliSense、コード ナビゲーション、高度なデバッグを提供します。
| インストラクション | スクリーンショット |
|---|---|
| Visual Studio Code で、アクティビティ バーの [拡張機能] アイコンをクリックして拡張機能ビューを表示します。 または、キーボード ショートカット (Ctrl + Shift + X) を使用します。 |

|
| Go 拡張機能を検索し、[インストール] を選択します。 |

|
4. Go ツールを更新する
| インストラクション | スクリーンショット |
|---|---|
| Visual Studio Code で、 コマンド パレットの ヘルプ>[すべてのコマンドを表示]を開きます。 または、キーボード ショートカットを使用します (Ctrl + Shift + P) |
|
Go: Install/Update toolsを検索し、パレットからコマンドを実行します |

|
| メッセージが表示されたら、使用可能なすべての Go ツールを選択し、[OK] を選択します。 |

|
| Go ツールの更新が完了するまで待ちます。 |

|
5. サンプル Go プログラムを作成する
この手順では、サンプルの Go プログラムを作成して実行し、すべてが正常に動作していることを確認します。
| インストラクション | スクリーンショット |
|---|---|
| Visual Studio Code で、Go アプリケーションのルート ディレクトリを開きます。 フォルダーを開くには、アクティビティ バーのエクスプローラー アイコンを選択し、[ フォルダーを開く] を選択します。 |

|
[エクスプローラー] パネルで [新しいフォルダー] を選択し、名前が付いたサンプル Go アプリケーションのルート ディレクターを作成します sample-app |

|
エクスプローラー パネルで [新しいファイル ] を選択し、ファイルに名前を付けます main.go |

|
ターミナルターミナル>新しいターミナルを開き、コマンド go mod init sample-appを実行してサンプル Go アプリを初期化します。 |

|
次のコードを main.go ファイルにコピーします。 |

|
サンプル コード:
package main

import "fmt"

func main() {
    name := "Go Developers"
    fmt.Println("Azure for", name)
}
6. デバッガーを実行する
最後に、ブレークポイントを作成し、デバッガー ツールを使用します。 ブレークポイントを使用すると、コードを 1 行ずつステップ実行し、アプリケーションの一時停止中に変数に格納されている値を表示できます。
| インストラクション | スクリーンショット |
|---|---|
| 番号付き行の左側をクリックして、7 行目にブレークポイントを作成します。 必要に応じて、7 行目にカーソルを置き、F9 キーを押します。 |

|
| Visual Studio Code の左側にあるアクティビティ バーでデバッグ アイコンを選択して、デバッグ ビューを開きます。 必要に応じて、キーボード ショートカット (Ctrl + Shift + D) を使用します。 |

|
[ 実行とデバッグ] を選択するか、F5 キーを押してデバッガーを実行します。 次に、7 行目 name 変数の上にマウス ポインターを置くと、その値が表示されます。 デバッガー バーの [続行 ] をクリックしてデバッガーを終了するか、F5 キーを押します。 |

|
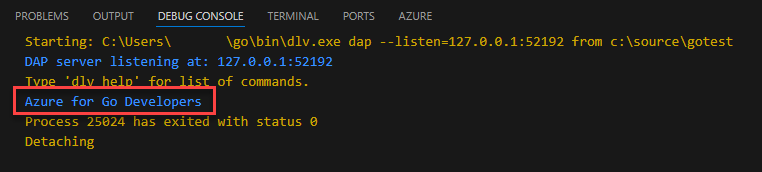
アプリケーションが完了すると、デバッグ コンソールに fmt.Println() ステートメントの出力が表示されます。
Visual Studio Code for Go 開発環境が正常に設定されました。