このチュートリアルでは、Azure DocumentDB と OpenAI を使用して AI を利用した広告ジェネレーターを構築し、動的でパーソナライズされた広告コンテンツを作成します。 このアプリケーションでは、ベクトル類似性検索を使用して広告の件名とインベントリ項目を照合し、GPT-4 と DALL-E 3 を使用して、Heelie という AI アシスタントを通じて説得力のある広告コピーと画像を生成します。
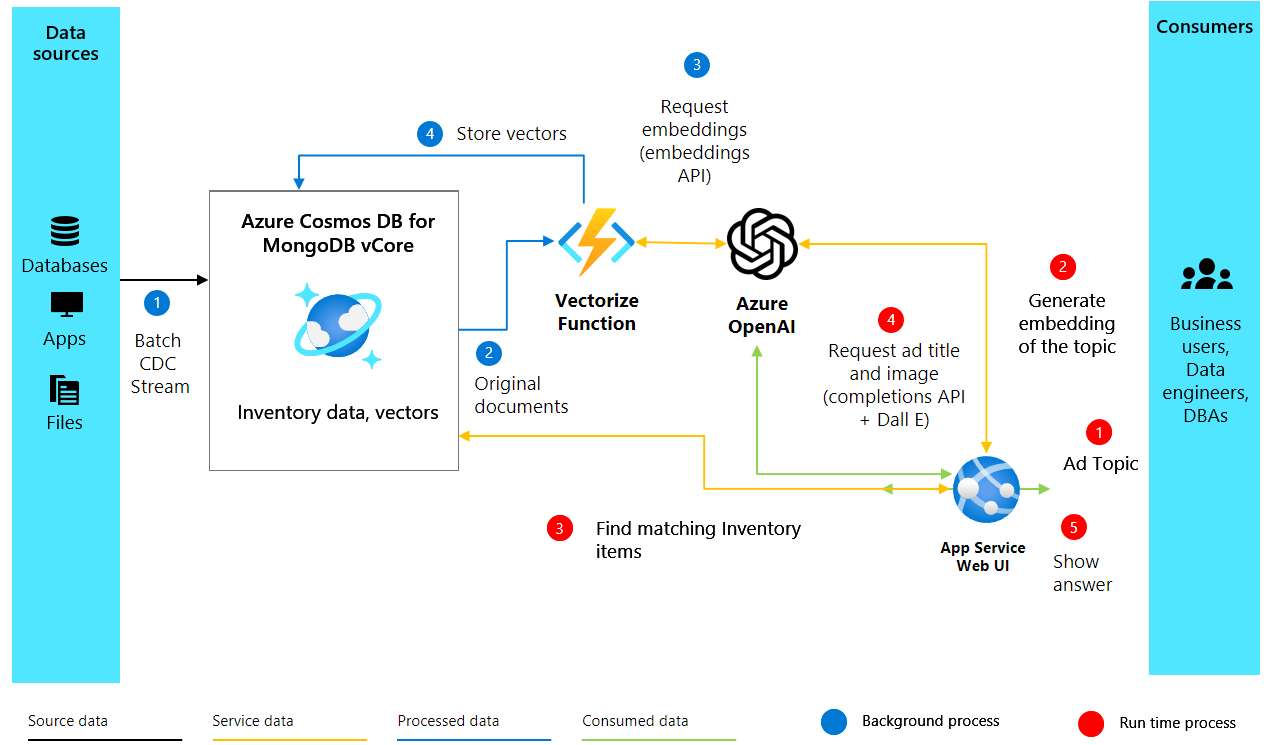
このアプリケーションは、OpenAI 埋め込みを使用してインベントリの説明用のベクター埋め込みを生成することで機能します。これは、製品の説明のセマンティックな意味をキャプチャします。 これらのベクターは Azure DocumentDB に格納され、インデックスが付けられます。これにより、強力なベクター類似性検索が可能になります。 提供情報を生成する必要がある場合、アプリケーションは、ベクトル検索を通じて最適に一致するインベントリ項目を見つけるために、広告の件名をベクター化します。 次に、取得拡張生成 (RAG) プロセスを使用して上位の一致を OpenAI に送信します。これにより、キャッチーなタグラインや現実的な画像を含む説得力のある広告コンテンツが作成されます。
このチュートリアルでは、次の操作を行います。
- 必要なパッケージを使用して Python 環境を設定する
- Azure OpenAI クライアントと Azure DocumentDB クライアントを構成する
- 製品の説明からベクター埋め込みを作成する
- ベクター インデックスを使用して Azure DocumentDB データベースを設定する
- ベクター類似性検索を実装して関連する製品を検索する
- GPT-4 と DALL-E 3 を使用して広告コンテンツを生成する
- Gradio を使用して対話型 Web インターフェイスを構築する
Azure サブスクリプションをお持ちでない場合は、開始する前に 無料アカウント を作成してください。
[前提条件]
Azure サブスクリプション
- Azure サブスクリプションをお持ちでない場合は、無料アカウントを作成してください
既存の Azure DocumentDB クラスター
- クラスターがない場合は、新しいクラスターを作成します
-
text-embedding-ada-002デプロイされた埋め込みモデルgpt-4完了モデルがデプロイされました
Python 3.12 以降
サンプル データを取得する
このチュートリアルでは、製品の説明と事前計算されたベクター埋め込みを含む靴製品のデータセットを操作します。 サンプル データには、ベクトルの類似性の検索と広告の生成を示すためにアプリケーションが使用するインベントリ情報が含まれています。
GitHub リポジトリからサンプル データ ファイルをダウンロードします。
curl -o data/shoes_with_vectors.json https://raw.githubusercontent.com/jayanta-mondal/ignite-demo/main/data/shoes_with_vectors.jsonプロジェクト ディレクトリに
dataフォルダーを作成し、その中にshoes_with_vectors.jsonファイルを保存します。 このファイルには、セマンティック検索機能を有効にする名前、説明、価格、ベクター埋め込みなどの製品情報が含まれています。
Python 環境を設定する
必要なパッケージを使用して Python 環境を設定し、OpenAI API と Azure サービスに対する要求を認証するように Azure クライアントを構成します。
ターミナルを開き、必要な Python パッケージをインストールします。
pip install numpy
pip install openai==1.2.3
pip install pymongo
pip install python-dotenv
pip install azure-core
pip install azure-cosmos
pip install tenacity
pip install gradio
OpenAI パッケージのインストールを確認します。
pip show openaiプロジェクトの新しい Python ファイルを作成します (たとえば、
ad_generator.py)。次のコードを追加して、必要なライブラリをインポートし、Azure OpenAI クライアントを構成します。
import json
import time
import openai

from dotenv import dotenv_values
from openai import AzureOpenAI

# Configure the API to use Azure as the provider
openai.api_type = "azure"
openai.api_key = "<AZURE_OPENAI_API_KEY>"  # Replace with your actual Azure OpenAI API key
openai.api_base = "https://<OPENAI_ACCOUNT_NAME>.openai.azure.com/"  # Replace with your OpenAI account name
openai.api_version = "2023-06-01-preview"

# Initialize the AzureOpenAI client with your API key, version, and endpoint
client = AzureOpenAI(
    api_key=openai.api_key,
    api_version=openai.api_version,
    azure_endpoint=openai.api_base
)
プレースホルダーの値を実際の Azure OpenAI 資格情報に置き換えます。
-
<AZURE_OPENAI_API_KEY>: 前提条件の Azure OpenAI API キー -
<OPENAI_ACCOUNT_NAME>: Azure OpenAI アカウント名
-
ベクター埋め込みの作成
製品の説明からベクター埋め込みを作成し、マシンが理解して処理できる形式でセマンティックな意味をキャプチャします。 次の図は、ソリューション アーキテクチャを示しています。
次の関数を Python ファイルに追加して、Azure OpenAI を使用してベクター埋め込みを作成します。
import openai

def generate_embeddings(text):
    try:
        response = client.embeddings.create(
            input=text, model="text-embedding-ada-002")
        embeddings = response.data[0].embedding
        return embeddings
    except Exception as e:
        print(f"An error occurred: {e}")
        return None
この関数はテキスト入力を受け取り、
client.embeddings.createメソッドを使用してベクター埋め込みを生成します。text-embedding-ada-002モデルは、テキストをセマンティックな意味をキャプチャする高次元ベクトルに変換します。サンプル製品の説明を使用して埋め込み関数をテストします。
embeddings = generate_embeddings("Shoes for San Francisco summer")

if embeddings is not None:
    print(embeddings)
成功した場合、関数は生成された埋め込みを出力します。それ以外の場合は、エラー メッセージを出力して例外を処理します。
Azure DocumentDB に接続する
ベクター類似性検索をサポートするデータベースに埋め込みを格納してインデックスを作成するために、Azure DocumentDB への接続を確立します。
次のコードを追加して、Azure DocumentDB クラスターとの接続を確立します。
import pymongo

# Replace <username>, <password>, and <cluster-name> with your actual credentials
mongo_conn = "mongodb+srv://<username>:<password>@<cluster-name>.mongocluster.cosmos.azure.com/?tls=true&authMechanism=SCRAM-SHA-256&retrywrites=false&maxIdleTimeMS=120000"
mongo_client = pymongo.MongoClient(mongo_conn)
プレースホルダーの値を、前提条件の実際の MongoDB 資格情報に置き換えます。
-
<username>: MongoDB ユーザー名 -
<password>: MongoDB パスワード -
<cluster-name>: 仮想コア クラスター名
-
データベースとコレクションを作成する
Azure DocumentDB インスタンス内にデータベースとコレクションを作成して、広告データと製品インベントリを格納します。
次のコードを追加して、データベースとコレクションを作成します。
DATABASE_NAME = "AdgenDatabase"
COLLECTION_NAME = "AdgenCollection"

mongo_client.drop_database(DATABASE_NAME)
db = mongo_client[DATABASE_NAME]
collection = db[COLLECTION_NAME]

if COLLECTION_NAME not in db.list_collection_names():
    # Creates a unsharded collection that uses the database's shared throughput
    db.create_collection(COLLECTION_NAME)
    print("Created collection '{}'.\n".format(COLLECTION_NAME))
else:
    print("Using collection: '{}'.\n".format(COLLECTION_NAME))
このコードでは、データベースとコレクションの名前を定義し、クリーン セットアップ用に同じ名前の既存のデータベースを削除し、新しいデータベースとコレクションを作成して、確認メッセージを出力します。
ベクトル インデックスを作成する
ベクトル インデックスを作成して、コレクション内で効率的なベクター類似性検索を有効にします。 Azure DocumentDB では、さまざまな種類の ベクター インデックス (反転ファイル インデックス (IVF) と階層ナビゲーション可能 Small World (HNSW) がサポートされています。
クラスター層に基づいてインデックス作成アルゴリズムを選択します。
- IVF: すべてのクラスター層で動作する既定のアルゴリズムでは、近似最近傍 (ANN) アプローチが使用されます
- HNSW: グラフベースの構造。より高速で精度が高く、M40 クラスターレベル以上でのみ使用できます
IVF インデックスを作成するには、次のコマンドを実行します。
db.runCommand({
  'createIndexes': 'AdgenCollection',
  'indexes': [
    {
      'name': 'vectorSearchIndex',
      'key': {
        "contentVector": "cosmosSearch"
      },
      'cosmosSearchOptions': {
        'kind': 'vector-ivf',
        'numLists': 1,
        'similarity': 'COS',
        'dimensions': 1536
      }
    }
  ]
});
(省略可能)M40 クラスターレベル以上を使用している場合は、代わりに HNSW インデックスを作成できます。
db.runCommand({
    "createIndexes": "AdgenCollection",
    "indexes": [
        {
            "name": "VectorSearchIndex",
            "key": {
                "contentVector": "cosmosSearch"
            },
            "cosmosSearchOptions": {
                "kind": "vector-hnsw",
                "m": 16,
                "efConstruction": 64,
                "similarity": "COS",
                "dimensions": 1536
            }
        }
    ]
})
Important
ベクトル プロパティごとに作成できるインデックスは 1 つだけです。 インデックスの種類 (IVF から HNSW など) を変更する場合は、新しいインデックスを作成する前に最初にインデックスを削除する必要があります。
インベントリ データを読み込む
製品の説明とそれに対応するベクター埋め込みを含む在庫データをコレクションに挿入します。
次のコードを追加して、データを読み込んでコレクションに挿入します。
data_file = open(file="./data/shoes_with_vectors.json", mode="r")
data = json.load(data_file)
data_file.close()

result = collection.insert_many(data)

print(f"Number of data points added: {len(result.inserted_ids)}")
このコードは、JSON ファイルを開き、データを読み込み、
insert_many()を使用してすべてのドキュメントをコレクションに挿入し、追加されたドキュメントの数を出力します。
ベクター検索を実装する
ベクター検索を使用して、クエリに基づいて最も関連性の高い項目を検索します。 作成したベクター インデックスを使用すると、データセット内でセマンティック検索を実行できます。
ベクトル類似性検索を実行するには、次の関数を追加します。
def vector_search(query, num_results=3):

    query_vector = generate_embeddings(query)

    embeddings_list = []
    pipeline = [
        {
            '$search': {
                "cosmosSearch": {
                    "vector": query_vector,
                    "numLists": 1,
                    "path": "contentVector",
                    "k": num_results
                },
                "returnStoredSource": True }},
        {'$project': { 'similarityScore': { '$meta': 'searchScore' }, 'document' : '$$ROOT' } }
    ]
    results = collection.aggregate(pipeline)
    return results
この関数は、検索クエリのベクター埋め込みを生成し、Azure DocumentDB の
$search機能を使用する集計パイプラインを作成し、ベクターの類似性に基づいて最も近い一致する項目を検索し、類似性スコアを持つ結果を返します。サンプル クエリを使用してベクター検索機能をテストします。
query = "Shoes for Seattle sweater weather"
results = vector_search(query, 3)

print("\nResults:\n")
for result in results:
    print(f"Similarity Score: {result['similarityScore']}")
    print(f"Title: {result['document']['name']}")
    print(f"Price: {result['document']['price']}")
    print(f"Material: {result['document']['material']}")
    print(f"Image: {result['document']['img_url']}")
    print(f"Purchase: {result['document']['purchase_url']}\n")
このコードはベクター検索を実行し、上位 3 つの一致する製品とその類似性スコアと詳細を表示します。
広告コンテンツを生成する
すべてのコンポーネントを組み合わせて、OpenAI の GPT-4 をテキストに、DALL-E 3 を使用して魅力的な広告を作成します。
GPT-4 を使用してキャッチーな広告タイトルを生成するには、次の関数を追加します。
from openai import OpenAI

def generate_ad_title(ad_topic):
    system_prompt = '''
    You are Heelie, an intelligent assistant for generating witty and captivating taglines for online advertisements.
        - The ad campaign taglines that you generate are short and typically under 100 characters.
    '''

    user_prompt = f'''Generate a catchy, witty, and short sentence (less than 100 characters)
                    for an advertisement for selling shoes for {ad_topic}'''
    messages=[
        {"role": "system", "content": system_prompt},
        {"role": "user", "content": user_prompt},
    ]

    response = client.chat.completions.create(
        model="gpt-4",
        messages=messages
    )

    return response.choices[0].message.content
DALL-E 3 を使用して広告イメージを生成するには、次の関数を追加します。
def generate_ad_image(ad_topic): daliClient = OpenAI( api_key="<DALI_API_KEY>" ) image_prompt = f''' Generate a photorealistic image of an ad campaign for selling {ad_topic}. The image should be clean, with the item being sold in the foreground with an easily identifiable landmark of the city in the background. The image should also try to depict the weather of the location for the time of the year mentioned. The image should not have any generated text overlay. ''' response = daliClient.images.generate( model="dall-e-3", prompt= image_prompt, size="1024x1024", quality="standard", n=1, ) return response.data[0].url<DALI_API_KEY>を OpenAI API キーに置き換えます。次の関数を追加して、すべての要素を完全な HTML アドバタイズに結合します。
def render_html_page(ad_topic):

    # Find the matching shoes from the inventory
    results = vector_search(ad_topic, 4)

    ad_header = generate_ad_title(ad_topic)
    ad_image_url = generate_ad_image(ad_topic)


    with open('./data/ad-start.html', 'r', encoding='utf-8') as html_file:
        html_content = html_file.read()

    html_content += f'''<header>
            <h1>{ad_header}</h1>
        </header>'''

    html_content += f'''
            <section class="ad">
            <img src="{ad_image_url}" alt="Base Ad Image" class="ad-image">
        </section>'''

    for result in results:
        html_content += f'''
        <section class="product">
            <img src="{result['document']['img_url']}" alt="{result['document']['name']}" class="product-image">
            <div class="product-details">
                <h3 class="product-title" color="gray">{result['document']['name']}</h2>
                <p class="product-price">{"$"+str(result['document']['price'])}</p>
                <p class="product-description">{result['document']['description']}</p>
                <a href="{result['document']['purchase_url']}" class="buy-now-button">Buy Now</a>
            </div>
        </section>
        '''

    html_content += '''</article>
                    </body>
                    </html>'''

    return html_content
この関数は、ベクター検索を実行して一致する製品を検索し、GPT-4 を使用して広告タイトルを生成し、DALL-E 3 を使用して広告画像を生成し、すべてを製品の一覧と共に HTML ページに結合します。
対話型インターフェイスを構築する
ユーザーが広告の件名を入力し、結果の広告を動的に生成して表示できるようにする対話型の Web インターフェイスを作成します。
次のコードを追加して、Web インターフェイスを作成します。
import gradio as gr

css = """
    button { background-color: purple; color: red; }
    <style>
    </style>
"""

with gr.Blocks(css=css, theme=gr.themes.Default(spacing_size=gr.themes.sizes.spacing_sm, radius_size="none")) as demo:
    subject = gr.Textbox(placeholder="Ad Keywords", label="Prompt for Heelie!!")
    btn = gr.Button("Generate Ad")
    output_html = gr.HTML(label="Generated Ad HTML")

    btn.click(render_html_page, [subject], output_html)

    btn = gr.Button("Copy HTML")

if __name__ == "__main__":
    demo.launch()
Python ファイル (たとえば、
ad_generator.py) を保存します。ターミナルからアプリケーションを実行します。
python ad_generator.pyWeb ブラウザーを開き、ターミナルに表示されている URL (通常は
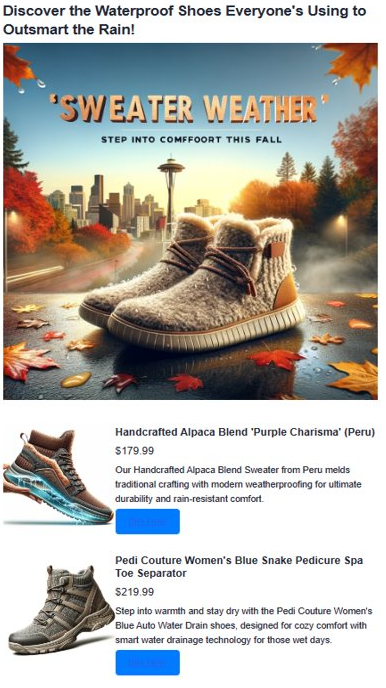
http://localhost:7860) に移動します。広告キーワードを入力し、[ 広告の生成 ] を選択して、AI によって生成された広告を表示します。
生成された広告を観察します。 生成された広告は、ベクター検索結果と AI によって生成されたコンテンツを組み合わせて、説得力のあるパーソナライズされた広告を作成します。 アプリはいくつかの項目を作成します。 まず、AI を使用してキャッチーなタグラインを作成します。 次に、DALL-E 3 で現実的な広告画像を作成します。 また、ベクトル検索を使用して、対象に一致する製品も検索します。 最後に、画像、説明、および購入するためのリンクを含む完全な製品の詳細が表示されます。
リソースをクリーンアップする
このチュートリアル専用のリソースを作成し、不要になった場合は、料金が発生しないように削除してください。
Azure Portal で Azure DocumentDB リソースに移動し、 データ エクスプローラーを選択し、
AdgenDatabaseを右クリックして、[データベースの削除] を選択して、Azure DocumentDB データベースを削除します。(省略可能)Azure Portal で Azure OpenAI リソースに移動し、 モデル デプロイを選択し、GPT-4 デプロイと text-embedding-ada-002 デプロイをこのチュートリアルでのみ作成した場合は削除します。
(省略可能)このチュートリアル用に専用のリソース グループを作成した場合は、リソース グループ全体を削除して、関連付けられているすべてのリソースを削除します。