重要
この記事では、Shared Access Signature (対称キー認証とも呼ばれます) を使用してデバイスを接続する手順について説明します。 この認証方法はテストと評価には便利ですが、X.509 証明書を使用してデバイスを認証する方が安全なアプローチです。 詳細については、 接続セキュリティ > IoT ソリューションのセキュリティのベスト プラクティスに関するページを参照してください。
このチュートリアルでは、クライアント アプリケーションを Azure IoT Central アプリケーションに接続する方法を説明します。 このアプリケーションは、温度コントローラー デバイスの動作をシミュレートします。 このアプリケーションは、IoT Central に接続するときに、温度コントローラー デバイス モデルのモデル ID を送信します。 IoT Central は、このモデル ID を使用してデバイス モデルを取得し、自動的にデバイス テンプレートを作成します。 デバイス テンプレートにビューを追加して、オペレーターがデバイスと対話できるようにします。
このチュートリアルでは、以下の内容を学習します。
- デバイス コードを作成して実行し、それが IoT Central アプリケーションに接続されることを確認する。
- デバイスから送信されるシミュレートされたテレメトリを表示する。
- カスタム ビューをデバイス テンプレートに追加する。
- デバイス テンプレートを発行する。
- ビューを使用してデバイス プロパティを管理する。
- コマンドを呼び出してデバイスを制御する。

重要
この記事では、Shared Access Signature (対称キー認証とも呼ばれます) を使用してデバイスを接続する手順について説明します。 この認証方法はテストと評価には便利ですが、X.509 証明書を使用してデバイスを認証する方が安全なアプローチです。 詳細については、 接続セキュリティ > IoT ソリューションのセキュリティのベスト プラクティスに関するページを参照してください。
前提条件
このチュートリアルを完了するには、以下が必要になります。
有効な Azure サブスクリプション Azure サブスクリプションをお持ちでない場合は、開始する前に 無料アカウント を作成してください。
カスタム アプリケーション テンプレートから作成された IoT Central アプリケーション。 詳細については、「IoT Central アプリケーションの作成」と「アプリケーションに関する情報を取得する方法」を参照してください。
このチュートリアルは Linux または Windows で実行できます。 このチュートリアルのシェル コマンドは、パス区切り記号を "/" とする Linux 規則に従っています。Windows 方式に従う場合は、必ずこれらの区切り記号を "\" に置き換えてください。
前提条件は、次のように、オペレーティング システムによって異なります。
Linux
このチュートリアルは、Ubuntu Linux を使用することを前提としています。 このチュートリアルの手順は、Ubuntu 18.04 を使用してテストされました。
このチュートリアルを Linux で完了するには、ご利用のローカルの Linux 環境に以下のソフトウェアをインストールする必要があります。
コマンドを使用して、GCC、Git、apt-get、および必要なすべての依存関係をインストールします。
sudo apt-get update
sudo apt-get install -y git cmake build-essential curl libcurl4-openssl-dev libssl-dev uuid-dev
cmake のバージョンが 2.8.12 以上であり、GCC のバージョンが 4.4.7 以上であることを確認します。
cmake --version
gcc --version
ウィンドウズ
Windows でこのチュートリアルを完了するには、ご利用のローカル Windows 環境に次のソフトウェアをインストールします。
- Visual Studio (Community、Professional、または Enterprise)。Visual Studio をインストールするときに、 [C++ によるデスクトップ開発] ワークロードを必ず含めてください。
- Git.
- CMake。
コードのダウンロード
このチュートリアルでは、Azure IoT Hub Device C SDK をクローンしてビルドするために使用できる開発環境を準備します。
任意のディレクトリでコマンド プロンプトを開きます。 次のコマンドを実行して、Azure IoT C SDK およびライブラリの GitHub リポジトリをこの場所にクローンします。
git clone https://github.com/Azure/azure-iot-sdk-c.git
cd azure-iot-sdk-c
git submodule update --init
この操作が完了するまで数分かかることが予想されます。
コードの確認
先ほどダウンロードした Microsoft Azure IoT SDK for C のコピーにある azure-iot-sdk-c/iothub_client/samples/pnp/pnp_temperature_controller/pnp_temperature_controller.c および azure-iot-sdk-c/iothub_client/samples/pnp/pnp_temperature_controller/pnp_thermostat_component.c ファイルをテキスト エディターで開きます。
このサンプルでは、複数コンポーネントの Temperature Controller デジタル ツイン定義言語モデルを実装しています。
このサンプルを実行して IoT Central に接続すると、Device Provisioning Service (DPS) を使用してデバイスが登録され、接続文字列が生成されます。 このサンプルでは、必要な DPS 接続情報がコマンドライン環境から取得されます。
pnp_temperature_controller.c では、main 関数はまず CreateDeviceClientAndAllocateComponents を呼び出して、以下のことを実行します。
-
dtmi:com:example:Thermostat;1モデル ID を設定します。 IoT Central では、モデル ID を使用して、このデバイスのデバイス テンプレートを識別または生成します。 詳しくは、「デバイスをデバイス テンプレートに割り当てる」をご覧ください。 - DPS を使用してデバイスをプロビジョニング、登録します。
- デバイス クライアント ハンドルを作成し、IoT Central アプリケーションに接続します。
- 温度コントローラー コンポーネント内のコマンドのハンドラーを作成します。
- 温度コントローラー コンポーネント内のプロパティ更新のハンドラーを作成します。
- 2 つのサーモスタット コンポーネントを作成します。
main 関数は、以下のことを実行します。
- すべてのコンポーネントの初期プロパティ値をレポートします。
- すべてのコンポーネントからテレメトリを送信するループを開始します。
その後、main 関数は、スレッドを開始してテレメトリを定期的に送信します。
int main(void)
{
    IOTHUB_DEVICE_CLIENT_LL_HANDLE deviceClient = NULL;

    g_pnpDeviceConfiguration.modelId = g_temperatureControllerModelId;
    g_pnpDeviceConfiguration.enableTracing = g_hubClientTraceEnabled;

    // First determine the IoT Hub / credentials / device to use.
    if (GetConnectionSettingsFromEnvironment(&g_pnpDeviceConfiguration) == false)
    {
        LogError("Cannot read required environment variable(s)");
    }
    // Creates the thermostat subcomponents defined by this model.  Since everything
    // is simulated, this setup stage just creates simulated objects in memory.
    else if (AllocateThermostatComponents() == false)
    {
        LogError("Failure allocating thermostat components");
    }
    // Create a handle to device client handle.  Note that this call may block
    // for extended periods of time when using DPS.
    else if ((deviceClient = CreateAndConfigureDeviceClientHandleForPnP()) == NULL)
    {
        LogError("Failure creating IoT Hub device client");
        PnP_ThermostatComponent_Destroy(g_thermostatHandle1);
        PnP_ThermostatComponent_Destroy(g_thermostatHandle2);
    }
    else
    {
        LogInfo("Successfully created device client.  Hit Control-C to exit program\n");

        int numberOfIterations = 0;

        // During startup, send what DTDLv2 calls "read-only properties" to indicate initial device state.
        PnP_TempControlComponent_ReportSerialNumber_Property(deviceClient);
        PnP_DeviceInfoComponent_Report_All_Properties(g_deviceInfoComponentName, deviceClient);
        PnP_TempControlComponent_Report_MaxTempSinceLastReboot_Property(g_thermostatHandle1, deviceClient);
        PnP_TempControlComponent_Report_MaxTempSinceLastReboot_Property(g_thermostatHandle2, deviceClient);

        while (true)
        {
            // Wake up periodically to poll.  Even if we do not plan on sending telemetry, we still need to poll periodically in order to process
            // incoming requests from the server and to do connection keep alives.
            if ((numberOfIterations % g_sendTelemetryPollInterval) == 0)
            {
                PnP_TempControlComponent_SendWorkingSet(deviceClient);
                PnP_ThermostatComponent_SendCurrentTemperature(g_thermostatHandle1, deviceClient);
                PnP_ThermostatComponent_SendCurrentTemperature(g_thermostatHandle2, deviceClient);
            }

            IoTHubDeviceClient_LL_DoWork(deviceClient);
            ThreadAPI_Sleep(g_sleepBetweenPollsMs);
            numberOfIterations++;
        }

        // The remainder of the code is used for cleaning up our allocated resources. It won't be executed in this
        // sample (because the loop above is infinite and is only broken out of by Control-C of the program), but
        // it is included for reference.

        // Free the memory allocated to track simulated thermostat.
        PnP_ThermostatComponent_Destroy(g_thermostatHandle1);
        PnP_ThermostatComponent_Destroy(g_thermostatHandle2);

        // Clean up the IoT Hub SDK handle.
        IoTHubDeviceClient_LL_Destroy(deviceClient);
        // Free all IoT Hub subsystem.
        IoTHub_Deinit();
    }

    return 0;
}
pnp_thermostat_component.c の PnP_ThermostatComponent_SendCurrentTemperature 関数は、デバイスがコンポーネントから IoT Central に温度テレメトリを送信する方法を示しています。
void PnP_ThermostatComponent_SendCurrentTemperature(PNP_THERMOSTAT_COMPONENT_HANDLE pnpThermostatComponentHandle, IOTHUB_DEVICE_CLIENT_LL_HANDLE deviceClient)
{
    PNP_THERMOSTAT_COMPONENT* pnpThermostatComponent = (PNP_THERMOSTAT_COMPONENT*)pnpThermostatComponentHandle;
    IOTHUB_MESSAGE_HANDLE messageHandle = NULL;
    IOTHUB_MESSAGE_RESULT messageResult;
    IOTHUB_CLIENT_RESULT iothubClientResult;

    char temperatureStringBuffer[CURRENT_TEMPERATURE_BUFFER_SIZE];

    // Create the telemetry message body to send.
    if (snprintf(temperatureStringBuffer, sizeof(temperatureStringBuffer), g_temperatureTelemetryBodyFormat, pnpThermostatComponent->currentTemperature) < 0)
    {
        LogError("snprintf of current temperature telemetry failed");
    }
    // Create the message handle and specify its metadata.
    else if ((messageHandle = IoTHubMessage_CreateFromString(temperatureStringBuffer)) == NULL)
    {
        LogError("IoTHubMessage_PnP_CreateFromString failed");
    }
    else if ((messageResult = IoTHubMessage_SetContentTypeSystemProperty(messageHandle, g_jsonContentType)) != IOTHUB_MESSAGE_OK)
    {
        LogError("IoTHubMessage_SetContentTypeSystemProperty failed, error=%d", messageResult);
    }
    else if ((messageResult = IoTHubMessage_SetContentEncodingSystemProperty(messageHandle, g_utf8EncodingType)) != IOTHUB_MESSAGE_OK)
    {
        LogError("IoTHubMessage_SetContentEncodingSystemProperty failed, error=%d", messageResult);
    }
    else if ((messageResult = IoTHubMessage_SetComponentName(messageHandle, pnpThermostatComponent->componentName)) != IOTHUB_MESSAGE_OK)
    {
        LogError("IoTHubMessage_SetContentEncodingSystemProperty failed, error=%d", messageResult);
    }
    // Send the telemetry message.
    else if ((iothubClientResult = IoTHubDeviceClient_LL_SendTelemetryAsync(deviceClient, messageHandle, NULL, NULL)) != IOTHUB_CLIENT_OK)
    {
        LogError("Unable to send telemetry message, error=%d", iothubClientResult);
    }

    IoTHubMessage_Destroy(messageHandle);
}
pnp_thermostat_component.c の PnP_TempControlComponent_Report_MaxTempSinceLastReboot_Property 関数は、コンポーネントから IoT Central に maxTempSinceLastReboot プロパティの更新を送信します。
void PnP_TempControlComponent_Report_MaxTempSinceLastReboot_Property(PNP_THERMOSTAT_COMPONENT_HANDLE pnpThermostatComponentHandle, IOTHUB_DEVICE_CLIENT_LL_HANDLE deviceClient)
{
    PNP_THERMOSTAT_COMPONENT* pnpThermostatComponent = (PNP_THERMOSTAT_COMPONENT*)pnpThermostatComponentHandle;
    char maximumTemperatureAsString[MAX_TEMPERATURE_SINCE_REBOOT_BUFFER_SIZE];
    IOTHUB_CLIENT_RESULT iothubClientResult;

    if (snprintf(maximumTemperatureAsString, sizeof(maximumTemperatureAsString), g_maxTempSinceLastRebootPropertyFormat, pnpThermostatComponent->maxTemperature) < 0)
    {
        LogError("Unable to create max temp since last reboot string for reporting result");
    }
    else
    {
        IOTHUB_CLIENT_PROPERTY_REPORTED maxTempProperty;
        maxTempProperty.structVersion = IOTHUB_CLIENT_PROPERTY_REPORTED_STRUCT_VERSION_1;
        maxTempProperty.name = g_maxTempSinceLastRebootPropertyName;
        maxTempProperty.value =  maximumTemperatureAsString;

        unsigned char* propertySerialized = NULL;
        size_t propertySerializedLength;

        // The first step of reporting properties is to serialize IOTHUB_CLIENT_PROPERTY_WRITABLE_RESPONSE into JSON for sending.
        if ((iothubClientResult = IoTHubClient_Properties_Serializer_CreateReported(&maxTempProperty, 1, pnpThermostatComponent->componentName, &propertySerialized, &propertySerializedLength)) != IOTHUB_CLIENT_OK)
        {
            LogError("Unable to serialize reported state, error=%d", iothubClientResult);
        }
        // The output of IoTHubClient_Properties_Serializer_CreateReported is sent to IoTHubDeviceClient_LL_SendPropertiesAsync to perform network I/O.
        else if ((iothubClientResult = IoTHubDeviceClient_LL_SendPropertiesAsync(deviceClient, propertySerialized, propertySerializedLength,  NULL, NULL)) != IOTHUB_CLIENT_OK)
        {
            LogError("Unable to send reported state, error=%d", iothubClientResult);
        }
        else
        {
            LogInfo("Sending %s property to IoTHub for component %s", g_maxTempSinceLastRebootPropertyName, pnpThermostatComponent->componentName);
        }
        IoTHubClient_Properties_Serializer_Destroy(propertySerialized);
    }
}
pnp_thermostat_component.c の PnP_ThermostatComponent_ProcessPropertyUpdate 関数は、IoT Central から受け取った書き込み可能なプロパティの更新を処理します。
void PnP_ThermostatComponent_ProcessPropertyUpdate(PNP_THERMOSTAT_COMPONENT_HANDLE pnpThermostatComponentHandle, IOTHUB_DEVICE_CLIENT_LL_HANDLE deviceClient, const char* propertyName, const char* propertyValue, int version)
{
    PNP_THERMOSTAT_COMPONENT* pnpThermostatComponent = (PNP_THERMOSTAT_COMPONENT*)pnpThermostatComponentHandle;

    if (strcmp(propertyName, g_targetTemperaturePropertyName) != 0)
    {
        LogError("Property %s was requested to be changed but is not part of the thermostat interface definition", propertyName);
    }
    else
    {
        char* next;
        double targetTemperature = strtod(propertyValue, &next);
        if ((propertyValue == next) || (targetTemperature == HUGE_VAL) || (targetTemperature == (-1*HUGE_VAL)))
        {
            LogError("Property %s is not a valid number", propertyValue);
            SendTargetTemperatureResponse(pnpThermostatComponent, deviceClient, propertyValue, PNP_STATUS_BAD_FORMAT, version, g_temperaturePropertyResponseDescriptionNotInt);
        }
        else
        {
            LogInfo("Received targetTemperature %f for component %s", targetTemperature, pnpThermostatComponent->componentName);

            bool maxTempUpdated = false;
            UpdateTemperatureAndStatistics(pnpThermostatComponent, targetTemperature, &maxTempUpdated);

            // The device needs to let the service know that it has received the targetTemperature desired property.
            SendTargetTemperatureResponse(pnpThermostatComponent, deviceClient, propertyValue, PNP_STATUS_SUCCESS, version, NULL);

            if (maxTempUpdated)
            {
                // If the maximum temperature has been updated, we also report this as a property.
                PnP_TempControlComponent_Report_MaxTempSinceLastReboot_Property(pnpThermostatComponent, deviceClient);
            }
        }
    }
}
pnp_thermostat_component.c の PnP_ThermostatComponent_ProcessCommand 関数は、IoT Central から呼び出されたコマンドを処理します。
void PnP_ThermostatComponent_ProcessCommand(PNP_THERMOSTAT_COMPONENT_HANDLE pnpThermostatComponentHandle, const char *pnpCommandName, JSON_Value* commandJsonValue, IOTHUB_CLIENT_COMMAND_RESPONSE* commandResponse)
{
    PNP_THERMOSTAT_COMPONENT* pnpThermostatComponent = (PNP_THERMOSTAT_COMPONENT*)pnpThermostatComponentHandle;
    const char* sinceStr;

    if (strcmp(pnpCommandName, g_getMaxMinReportCommandName) != 0)
    {
        LogError("Command %s is not supported on thermostat component", pnpCommandName);
        commandResponse->statusCode = PNP_STATUS_NOT_FOUND;
    }
    // See caveats section in ../readme.md; we don't actually respect this sinceStr to keep the sample simple,
    // but want to demonstrate how to parse out in any case.
    else if ((sinceStr = json_value_get_string(commandJsonValue)) == NULL)
    {
        LogError("Cannot retrieve JSON string for command");
        commandResponse->statusCode = PNP_STATUS_BAD_FORMAT;
    }
    else if (BuildMaxMinCommandResponse(pnpThermostatComponent, commandResponse) == false)
    {
        LogError("Unable to build response for component %s", pnpThermostatComponent->componentName);
        commandResponse->statusCode = PNP_STATUS_INTERNAL_ERROR;
    }
    else
    {
        LogInfo("Returning success from command request for component %s", pnpThermostatComponent->componentName);
        commandResponse->statusCode = PNP_STATUS_SUCCESS;
    }
}
コードのビルド
デバイス SDK を使用して、含まれているサンプル コードをビルドします。
デバイス SDK のルート フォルダーに cmake サブディレクトリを作成し、そのフォルダーに移動します。
cd azure-iot-sdk-c
mkdir cmake
cd cmake
次のコマンドを実行して、SDK とサンプルをビルドします。
cmake -Duse_prov_client=ON -Dhsm_type_symm_key=ON -Drun_e2e_tests=OFF ..
cmake --build .
接続情報の取得
後でこのチュートリアルの中でサンプル デバイス アプリケーションを実行するときに、次の構成値が必要になります。
- ID スコープ: IoT Central アプリケーションで、[アクセス許可] > [デバイス接続のグループ] に移動します。 ID スコープの値を書き留めておきます。
- グループ プライマリ キー: IoT Central アプリケーションで、[アクセス許可] > [デバイス接続のグループ] > [SAS-IoT-Devices] に移動します。 Shared Access Signature の [プライマリ キー] 値を書き留めておきます。
Azure Cloud Shell を使用して、取得したグループ プライマリ キーからデバイス キーを生成します。
az extension add --name azure-iot
az iot central device compute-device-key --device-id sample-device-01 --pk <the group primary key value>
生成されたデバイス キーを書き留めておきます。このキーは、後でこのチュートリアルの中で使用します。
注
このサンプルを実行するには、デバイスを IoT Central アプリケーションに事前に登録する必要はありません。 このサンプルでは、IoT Central 機能を使用して、初めて接続するときにデバイスを自動的に登録します。
コードの実行
サンプル アプリケーションを実行するには、コマンドライン環境を開いて、azure-iot-sdk-c\cmake フォルダーに移動します。
サンプルを構成するための環境変数を設定します。 以下のスニペットは、Windows コマンド プロンプトから環境変数を設定する方法を示したものです。
bash シェルを使用する場合は、set コマンドを export コマンドに置き換えてください。
set IOTHUB_DEVICE_SECURITY_TYPE=DPS
set IOTHUB_DEVICE_DPS_ID_SCOPE=<The ID scope you made a note of previously>
set IOTHUB_DEVICE_DPS_DEVICE_ID=sample-device-01
set IOTHUB_DEVICE_DPS_DEVICE_KEY=<The generated device key you made a note of previously>
set IOTHUB_DEVICE_DPS_ENDPOINT=global.azure-devices-provisioning.net
サンプルを実行するには
# Bash
cd iothub_client/samples/pnp/pnp_temperature_controller/
./pnp_temperature_controller
REM Windows
cd iothub_client\samples\pnp\pnp_temperature_controller\Debug
.\pnp_temperature_controller.exe
次の出力は、デバイスが IoT Central に登録して接続するようすを示しています。 サンプルからテレメトリが送信され始めます。
Info: Initiating DPS client to retrieve IoT Hub connection information
-> 09:43:27 CONNECT | VER: 4 | KEEPALIVE: 0 | FLAGS: 194 | USERNAME: 0ne0026656D/registrations/sample-device-01/api-version=2019-03-31&ClientVersion=1.6.0 | PWD: XXXX | CLEAN: 1
<- 09:43:28 CONNACK | SESSION_PRESENT: false | RETURN_CODE: 0x0
-> 09:43:29 SUBSCRIBE | PACKET_ID: 1 | TOPIC_NAME: $dps/registrations/res/# | QOS: 1
<- 09:43:30 SUBACK | PACKET_ID: 1 | RETURN_CODE: 1
-> 09:43:30 PUBLISH | IS_DUP: false | RETAIN: 0 | QOS: DELIVER_AT_MOST_ONCE | TOPIC_NAME: $dps/registrations/PUT/iotdps-register/?$rid=1 | PAYLOAD_LEN: 102
<- 09:43:31 PUBLISH | IS_DUP: false | RETAIN: 0 | QOS: DELIVER_AT_LEAST_ONCE | TOPIC_NAME: $dps/registrations/res/202/?$rid=1&retry-after=3 | PACKET_ID: 2 | PAYLOAD_LEN: 94
-> 09:43:31 PUBACK | PACKET_ID: 2
-> 09:43:33 PUBLISH | IS_DUP: false | RETAIN: 0 | QOS: DELIVER_AT_MOST_ONCE | TOPIC_NAME: $dps/registrations/GET/iotdps-get-operationstatus/?$rid=2&operationId=4.2f792ade0a5c3e68.baf0e879-d88a-4153-afef-71aff51fd847 | PAYLOAD_LEN: 102
<- 09:43:34 PUBLISH | IS_DUP: false | RETAIN: 0 | QOS: DELIVER_AT_LEAST_ONCE | TOPIC_NAME: $dps/registrations/res/202/?$rid=2&retry-after=3 | PACKET_ID: 2 | PAYLOAD_LEN: 173
-> 09:43:34 PUBACK | PACKET_ID: 2
-> 09:43:36 PUBLISH | IS_DUP: false | RETAIN: 0 | QOS: DELIVER_AT_MOST_ONCE | TOPIC_NAME: $dps/registrations/GET/iotdps-get-operationstatus/?$rid=3&operationId=4.2f792ade0a5c3e68.baf0e879-d88a-4153-afef-71aff51fd847 | PAYLOAD_LEN: 102
<- 09:43:37 PUBLISH | IS_DUP: false | RETAIN: 0 | QOS: DELIVER_AT_LEAST_ONCE | TOPIC_NAME: $dps/registrations/res/200/?$rid=3 | PACKET_ID: 2 | PAYLOAD_LEN: 478
-> 09:43:37 PUBACK | PACKET_ID: 2
Info: Provisioning callback indicates success.  iothubUri=iotc-60a....azure-devices.net, deviceId=sample-device-01
-> 09:43:37 DISCONNECT
Info: DPS successfully registered.  Continuing on to creation of IoTHub device client handle.
Info: Successfully created device client.  Hit Control-C to exit program

Info: Sending serialNumber property to IoTHub
Info: Sending device information property to IoTHub.  propertyName=swVersion, propertyValue="1.0.0.0"
Info: Sending device information property to IoTHub.  propertyName=manufacturer, propertyValue="Sample-Manufacturer"
Info: Sending device information property to IoTHub.  propertyName=model, propertyValue="sample-Model-123"
Info: Sending device information property to IoTHub.  propertyName=osName, propertyValue="sample-OperatingSystem-name"
Info: Sending device information property to IoTHub.  propertyName=processorArchitecture, propertyValue="Contoso-Arch-64bit"
Info: Sending device information property to IoTHub.  propertyName=processorManufacturer, propertyValue="Processor Manufacturer(TM)"
Info: Sending device information property to IoTHub.  propertyName=totalStorage, propertyValue=10000
Info: Sending device information property to IoTHub.  propertyName=totalMemory, propertyValue=200
Info: Sending maximumTemperatureSinceLastReboot property to IoTHub for component=thermostat1
Info: Sending maximumTemperatureSinceLastReboot property to IoTHub for component=thermostat2
-> 09:43:44 CONNECT | VER: 4 | KEEPALIVE: 240 | FLAGS: 192 | USERNAME: iotc-60a576a2-eec7-48e2-9306-9e7089a79995.azure-devices.net/sample-device-01/?api-version=2020-09-30&DeviceClientType=iothubclient%2f1.6.0%20(native%3b%20Linux%3b%20x86_64)&model-id=dtmi%3acom%3aexample%3aTemperatureController%3b1 | PWD: XXXX | CLEAN: 0
<- 09:43:44 CONNACK | SESSION_PRESENT: false | RETURN_CODE: 0x0
-> 09:43:44 SUBSCRIBE | PACKET_ID: 2 | TOPIC_NAME: $iothub/twin/res/# | QOS: 0 | TOPIC_NAME: $iothub/methods/POST/# | QOS: 0
-> 09:43:44 PUBLISH | IS_DUP: false | RETAIN: 0 | QOS: DELIVER_AT_LEAST_ONCE | TOPIC_NAME: devices/sample-device-01/messages/events/ | PACKET_ID: 3 | PAYLOAD_LEN: 19
-> 09:43:44 PUBLISH | IS_DUP: false | RETAIN: 0 | QOS: DELIVER_AT_LEAST_ONCE | TOPIC_NAME: devices/sample-device-01/messages/events/%24.sub=thermostat1 | PACKET_ID: 4 | PAYLOAD_LEN: 21
-> 09:43:44 PUBLISH | IS_DUP: false | RETAIN: 0 | QOS: DELIVER_AT_LEAST_ONCE | TOPIC_NAME: devices/sample-device-01/messages/events/%24.sub=thermostat2 | PACKET_ID: 5 | PAYLOAD_LEN: 21
Azure IoT Central アプリケーションのオペレーターとして、次のことを実行できます。
2 つのサーモスタット コンポーネントによって送信されたテレメトリを [概要] ページで確認します。

[About](情報) ページでデバイスのプロパティを確認します。 このページには、デバイス情報コンポーネントと 2 つのサーモスタット コンポーネントからのプロパティが表示されます。


デバイス テンプレートをカスタマイズする
温度コントローラー デバイスの接続時に IoT Central によって自動的に作成されたデバイス テンプレートは、ソリューション開発者がカスタマイズできます。
デバイスに関連付けられている顧客名を格納するためのクラウド プロパティを追加するには、次の手順に従います。
IoT Central アプリケーションで、 [デバイス テンプレート] ページの Temperature Controller デバイス テンプレートに移動します。
[温度コントローラー] モデルで、[+機能の追加] を選択します。
[表示名] に "カスタム名" を入力し、[機能の種類] で[クラウド プロパティ] を選択し、エントリを展開して、[スキーマ] で [文字列] を選択します。 次に、 [保存] を選択します。
[Get Max-Min report](最大-最小レポートの取得) コマンドが IoT Central アプリケーションでどのように表示されるかをカスタマイズするには:
[デバイス テンプレート] ページで Temperature Controller デバイス テンプレートに移動します。
getMaxMinReport (thermostat1) の場合は、Get Max-Min report. を Get thermostat1 status report に置き換えます。
getMaxMinReport (thermostat2) の場合は、Get Max-Min report. を Get thermostat2 status report に置き換えます。
[保存] を選択します。
[Target Temperature](目標温度) 書き込み可能プロパティが IoT Central アプリケーションにどのように表示されるかをカスタマイズするには:
[デバイス テンプレート] ページで Temperature Controller デバイス テンプレートに移動します。
targetTemperature (thermostat1) と表示する場合は、 [Target Temperature](目標温度) を [Target Temperature (1)](目標温度 (1)) で置き換えます。
targetTemperature (thermostat2) と表示する場合は、 [Target Temperature](目標温度) を [Target Temperature (2)](目標温度 (2)) で置き換えます。
[保存] を選択します。
Temperature Controller モデルのサーモスタット コンポーネントには [Target Temperature](目標温度) という書き込み可能プロパティが、デバイス テンプレートには [Customer Name](顧客名) というクラウド プロパティがあります。 オペレーターがこれらのプロパティを編集する際に使用できるビューを作成します。
[ビュー] を選択し、 [デバイスとクラウドのデータの編集] タイルを選択します。
フォーム名として「Properties」を入力します。
[Target Temperature (1)](目標温度 (1))、[Target Temperature (2)](目標温度 (2))、および [Customer Name](顧客名) の各プロパティを選択します。 次に、 [セクションの追加] を選択します。
変更を保存します。

デバイス テンプレートを公開する
これまでに加えたカスタマイズをオペレーターが見て使用できるようにするためには、デバイス テンプレートを発行する必要があります。
Thermostat デバイス テンプレートから [発行] を選択します。 [このデバイス テンプレートのアプリケーションへの発行] パネルで、 [発行] を選択します。
これでオペレーターは、 [プロパティ] ビューを使用してプロパティ値を更新したり、デバイスのコマンド ページで [Get thermostat1 status report](thermostat1 状態レポートの取得) や [Get thermostat2 status report](thermostat2 状態レポートの取得) というコマンドを呼び出したりできるようになりました。
書き込み可能なプロパティの値を [プロパティ] ページで更新します。

[コマンド] ページからコマンドを呼び出します。 状態レポート コマンドを実行する場合は、実行する前に、 [以降] パラメーターに対して日付と時刻を選択します。


コマンドとプロパティの更新に対してデバイスがどのように応答するかを確認できます。
<- 09:49:03 PUBLISH | IS_DUP: false | RETAIN: 0 | QOS: DELIVER_AT_MOST_ONCE | TOPIC_NAME: $iothub/methods/POST/thermostat1*getMaxMinReport/?$rid=1 | PAYLOAD_LEN: 26
Info: Received PnP command for component=thermostat1, command=getMaxMinReport
Info: Returning success from command request for component=thermostat1
-> 09:49:03 PUBLISH | IS_DUP: false | RETAIN: 0 | QOS: DELIVER_AT_MOST_ONCE | TOPIC_NAME: $iothub/methods/res/200/?$rid=1 | PAYLOAD_LEN: 117

...

<- 09:50:04 PUBLISH | IS_DUP: false | RETAIN: 0 | QOS: DELIVER_AT_MOST_ONCE | TOPIC_NAME: $iothub/twin/PATCH/properties/desired/?$version=2 | PAYLOAD_LEN: 63
Info: Received targetTemperature=67.000000 for component=thermostat2
Info: Sending acknowledgement of property to IoTHub for component=thermostat2
重要
この記事では、Shared Access Signature (対称キー認証とも呼ばれます) を使用してデバイスを接続する手順について説明します。 この認証方法はテストと評価には便利ですが、X.509 証明書を使用してデバイスを認証する方が安全なアプローチです。 詳細については、 接続セキュリティ > IoT ソリューションのセキュリティのベスト プラクティスに関するページを参照してください。
前提条件
この記事の手順を完了するには、次のリソースが必要です。
有効な Azure サブスクリプション Azure サブスクリプションをお持ちでない場合は、開始する前に 無料アカウント を作成してください。
カスタム アプリケーション テンプレートから作成された IoT Central アプリケーション。 詳細については、「IoT Central アプリケーションの作成」と「アプリケーションに関する情報を取得する方法」を参照してください。
Visual Studio (Community、Professional、Enterprise のいずれか) がインストールされている開発マシン。
サンプル コードが格納された Microsoft Azure IoT SDK for C# (.NET) GitHub リポジトリのローカル コピー。 このリンク (ZIP のダウンロード) を使用してリポジトリのコピーをダウンロードしてください。 次に、ローカル コンピューター上の適切な場所にファイルを解凍します。
コードの確認
先ほどダウンロードした Microsoft Azure IoT SDK for C# リポジトリのコピーにある azure-iot-sdk-csharp-main\azureiot.sln ソリューション ファイルを Visual Studio で開きます。 ソリューション エクスプローラーで、PnpDeviceSamples > TemperatureController フォルダーを展開し、Program.cs および TemperatureControllerSample.cs ファイルを開いて、このサンプルのコードを表示します。
このサンプルでは、複数コンポーネントの Temperature Controller デジタル ツイン定義言語モデルを実装しています。
このサンプルを実行して IoT Central に接続すると、Device Provisioning Service (DPS) を使用してデバイスが登録され、接続文字列が生成されます。 このサンプルでは、必要な DPS 接続情報がその環境から取得されます。
Program.cs の Main メソッドは、SetupDeviceClientAsync を呼び出して次のことを行います。
- DPS でデバイスをプロビジョニングする際に、モデル ID
dtmi:com:example:TemperatureController;2を使用します。 IoT Central では、モデル ID を使用して、このデバイスのデバイス テンプレートを識別または生成します。 詳しくは、「デバイスをデバイス テンプレートに割り当てる」をご覧ください。 - IoT Central に接続するための DeviceClient インスタンスを作成します。
private static async Task<DeviceClient> SetupDeviceClientAsync(Parameters parameters, CancellationToken cancellationToken)
{
  DeviceClient deviceClient;
  switch (parameters.DeviceSecurityType.ToLowerInvariant())
  {
    case "dps":
      DeviceRegistrationResult dpsRegistrationResult = await ProvisionDeviceAsync(parameters, cancellationToken);
      var authMethod = new DeviceAuthenticationWithRegistrySymmetricKey(dpsRegistrationResult.DeviceId, parameters.DeviceSymmetricKey);
      deviceClient = InitializeDeviceClient(dpsRegistrationResult.AssignedHub, authMethod);
      break;

    case "connectionstring":
      // ...

    default:
      // ...
  }
  return deviceClient;
}
その後、main メソッドは、TemperatureControllerSample インスタンスを作成し、IoT Central との対話を処理する PerformOperationsAsync メソッドを呼び出します。
TemperatureControllerSample.cs の PerformOperationsAsync メソッドは:
- 既定のコンポーネントに対して reboot コマンドのハンドラーを設定します。
- 2 つのサーモスタット コンポーネントに対して getMaxMinReport コマンドのハンドラーを設定します。
- 2 つのサーモスタット コンポーネントに対して、目標温度プロパティの更新を受け取るハンドラーを設定します。
- 初期デバイス情報プロパティの更新を送信します。
- 2 つのサーモスタット コンポーネントから温度テレメトリを定期的に送信します。
- 既定のコンポーネントからワーキング セット テレメトリを定期的に送信します。
- 2 つのサーモスタット コンポーネントで新たな最高温度に達するたび、前回の再起動以降の最高温度を送信します。
public async Task PerformOperationsAsync(CancellationToken cancellationToken)
{
  await _deviceClient.SetMethodHandlerAsync("reboot", HandleRebootCommandAsync, _deviceClient, cancellationToken);

  // For a component-level command, the command name is in the format "<component-name>*<command-name>".
  await _deviceClient.SetMethodHandlerAsync("thermostat1*getMaxMinReport", HandleMaxMinReportCommand, Thermostat1, cancellationToken);
  await _deviceClient.SetMethodHandlerAsync("thermostat2*getMaxMinReport", HandleMaxMinReportCommand, Thermostat2, cancellationToken);

  await _deviceClient.SetDesiredPropertyUpdateCallbackAsync(SetDesiredPropertyUpdateCallback, null, cancellationToken);
  _desiredPropertyUpdateCallbacks.Add(Thermostat1, TargetTemperatureUpdateCallbackAsync);
  _desiredPropertyUpdateCallbacks.Add(Thermostat2, TargetTemperatureUpdateCallbackAsync);

  await UpdateDeviceInformationAsync(cancellationToken);
  await SendDeviceSerialNumberAsync(cancellationToken);

  bool temperatureReset = true;
  _maxTemp[Thermostat1] = 0d;
  _maxTemp[Thermostat2] = 0d;

  while (!cancellationToken.IsCancellationRequested)
  {
    if (temperatureReset)
    {
      // Generate a random value between 5.0°C and 45.0°C for the current temperature reading for each "Thermostat" component.
      _temperature[Thermostat1] = Math.Round(s_random.NextDouble() * 40.0 + 5.0, 1);
      _temperature[Thermostat2] = Math.Round(s_random.NextDouble() * 40.0 + 5.0, 1);
    }

    await SendTemperatureAsync(Thermostat1, cancellationToken);
    await SendTemperatureAsync(Thermostat2, cancellationToken);
    await SendDeviceMemoryAsync(cancellationToken);

    temperatureReset = _temperature[Thermostat1] == 0 && _temperature[Thermostat2] == 0;
    await Task.Delay(5 * 1000);
  }
}
SendTemperatureAsync メソッドは、デバイスがコンポーネントから IoT Central に温度テレメトリを送信する方法を示しています。
SendTemperatureTelemetryAsync メソッドは、PnpConvention クラスを使用してメッセージを作成します。
private async Task SendTemperatureAsync(string componentName, CancellationToken cancellationToken)
{
  await SendTemperatureTelemetryAsync(componentName, cancellationToken);

  double maxTemp = _temperatureReadingsDateTimeOffset[componentName].Values.Max<double>();
  if (maxTemp > _maxTemp[componentName])
  {
    _maxTemp[componentName] = maxTemp;
    await UpdateMaxTemperatureSinceLastRebootAsync(componentName, cancellationToken);
  }
}

private async Task SendTemperatureTelemetryAsync(string componentName, CancellationToken cancellationToken)
{
  const string telemetryName = "temperature";
  double currentTemperature = _temperature[componentName];
  using Message msg = PnpConvention.CreateMessage(telemetryName, currentTemperature, componentName);

  await _deviceClient.SendEventAsync(msg, cancellationToken);

  if (_temperatureReadingsDateTimeOffset.ContainsKey(componentName))
  {
    _temperatureReadingsDateTimeOffset[componentName].TryAdd(DateTimeOffset.UtcNow, currentTemperature);
  }
  else
  {
    _temperatureReadingsDateTimeOffset.TryAdd(
      componentName,
      new Dictionary<DateTimeOffset, double>
      {
        { DateTimeOffset.UtcNow, currentTemperature },
      });
  }
}
UpdateMaxTemperatureSinceLastRebootAsync メソッドは、maxTempSinceLastReboot プロパティの更新を IoT Central に送信します。 このメソッドは、PnpConvention クラスを使用して修正プログラムを作成します。
private async Task UpdateMaxTemperatureSinceLastRebootAsync(string componentName, CancellationToken cancellationToken)
{
  const string propertyName = "maxTempSinceLastReboot";
  double maxTemp = _maxTemp[componentName];
  TwinCollection reportedProperties = PnpConvention.CreateComponentPropertyPatch(componentName, propertyName, maxTemp);

  await _deviceClient.UpdateReportedPropertiesAsync(reportedProperties, cancellationToken);
}
TargetTemperatureUpdateCallbackAsync メソッドは、IoT Central から受け取った書き込み可能な目標温度プロパティの更新を処理します。 このメソッドは、PnpConvention クラスを使用してプロパティの更新メッセージを読み取り、応答を作成します。
private async Task TargetTemperatureUpdateCallbackAsync(TwinCollection desiredProperties, object userContext)
{
  const string propertyName = "targetTemperature";
  string componentName = (string)userContext;

  bool targetTempUpdateReceived = PnpConvention.TryGetPropertyFromTwin(
    desiredProperties,
    propertyName,
    out double targetTemperature,
    componentName);
  if (!targetTempUpdateReceived)
  {
      return;
  }

  TwinCollection pendingReportedProperty = PnpConvention.CreateComponentWritablePropertyResponse(
      componentName,
      propertyName,
      targetTemperature,
      (int)StatusCode.InProgress,
      desiredProperties.Version);

  await _deviceClient.UpdateReportedPropertiesAsync(pendingReportedProperty);

  // Update Temperature in 2 steps
  double step = (targetTemperature - _temperature[componentName]) / 2d;
  for (int i = 1; i <= 2; i++)
  {
      _temperature[componentName] = Math.Round(_temperature[componentName] + step, 1);
      await Task.Delay(6 * 1000);
  }

  TwinCollection completedReportedProperty = PnpConvention.CreateComponentWritablePropertyResponse(
      componentName,
      propertyName,
      _temperature[componentName],
      (int)StatusCode.Completed,
      desiredProperties.Version,
      "Successfully updated target temperature");

  await _deviceClient.UpdateReportedPropertiesAsync(completedReportedProperty);
}
HandleMaxMinReportCommand メソッドは、IoT Central から呼び出されたコンポーネントに対するコマンドを処理します。
private Task<MethodResponse> HandleMaxMinReportCommand(MethodRequest request, object userContext)
{
    try
    {
        string componentName = (string)userContext;
        DateTime sinceInUtc = JsonConvert.DeserializeObject<DateTime>(request.DataAsJson);
        var sinceInDateTimeOffset = new DateTimeOffset(sinceInUtc);

        if (_temperatureReadingsDateTimeOffset.ContainsKey(componentName))
        {

            Dictionary<DateTimeOffset, double> allReadings = _temperatureReadingsDateTimeOffset[componentName];
            Dictionary<DateTimeOffset, double> filteredReadings = allReadings.Where(i => i.Key > sinceInDateTimeOffset)
                .ToDictionary(i => i.Key, i => i.Value);

            if (filteredReadings != null && filteredReadings.Any())
            {
                var report = new
                {
                    maxTemp = filteredReadings.Values.Max<double>(),
                    minTemp = filteredReadings.Values.Min<double>(),
                    avgTemp = filteredReadings.Values.Average(),
                    startTime = filteredReadings.Keys.Min(),
                    endTime = filteredReadings.Keys.Max(),
                };

                byte[] responsePayload = Encoding.UTF8.GetBytes(JsonConvert.SerializeObject(report));
                return Task.FromResult(new MethodResponse(responsePayload, (int)StatusCode.Completed));
            }

            return Task.FromResult(new MethodResponse((int)StatusCode.NotFound));
        }

        return Task.FromResult(new MethodResponse((int)StatusCode.NotFound));
    }
    catch (JsonReaderException ex)
    {
        // ...
    }
}
接続情報の取得
後でこのチュートリアルの中でサンプル デバイス アプリケーションを実行するときに、次の構成値が必要になります。
- ID スコープ: IoT Central アプリケーションで、[アクセス許可] > [デバイス接続のグループ] に移動します。 ID スコープの値を書き留めておきます。
- グループ プライマリ キー: IoT Central アプリケーションで、[アクセス許可] > [デバイス接続のグループ] > [SAS-IoT-Devices] に移動します。 Shared Access Signature の [プライマリ キー] 値を書き留めておきます。
Azure Cloud Shell を使用して、取得したグループ プライマリ キーからデバイス キーを生成します。
az extension add --name azure-iot
az iot central device compute-device-key --device-id sample-device-01 --pk <the group primary key value>
生成されたデバイス キーを書き留めておきます。このキーは、後でこのチュートリアルの中で使用します。
注
このサンプルを実行するには、デバイスを IoT Central アプリケーションに事前に登録する必要はありません。 このサンプルでは、IoT Central 機能を使用して、初めて接続するときにデバイスを自動的に登録します。
コードの実行
注
コードを実行する前に、スタートアップ プロジェクトとして TemperatureController を設定します。
Visual Studio でサンプル アプリケーションを実行するには:
ソリューション エクスプローラーで、PnpDeviceSamples > TemperatureController プロジェクトファイルを選択します。
[プロジェクト] > [TemperatureController のプロパティ] > [デバッグ] の順に移動します。 プロジェクトに次の環境変数を追加します。
名前 値 IOTHUB_DEVICE_SECURITY_TYPE DPS IOTHUB_DEVICE_DPS_ENDPOINT global.azure-devices-provisioning.net IOTHUB_DEVICE_DPS_ID_SCOPE あらかじめ書き留めておいた ID スコープ値。 IOTHUB_DEVICE_DPS_DEVICE_ID sample-device-01 IOTHUB_DEVICE_DPS_DEVICE_KEY あらかじめ書き留めておいた、生成されたデバイス キーの値。
これで、Visual Studio からサンプルを実行およびデバッグできるようになりました。
次の出力は、デバイスが IoT Central に登録して接続するようすを示しています。 サンプルからテレメトリが送信され始めます。
[03/31/2021 14:43:17]info: Microsoft.Azure.Devices.Client.Samples.TemperatureControllerSample[0]
      Press Control+C to quit the sample.
[03/31/2021 14:43:17]dbug: Microsoft.Azure.Devices.Client.Samples.TemperatureControllerSample[0]
      Set up the device client.
[03/31/2021 14:43:18]dbug: Microsoft.Azure.Devices.Client.Samples.TemperatureControllerSample[0]
      Initializing via DPS
[03/31/2021 14:43:27]dbug: Microsoft.Azure.Devices.Client.Samples.TemperatureControllerSample[0]
      Set handler for 'reboot' command.
[03/31/2021 14:43:27]dbug: Microsoft.Azure.Devices.Client.Samples.TemperatureControllerSample[0]
      Connection status change registered - status=Connected, reason=Connection_Ok.
[03/31/2021 14:43:28]dbug: Microsoft.Azure.Devices.Client.Samples.TemperatureControllerSample[0]
      Set handler for "getMaxMinReport" command.
[03/31/2021 14:43:28]dbug: Microsoft.Azure.Devices.Client.Samples.TemperatureControllerSample[0]
      Set handler to receive 'targetTemperature' updates.
[03/31/2021 14:43:28]dbug: Microsoft.Azure.Devices.Client.Samples.TemperatureControllerSample[0]
      Property: Update - component = 'deviceInformation', properties update is complete.
[03/31/2021 14:43:28]dbug: Microsoft.Azure.Devices.Client.Samples.TemperatureControllerSample[0]
      Property: Update - { "serialNumber": "SR-123456" } is complete.
[03/31/2021 14:43:29]dbug: Microsoft.Azure.Devices.Client.Samples.TemperatureControllerSample[0]
      Telemetry: Sent - component="thermostat1", { "temperature": 34.2 } in °C.
[03/31/2021 14:43:29]dbug: Microsoft.Azure.Devices.Client.Samples.TemperatureControllerSample[0]
      Property: Update - component="thermostat1", { "maxTempSinceLastReboot": 34.2 } in °C is complete.
[03/31/2021 14:43:29]dbug: Microsoft.Azure.Devices.Client.Samples.TemperatureControllerSample[0]
      Telemetry: Sent - component="thermostat2", { "temperature": 25.1 } in °C.
[03/31/2021 14:43:29]dbug: Microsoft.Azure.Devices.Client.Samples.TemperatureControllerSample[0]
      Property: Update - component="thermostat2", { "maxTempSinceLastReboot": 25.1 } in °C is complete.
[03/31/2021 14:43:29]dbug: Microsoft.Azure.Devices.Client.Samples.TemperatureControllerSample[0]
      Telemetry: Sent - {"workingSet":31412} in KB.
Azure IoT Central アプリケーションのオペレーターとして、次のことを実行できます。
2 つのサーモスタット コンポーネントによって送信されたテレメトリを [概要] ページで確認します。
[About](情報) ページでデバイスのプロパティを確認します。 このページには、デバイス情報コンポーネントと 2 つのサーモスタット コンポーネントからのプロパティが表示されます。
デバイス テンプレートをカスタマイズする
温度コントローラー デバイスの接続時に IoT Central によって自動的に作成されたデバイス テンプレートは、ソリューション開発者がカスタマイズできます。
デバイスに関連付けられている顧客名を格納するためのクラウド プロパティを追加するには、次の手順に従います。
IoT Central アプリケーションで、 [デバイス テンプレート] ページの Temperature Controller デバイス テンプレートに移動します。
[温度コントローラー] モデルで、[+機能の追加] を選択します。
[表示名] に "カスタム名" を入力し、[機能の種類] で[クラウド プロパティ] を選択し、エントリを展開して、[スキーマ] で [文字列] を選択します。 次に、 [保存] を選択します。
[Get Max-Min report](最大-最小レポートの取得) コマンドが IoT Central アプリケーションでどのように表示されるかをカスタマイズするには:
[デバイス テンプレート] ページで Temperature Controller デバイス テンプレートに移動します。
getMaxMinReport (thermostat1) の場合は、Get Max-Min report. を Get thermostat1 status report に置き換えます。
getMaxMinReport (thermostat2) の場合は、Get Max-Min report. を Get thermostat2 status report に置き換えます。
[保存] を選択します。
[Target Temperature](目標温度) 書き込み可能プロパティが IoT Central アプリケーションにどのように表示されるかをカスタマイズするには:
[デバイス テンプレート] ページで Temperature Controller デバイス テンプレートに移動します。
targetTemperature (thermostat1) と表示する場合は、 [Target Temperature](目標温度) を [Target Temperature (1)](目標温度 (1)) で置き換えます。
targetTemperature (thermostat2) と表示する場合は、 [Target Temperature](目標温度) を [Target Temperature (2)](目標温度 (2)) で置き換えます。
[保存] を選択します。
Temperature Controller モデルのサーモスタット コンポーネントには [Target Temperature](目標温度) という書き込み可能プロパティが、デバイス テンプレートには [Customer Name](顧客名) というクラウド プロパティがあります。 オペレーターがこれらのプロパティを編集する際に使用できるビューを作成します。
[ビュー] を選択し、 [デバイスとクラウドのデータの編集] タイルを選択します。
フォーム名として「Properties」を入力します。
[Target Temperature (1)](目標温度 (1))、[Target Temperature (2)](目標温度 (2))、および [Customer Name](顧客名) の各プロパティを選択します。 次に、 [セクションの追加] を選択します。
変更を保存します。
デバイス テンプレートを公開する
これまでに加えたカスタマイズをオペレーターが見て使用できるようにするためには、デバイス テンプレートを発行する必要があります。
Thermostat デバイス テンプレートから [発行] を選択します。 [このデバイス テンプレートのアプリケーションへの発行] パネルで、 [発行] を選択します。
これでオペレーターは、 [プロパティ] ビューを使用してプロパティ値を更新したり、デバイスのコマンド ページで [Get thermostat1 status report](thermostat1 状態レポートの取得) や [Get thermostat2 status report](thermostat2 状態レポートの取得) というコマンドを呼び出したりできるようになりました。
書き込み可能なプロパティの値を [プロパティ] ページで更新します。
[コマンド] ページからコマンドを呼び出します。 状態レポート コマンドを実行する場合は、実行する前に、 [以降] パラメーターに対して日付と時刻を選択します。
コマンドとプロパティの更新に対してデバイスがどのように応答するかを確認できます。
[03/31/2021 14:47:00]dbug: Microsoft.Azure.Devices.Client.Samples.TemperatureControllerSample[0]
      Command: Received - component="thermostat2", generating max, min and avg temperature report since 31/03/2021 06:00:00.
[03/31/2021 14:47:00]dbug: Microsoft.Azure.Devices.Client.Samples.TemperatureControllerSample[0]
      Command: component="thermostat2", MaxMinReport since 31/03/2021 06:00:00: maxTemp=36.4, minTemp=36.4, avgTemp=36.4, startTime=31/03/2021 14:46:33, endTime=31/03/2021 14:46:55

...

[03/31/2021 14:46:36]dbug: Microsoft.Azure.Devices.Client.Samples.TemperatureControllerSample[0]
      Property: Received - component="thermostat1", { "targetTemperature": 67°C }.
[03/31/2021 14:46:36]dbug: Microsoft.Azure.Devices.Client.Samples.TemperatureControllerSample[0]
      Property: Update - component="thermostat1", {"targetTemperature": 67 } in °C is InProgress.
[03/31/2021 14:46:49]dbug: Microsoft.Azure.Devices.Client.Samples.TemperatureControllerSample[0]
      Property: Update - component="thermostat1", {"targetTemperature": 67 } in °C is Completed
[03/31/2021 14:46:49]dbug: Microsoft.Azure.Devices.Client.Samples.TemperatureControllerSample[0]
      Telemetry: Sent - component="thermostat1", { "temperature": 67 } in °C.
重要
この記事では、Shared Access Signature (対称キー認証とも呼ばれます) を使用してデバイスを接続する手順について説明します。 この認証方法はテストと評価には便利ですが、X.509 証明書を使用してデバイスを認証する方が安全なアプローチです。 詳細については、 接続セキュリティ > IoT ソリューションのセキュリティのベスト プラクティスに関するページを参照してください。
前提条件
この記事の手順を完了するには、次のリソースが必要です。
有効な Azure サブスクリプション Azure サブスクリプションをお持ちでない場合は、開始する前に 無料アカウント を作成してください。
カスタム アプリケーション テンプレートから作成された IoT Central アプリケーション。 詳細については、「IoT Central アプリケーションの作成」と「アプリケーションに関する情報を取得する方法」を参照してください。
Node.js バージョン 6 以降がインストールされた開発用マシン。 バージョンを確認するには、コマンド ラインで
node --versionを実行できます。 このチュートリアルの手順は、Windows コマンド プロンプトから node コマンドを実行することを前提としています。 ただし、他の多くのオペレーティング システムで Node.js を使用できます。サンプル コードが格納された Microsoft Azure IoT SDK for Node.js GitHub リポジトリのローカル コピー。 このリンク (ZIP のダウンロード) を使用してリポジトリのコピーをダウンロードしてください。 次に、ローカル コンピューター上の適切な場所にファイルを解凍します。
コードの確認
先ほどダウンロードした Microsoft Azure IoT SDK for Node.js のコピーにある azure-iot-sdk-node/device/samples/javascript/pnp_temperature_controller.js ファイルをテキスト エディターで開きます。
このサンプルでは、複数コンポーネントの Temperature Controller デジタル ツイン定義言語モデルを実装しています。
このサンプルを実行して IoT Central に接続すると、Device Provisioning Service (DPS) を使用してデバイスが登録され、接続文字列が生成されます。 このサンプルでは、必要な DPS 接続情報がコマンドライン環境から取得されます。
main メソッド:
-
clientオブジェクトを作成し、接続が開かれる前にdtmi:com:example:TemperatureController;2モデル ID を設定します。 IoT Central では、モデル ID を使用して、このデバイスのデバイス テンプレートを識別または生成します。 詳しくは、「デバイスをデバイス テンプレートに割り当てる」をご覧ください。 - 3 つのコマンドのコマンド ハンドラーを作成します。
- 各サーモスタット コンポーネントから 5 秒ごとに温度テレメトリを送信するループを開始します。
- 既定のコンポーネントから 6 秒ごとにワーキング セット サイズ テレメトリを送信するループを開始します。
- サーモスタット コンポーネントごとに
maxTempSinceLastRebootプロパティを送信します。 - デバイス情報プロパティを送信します。
- 3 つのコンポーネントの書き込み可能なプロパティ ハンドラーを作成します。
async function main() {
  // ...

  // fromConnectionString must specify a transport, coming from any transport package.
  const client = Client.fromConnectionString(deviceConnectionString, Protocol);
  console.log('Connecting using connection string: ' + deviceConnectionString);
  let resultTwin;

  try {
    // Add the modelId here
    await client.setOptions(modelIdObject);
    await client.open();
    console.log('Enabling the commands on the client');
    client.onDeviceMethod(commandNameGetMaxMinReport1, commandHandler);
    client.onDeviceMethod(commandNameGetMaxMinReport2, commandHandler);
    client.onDeviceMethod(commandNameReboot, commandHandler);

    // Send Telemetry after some interval
    let index1 = 0;
    let index2 = 0;
    let index3 = 0;
    intervalToken1 = setInterval(() => {
      const data = JSON.stringify(thermostat1.updateSensor().getCurrentTemperatureObject());
      sendTelemetry(client, data, index1, thermostat1ComponentName).catch((err) => console.log('error ', err.toString()));
      index1 += 1;
    }, 5000);

    intervalToken2 = setInterval(() => {
      const data = JSON.stringify(thermostat2.updateSensor().getCurrentTemperatureObject());
      sendTelemetry(client, data, index2, thermostat2ComponentName).catch((err) => console.log('error ', err.toString()));
      index2 += 1;
    }, 5500);


    intervalToken3 = setInterval(() => {
      const data = JSON.stringify({ workingset: 1 + (Math.random() * 90) });
      sendTelemetry(client, data, index3, null).catch((err) => console.log('error ', err.toString()));
      index3 += 1;
    }, 6000);

    // attach a standard input exit listener
    exitListener(client);

    try {
      resultTwin = await client.getTwin();
      // Only report readable properties
      const patchRoot = helperCreateReportedPropertiesPatch({ serialNumber: serialNumber }, null);
      const patchThermostat1Info = helperCreateReportedPropertiesPatch({
        maxTempSinceLastReboot: thermostat1.getMaxTemperatureValue(),
      }, thermostat1ComponentName);

      const patchThermostat2Info = helperCreateReportedPropertiesPatch({
        maxTempSinceLastReboot: thermostat2.getMaxTemperatureValue(),
      }, thermostat2ComponentName);

      const patchDeviceInfo = helperCreateReportedPropertiesPatch({
        manufacturer: 'Contoso Device Corporation',
        model: 'Contoso 47-turbo',
        swVersion: '10.89',
        osName: 'Contoso_OS',
        processorArchitecture: 'Contoso_x86',
        processorManufacturer: 'Contoso Industries',
        totalStorage: 65000,
        totalMemory: 640,
      }, deviceInfoComponentName);

      // the below things can only happen once the twin is there
      updateComponentReportedProperties(resultTwin, patchRoot, null);
      updateComponentReportedProperties(resultTwin, patchThermostat1Info, thermostat1ComponentName);
      updateComponentReportedProperties(resultTwin, patchThermostat2Info, thermostat2ComponentName);
      updateComponentReportedProperties(resultTwin, patchDeviceInfo, deviceInfoComponentName);
      desiredPropertyPatchListener(resultTwin, [thermostat1ComponentName, thermostat2ComponentName, deviceInfoComponentName]);
    } catch (err) {
      console.error('could not retrieve twin or report twin properties\n' + err.toString());
    }
  } catch (err) {
    console.error('could not connect Plug and Play client or could not attach interval function for telemetry\n' + err.toString());
  }
}
provisionDevice 関数は、このデバイスが DPS を使用して IoT Central に登録、接続する方法を示しています。 ペイロードには、デバイスをデバイス テンプレートに割り当てるために IoT Central が使うモデル ID が含まれています。
async function provisionDevice(payload) {
  var provSecurityClient = new SymmetricKeySecurityClient(registrationId, symmetricKey);
  var provisioningClient = ProvisioningDeviceClient.create(provisioningHost, idScope, new ProvProtocol(), provSecurityClient);

  if (payload) {
    provisioningClient.setProvisioningPayload(payload);
  }

  try {
    let result = await provisioningClient.register();
    deviceConnectionString = 'HostName=' + result.assignedHub + ';DeviceId=' + result.deviceId + ';SharedAccessKey=' + symmetricKey;
    console.log('registration succeeded');
    console.log('assigned hub=' + result.assignedHub);
    console.log('deviceId=' + result.deviceId);
    console.log('payload=' + JSON.stringify(result.payload));
  } catch (err) {
    console.error("error registering device: " + err.toString());
  }
}
sendTelemetry 関数は、温度テレメトリをデバイスから IoT Central に送信する方法を示しています。 コンポーネントからのテレメトリについては、$.sub というプロパティをコンポーネント名と共に追加します。
async function sendTelemetry(deviceClient, data, index, componentName) {
  if componentName) {
    console.log('Sending telemetry message %d from component: %s ', index, componentName);
  } else {
    console.log('Sending telemetry message %d from root interface', index);
  }
  const msg = new Message(data);
  if (componentName) {
    msg.properties.add(messageSubjectProperty, componentName);
  }
  msg.contentType = 'application/json';
  msg.contentEncoding = 'utf-8';
  await deviceClient.sendEvent(msg);
}
main メソッドは、helperCreateReportedPropertiesPatch というヘルパー メソッドを使用してプロパティ更新メッセージを作成します。 このメソッドは、プロパティを送信するコンポーネントを指定するための省略可能なパラメーターを受け取ります。
const helperCreateReportedPropertiesPatch = (propertiesToReport, componentName) => {
  let patch;
  if (!!(componentName)) {
    patch = { };
    propertiesToReport.__t = 'c';
    patch[componentName] = propertiesToReport;
  } else {
    patch = { };
    patch = propertiesToReport;
  }
  if (!!(componentName)) {
    console.log('The following properties will be updated for component: ' + componentName);
  } else {
    console.log('The following properties will be updated for root interface.');
  }
  console.log(patch);
  return patch;
};
main メソッドは、次のメソッドを使用して、IoT Central から受け取った書き込み可能なプロパティの更新を処理します。 このメソッドからの応答が、バージョンと状態コードを使用して構築されていることがわかります。
const desiredPropertyPatchListener = (deviceTwin, componentNames) => {
  deviceTwin.on('properties.desired', (delta) => {
    console.log('Received an update for device with value: ' + JSON.stringify(delta));
    Object.entries(delta).forEach(([key, values]) => {
      const version = delta.$version;
      if (!!(componentNames) && componentNames.includes(key)) { // then it is a component we are expecting
        const componentName = key;
        const patchForComponents = { [componentName]: {} };
        Object.entries(values).forEach(([propertyName, propertyValue]) => {
          if (propertyName !== '__t' && propertyName !== '$version') {
            console.log('Will update property: ' + propertyName + ' to value: ' + propertyValue + ' of component: ' + componentName);
            const propertyContent = { value: propertyValue };
            propertyContent.ac = 200;
            propertyContent.ad = 'Successfully executed patch';
            propertyContent.av = version;
            patchForComponents[componentName][propertyName] = propertyContent;
          }
        });
        updateComponentReportedProperties(deviceTwin, patchForComponents, componentName);
      }
      else if  (key !== '$version') { // individual property for root
        const patchForRoot = { };
        console.log('Will update property: ' + key + ' to value: ' + values + ' for root');
        const propertyContent = { value: values };
        propertyContent.ac = 200;
        propertyContent.ad = 'Successfully executed patch';
        propertyContent.av = version;
        patchForRoot[key] = propertyContent;
        updateComponentReportedProperties(deviceTwin, patchForRoot, null);
      }
    });
  });
};
main メソッドは、次のメソッドを使用して、IoT Central からのコマンドを処理します。
const commandHandler = async (request, response) => {
  helperLogCommandRequest(request);
  switch (request.methodName) {
  case commandNameGetMaxMinReport1: {
    await sendCommandResponse(request, response, 200, thermostat1.getMaxMinReportObject());
    break;
  }
  case commandNameGetMaxMinReport2: {
    await sendCommandResponse(request, response, 200, thermostat2.getMaxMinReportObject());
    break;
  }
  case commandNameReboot: {
    await sendCommandResponse(request, response, 200, 'reboot response');
    break;
  }
  default:
    await sendCommandResponse(request, response, 404, 'unknown method');
    break;
  }
};

const sendCommandResponse = async (request, response, status, payload) => {
  try {
    await response.send(status, payload);
    console.log('Response to method: ' + request.methodName + ' sent successfully.' );
  } catch (err) {
    console.error('An error occurred when sending a method response:\n' + err.toString());
  }
};
接続情報の取得
後でこのチュートリアルの中でサンプル デバイス アプリケーションを実行するときに、次の構成値が必要になります。
- ID スコープ: IoT Central アプリケーションで、[アクセス許可] > [デバイス接続のグループ] に移動します。 ID スコープの値を書き留めておきます。
- グループ プライマリ キー: IoT Central アプリケーションで、[アクセス許可] > [デバイス接続のグループ] > [SAS-IoT-Devices] に移動します。 Shared Access Signature の [プライマリ キー] 値を書き留めておきます。
Azure Cloud Shell を使用して、取得したグループ プライマリ キーからデバイス キーを生成します。
az extension add --name azure-iot
az iot central device compute-device-key --device-id sample-device-01 --pk <the group primary key value>
生成されたデバイス キーを書き留めておきます。このキーは、後でこのチュートリアルの中で使用します。
注
このサンプルを実行するには、デバイスを IoT Central アプリケーションに事前に登録する必要はありません。 このサンプルでは、IoT Central 機能を使用して、初めて接続するときにデバイスを自動的に登録します。
コードの実行
サンプル アプリケーションを実行するには、コマンド ライン環境を開き、pnp_temperature_controller.js サンプル ファイルがある azure-iot-sdk-node/device/samples/javascript フォルダーに移動します。
サンプルを構成するための環境変数を設定します。 以下のスニペットは、Windows コマンド プロンプトから環境変数を設定する方法を示したものです。
bash シェルを使用する場合は、set コマンドを export コマンドに置き換えてください。
set IOTHUB_DEVICE_SECURITY_TYPE=DPS
set IOTHUB_DEVICE_DPS_ID_SCOPE=<The ID scope you made a note of previously>
set IOTHUB_DEVICE_DPS_DEVICE_ID=sample-device-01
set IOTHUB_DEVICE_DPS_DEVICE_KEY=<The generated device key you made a note of previously>
set IOTHUB_DEVICE_DPS_ENDPOINT=global.azure-devices-provisioning.net
必要なパッケージをインストールします。
npm install
サンプルを実行します。
node pnp_temperature_controller.js
次の出力は、デバイスが IoT Central に登録して接続するようすを示しています。 その後、サンプルは、2 つのサーモスタット コンポーネントから maxTempSinceLastReboot プロパティを送信した後、テレメトリの送信を開始します。
registration succeeded
assigned hub=iotc-....azure-devices.net
deviceId=sample-device-01
payload=undefined
Connecting using connection string: HostName=iotc-....azure-devices.net;DeviceId=sample-device-01;SharedAccessKey=qdv...IpAo=
Enabling the commands on the client
Please enter q or Q to exit sample.
The following properties will be updated for root interface.
{ serialNumber: 'alwinexlepaho8329' }
The following properties will be updated for component: thermostat1
{ thermostat1: { maxTempSinceLastReboot: 1.5902294191855972, __t: 'c' } }
The following properties will be updated for component: thermostat2
{ thermostat2: { maxTempSinceLastReboot: 16.181771928614545, __t: 'c' } }
The following properties will be updated for component: deviceInformation
{ deviceInformation:
   { manufacturer: 'Contoso Device Corporation',
     model: 'Contoso 47-turbo',
     swVersion: '10.89',
     osName: 'Contoso_OS',
     processorArchitecture: 'Contoso_x86',
     processorManufacturer: 'Contoso Industries',
     totalStorage: 65000,
     totalMemory: 640,
     __t: 'c' } }
executed sample
Received an update for device with value: {"$version":1}
Properties have been reported for component: thermostat1
Properties have been reported for component: thermostat2
Properties have been reported for component: deviceInformation
Properties have been reported for root interface.
Sending telemetry message 0 from component: thermostat1
Sending telemetry message 0 from component: thermostat2
Sending telemetry message 0 from root interface
Azure IoT Central アプリケーションのオペレーターとして、次のことを実行できます。
2 つのサーモスタット コンポーネントによって送信されたテレメトリを [概要] ページで確認します。
[About](情報) ページでデバイスのプロパティを確認します。 このページには、デバイス情報コンポーネントと 2 つのサーモスタット コンポーネントからのプロパティが表示されます。
デバイス テンプレートをカスタマイズする
温度コントローラー デバイスの接続時に IoT Central によって自動的に作成されたデバイス テンプレートは、ソリューション開発者がカスタマイズできます。
デバイスに関連付けられている顧客名を格納するためのクラウド プロパティを追加するには、次の手順に従います。
IoT Central アプリケーションで、 [デバイス テンプレート] ページの Temperature Controller デバイス テンプレートに移動します。
[温度コントローラー] モデルで、[+機能の追加] を選択します。
[表示名] に "カスタム名" を入力し、[機能の種類] で[クラウド プロパティ] を選択し、エントリを展開して、[スキーマ] で [文字列] を選択します。 次に、 [保存] を選択します。
[Get Max-Min report](最大-最小レポートの取得) コマンドが IoT Central アプリケーションでどのように表示されるかをカスタマイズするには:
[デバイス テンプレート] ページで Temperature Controller デバイス テンプレートに移動します。
getMaxMinReport (thermostat1) の場合は、Get Max-Min report. を Get thermostat1 status report に置き換えます。
getMaxMinReport (thermostat2) の場合は、Get Max-Min report. を Get thermostat2 status report に置き換えます。
[保存] を選択します。
[Target Temperature](目標温度) 書き込み可能プロパティが IoT Central アプリケーションにどのように表示されるかをカスタマイズするには:
[デバイス テンプレート] ページで Temperature Controller デバイス テンプレートに移動します。
targetTemperature (thermostat1) と表示する場合は、 [Target Temperature](目標温度) を [Target Temperature (1)](目標温度 (1)) で置き換えます。
targetTemperature (thermostat2) と表示する場合は、 [Target Temperature](目標温度) を [Target Temperature (2)](目標温度 (2)) で置き換えます。
[保存] を選択します。
Temperature Controller モデルのサーモスタット コンポーネントには [Target Temperature](目標温度) という書き込み可能プロパティが、デバイス テンプレートには [Customer Name](顧客名) というクラウド プロパティがあります。 オペレーターがこれらのプロパティを編集する際に使用できるビューを作成します。
[ビュー] を選択し、 [デバイスとクラウドのデータの編集] タイルを選択します。
フォーム名として「Properties」を入力します。
[Target Temperature (1)](目標温度 (1))、[Target Temperature (2)](目標温度 (2))、および [Customer Name](顧客名) の各プロパティを選択します。 次に、 [セクションの追加] を選択します。
変更を保存します。
デバイス テンプレートを公開する
これまでに加えたカスタマイズをオペレーターが見て使用できるようにするためには、デバイス テンプレートを発行する必要があります。
Thermostat デバイス テンプレートから [発行] を選択します。 [このデバイス テンプレートのアプリケーションへの発行] パネルで、 [発行] を選択します。
これでオペレーターは、 [プロパティ] ビューを使用してプロパティ値を更新したり、デバイスのコマンド ページで [Get thermostat1 status report](thermostat1 状態レポートの取得) や [Get thermostat2 status report](thermostat2 状態レポートの取得) というコマンドを呼び出したりできるようになりました。
書き込み可能なプロパティの値を [プロパティ] ページで更新します。
[コマンド] ページからコマンドを呼び出します。 状態レポート コマンドを実行する場合は、実行する前に、 [以降] パラメーターに対して日付と時刻を選択します。
コマンドとプロパティの更新に対してデバイスがどのように応答するかを確認できます。
getMaxMinReport コマンドは thermostat2 コンポーネントに含まれており、reboot コマンドは既定のコンポーネントに含まれています。
targetTemperature 書き込み可能なプロパティが、thermostat2 コンポーネントに対してが設定されました。
Received command request for command name: thermostat2*getMaxMinReport
The command request payload is:
2021-03-26T06:00:00.000Z
Response to method: thermostat2*getMaxMinReport sent successfully.

...

Received command request for command name: reboot
The command request payload is:
10
Response to method: reboot sent successfully.

...

Received an update for device with value: {"thermostat2":{"targetTemperature":76,"__t":"c"},"$version":2}
Will update property: targetTemperature to value: 76 of component: thermostat2
Properties have been reported for component: thermostat2
重要
この記事では、Shared Access Signature (対称キー認証とも呼ばれます) を使用してデバイスを接続する手順について説明します。 この認証方法はテストと評価には便利ですが、X.509 証明書を使用してデバイスを認証する方が安全なアプローチです。 詳細については、 接続セキュリティ > IoT ソリューションのセキュリティのベスト プラクティスに関するページを参照してください。
前提条件
この記事の手順を完了するには、次のリソースが必要です。
有効な Azure サブスクリプション Azure サブスクリプションをお持ちでない場合は、開始する前に 無料アカウント を作成してください。
カスタム アプリケーション テンプレートから作成された IoT Central アプリケーション。 詳細については、「IoT Central アプリケーションの作成」と「アプリケーションに関する情報を取得する方法」を参照してください。
Python がインストールされた開発用マシン。 現在の Python バージョンの要件については、Azure IoT Python SDK を確認してください。 コマンドラインで
python --versionを実行して、お使いのバージョンを確認できます。 Python は、さまざまなオペレーティング システムで使用できます。 このチュートリアルの手順では、Windows コマンド プロンプトで python コマンドを実行していることを前提としています。サンプル コードが格納された Microsoft Azure IoT SDK for Python GitHub リポジトリのローカル コピー。 このリンク (ZIP のダウンロード) を使用してリポジトリのコピーをダウンロードしてください。 次に、ローカル コンピューター上の適切な場所にファイルを解凍します。
コードの確認
先ほどダウンロードした Microsoft Azure IoT SDK for Python のコピーにある azure-iot-sdk-python/samples/pnp/temp_controller_with_thermostats.py ファイルをテキスト エディターで開きます。
このサンプルでは、複数コンポーネントの Temperature Controller デジタル ツイン定義言語モデルを実装しています。
このサンプルを実行して IoT Central に接続すると、Device Provisioning Service (DPS) を使用してデバイスが登録され、接続文字列が生成されます。 このサンプルでは、必要な DPS 接続情報がコマンドライン環境から取得されます。
main 関数は、次のことを行います。
- DPS を使用してデバイスをプロビジョニングします。 プロビジョニング情報には、モデル ID が含まれます。 IoT Central では、モデル ID を使用して、このデバイスのデバイス テンプレートを識別または生成します。 詳しくは、「デバイスをデバイス テンプレートに割り当てる」をご覧ください。
-
Device_clientオブジェクトを作成し、接続が開かれる前にdtmi:com:example:TemperatureController;2モデル ID を設定します。 - 初期プロパティ値を IoT Central に送信します。 これは
pnp_helperを使用して修正プログラムを作成します。 -
getMaxMinReportおよびrebootコマンドのリスナーを作成します。 各サーモスタット コンポーネントには、独自のgetMaxMinReportコマンドがあります。 - 書き込み可能なプロパティの更新を検出するプロパティリスナーを作成します。
- 2 つのサーモスタット コンポーネントからは温度テレメトリを、既定のコンポーネントからはワーキング セット テレメトリを 8 秒ごとに送信するループを開始します。
async def main():
    switch = os.getenv("IOTHUB_DEVICE_SECURITY_TYPE")
    if switch == "DPS":
        provisioning_host = (
            os.getenv("IOTHUB_DEVICE_DPS_ENDPOINT")
            if os.getenv("IOTHUB_DEVICE_DPS_ENDPOINT")
            else "global.azure-devices-provisioning.net"
        )
        id_scope = os.getenv("IOTHUB_DEVICE_DPS_ID_SCOPE")
        registration_id = os.getenv("IOTHUB_DEVICE_DPS_DEVICE_ID")
        symmetric_key = os.getenv("IOTHUB_DEVICE_DPS_DEVICE_KEY")

        registration_result = await provision_device(
            provisioning_host, id_scope, registration_id, symmetric_key, model_id
        )

        if registration_result.status == "assigned":
            print("Device was assigned")
            print(registration_result.registration_state.assigned_hub)
            print(registration_result.registration_state.device_id)
            device_client = IoTHubDeviceClient.create_from_symmetric_key(
                symmetric_key=symmetric_key,
                hostname=registration_result.registration_state.assigned_hub,
                device_id=registration_result.registration_state.device_id,
                product_info=model_id,
            )
        else:
            raise RuntimeError(
                "Could not provision device. Aborting Plug and Play device connection."
            )

    elif switch == "connectionString":
        # ...

    # Connect the client.
    await device_client.connect()

    ################################################
    # Update readable properties from various components

    properties_root = pnp_helper.create_reported_properties(serialNumber=serial_number)
    properties_thermostat1 = pnp_helper.create_reported_properties(
        thermostat_1_component_name, maxTempSinceLastReboot=98.34
    )
    properties_thermostat2 = pnp_helper.create_reported_properties(
        thermostat_2_component_name, maxTempSinceLastReboot=48.92
    )
    properties_device_info = pnp_helper.create_reported_properties(
        device_information_component_name,
        swVersion="5.5",
        manufacturer="Contoso Device Corporation",
        model="Contoso 4762B-turbo",
        osName="Mac Os",
        processorArchitecture="x86-64",
        processorManufacturer="Intel",
        totalStorage=1024,
        totalMemory=32,
    )

    property_updates = asyncio.gather(
        device_client.patch_twin_reported_properties(properties_root),
        device_client.patch_twin_reported_properties(properties_thermostat1),
        device_client.patch_twin_reported_properties(properties_thermostat2),
        device_client.patch_twin_reported_properties(properties_device_info),
    )

    ################################################
    # Get all the listeners running
    print("Listening for command requests and property updates")

    global THERMOSTAT_1
    global THERMOSTAT_2
    THERMOSTAT_1 = Thermostat(thermostat_1_component_name, 10)
    THERMOSTAT_2 = Thermostat(thermostat_2_component_name, 10)

    listeners = asyncio.gather(
        execute_command_listener(
            device_client, method_name="reboot", user_command_handler=reboot_handler
        ),
        execute_command_listener(
            device_client,
            thermostat_1_component_name,
            method_name="getMaxMinReport",
            user_command_handler=max_min_handler,
            create_user_response_handler=create_max_min_report_response,
        ),
        execute_command_listener(
            device_client,
            thermostat_2_component_name,
            method_name="getMaxMinReport",
            user_command_handler=max_min_handler,
            create_user_response_handler=create_max_min_report_response,
        ),
        execute_property_listener(device_client),
    )

    ################################################
    # Function to send telemetry every 8 seconds

    async def send_telemetry():
        print("Sending telemetry from various components")

        while True:
            curr_temp_ext = random.randrange(10, 50)
            THERMOSTAT_1.record(curr_temp_ext)

            temperature_msg1 = {"temperature": curr_temp_ext}
            await send_telemetry_from_temp_controller(
                device_client, temperature_msg1, thermostat_1_component_name
            )

            curr_temp_int = random.randrange(10, 50)  # Current temperature in Celsius
            THERMOSTAT_2.record(curr_temp_int)

            temperature_msg2 = {"temperature": curr_temp_int}

            await send_telemetry_from_temp_controller(
                device_client, temperature_msg2, thermostat_2_component_name
            )

            workingset_msg3 = {"workingSet": random.randrange(1, 100)}
            await send_telemetry_from_temp_controller(device_client, workingset_msg3)

    send_telemetry_task = asyncio.ensure_future(send_telemetry())

    # ...
provision_device 関数は、DPS を使用してデバイスをプロビジョニングし、IoT Central に登録します。 この関数により、デバイスのモデル ID (デバイスをデバイス テンプレートに割り当てるために IoT Central が使用) がプロビジョニング ペイロードに追加されます。
async def provision_device(provisioning_host, id_scope, registration_id, symmetric_key, model_id):
    provisioning_device_client = ProvisioningDeviceClient.create_from_symmetric_key(
        provisioning_host=provisioning_host,
        registration_id=registration_id,
        id_scope=id_scope,
        symmetric_key=symmetric_key,
    )

    provisioning_device_client.provisioning_payload = {"modelId": model_id}
    return await provisioning_device_client.register()
execute_command_listener 関数はコマンド要求を処理して、デバイスがサーモスタット コンポーネントの max_min_handler コマンドを受信したときに getMaxMinReport 関数を実行し、デバイスが reboot_handler コマンドを受信したときに reboot 関数を実行します。 これは、pnp_helper モジュールを使用して応答を作成します。
async def execute_command_listener(
    device_client,
    component_name=None,
    method_name=None,
    user_command_handler=None,
    create_user_response_handler=None,
):
    while True:
        if component_name and method_name:
            command_name = component_name + "*" + method_name
        elif method_name:
            command_name = method_name
        else:
            command_name = None

        command_request = await device_client.receive_method_request(command_name)
        print("Command request received with payload")
        values = command_request.payload
        print(values)

        if user_command_handler:
            await user_command_handler(values)
        else:
            print("No handler provided to execute")

        (response_status, response_payload) = pnp_helper.create_response_payload_with_status(
            command_request, method_name, create_user_response=create_user_response_handler
        )

        command_response = MethodResponse.create_from_method_request(
            command_request, response_status, response_payload
        )

        try:
            await device_client.send_method_response(command_response)
        except Exception:
            print("responding to the {command} command failed".format(command=method_name))
async def execute_property_listener は、サーモスタット コンポーネントの書き込み可能なプロパティ (targetTemperature など) の更新を処理し、JSON 応答を生成します。 これは、pnp_helper モジュールを使用して応答を作成します。
async def execute_property_listener(device_client):
    while True:
        patch = await device_client.receive_twin_desired_properties_patch()  # blocking call
        print(patch)
        properties_dict = pnp_helper.create_reported_properties_from_desired(patch)

        await device_client.patch_twin_reported_properties(properties_dict)
send_telemetry_from_temp_controller 関数は、サーモスタット コンポーネントから IoT Central にテレメトリ メッセージを送信します。 これは、pnp_helper モジュールを使用してメッセージを作成します。
async def send_telemetry_from_temp_controller(device_client, telemetry_msg, component_name=None):
    msg = pnp_helper.create_telemetry(telemetry_msg, component_name)
    await device_client.send_message(msg)
    print("Sent message")
    print(msg)
    await asyncio.sleep(5)
接続情報の取得
後でこのチュートリアルの中でサンプル デバイス アプリケーションを実行するときに、次の構成値が必要になります。
- ID スコープ: IoT Central アプリケーションで、[アクセス許可] > [デバイス接続のグループ] に移動します。 ID スコープの値を書き留めておきます。
- グループ プライマリ キー: IoT Central アプリケーションで、[アクセス許可] > [デバイス接続のグループ] > [SAS-IoT-Devices] に移動します。 Shared Access Signature の [プライマリ キー] 値を書き留めておきます。
Azure Cloud Shell を使用して、取得したグループ プライマリ キーからデバイス キーを生成します。
az extension add --name azure-iot
az iot central device compute-device-key --device-id sample-device-01 --pk <the group primary key value>
生成されたデバイス キーを書き留めておきます。このキーは、後でこのチュートリアルの中で使用します。
注
このサンプルを実行するには、デバイスを IoT Central アプリケーションに事前に登録する必要はありません。 このサンプルでは、IoT Central 機能を使用して、初めて接続するときにデバイスを自動的に登録します。
コードの実行
サンプル アプリケーションを実行するには、コマンドライン環境を開き、temp_controller_with_thermostats.py サンプル ファイルがある azure-iot-sdk-python-2/samples/pnp フォルダーに移動します。
サンプルを構成するための環境変数を設定します。 以下のスニペットは、Windows コマンド プロンプトから環境変数を設定する方法を示したものです。
bash シェルを使用する場合は、set コマンドを export コマンドに置き換えてください。
set IOTHUB_DEVICE_SECURITY_TYPE=DPS
set IOTHUB_DEVICE_DPS_ID_SCOPE=<The ID scope you made a note of previously>
set IOTHUB_DEVICE_DPS_DEVICE_ID=sample-device-01
set IOTHUB_DEVICE_DPS_DEVICE_KEY=<The generated device key you made a note of previously>
set IOTHUB_DEVICE_DPS_ENDPOINT=global.azure-devices-provisioning.net
必要なパッケージをインストールします。
pip install azure-iot-device
サンプルを実行します。
python temp_controller_with_thermostats.py
次の出力は、デバイスが IoT Central に登録して接続するようすを示しています。 サンプルは、2 つのサーモスタット コンポーネントから maxTempSinceLastReboot プロパティを送信した後、テレメトリの送信を開始します。
Device was assigned
iotc-60a.....azure-devices.net
sample-device-01
Updating pnp properties for root interface
{'serialNumber': 'alohomora'}
Updating pnp properties for thermostat1
{'thermostat1': {'maxTempSinceLastReboot': 98.34, '__t': 'c'}}
Updating pnp properties for thermostat2
{'thermostat2': {'maxTempSinceLastReboot': 48.92, '__t': 'c'}}
Updating pnp properties for deviceInformation
{'deviceInformation': {'swVersion': '5.5', 'manufacturer': 'Contoso Device Corporation', 'model': 'Contoso 4762B-turbo', 'osName': 'Mac Os', 'processorArchitecture': 'x86-64', 'processorManufacturer': 'Intel', 'totalStorage': 1024, 'totalMemory': 32, '__t': 'c'}}
Listening for command requests and property updates
Press Q to quit
Sending telemetry from various components
Sent message
{"temperature": 27}
Sent message
{"temperature": 17}
Sent message
{"workingSet": 13}
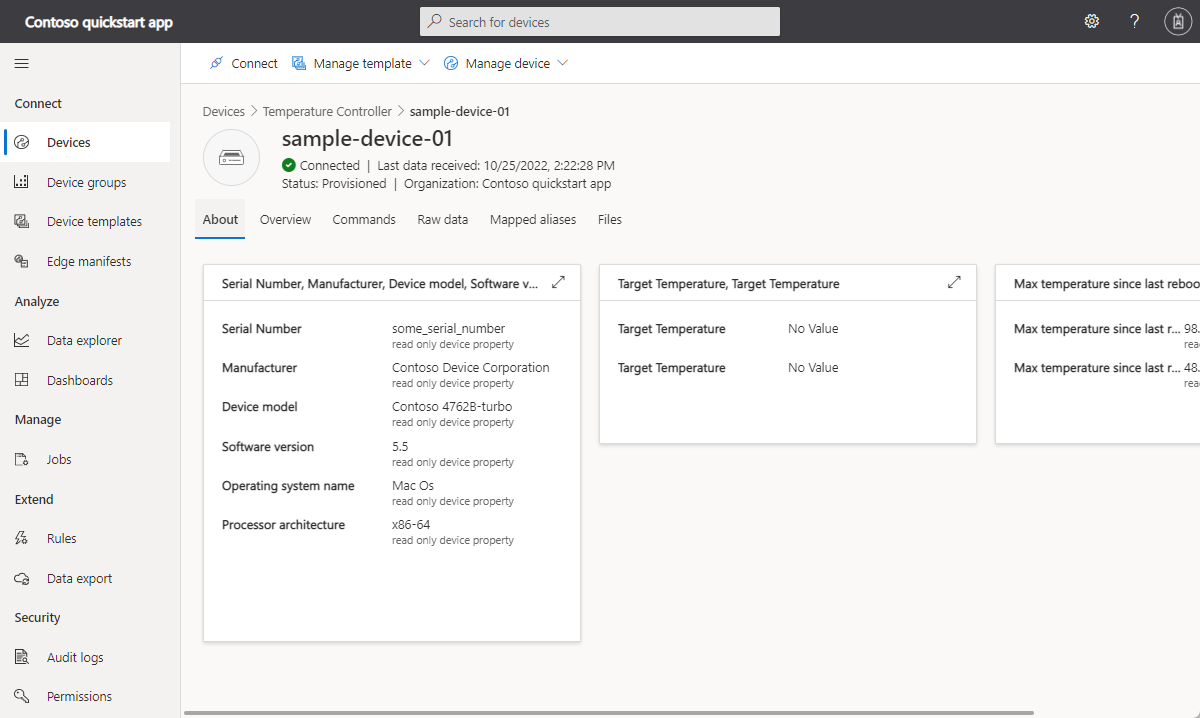
Azure IoT Central アプリケーションのオペレーターとして、次のことを実行できます。
2 つのサーモスタット コンポーネントによって送信されたテレメトリを [概要] ページで確認します。
[About](情報) ページでデバイスのプロパティを確認します。 このページには、デバイス情報コンポーネントと 2 つのサーモスタット コンポーネントからのプロパティが表示されます。
デバイス テンプレートをカスタマイズする
温度コントローラー デバイスの接続時に IoT Central によって自動的に作成されたデバイス テンプレートは、ソリューション開発者がカスタマイズできます。
デバイスに関連付けられている顧客名を格納するためのクラウド プロパティを追加するには、次の手順に従います。
IoT Central アプリケーションで、 [デバイス テンプレート] ページの Temperature Controller デバイス テンプレートに移動します。
[温度コントローラー] モデルで、[+機能の追加] を選択します。
[表示名] に "カスタム名" を入力し、[機能の種類] で[クラウド プロパティ] を選択し、エントリを展開して、[スキーマ] で [文字列] を選択します。 次に、 [保存] を選択します。
[Get Max-Min report](最大-最小レポートの取得) コマンドが IoT Central アプリケーションでどのように表示されるかをカスタマイズするには:
[デバイス テンプレート] ページで Temperature Controller デバイス テンプレートに移動します。
getMaxMinReport (thermostat1) の場合は、Get Max-Min report. を Get thermostat1 status report に置き換えます。
getMaxMinReport (thermostat2) の場合は、Get Max-Min report. を Get thermostat2 status report に置き換えます。
[保存] を選択します。
[Target Temperature](目標温度) 書き込み可能プロパティが IoT Central アプリケーションにどのように表示されるかをカスタマイズするには:
[デバイス テンプレート] ページで Temperature Controller デバイス テンプレートに移動します。
targetTemperature (thermostat1) と表示する場合は、 [Target Temperature](目標温度) を [Target Temperature (1)](目標温度 (1)) で置き換えます。
targetTemperature (thermostat2) と表示する場合は、 [Target Temperature](目標温度) を [Target Temperature (2)](目標温度 (2)) で置き換えます。
[保存] を選択します。
Temperature Controller モデルのサーモスタット コンポーネントには [Target Temperature](目標温度) という書き込み可能プロパティが、デバイス テンプレートには [Customer Name](顧客名) というクラウド プロパティがあります。 オペレーターがこれらのプロパティを編集する際に使用できるビューを作成します。
[ビュー] を選択し、 [デバイスとクラウドのデータの編集] タイルを選択します。
フォーム名として「Properties」を入力します。
[Target Temperature (1)](目標温度 (1))、[Target Temperature (2)](目標温度 (2))、および [Customer Name](顧客名) の各プロパティを選択します。 次に、 [セクションの追加] を選択します。
変更を保存します。
デバイス テンプレートを公開する
これまでに加えたカスタマイズをオペレーターが見て使用できるようにするためには、デバイス テンプレートを発行する必要があります。
Thermostat デバイス テンプレートから [発行] を選択します。 [このデバイス テンプレートのアプリケーションへの発行] パネルで、 [発行] を選択します。
これでオペレーターは、 [プロパティ] ビューを使用してプロパティ値を更新したり、デバイスのコマンド ページで [Get thermostat1 status report](thermostat1 状態レポートの取得) や [Get thermostat2 status report](thermostat2 状態レポートの取得) というコマンドを呼び出したりできるようになりました。
書き込み可能なプロパティの値を [プロパティ] ページで更新します。
[コマンド] ページからコマンドを呼び出します。 状態レポート コマンドを実行する場合は、実行する前に、 [以降] パラメーターに対して日付と時刻を選択します。
コマンドとプロパティの更新に対してデバイスがどのように応答するかを確認できます。
{'thermostat1': {'targetTemperature': 67, '__t': 'c'}, '$version': 2}
the data in the desired properties patch was: {'thermostat1': {'targetTemperature': 67, '__t': 'c'}, '$version': 2}
Values received are :-
{'targetTemperature': 67, '__t': 'c'}
Sent message

...

Command request received with payload
2021-03-31T05:00:00.000Z
Will return the max, min and average temperature from the specified time 2021-03-31T05:00:00.000Z to the current time
Done generating
{"avgTemp": 4.0, "endTime": "2021-03-31T12:29:48.322427", "maxTemp": 18, "minTemp": null, "startTime": "2021-03-31T12:28:28.322381"}
生データを表示する
[生データ] ビューを使用して、デバイスから IoT Central に送信されている生データを調べることができます。

このビューでは、表示する列を選択したり、確認対象の時間の範囲を設定したりできます。 [Unmodeled data](モデル化されていないデータ) 列には、デバイス テンプレート内のプロパティまたはテレメトリ定義と一致しないデバイス データが表示されます。
リソースをクリーンアップする
今後 IoT Central のクイックスタートやチュートリアルに取り組む予定がなければ、ここで使用した IoT Central アプリケーションは次の手順で削除してください。
- IoT Central アプリケーションで、[アプリケーション] > [管理]に移動します。
- [削除] を選択して操作を確定します。
次の手順
一連の IoT Central チュートリアルを続行し、IoT Central ソリューションの構築方法の詳細を確認するには、次のページを参照してください。