適用対象: Azure CLI ml extension v2 (current)Python SDK azure-ai-ml v2 (current)
警告
外部ソース (プレビュー) および Data Connections (プレビュー) からのデータインポートは Azure Machine Learning で非推奨となり、2026年9月30日以降は使用できません。 それまでは、中断することなくこれらの機能を引き続き使用できます。 その日を過ぎると、それらに依存するすべてのワークロードが中断されます。
Recommended action: 外部データ インポートを Microsoft Fabric に移行し、Azure Machine Learning データストアを使用してデータを Azure Machine Learning で使用可能にします。
この記事では、外部データ ソースに接続して、データをAzure Machine Learningで使用できるようにする方法について説明します。 また、複数の外部非データ サービスに接続する方法についても説明します。 Azure Machine Learning CLI、Python 用の Azure Machine Learning SDK、または Machine Learning Studio を使用して、これらの接続を作成できます。
Azure Machine Learning接続では、ユーザー名とパスワードがシークレットとしてキー コンテナーに安全に格納されます。 Azure接続はキー コンテナー プロキシとして機能し、接続との対話はAzure Key Vaultとの直接的な相互作用です。 Key Vaultロールベースのアクセス制御 (RBAC) は、データ リソースへのアクセスを管理します。 資格情報がキー コンテナーに格納された後、資格情報を直接処理する必要はありません。
Azureでは、データの可用性のために次の外部ソースへの接続がサポートされています。
- Snowflake
- Azure SQL Database
- Amazon S3
重要
この機能は現在、パブリック プレビュー段階です。 このプレビュー バージョンはサービス レベル アグリーメントなしで提供されており、運用環境のワークロードにはお勧めしません。 特定の機能がサポートされていないか、機能が制限されている可能性があります。
詳細については、「Microsoft Azure プレビューの使用条件を参照してください。
前提 条件
Azure Machine Learningの無料または有料バージョンを持つAzure サブスクリプション。
Azure Machine Learning ワークスペース。
ml 拡張機能バージョン 2.15.1 以降がインストールされているAzure CLI。
古いAzure CLIバージョンまたは拡張機能がある場合は、次のコードを使用してアンインストールし、新しいバージョンをインストールします。
az extension remove -n ml
az extension add -n ml --yes
az extension show -n ml 2.15.1
Azure Machine Learningの無料または有料バージョンを持つAzure サブスクリプション。
Azure Machine Learning ワークスペース。
バージョン 1.5.0 以降のパッケージがインストールされている azure-ai-ml。
古い SDK パッケージがある場合は、次のコードを使用してアンインストールし、新しいパッケージをインストールします。
pip uninstall azure-ai-ml
pip install azure-ai-ml
pip show azure-ai-ml 1.5.0
Snowflake データ接続を作成する
Azure Machine Learning CLI、Azure Machine Learning SDK for Python、または Machine Learning Studio を使用して、ユーザー名/パスワード認証を使用する Snowflake データ接続を作成できます。
Azure CLIまたは Python SDK を使用して、サービス プリンシパルで OAuth を使用する Snowflake 接続を作成することもできます。 Machine Learning Studio では、OAuth 接続の作成はサポートされていません。
ユーザー名/パスワード認証を使用する接続を作成する
Snowflake 接続を作成するには、まず接続を定義する YAML ファイルをアセンブルしてから、YAML ファイルを呼び出すコマンドまたはスクリプトを実行します。 Python SDK の場合は、YAML ファイルを使用せずに接続情報を直接指定することもできます。
YAML ファイルに資格情報を格納し、接続を作成するときに、Azure CLI コマンド ラインに格納されている資格情報をオーバーライドできます。 ただし、セキュリティ侵害によって資格情報が漏洩する可能性があるため、ファイルに資格情報を格納しないようにすることをお勧めします。 代わりに、 credentials 値を空白のままにして、コマンド ラインで指定できます。
次の YAML ファイルは、ユーザー名/パスワード認証を使用する Snowflake 接続を定義します。 ファイルを作成するには、 <connection-name>を指定し、 <account>、 <database>、 <warehouse>、および <role> プレースホルダーを Snowflake アカウントの値に置き換えます。
<role>を指定しない場合、既定値はPUBLIC。
my_snowflake_connection.yaml のような名前でファイルを保存します。
$schema: http://azureml/sdk-2-0/Connection.json
type: snowflake
name: <connection-name>

target: jdbc:snowflake://<account>.snowflakecomputing.com/?db=<database>&warehouse=<warehouse>&role=<role>
credentials:
    type: username_password
    username: <snowflake-username>
    password: <snowflake-password>
Machine Learning Studio で Snowflake データベースへのデータ接続を作成し、その接続を使用してデータ インポート ジョブを実行できます。 ユーザー名/パスワードの資格情報は、ワークスペースに関連付けられているキー コンテナーに安全に格納されます。
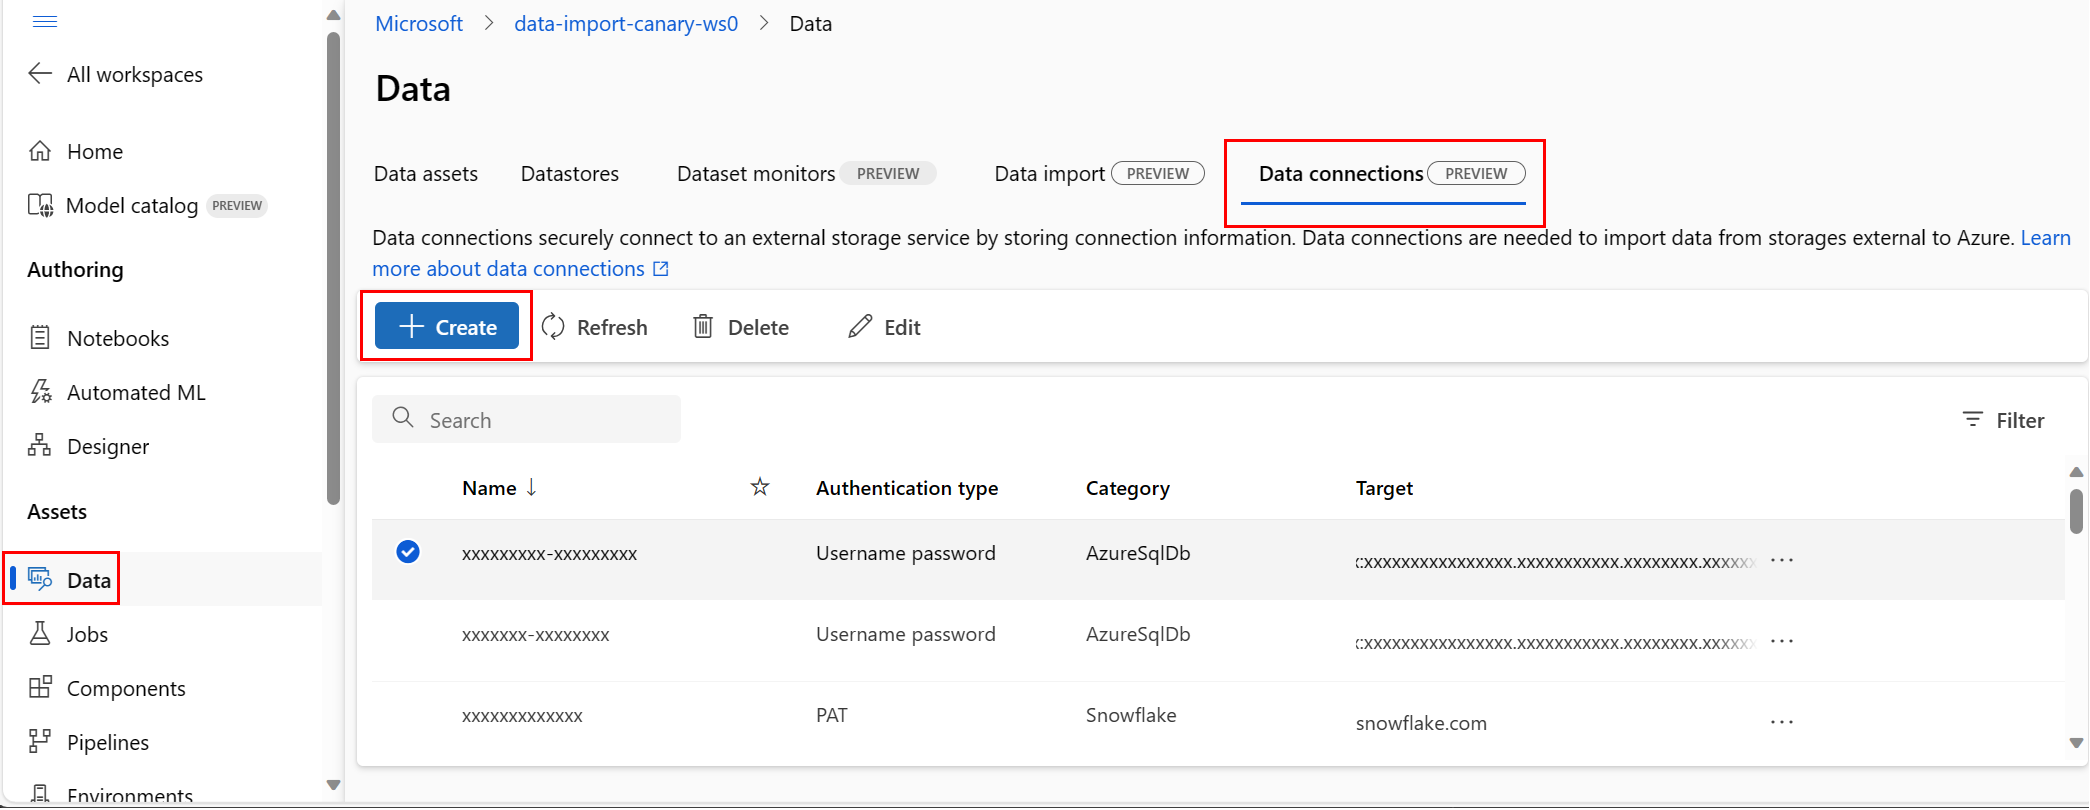
Azure Machine Learning スタジオでデータ接続を作成するには:
Machine Learning ワークスペースで、左側のナビゲーション メニューの Assets の下にある Data を選択します。
[ データ ] ページで、[ データ接続 ] タブを選択し、[ 接続] を選択します。
Azure Machine Learning スタジオ で新しいデータ接続の開始を示すスクリーンショット。
接続を作成するには、次のいずれかのコマンド ラインを実行し、 <yaml-filename> プレースホルダーの YAML ファイル名を指定します。
YAML ファイルに格納したユーザー名とパスワードを使用するには、次のコマンドを実行します。
az ml connection create --file <yaml-filename>.yaml
コマンド ラインの一部としてユーザー名とパスワードを指定するには、次のコマンドを実行し、プレースホルダーの <username> と <password> を入力します。
az ml connection create --file <yaml-filename>.yaml --set credentials.username="<username>" credentials.password="<password>"
YAML ファイルを呼び出して Snowflake 接続を作成するには、次のPython スクリプトを実行し、<yaml-filename> プレースホルダーを YAML ファイル名に置き換えます。
from azure.ai.ml import MLClient, load_workspace_connection

ml_client = MLClient.from_config()

wps_connection = load_workspace_connection(source="./<yaml-filename>.yaml")
wps_connection.credentials.username="<snowflake-username>"
wps_connection.credentials.password="<snowflake-password>"
ml_client.connections.create_or_update(workspace_connection=wps_connection)
直接作成する
YAML ファイルを使用せずに接続情報を直接指定するには、次のPython スクリプトを実行します。
<connection-name>を指定し、<account>、<database>、<warehouse>、<role>のプレースホルダーを Snowflake アカウントの値に置き換えます。
<role>を指定しない場合、既定値はPUBLIC。 ユーザー名とパスワードの認証の種類の場合、名前/パスワードの値は URL でエンコードする必要があります。
from azure.ai.ml import MLClient
from azure.ai.ml.entities import WorkspaceConnection
from azure.ai.ml.entities import UsernamePasswordConfiguration

import urllib.parse
username = urllib.parse.quote(os.environ["SNOWFLAKEDB_USERNAME"], safe="")
password = urllib.parse.quote(os.environ["SNOWFLAKEDB_PASSWORD"], safe="")

target= "jdbc:snowflake://<account>.snowflakecomputing.com/?db=<database>&warehouse=<warehouse>&role=<role>"
name= <connection-name>
wps_connection = WorkspaceConnection(name= name,
type="snowflake",
target= target,
credentials= UsernamePasswordConfiguration(username=username, password=password)
)

ml_client.connections.create_or_update(workspace_connection=wps_connection)
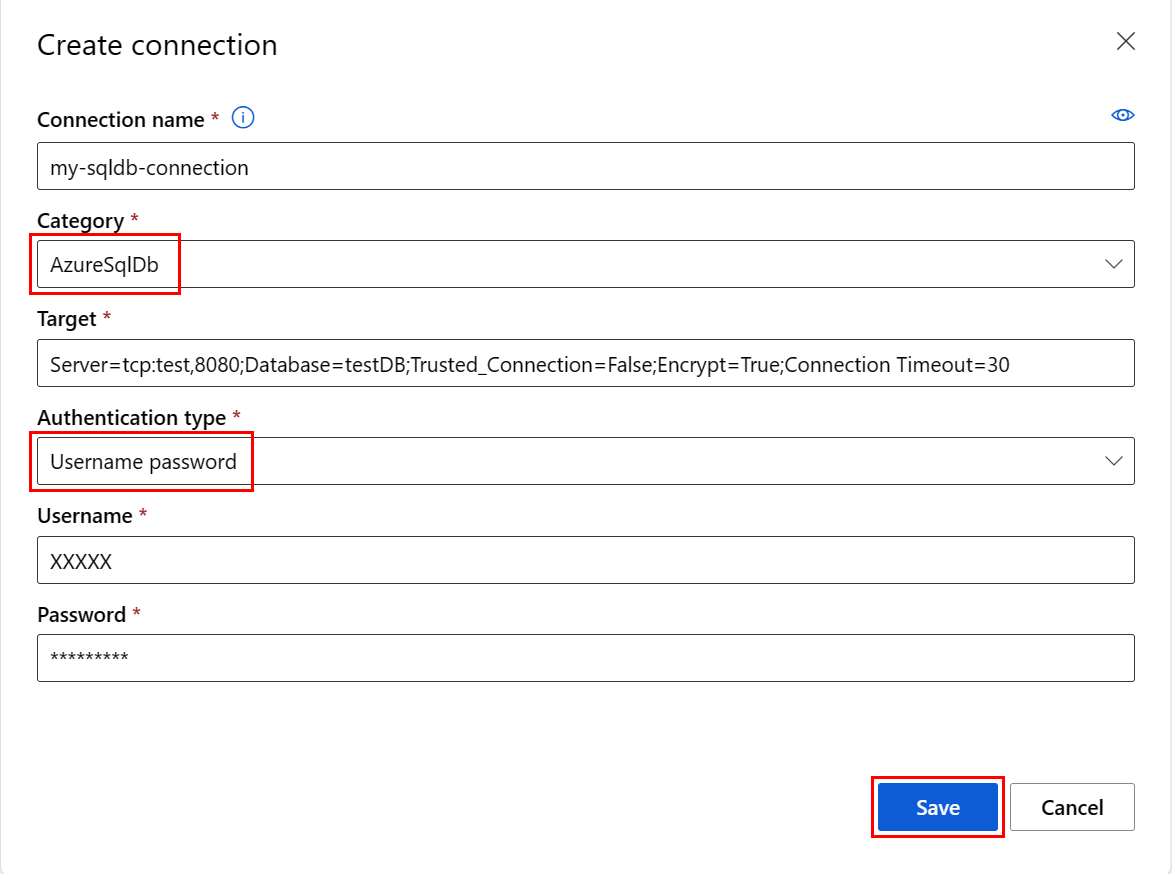
[ 接続の作成 ] 画面で、次の情報を入力します。
-
サービス: Snowflake を選択します。
-
ターゲット: プレースホルダーの Snowflake アカウントの値を使用して、次のターゲットを入力します。
jdbc:snowflake://<account>.snowflakecomputing.com/?db=<database>&warehouse=<warehouse>&role=<role>
-
認証の種類: [ユーザー名のパスワード] を選択します。
-
ユーザー名: Snowflake ユーザー名を入力します。
-
パスワード: Snowflake パスワードを入力します。
-
接続名: Snowflake 接続の名前を入力します。
必要に応じて、[ 接続のテスト ] を選択して接続をテストし、[保存] を選択 します。
Azure Machine Learning スタジオ で新しい Snowflake 接続を作成する様子を示すスクリーンショット
Azure CLIまたは Python SDK を使用して OAuth 認証を使用して接続を作成する
Azure CLIまたは Python SDK を使用して、OAuth のサービス プリンシパルを使用して認証する Snowflake 接続を作成できます。
Azure Machine Learningの OAuth 接続を作成するには、次の情報が必要です。
-
クライアント ID: サービス プリンシパルの ID
-
クライアント シークレット: サービス プリンシパル シークレット
-
テナント ID: Microsoft Entra ID テナントの ID
接続を作成するには、まず接続を定義する YAML ファイルをアセンブルしてから、YAML ファイルを呼び出すコマンドまたはスクリプトを実行します。 Python SDK の場合は、YAML ファイルを使用せずに接続情報を直接指定することもできます。
次の YAML ファイルを作成して、OAuth を使用する Snowflake 接続を定義します。
<connection-name>を指定し、<account>、<database>、<warehouse>、<service-principal-scope>のプレースホルダーを Snowflake アカウントの値に置き換えます。 資格情報については、 <client-id>、 <client-secret>、および <tenant_id>を指定します。
name: <connection-name>
type: snowflake
target: jdbc:snowflake://<account>.snowflakecomputing.com/?db=<database>&warehouse=<warehouse>&scope=<service-principal-scope>
credentials:
  type: service_principal
  client_id: <client-id>
  client_secret: <client-secret>
  tenant_id: <tenant-id>
Machine Learning Studio では、OAuth 認証を使用するデータ接続の作成はサポートされていません。
YAML ファイルに格納されている資格情報を使用して接続を作成するには、次のコマンドを実行し、 <yaml-filename> プレースホルダーを YAML ファイル名に置き換えます。
az ml connection create --file <yaml-filename>.yaml
YAML ファイルの資格情報をオーバーライドするか、コマンド ラインで資格情報を指定するには、次のコマンドを実行し、プレースホルダーの <client-id>、 <client-secret>、および <tenant-id> の値を入力します。
az ml connection create --file <yaml-filename>.yaml --set credentials.client_id="<client-id>" credentials.client_secret="<client-secret>" credentials.tenant_id="<tenant-id>"
YAML ファイルを呼び出して OAuth 接続を作成するには、次のPython スクリプトを実行し、<yaml-filename> プレースホルダーを YAML ファイル名に置き換えます。 必要に応じて、 <wps_connection.credentials> 値を指定またはオーバーライドできます。
from azure.ai.ml import MLClient, load_workspace_connection

ml_client = MLClient.from_config()

wps_connection = load_workspace_connection(source="./<yaml-filename>.yaml")
wps_connection.credentials.client_id="<client-id>"
wps_connection.credentials.client_secret="<client-secret>"
wps_connection.credentials.tenant_id="<tenant-id>"
ml_client.connections.create_or_update(workspace_connection=wps_connection)
直接作成する
次の Python スクリプトを実行して、YAML ファイルを使用せずに OAuth 接続情報を直接指定します。
<connection-name>を指定し、<account>、<database>、<warehouse>、<role>のプレースホルダーを Snowflake アカウントの値に置き換えます。 対応するプレースホルダーに、 <client-id>、 <client-secret>、 <tenant-id> の値を入力します。
from azure.ai.ml import MLClient
from azure.ai.ml.entities import WorkspaceConnection
from azure.ai.ml.entities import ServicePrincipalConfiguration

target= "jdbc:snowflake://<account>.snowflakecomputing.com/?db=<database>&warehouse=<warehouse>&role=<role>"
name= <connection-name>
auth = ServicePrincipalConfiguration(client_id="<client-id>", client_secret="<client-secret>", tenant_id="<tenant-id>")
wps_connection = WorkspaceConnection(name= name,
                                     type="snowflake",
                                     target=target,
                                     credentials=auth
)

ml_client.connections.create_or_update(workspace_connection=wps_connection)
ユーザー名/パスワード認証を使用して Snowflake 接続を作成するか、Azure CLIまたは Python SDK を使用して OAuth 認証を使用して接続を作成できます。
Azure SQL Database データ接続を作成する
Azure Machine Learning CLI、Python 用の Azure Machine Learning SDK、または Machine Learning Studio を使用して、Azure SQL Database データ接続を作成できます。
Azure SQLデータベース接続を作成するには、まず、接続を定義する YAML ファイルをアセンブルしてから、YAML ファイルを呼び出す Azure CLI または Python SDK コマンドまたはスクリプトを実行します。 Python SDK の場合は、YAML ファイルを使用せずに接続情報を直接指定することもできます。
次の YAML ファイルを作成してAzure SQL Database接続を定義し、my_azuresqldb_connection.yaml。
<connection-name>を指定し、<server>、<port>、および <database> プレースホルダーを、Azure SQL データベースの適切な値に置き換えます。
credentials の場合は、Azure SQL データベースのユーザー名とパスワードをこのファイルに格納できますが、値を空白のままにして、接続を作成するコマンド ラインで指定する方が安全です。
$schema: http://azureml/sdk-2-0/Connection.json

type: azure_sql_db
name: <connection-name>

target: Server=tcp:<server>,<port>;Database=<database>;Trusted_Connection=False;Encrypt=True;Connection Timeout=30
credentials:
    type: sql_auth
    username: <username>
    password: <password>
Machine Learning Studio でAzure SQL データベースへのデータ接続を作成し、その接続を使用してデータ インポート ジョブを実行できます。 ユーザー名/パスワードの資格情報は、ワークスペースに関連付けられているキー コンテナーに安全に格納されます。
Azure Machine Learning スタジオでデータ接続を作成するには:
Machine Learning ワークスペースで、左側のナビゲーション メニューの Assets の下にある Data を選択します。
[ データ ] ページで、[ データ接続 ] タブを選択し、[ 接続] を選択します。
接続を作成するには、次のいずれかの CLI コマンド ラインを実行し、 <yaml-filename> プレースホルダーの YAML ファイル名を指定します。
YAML ファイルに格納されているユーザー名とパスワードを使用するには、次のコマンドを実行します。
az ml connection create --file <yaml-filename>.yaml
コマンド ラインの一部としてユーザー名とパスワードを指定するには、次のコマンドを実行し、プレースホルダーの <username> と <password> を入力します。
az ml connection create --file <yaml-filename>.yaml --set credentials.username="<username>" credentials.password="<password>"
YAML ファイルを呼び出してAzure SQL Database接続を作成するには、次のPython スクリプトを実行し、<yaml-filename> プレースホルダーを YAML ファイル名に置き換えます。
from azure.ai.ml import MLClient, load_workspace_connection

ml_client = MLClient.from_config()

wps_connection = load_workspace_connection(source="./<yaml-filename>.yaml")
wps_connection.credentials.username="<username>"
wps_connection.credentials.password="<password>"
ml_client.connections.create_or_update(workspace_connection=wps_connection)
直接作成する
YAML ファイルを使用せずに接続情報を直接指定するには、次のPython スクリプトを実行します。
<connection-name>を指定し、<server>、<port>、および <database> プレースホルダーをAzure SQL データベースの値に置き換えます。 ユーザー名とパスワードの認証の種類では、名前とパスワードの値を URL エンコードする必要があります。
from azure.ai.ml import MLClient
from azure.ai.ml.entities import WorkspaceConnection
from azure.ai.ml.entities import UsernamePasswordConfiguration

import urllib.parse
username = urllib.parse.quote(os.environ["MYSQL_USERNAME"], safe="")
password = urllib.parse.quote(os.environ["MYSQL_PASSWORD"], safe="")

target= "Server=tcp:<server>,<port>;Database=<database>;Trusted_Connection=False;Encrypt=True;Connection Timeout=30"
# add the sql servername, port address and database

name= <connection-name>
wps_connection = WorkspaceConnection(name= name,
type="azure_sql_db",
target= target,
credentials= UsernamePasswordConfiguration(username=username, password=password)
)

ml_client.connections.create_or_update(workspace_connection=wps_connection)
[ 接続の作成 ] 画面で、次の情報を入力します。
-
サービス: AzureSqlDb を選択します。
-
Target: プレースホルダーのAzure SQL データベースの値を使用して、次のターゲットを入力します。
Server=tcp:<server>,<port>;Database=<database>;Trusted_Connection=False;Encrypt=True;接続タイムアウト = 30
-
認証の種類: [ユーザー名のパスワード] を選択します。
-
Username: Azure SQL Databaseユーザー名を入力します。
-
Password: Azure SQL Databaseパスワードを入力します。
-
接続名: Azure SQL Database接続の名前を入力します。
必要に応じて、[ 接続のテスト ] を選択して接続をテストし、[保存] を選択 します。
Amazon S3 データ接続を作成する
Azure Machine Learning CLI、Python 用の Azure Machine Learning SDK、または Machine Learning Studio を使用して、Amazon S3 データ接続を作成できます。
Amazon S3 データ接続を作成するには、まず、接続を定義する YAML ファイルをアセンブルしてから、YAML ファイルを呼び出す Azure CLI または Python SDK コマンドまたはスクリプトを実行します。 Python SDK の場合は、YAML ファイルを使用せずに接続情報を直接指定することもできます。
Azure Machine Learning CLI を使用して Amazon S3 データ接続を作成するには、まず接続を定義する YAML ファイルをアセンブルしてから、YAML ファイルを呼び出す Azure CLI コマンドを実行します。
Amazon S3 接続を定義する次の YAML ファイルを作成します。
<connection-name>を指定し、<s3-bucket-name>、<access-key-id>、および<secret-access-key>プレースホルダーを Amazon S3 アカウントの値に置き換えます。
my_amazons3_connection.yaml のような名前でファイルを保存します。
$schema: http://azureml/sdk-2-0/Connection.json

type: s3
name: <connection-name>

target: <s3-bucket-name>
credentials:
    type: access_key
    access_key_id: <access-key-id>
    secret_access_key: <secret-access-key>
Machine Learning Studio で Amazon S3 データへの接続を作成し、その接続を使用してデータインポートジョブを実行できます。 ユーザー名/パスワードの資格情報は、ワークスペースに関連付けられているキー コンテナーに安全に格納されます。
Azure Machine Learning スタジオでデータ接続を作成するには:
Machine Learning ワークスペースで、左側のナビゲーション メニューの Assets の下にある Data を選択します。
[ データ ] ページで、[ データ接続 ] タブを選択し、[ 接続] を選択します。
接続を作成するには、次の CLI コマンドを実行し、 <yaml-filename> プレースホルダーの YAML ファイル名を指定します。
az ml connection create --file <yaml-filename>.yaml
YAML ファイルを呼び出して Amazon S3 接続を作成するには、次の Python スクリプトを実行し、<yaml-filename> プレースホルダーを YAML ファイル名に置き換えます。
from azure.ai.ml import MLClient, load_workspace_connection

ml_client = MLClient.from_config()

wps_connection = load_workspace_connection(source="./<yaml-filename>.yaml")
ml_client.connections.create_or_update(workspace_connection=wps_connection)
直接作成する
YAML ファイルを使用せずに接続情報を直接指定するには、次のPython スクリプトを実行します。
<connection-name>を指定し、<s3-bucket-name>、<access-key-id>、および<secret-access-key>プレースホルダーを Amazon S3 アカウントの値に置き換えます。
from azure.ai.ml import MLClient
from azure.ai.ml.entities import WorkspaceConnection
from azure.ai.ml.entities import AccessKeyConfiguration

target=<s3-bucket-name>
name=<connection-name>
wps_connection=WorkspaceConnection(name=name,
type="s3",
target= target,
credentials= AccessKeyConfiguration(access_key_id="<access-key-id>",secret_access_key="<secret-access-key>")
)

ml_client.connections.create_or_update(workspace_connection=wps_connection)
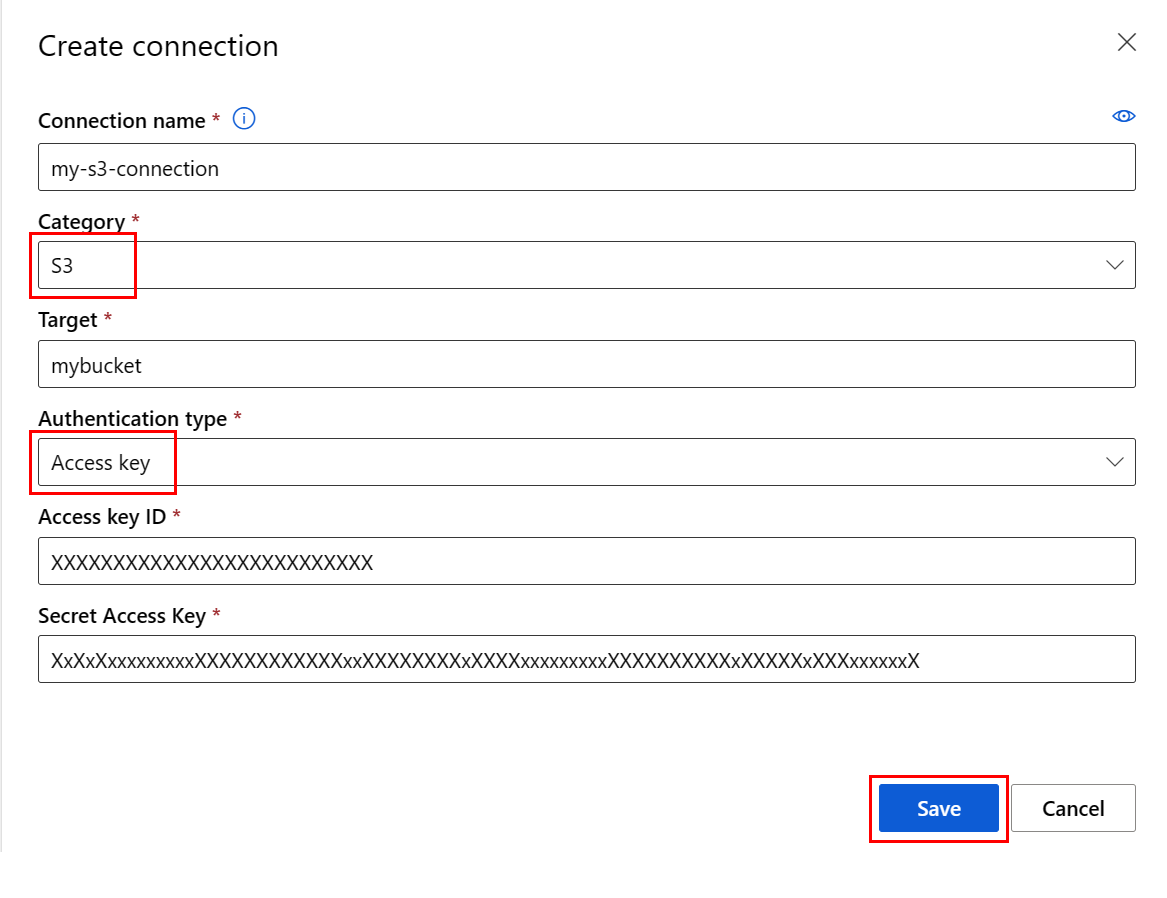
[ 接続の作成 ] 画面で、次の情報を入力します。
-
サービス: S3 を選択します。
-
ターゲット: Amazon S3 バケット名を入力します。
-
認証の種類: [アクセス キー] を選択します。
-
アクセスキー ID: Amazon S3 アクセスキー ID を入力します。
-
シークレットアクセスキー:Amazon S3シークレットアクセスキーを入力します。
-
接続名: Amazon S3 接続の名前を入力します。
必要に応じて、[ 接続のテスト ] を選択して接続をテストし、[保存] を選択 します。
外部の非データ接続を作成する
また、コードで使用する外部サービスへの非データ Azure Machine Learning接続を作成することもできます。 このセクションでは、次の非データ接続を作成する方法を示します。
- Git
- Python フィード
- Azure Container Registry
- 汎用コンテナー レジストリ
- API キー
Git 接続を作成する
Azure CLI、Python SDK、または Machine Learning Studio を使用して Git 接続を作成できます。
Azure CLIを使用して Git 接続を作成するには、次のいずれかの YAML ファイルを使用して接続を定義します。 ファイルに git-connection.ymlのような名前を付けます。
個人用アクセス トークン (PAT) を使用して接続するには、 <connection-name>を指定し、 <account>、 <repo>、および <PAT> プレースホルダーを Git アカウント、リポジトリ、PAT の値に置き換えます。
name: <connection-name>
type: git
target: https://github.com/<account>/<repo>
credentials:
   type: pat
   pat: <PAT>
資格情報を使用せずにパブリック リポジトリに接続するには、 <connection-name>を指定し、 <account>と <repo> プレースホルダーを実際の値に置き換えます。
name: <connection-name>
type: git
target: https://github.com/<account>/<repo>
次のコマンドを実行し、<yaml-filename> プレースホルダーの YAML ファイル名を指定して、Azure Machine Learning接続を作成します。
az ml connection create --file <yaml-filename>.yaml
Python SDK を使用して Git リポジトリへの接続を作成するには、次のスクリプトを使用します。 GitHub個人用アクセス トークン (PAT) を使用して接続を認証します。
<connection-name>を指定し、<account>、<repo>、および<PAT>プレースホルダーを実際の値に置き換えます。
from azure.ai.ml.entities import WorkspaceConnection
from azure.ai.ml.entities import UsernamePasswordConfiguration, PatTokenConfiguration

name = "<connection-name>"

target = "https://github.com/<account>/<repo>"

wps_connection = WorkspaceConnection(
    name=name,
    type="git",
    target=target,
    credentials=PatTokenConfiguration(pat="<PAT>"),
)
ml_client.connections.create_or_update(workspace_connection=wps_connection)
Machine Learning Studio で Git 接続を作成するには:
Azure Machine Learning スタジオで、左側のナビゲーションの Manage の下にある Connections を選択し、 Connect を選択します。
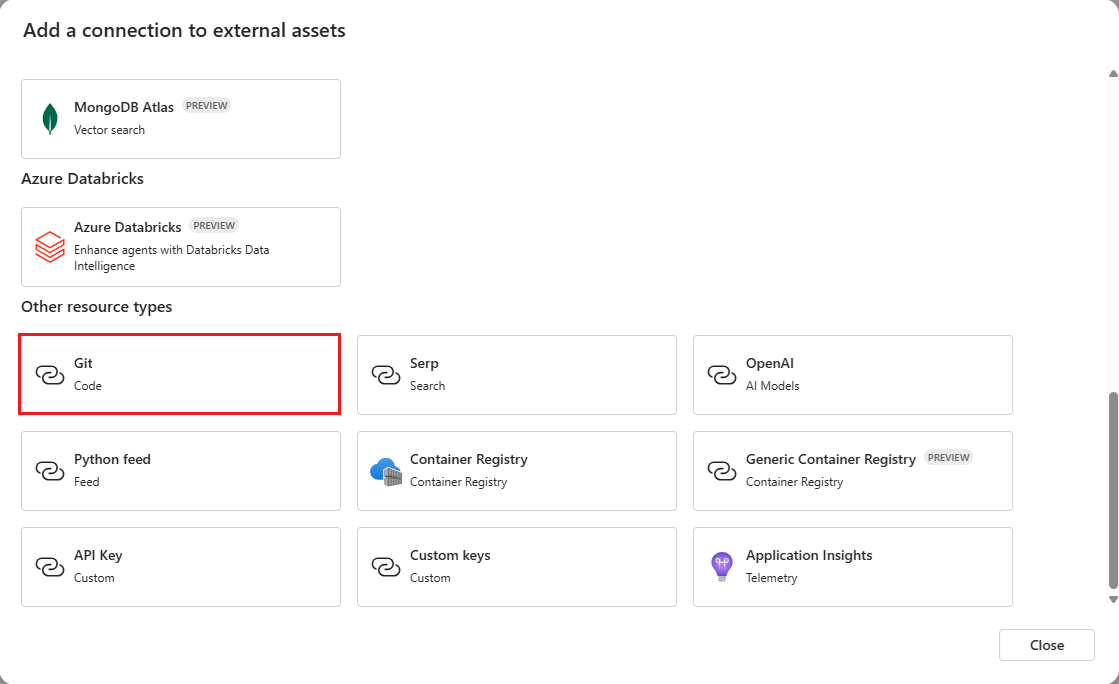
[ 外部資産への接続の追加 ] 画面で、[ その他のリソースの種類] まで下にスクロールし、[Git] を選択 します。
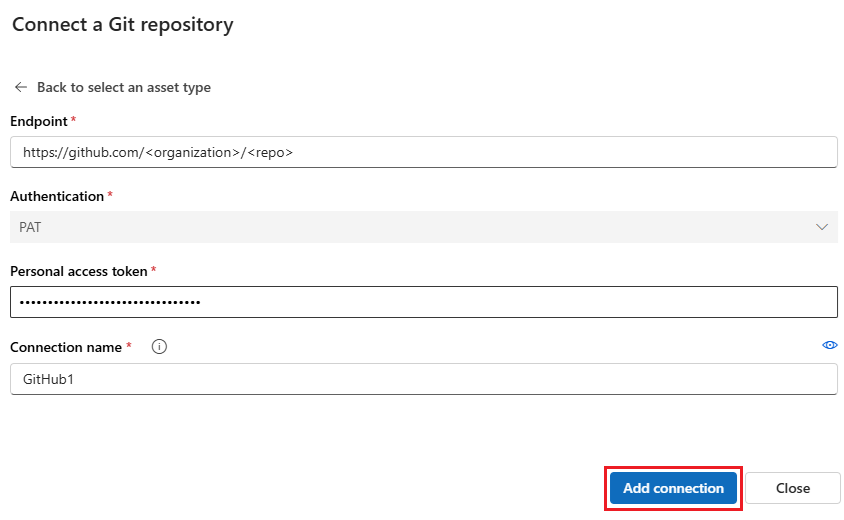
[ Git リポジトリの接続 ] 画面で、[ エンドポイント ] で Git リポジトリへのパスを入力し、[ 個人用アクセス トークン] で Git 個人用アクセス トークン (PAT) を入力します。
接続名を指定し、[接続の追加] を選択します。
Python フィード
Azure CLI、Python SDK、または Machine Learning Studio を使用して、Python フィードへの接続を作成できます。
次のいずれかの YAML ファイルを使用して、Python フィード接続を定義します。 ファイルに python-feed-connection.ymlのような名前を付けます。
PAT を使用して接続するには、 <connection-name>を指定し、 <feed-url> と <PAT> プレースホルダーをフィードの値に置き換えます。
name: <connection-name>
type: python_feed
target: https://<feed-url>
credentials:
   type: pat
   pat: <PAT>
ユーザー名とパスワードを使用して接続するには、 <connection-name>を指定し、 <feed-url>、 <username>、および <password> プレースホルダーをフィードの値に置き換えます。
name: <connection-name>
type: python_feed
target: https://<feed-url>
credentials:
   type: username_password
   username: <username>
   password: <password>
資格情報を使用せずにパブリック フィードに接続するには、<connection-name> を指定し、<feed-url> プレースホルダーをPython フィードの URL に置き換えます。
name: <connection-name>
type: python_feed
target: https://<feed-url>
次のコマンドを実行し、<yaml-filename> プレースホルダーの YAML ファイル名を指定して、Azure Machine Learning接続を作成します。
az ml connection create --file <yaml-filename>.yaml
次のスクリプトを使用して、Python SDK を使用してPython フィード接続を作成します。
<connection-name>を指定し、<feed-url> プレースホルダーをPython フィード URL に置き換えます。
PAT またはユーザー名とパスワードを使用して接続を認証するか、資格情報なしでパブリック フィードに接続できます。 PAT 認証の種類として、 <PAT> プレースホルダーの PAT を指定します。 ユーザー名とパスワードの認証の種類の場合、名前/パスワードの値は URL でエンコードする必要があります。
PAT の代わりにユーザー名/パスワードを使用するか、認証を使用しない場合は、次のスクリプトの適切な行をコメント解除し、 credentials=PatTokenConfiguration(pat="<PAT>"), 行をコメント アウトします。
from azure.ai.ml.entities import WorkspaceConnection
from azure.ai.ml.entities import UsernamePasswordConfiguration, PatTokenConfiguration

# import urllib.parse
# username = urllib.parse.quote(os.environ["FEED_USERNAME"], safe="")
# password = urllib.parse.quote(os.environ["FEED_PASSWORD"], safe="")

name = "<connection-name>"

target = "https://<feed-url>"

wps_connection = WorkspaceConnection(
    name=name,
    type="python_feed",
    target=target,
    #credentials=UsernamePasswordConfiguration(username=username, password=password),
    credentials=PatTokenConfiguration(pat="<PAT>"),

    #credentials=None
)
ml_client.connections.create_or_update(workspace_connection=wps_connection)
Machine Learning Studio でPython フィードへの接続を作成するには:
Azure Machine Learning スタジオ ワークスペースで、左側のナビゲーションの Manage の下にある Connections を選択し、Connect を選択します。
外部資産への接続の追加画面で、下へスクロールして その他のリソースの種類、Python フィード を選択します。
Python フィードの接続画面で次の手順を実行します。
-
[エンドポイント] で Git リポジトリへのパスを入力します。
- [認証] で [なし]、[PAT]、または [ユーザー名のパスワード] を選択し、適切な値を指定します。
-
接続名を指定します。
[ 接続の追加] を選択します。
Azure Container Registry
Azure CLI、Python SDK、または Machine Learning Studio を使用して、Azure Container Registryへの接続を作成できます。
次の YAML ファイルを使用して、ユーザー名/パスワード認証を使用してAzure Container Registryへの接続を定義します。
name: <connection-name>
type: container_registry
target: https://<container-registry-url>
credentials:
   type: username_password
   username: <username>
   password: <password>
接続を作成するには、次のコマンドを実行します。
az ml connection create --file connection.yaml
次の例では、Azure Container Registry接続を作成します。
from azure.ai.ml.entities import WorkspaceConnection
from azure.ai.ml.entities import UsernamePasswordConfiguration

# If using username/password, the name/password values should be url-encoded
import urllib.parse
username = os.environ["REGISTRY_USERNAME"]
password = os.environ["REGISTRY_PASSWORD"]

name = "my_acr_conn"

target = "https://iJ5kL6mN7.core.windows.net/mycontainer"

wps_connection = WorkspaceConnection(
    name=name,
    type="container_registry",
    target=target,
    credentials=UsernamePasswordConfiguration(username=username, password=password),
)
ml_client.connections.create_or_update(workspace_connection=wps_connection)
Machine Learning Studio でAzure Container Registryへの接続を作成するには:
Azure Machine Learning ワークスペースで、左側のナビゲーションの Manage の下にある 1>Connections を選択し、Connect を選択します。
[ 外部資産への接続の追加 ] 画面で、[ その他のリソースの種類] まで下にスクロールし、[ コンテナー レジストリ] を選択します。
Endpoint でAzure コンテナー レジストリへのパスを入力します。 None または Username password for Authentication を適切な値で選択し、Connection 名 を入力します。
[ 接続の追加] を選択します。
汎用コンテナー レジストリ
GenericContainerRegistry ワークスペース接続では、イメージ ビルドの外部レジストリ (Nexus や Artifactory など) を指定します。 環境イメージは指定されたレジストリからプッシュされ、前のキャッシュは無視されます。 Azure CLI、Python SDK、または Machine Learning Studio を使用して、汎用コンテナー レジストリへの接続を作成できます。
Azure CLI SDK と Python SDK の場合、次の YAML ファイルの例では、汎用コンテナー レジストリ接続を定義します。 サンプル値を独自の値で更新します。
#myenv.yml
$schema: https://azuremlschemas.azureedge.net/latest/environment.schema.json
name: docker-image-plus-conda-example
image: mcr.microsoft.com/azureml/openmpi4.1.0-ubuntu20.04
type: python_feed
conda_file: conda_dep.yml
description: Environment created from a Docker image plus Conda environment
#conda_dep.yml
name: project_environment
dependencies:
  - python=3.10
  - pip:
    - azureml-defaults
channels:
  - anaconda
  - conda-forge
#connection.yml
name: ws_conn_generic_container_registry
type: container_registry
target: https://test-registry.com
credentials:
  type: username_password
  username: myusername
  password: <password>
#hello_world_job.yml
$schema: https://azuremlschemas.azureedge.net/latest/commandJob.schema.json
command: echo "hello world"
environment: azureml:myenv@latest
Studio で汎用コンテナー レジストリ (プレビュー) 接続を作成することもできます。
Azure Machine Learning スタジオで、左側のナビゲーションの Manage の下にある Connections を選択し、 Connect を選択します。
[外部資産への接続の追加] 画面で、[その他のリソースの種類] で [汎用コンテナー レジストリ (プレビュー)] を選択します。
次のコマンドを実行して、上記の YAML ファイルと資格情報を使用して接続を作成します。 サンプル値を独自の値で更新します。
az ml connection create --file connection.yml --credentials username=myusername password=<password> --resource-group my-resource-group --workspace-name my-workspace
環境を作成するには、次のコマンドを実行します。
az ml environment create --name docker-image-plus-conda-example --version 1 --file myenv.yml --conda-file conda_dep.yml --image mcr.microsoft.com/azureml/openmpi4.1.0-ubuntu20.04 --resource-group my-resource-group --workspace-name my-workspace
次のコマンドを実行して、環境が正常に作成されたことを確認します。
az ml environment show --name docker-image-plus-conda-example --version 1 --resource-group my-resource-group --workspace-name my-workspace
次のPythonサンプル スクリプトは、前のサンプル ファイルを使用して汎用コンテナー レジストリ接続を作成します。 サンプル値を独自の値で更新します。
import os
from azure.ai.ml import MLClient
from azure.identity import DefaultAzureCredential
from azure.ai.ml.entities import Environment
from azure.ai.ml.entities import WorkspaceConnection
from azure.ai.ml.entities import UsernamePasswordConfiguration
from azureml.core.conda_dependencies import CondaDependencies
from azure.ai.ml import command

username = os.environ["REGISTRY_USERNAME"]
password = os.environ["REGISTRY_PASSWORD"]

# Enter details of Azure Machine Learning workspace
subscription_id = "00000000-0000-0000-0000-000000000000"
resource_group = "my-resource-group"
workspace = "my-workspace"

ml_client = MLClient( DefaultAzureCredential(), subscription_id, resource_group, workspace)
credentials = UsernamePasswordConfiguration(username=username, password=password)

# Create GenericContainerRegistry workspace connection for a generic registry
ws_connection = WorkspaceConnection(name="ws_conn_generic_container_registry", target="https://test-registry.com", type="GenericContainerRegistry", credentials=credentials)
ml_client.connections.create_or_update(ws_connection)

# Create an environment
env_docker_conda = Environment(image="mcr.microsoft.com/azureml/openmpi4.1.0-ubuntu20.04", conda_file="conda_dep.yml", name="docker-image-plus-conda-example", description="Environment created from a Docker image plus Conda environment.")
ml_client.environments.create_or_update(env_docker_conda)

job = command(command="echo 'hello world'", environment=env_docker_conda,display_name="v2-job-example")
returned_job = ml_client.create_or_update(job)
[ コンテナー レジストリの接続 ] 画面で、次の手順を実行します。
-
[エンドポイント] でコンテナー レジストリへのパスを入力します。
-
ユーザー名とパスワードを入力します。
-
接続名を指定します。
[ 接続の追加] を選択します。
API キー
次の YAML ファイルを作成して、API キーへの接続を定義します。 サンプル値を独自の値で更新します。
name: my_api_key
type: api_key
api_base: "https://myapi.core.windows.net/mycontainer"
api_key: "aAbBcCdD"
接続を作成するには、次のコマンドを実行します。
az ml connection create --file connection.yaml
セキュリティを強化するために、 api_key 値は YAML ファイルから除外し、コマンド ラインで指定します。
az ml connection create --file connection.yml --set api_key="aAbBcCdD"
次の Python SDK の例では、API キー接続を作成します。 サンプル値を独自の値で更新します。
from azure.ai.ml.entities import WorkspaceConnection
from azure.ai.ml.entities import UsernamePasswordConfiguration, ApiKeyConfiguration

name = "my_api_key"

target = "https://myapi.core.windows.net/mycontainer"

wps_connection = WorkspaceConnection(
    name=name,
    type="apikey",
    target=target,
    credentials=ApiKeyConfiguration(key="aAbBcCdD"),
)
ml_client.connections.create_or_update(workspace_connection=wps_connection)
Machine Learning Studio で API キーへの接続を作成するには:
Azure Machine Learning ワークスペースで、左側のナビゲーションの Manage の下にある 1>Connections を選択し、Connect を選択します。
[ 外部資産への接続の追加 ] 画面で、[ その他のリソースの種類] まで下にスクロールし、[ API キー] を選択します。
[エンドポイント] で API キーへのパスを入力し、[キー] に API キー シークレットを入力し、接続名を入力して、[接続の追加] を選択します。
関連コンテンツ


