適用対象:  Python SDK azure-ai-ml v2 (現行)
この記事では、Open Neural Network Exchange (ONNX) を使用して、Azure Machine Learning の自動機械学習 (AutoML) から生成されたコンピューター ビジョン モデルで予測を行う方法について説明します。
予測に ONNX を使用するには、次のことを行う必要があります。
- AutoML トレーニングの実行から ONNX モデル ファイルをダウンロードします。
- ONNX モデルの入力と出力を理解します。
- 入力画像に必要な形式になるようにデータを前処理します。
- Python 用の ONNX ランタイムで推論を実行します。
- 物体検出とインスタンスのセグメント化タスクの予測を視覚化します。
ONNX は、機械学習とディープ ラーニング モデルのオープン スタンダードです。 これにより、一般的な AI フレームワーク間でモデルのインポートとエクスポート (相互運用性) が可能になります。 詳細については、ONNX GitHub プロジェクトを参照してください。
ONNX Runtime は、クロスプラットフォームの推論をサポートするオープン ソース プロジェクトです。 ONNX ランタイムでは、複数のプログラミング言語 (Python、C++、C#、C、Java、JavaScript など) にわたって API が提供されます。 これらの API を使用して、入力画像に対する推論を実行できます。 ONNX 形式でエクスポートされたモデルの作成後、プロジェクトに必要な任意のプログラミング言語でこれらの API を使用できます。
このガイドでは、ONNX Runtime 用の Python API を使用して、一般的なビジョン タスクの画像で予測を行う方法について説明します。 これらの ONNX のエクスポートされたモデルは、複数の言語で使用できます。
前提条件
ONNX モデル ファイルをダウンロードする
ONNX モデル ファイルは、Azure Machine Learning スタジオ UI または Azure Machine Learning Python SDK を使用して、AutoML 実行からダウンロードできます。 SDK を通じて実験名と親実行 ID を指定してダウンロードすることをお勧めします。
Azure Machine Learning Studio
Azure Machine Learning スタジオで、トレーニング ノートブックで生成された実験へのハイパーリンクを使用するか、[アセット] の下の [実験] タブで実験名を選択して、実験に移動します。 次に、最適な子の実行を選択します。
最適な子を実行するには、[出力+ログ>train_artifacts]にアクセスします。 [ダウンロード] ボタンを使用して、次のファイルを手動でダウンロードします。
- labels.json: トレーニング データセット内のすべてのクラスまたはラベルを含むファイル。
- model.onnx: ONNX 形式のモデル。
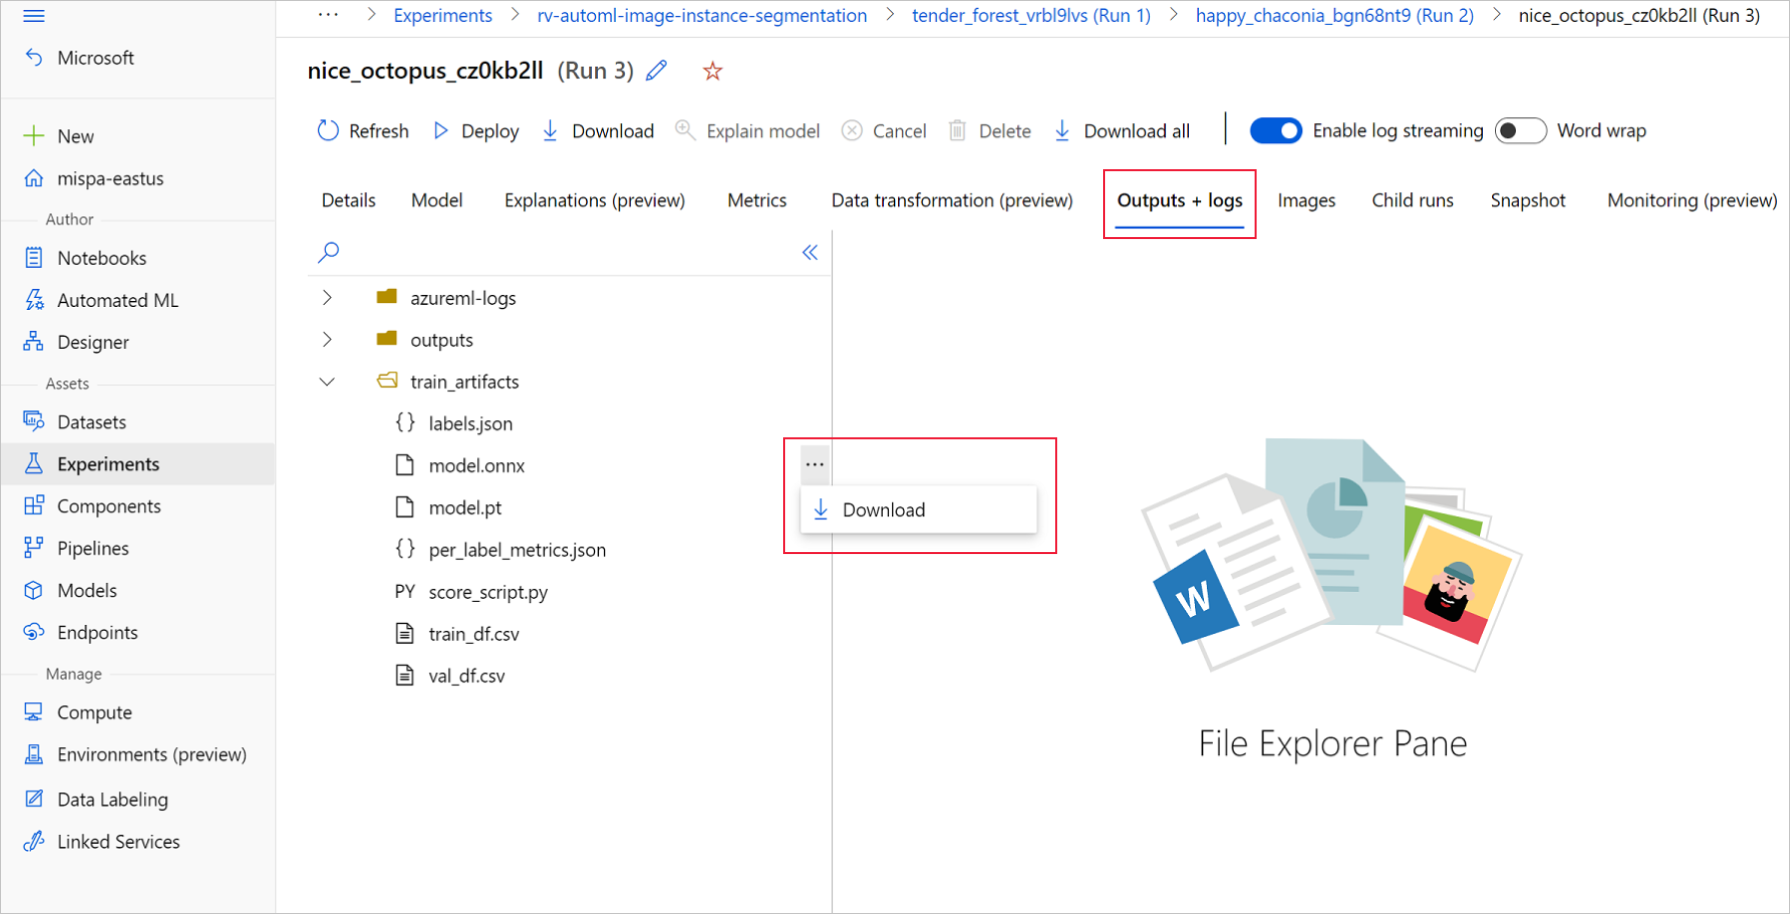
ダウンロードしたモデル ファイルをディレクトリに保存します。 この記事の例では、./automl_models ディレクトリを使用します。
Azure Machine Learning Python SDK
SDK では、実験名と親実行 ID を使用して、最適な子実行を選択できます (プライマリ メトリックごと)。 次に、labels.json および model.onnx ファイルをダウンロードできます。
次のコードでは、該当するプライマリ メトリックに基づいて、最適な子実行が返されます。
from azure.identity import DefaultAzureCredential
from azure.ai.ml import MLClient
mlflow_client = MlflowClient()

credential = DefaultAzureCredential()
ml_client = None
try:
    ml_client = MLClient.from_config(credential)
except Exception as ex:
    print(ex)
    # Enter details of your Azure Machine Learning workspace
    subscription_id = ''
    resource_group = ''
    workspace_name = ''
    ml_client = MLClient(credential, subscription_id, resource_group, workspace_name)
import mlflow
from mlflow.tracking.client import MlflowClient

# Obtain the tracking URL from MLClient
MLFLOW_TRACKING_URI = ml_client.workspaces.get(
    name=ml_client.workspace_name
).mlflow_tracking_uri

mlflow.set_tracking_uri(MLFLOW_TRACKING_URI)

# Specify the job name
job_name = ''

# Get the parent run
mlflow_parent_run = mlflow_client.get_run(job_name)
best_child_run_id = mlflow_parent_run.data.tags['automl_best_child_run_id']
# get the best child run
best_run = mlflow_client.get_run(best_child_run_id)
トレーニング データセット内のすべてのクラスおよびラベルを含む labels.json ファイルをダウンロードします。
local_dir = './automl_models'
if not os.path.exists(local_dir):
    os.mkdir(local_dir)

labels_file = mlflow_client.download_artifacts(
    best_run.info.run_id, 'train_artifacts/labels.json', local_dir
)
model.onnx ファイルをダウンロードします。
onnx_model_path = mlflow_client.download_artifacts(
    best_run.info.run_id, 'train_artifacts/model.onnx', local_dir
)
ONNX モデルを使用する物体検出とインスタンス セグメント化のバッチ推論の場合は、「バッチ スコアリングのモデル生成」セクションを参照してください。
バッチ スコアリングのモデル生成
既定では、AutoML for Images で分類のバッチ スコアリングがサポートされます。 ただし、物体検出とインスタンス セグメント化の ONNX モデルでは、バッチ推論がサポートされません。 物体検出とインスタンスのセグメント化に対してバッチ推論を行う場合は、次の手順を使用して、必要なバッチ サイズの ONNX モデルを生成します。 特定のバッチ サイズに対して生成されたモデルは、他のバッチ サイズでは機能しません。
conda 環境ファイルをダウンロードし、コマンド ジョブで使用される環境オブジェクトを作成します。
#  Download conda file and define the environment

conda_file = mlflow_client.download_artifacts(
    best_run.info.run_id, "outputs/conda_env_v_1_0_0.yml", local_dir
)
from azure.ai.ml.entities import Environment
env = Environment(
    name="automl-images-env-onnx",
    description="environment for automl images ONNX batch model generation",
    image="mcr.microsoft.com/azureml/openmpi4.1.0-cuda11.1-cudnn8-ubuntu18.04",
    conda_file=conda_file,
)
次のモデル固有の引数を使用して、スクリプトを送信します。 引数の詳細については、モデル固有のハイパーパラメーターに関するセクションを参照してください。サポートされる物体検出モデルの名前については、「サポートされているモデル アーキテクチャ」セクションを参照してください。
バッチ スコアリング モデルの作成に必要な引数の値を取得するには、AutoML トレーニング実行の出力フォルダーの下に生成されるスコアリング スクリプトを参照してください。 最適な子実行には、スコアリング ファイル内のモデル設定変数で使用できるハイパーパラメーター値を使用します。
複数クラスの画像分類の場合、最適な子実行に対して生成される ONNX モデルでは、既定でバッチ スコアリングがサポートされます。 そのため、このタスクの種類には、モデル固有の引数は必要ありません。「ラベルと ONNX モデル ファイルを読み込む」セクションに進むことができます。
複数ラベルの画像分類の場合、最適な子実行に対して生成される ONNX モデルでは、既定でバッチ スコアリングがサポートされます。 そのため、このタスクの種類には、モデル固有の引数は必要ありません。「ラベルと ONNX モデル ファイルを読み込む」セクションに進むことができます。
inputs = {'model_name': 'fasterrcnn_resnet34_fpn',  # enter the faster rcnn or retinanet model name
         'batch_size': 8,  # enter the batch size of your choice
         'height_onnx': 600,  # enter the height of input to ONNX model
         'width_onnx': 800,  # enter the width of input to ONNX model
         'job_name': job_name,
         'task_type': 'image-object-detection',
         'min_size': 600,  # minimum size of the image to be rescaled before feeding it to the backbone
         'max_size': 1333,  # maximum size of the image to be rescaled before feeding it to the backbone
         'box_score_thresh': 0.3,  # threshold to return proposals with a classification score > box_score_thresh
         'box_nms_thresh': 0.5,  # NMS threshold for the prediction head
         'box_detections_per_img': 100   # maximum number of detections per image, for all classes
         }
inputs = {'model_name': 'yolov5',  # enter the yolo model name
          'batch_size': 8,  # enter the batch size of your choice
          'height_onnx': 640,  # enter the height of input to ONNX model
          'width_onnx': 640,  # enter the width of input to ONNX model
          'job_name': job_name,
          'task_type': 'image-object-detection',
          'img_size': 640,  # image size for inference
          'model_size': 'small',  # size of the yolo model
          'box_score_thresh': 0.1,  # threshold to return proposals with a classification score > box_score_thresh
          'box_iou_thresh': 0.5
        }
inputs = {'model_name': 'maskrcnn_resnet50_fpn',  # enter the maskrcnn model name
         'batch_size': 8,  # enter the batch size of your choice
         'height_onnx': 600,  # enter the height of input to ONNX model
         'width_onnx': 800,  # enter the width of input to ONNX model
         'job_name': job_name,
         'task_type': 'image-instance-segmentation',
         'min_size': 600,  # minimum size of the image to be rescaled before feeding it to the backbone
         'max_size': 1333,  # maximum size of the image to be rescaled before feeding it to the backbone
         'box_score_thresh': 0.3,  # threshold to return proposals with a classification score > box_score_thresh
         'box_nms_thresh': 0.5,  # NMS threshold for the prediction head
         'box_detections_per_img': 100  # maximum number of detections per image, for all classes
         }
スクリプトを送信するために、現在のディレクトリに ONNX_batch_model_generator_automl_for_images.py ファイルをダウンロードして保存します。 次のコマンド ジョブを使用して、ONNX_batch_model_generator_automl_for_images.pyにある azureml-examples GitHub リポジトリにあるスクリプト を送信し、特定のバッチ サイズの ONNX モデルを生成します。 次のコードでは、トレーニング済みのモデル環境を使用してこのスクリプトを送信し、ONNX モデルを生成して出力ディレクトリに保存します。
複数クラスの画像分類の場合、最適な子実行に対して生成される ONNX モデルでは、既定でバッチ スコアリングがサポートされます。 そのため、このタスクの種類には、モデル固有の引数は必要ありません。「ラベルと ONNX モデル ファイルを読み込む」セクションに進むことができます。
複数ラベルの画像分類の場合、最適な子実行に対して生成される ONNX モデルでは、既定でバッチ スコアリングがサポートされます。 そのため、このタスクの種類には、モデル固有の引数は必要ありません。「ラベルと ONNX モデル ファイルを読み込む」セクションに進むことができます。
from azure.ai.ml import command

job = command(
    code="./onnx_generator_files",  # local path where the code is stored
    command="python ONNX_batch_model_generator_automl_for_images.py --model_name ${{inputs.model_name}} --batch_size ${{inputs.batch_size}} --height_onnx ${{inputs.height_onnx}} --width_onnx ${{inputs.width_onnx}} --job_name ${{inputs.job_name}} --task_type ${{inputs.task_type}} --min_size ${{inputs.min_size}} --max_size ${{inputs.max_size}} --box_score_thresh ${{inputs.box_score_thresh}} --box_nms_thresh ${{inputs.box_nms_thresh}} --box_detections_per_img ${{inputs.box_detections_per_img}}",
    inputs=inputs,
    environment=env,
    compute=compute_name,
    display_name="ONNX-batch-model-generation-rcnn",
    description="Use the PyTorch to generate ONNX batch scoring model.",
)
returned_job = ml_client.create_or_update(job)
ml_client.jobs.stream(returned_job.name)
from azure.ai.ml import command

job = command(
    code="./onnx_generator_files",  # local path where the code is stored
    command="python ONNX_batch_model_generator_automl_for_images.py --model_name ${{inputs.model_name}} --batch_size ${{inputs.batch_size}} --height_onnx ${{inputs.height_onnx}} --width_onnx ${{inputs.width_onnx}} --job_name ${{inputs.job_name}} --task_type ${{inputs.task_type}} --img_size ${{inputs.img_size}} --model_size ${{inputs.model_size}} --box_score_thresh ${{inputs.box_score_thresh}} --box_iou_thresh ${{inputs.box_iou_thresh}}",
    inputs=inputs,
    environment=env,
    compute=compute_name,
    display_name="ONNX-batch-model-generation",
    description="Use the PyTorch to generate ONNX batch scoring model.",
)
returned_job = ml_client.create_or_update(job)
ml_client.jobs.stream(returned_job.name)
from azure.ai.ml import command

job = command(
    code="./onnx_generator_files",  # local path where the code is stored
    command="python ONNX_batch_model_generator_automl_for_images.py --model_name ${{inputs.model_name}} --batch_size ${{inputs.batch_size}} --height_onnx ${{inputs.height_onnx}} --width_onnx ${{inputs.width_onnx}} --job_name ${{inputs.job_name}} --task_type ${{inputs.task_type}} --min_size ${{inputs.min_size}} --max_size ${{inputs.max_size}} --box_score_thresh ${{inputs.box_score_thresh}} --box_nms_thresh ${{inputs.box_nms_thresh}} --box_detections_per_img ${{inputs.box_detections_per_img}}",
    inputs=inputs,
    environment=env,
    compute=compute_name,
    display_name="ONNX-batch-model-generation-maskrcnn",
    description="Use the PyTorch to generate ONNX batch scoring model.",
)
returned_job = ml_client.create_or_update(job)
ml_client.jobs.stream(returned_job.name)
バッチ モデルが生成されたら、それを UI ([出力 + ログ]>[出力]) から手動でダウンロードするか、次のメソッドを使用します。
batch_size = 8  # use the batch size used to generate the model
returned_job_run = mlflow_client.get_run(returned_job.name)

# Download run's artifacts/outputs
onnx_model_path = mlflow_client.download_artifacts(
    returned_job_run.info.run_id, 'outputs/model_'+str(batch_size)+'.onnx', local_dir
)
モデルのダウンロードの手順の後、ONNX Runtime Python パッケージを使用し、model.onnx ファイルを利用して推論を実行します。 デモンストレーションを目的として、この記事では各ビジョン タスクのために、画像データセットの準備方法に関するページのデータセットを使用します。
ONNX モデルの推論のデモンストレーションをするために、各データセットを使用してすべてのビジョン タスクのモデルをトレーニングしました。
ラベルと ONNX モデル ファイルを読み込む
次のコード スニペットでは、クラス名が順序付けられている labels.json が読み込まれます。 つまり、ONNX モデルでラベル ID が 2 であると予測される場合は、labels.json ファイルで 3 番目のインデックスに指定されているラベル名が対応しています。
import json
import onnxruntime

labels_file = "automl_models/labels.json"
with open(labels_file) as f:
    classes = json.load(f)
print(classes)
try:
    session = onnxruntime.InferenceSession(onnx_model_path)
    print("ONNX model loaded...")
except Exception as e:
    print("Error loading ONNX file: ", str(e))
モデルがある場合、モデル固有の詳細とタスク固有の詳細を把握しておくことが重要です。 これらの詳細には、モデル固有の出力またはタスク固有の出力がわかるように、入力の数と出力の数、画像の前処理のために想定される入力の図形または形式、および出力の図形が含まれます。
sess_input = session.get_inputs()
sess_output = session.get_outputs()
print(f"No. of inputs : {len(sess_input)}, No. of outputs : {len(sess_output)}")

for idx, input_ in enumerate(range(len(sess_input))):
    input_name = sess_input[input_].name
    input_shape = sess_input[input_].shape
    input_type = sess_input[input_].type
    print(f"{idx} Input name : { input_name }, Input shape : {input_shape}, \
    Input type  : {input_type}")

for idx, output in enumerate(range(len(sess_output))):
    output_name = sess_output[output].name
    output_shape = sess_output[output].shape
    output_type = sess_output[output].type
    print(f" {idx} Output name : {output_name}, Output shape : {output_shape}, \
    Output type  : {output_type}")
すべての ONNX モデルには、入力形式と出力形式の定義済みセットがあります。
この例では、ONNX モデルの推論を説明するために、134 個の画像と 4 つのクラスおよびラベルの fridgeObjects データセットでトレーニングされたモデルを適用します。 画像分類タスクのトレーニングの詳細については、複数クラスの画像分類のノートブックを参照してください。
入力は、前処理された画像です。
| 入力名 |
入力図形 |
入力型 |
説明 |
| インプット1 |
(batch_size, num_channels, height, width) |
ndarray(float) |
入力は前処理された画像であり、図形は (1, 3, 224, 224) で、バッチ サイズが 1、高さと幅が 224 です。 これらの数値は、トレーニングの例で crop_size に使用されている値と対応しています。 |
出力は、すべてのクラスおよびラベルのロジットの配列です。
| 出力名 |
出力図形 |
出力の種類 |
説明 |
| 出力1 |
(batch_size, num_classes) |
ndarray(float) |
モデルはロジットを返します (softmax なし)。 たとえば、バッチ サイズが 1 で 4 クラスの場合は、(1, 4) が返されます。 |
この例では、ONNX モデルの推論を説明するために、128 個の画像と 4 つのクラスおよびラベルの複数ラベルの fridgeObjects データセットでトレーニングされたモデルを使用します。 複数ラベルの画像分類に対するモデル トレーニングの詳細については、複数ラベルの画像分類のノートブックを参照してください。
入力は、前処理された画像です。
| 入力名 |
入力図形 |
入力型 |
説明 |
| 入力1 |
(batch_size, num_channels, height, width) |
ndarray(float) |
入力は前処理された画像であり、図形は (1, 3, 224, 224) で、バッチ サイズが 1、高さと幅が 224 です。 これらの数値は、トレーニングの例で crop_size に使用されている値と対応しています。 |
出力は、すべてのクラスおよびラベルのロジットの配列です。
| 出力名 |
出力図形 |
出力の種類 |
説明 |
| アウトプット1 |
(batch_size, num_classes) |
ndarray(float) |
モデルはロジットを返します (sigmoid なし)。 たとえば、バッチ サイズが 1 で 4 クラスの場合は、(1, 4) が返されます。 |
この物体検出の例では、ONNX モデルの推論を説明するために、128 個の画像と 4 つのクラスおよびラベルの fridgeObjects 検出データセットでトレーニングされたモデルを使用します。 この例では、推論の手順を示すために、Faster R-CNN モデルをトレーニングします。 物体検出モデルのトレーニングの詳細については、物体検出のノートブックを参照してください。
入力は、前処理された画像です。
| 入力名 |
入力図形 |
入力型 |
説明 |
| 入力 |
(batch_size, num_channels, height, width) |
ndarray(float) |
入力は前処理された画像であり、図形は (1, 3, 600, 800) で、バッチ サイズが 1、高さが 600、幅が 800 です。 |
出力は、output_names と予測の組です。 ここでは、output_names と predictions はそれぞれ、長さが 3*batch_size のリストです。 Faster R-CNN の出力順序は、ボックス、ラベル、スコアです。一方、RetinaNet 出力では、ボックス、スコア、ラベルです。
| 出力名 |
出力図形 |
出力の種類 |
説明 |
output_names |
(3*batch_size) |
キーのリスト |
バッチ サイズが 2 の場合、output_names は ['boxes_0', 'labels_0', 'scores_0', 'boxes_1', 'labels_1', 'scores_1'] になります |
predictions |
(3*batch_size) |
ndarray(float) のリスト |
バッチ サイズが 2 の場合、predictions は [(n1_boxes, 4), (n1_boxes), (n1_boxes), (n2_boxes, 4), (n2_boxes), (n2_boxes)] の形になります。 ここでは、各インデックスの値が output_names の同じインデックスに対応しています。 |
次の表では、イメージのバッチで各サンプルに返されるボックス、ラベル、およびスコアについて説明します。
| 名前 |
図形 |
タイプ |
説明 |
| 矩形 |
(n_boxes, 4)。ここで、各矩形は x_min, y_min, x_max, y_max |
ndarray(float) |
モデルは、左上と右下の座標がある n 個の矩形を返します。 |
| ラベル |
(n_boxes) |
ndarray(float) |
各矩形内の物体のラベルまたはクラス ID。 |
| スコア |
(n_boxes) |
ndarray(float) |
各矩形内の物体の信頼度スコア。 |
この物体検出の例では、ONNX モデルの推論を説明するために、128 個の画像と 4 つのクラスおよびラベルの fridgeObjects 検出データセットでトレーニングされたモデルを使用します。 この例では、推論の手順を示すために、YOLO モデルをトレーニングします。 物体検出モデルのトレーニングの詳細については、物体検出のノートブックを参照してください。
入力は前処理された画像であり、図形は (1, 3, 640, 640) で、バッチ サイズが 1、高さと幅が 640 です。 これらの数値は、トレーニングの例で使用されている値と対応しています。
| 入力名 |
入力図形 |
入力型 |
説明 |
| 入力 |
(batch_size, num_channels, height, width) |
ndarray(float) |
入力は前処理された画像であり、図形は (1, 3, 640, 640) で、バッチ サイズが 1、高さが 640、幅が 640 です。 |
ONNX モデル予測には複数の出力が含まれます。 最初の出力は、検出の非最大抑制を実行するために必要です。 使いやすくするために、自動 ML では、NMS 後処理ステップの後に出力形式が表示されます。 NMS の後の出力は、バッチ内の各サンプルのボックス、ラベル、およびスコアのリストです。
| 出力名 |
出力図形 |
出力の種類 |
説明 |
| 出力 |
(batch_size) |
ndarray(float) のリスト |
モデルでは、バッチ内の各サンプルのボックス検出を返します。 |
リスト内の各セルは、図形 (n_boxes, 6) を含むサンプルのボックス検出を示しています (各ボックスには x_min, y_min, x_max, y_max, confidence_score, class_id が含まれます)。
このインスタンス セグメント化の例では、ONNX モデルの推論を説明するために、128 個の画像と 4 つのクラスおよびラベルの fridgeObjects データセットでトレーニングされた Mask R-CNN モデルを使用します。 インスタンス セグメント化モデルのトレーニングの詳細については、インスタンス セグメント化のノートブックを参照してください。
重要
インスタンス セグメント化タスクでは、Mask R-CNN のみがサポートされています。 入力形式と出力形式は、Mask R-CNN のみに基づいています。
入力は、前処理された画像です。 さまざまな図形の画像を操作するために、Mask R-CNN の ONNX モデルがエクスポートされました。 パフォーマンスを向上させるために、トレーニング画像のサイズと一貫性のある固定サイズにサイズ変更することをお勧めします。
| 入力名 |
入力図形 |
入力型 |
説明 |
| 入力 |
(batch_size, num_channels, height, width) |
ndarray(float) |
入力は前処理された画像であり、図形は (1, 3, input_image_height, input_image_width) で、バッチ サイズが 1、高さと幅は入力画像と同様です。 |
出力は、output_names と予測の組です。 ここでは、output_names と predictions はそれぞれ、長さが 4*batch_size のリストです。
| 出力名 |
出力図形 |
出力の種類 |
説明 |
output_names |
(4*batch_size) |
キーのリスト |
バッチ サイズが 2 の場合、output_names は ['boxes_0', 'labels_0', 'scores_0', 'masks_0', 'boxes_1', 'labels_1', 'scores_1', 'masks_1'] になります |
predictions |
(4*batch_size) |
ndarray(float) のリスト |
バッチ サイズが 2 の場合、predictions は [(n1_boxes, 4), (n1_boxes), (n1_boxes), (n1_boxes, 1, height_onnx, width_onnx), (n2_boxes, 4), (n2_boxes), (n2_boxes), (n2_boxes, 1, height_onnx, width_onnx)] の形になります。 ここでは、各インデックスの値が output_names の同じインデックスに対応しています。 |
| 名前 |
図形 |
タイプ |
説明 |
| 矩形 |
(n_boxes, 4)。ここで、各矩形は x_min, y_min, x_max, y_max |
ndarray(float) |
モデルは、左上と右下の座標がある n 個の矩形を返します。 |
| ラベル |
(n_boxes) |
ndarray(float) |
各矩形内の物体のラベルまたはクラス ID。 |
| スコア |
(n_boxes) |
ndarray(float) |
各矩形内の物体の信頼度スコア。 |
| マスク |
(n_boxes, 1, height_onnx, width_onnx) |
ndarray(float) |
検出された物体のマスク (多角形) と入力画像の図形の高さと幅。 |
前処理
ONNX モデルの推論のために、次の前処理手順を実行します。
- 画像を RGB に変換します。
- 画像のサイズを、トレーニング中の検証データセットの変換に使用される値に対応する、
valid_resize_size と valid_resize_size の値に変更します。 valid_resize_size の既定値は 256 です。
- 画像を
height_onnx_crop_size と width_onnx_crop_size に中央でトリミングします。 これは、既定値が 224 である valid_crop_size に対応しています。
HxWxC を CxHxW に変更します。- float 型に変換します。
- ImageNet の
mean = [0.485, 0.456, 0.406] および std = [0.229, 0.224, 0.225] を使用して正規化します。
トレーニング中にハイパーパラメーターvalid_resize_size と valid_crop_size に異なる値を選択した場合は、それらの値を使用する必要があります。
ONNX モデルに必要な入力図形を取得します。
batch, channel, height_onnx_crop_size, width_onnx_crop_size = session.get_inputs()[0].shape
batch, channel, height_onnx_crop_size, width_onnx_crop_size
PyTorch を使用しない
import glob
import numpy as np
from PIL import Image

def preprocess(image, resize_size, crop_size_onnx):
    """Perform pre-processing on raw input image

    :param image: raw input image
    :type image: PIL image
    :param resize_size: value to resize the image
    :type image: Int
    :param crop_size_onnx: expected height of an input image in onnx model
    :type crop_size_onnx: Int
    :return: pre-processed image in numpy format
    :rtype: ndarray 1xCxHxW
    """

    image = image.convert('RGB')
    # resize
    image = image.resize((resize_size, resize_size))
    #  center  crop
    left = (resize_size - crop_size_onnx)/2
    top = (resize_size - crop_size_onnx)/2
    right = (resize_size + crop_size_onnx)/2
    bottom = (resize_size + crop_size_onnx)/2
    image = image.crop((left, top, right, bottom))

    np_image = np.array(image)
    # HWC -> CHW
    np_image = np_image.transpose(2, 0, 1) # CxHxW
    # normalize the image
    mean_vec = np.array([0.485, 0.456, 0.406])
    std_vec = np.array([0.229, 0.224, 0.225])
    norm_img_data = np.zeros(np_image.shape).astype('float32')
    for i in range(np_image.shape[0]):
        norm_img_data[i,:,:] = (np_image[i,:,:]/255 - mean_vec[i])/std_vec[i]

    np_image = np.expand_dims(norm_img_data, axis=0) # 1xCxHxW
    return np_image

# following code loads only batch_size number of images for demonstrating ONNX inference
# make sure that the data directory has at least batch_size number of images

test_images_path = "automl_models_multi_cls/test_images_dir/*" # replace with path to images
# Select batch size needed
batch_size = 8
# you can modify resize_size based on your trained model
resize_size = 256
# height and width will be the same for classification
crop_size_onnx = height_onnx_crop_size

image_files = glob.glob(test_images_path)
img_processed_list = []
for i in range(batch_size):
    img = Image.open(image_files[i])
    img_processed_list.append(preprocess(img, resize_size, crop_size_onnx))

if len(img_processed_list) > 1:
    img_data = np.concatenate(img_processed_list)
elif len(img_processed_list) == 1:
    img_data = img_processed_list[0]
else:
    img_data = None

assert batch_size == img_data.shape[0]
PyTorch を使用する
import glob
import torch
import numpy as np
from PIL import Image
from torchvision import transforms

def _make_3d_tensor(x) -> torch.Tensor:
    """This function is for images that have less channels.

    :param x: input tensor
    :type x: torch.Tensor
    :return: return a tensor with the correct number of channels
    :rtype: torch.Tensor
    """
    return x if x.shape[0] == 3 else x.expand((3, x.shape[1], x.shape[2]))

def preprocess(image, resize_size, crop_size_onnx):
    transform = transforms.Compose([
        transforms.Resize(resize_size),
        transforms.CenterCrop(crop_size_onnx),
        transforms.ToTensor(),
        transforms.Lambda(_make_3d_tensor),
        transforms.Normalize([0.485, 0.456, 0.406], [0.229, 0.224, 0.225])])

    img_data = transform(image)
    img_data = img_data.numpy()
    img_data = np.expand_dims(img_data, axis=0)
    return img_data

# following code loads only batch_size number of images for demonstrating ONNX inference
# make sure that the data directory has at least batch_size number of images

test_images_path = "automl_models_multi_cls/test_images_dir/*"  # replace with path to images
# Select batch size needed
batch_size = 8
# you can modify resize_size based on your trained model
resize_size = 256
# height and width will be the same for classification
crop_size_onnx = height_onnx_crop_size

image_files = glob.glob(test_images_path)
img_processed_list = []
for i in range(batch_size):
    img = Image.open(image_files[i])
    img_processed_list.append(preprocess(img, resize_size, crop_size_onnx))

if len(img_processed_list) > 1:
    img_data = np.concatenate(img_processed_list)
elif len(img_processed_list) == 1:
    img_data = img_processed_list[0]
else:
    img_data = None

assert batch_size == img_data.shape[0]
ONNX モデルの推論のために、次の前処理手順を実行します。 これらの手順は、複数クラスの画像分類でも同じです。
- 画像を RGB に変換します。
- 画像のサイズを、トレーニング中の検証データセットの変換に使用される値に対応する、
valid_resize_size と valid_resize_size の値に変更します。 valid_resize_size の既定値は 256 です。
- 画像を
height_onnx_crop_size と width_onnx_crop_size に中央でトリミングします。 これは、既定値が 224 である valid_crop_size に対応しています。
HxWxC を CxHxW に変更します。- float 型に変換します。
- ImageNet の
mean = [0.485, 0.456, 0.406] および std = [0.229, 0.224, 0.225] を使用して正規化します。
トレーニング中にハイパーパラメーターvalid_resize_size と valid_crop_size に異なる値を選択した場合は、それらの値を使用する必要があります。
ONNX モデルに必要な入力図形を取得します。
batch, channel, height_onnx_crop_size, width_onnx_crop_size = session.get_inputs()[0].shape
batch, channel, height_onnx_crop_size, width_onnx_crop_size
PyTorch を使用しない
import glob
import numpy as np
from PIL import Image

def preprocess(image, resize_size, crop_size_onnx):
    """Perform pre-processing on raw input image

    :param image: raw input image
    :type image: PIL image
    :param resize_size: value to resize the image
    :type image: Int
    :param crop_size_onnx: expected height of an input image in onnx model
    :type crop_size_onnx: Int
    :return: pre-processed image in numpy format
    :rtype: ndarray 1xCxHxW
    """

    image = image.convert('RGB')
    # resize
    image = image.resize((resize_size, resize_size))
    # center  crop
    left = (resize_size - crop_size_onnx)/2
    top = (resize_size - crop_size_onnx)/2
    right = (resize_size + crop_size_onnx)/2
    bottom = (resize_size + crop_size_onnx)/2
    image = image.crop((left, top, right, bottom))

    np_image = np.array(image)
    # HWC -> CHW
    np_image = np_image.transpose(2, 0, 1) # CxHxW

    # normalize the image
    mean_vec = np.array([0.485, 0.456, 0.406])
    std_vec = np.array([0.229, 0.224, 0.225])
    norm_img_data = np.zeros(np_image.shape).astype('float32')
    for i in range(np_image.shape[0]):
        norm_img_data[i,:,:] = (np_image[i,:,:] / 255 - mean_vec[i]) / std_vec[i]
    np_image = np.expand_dims(norm_img_data, axis=0) # 1xCxHxW
    return np_image

# following code loads only batch_size number of images for demonstrating ONNX inference
# make sure that the data directory has at least batch_size number of images

test_images_path = "automl_models_multi_label/test_images_dir/*" # replace with path to images
# Select batch size needed
batch_size = 8
# you can modify resize_size based on your trained model
resize_size = 256
# height and width will be the same for classification
crop_size_onnx = height_onnx_crop_size

image_files = glob.glob(test_images_path)
img_processed_list = []
for i in range(batch_size):
    img = Image.open(image_files[i])
    img_processed_list.append(preprocess(img, resize_size, crop_size_onnx))

if len(img_processed_list) > 1:
    img_data = np.concatenate(img_processed_list)
elif len(img_processed_list) == 1:
    img_data = img_processed_list[0]
else:
    img_data = None

assert batch_size == img_data.shape[0]
PyTorch を使用する
import glob
import torch
import numpy as np
from PIL import Image
from torchvision import transforms

def _make_3d_tensor(x) -> torch.Tensor:
    """This function is for images that have less channels.

    :param x: input tensor
    :type x: torch.Tensor
    :return: return a tensor with the correct number of channels
    :rtype: torch.Tensor
    """
    return x if x.shape[0] == 3 else x.expand((3, x.shape[1], x.shape[2]))

def preprocess(image, resize_size, crop_size_onnx):
    """Perform pre-processing on raw input image

    :param image: raw input image
    :type image: PIL image
    :param resize_size: value to resize the image
    :type image: Int
    :param crop_size_onnx: expected height of an input image in onnx model
    :type crop_size_onnx: Int
    :return: pre-processed image in numpy format
    :rtype: ndarray 1xCxHxW
    """
    transform = transforms.Compose([
        transforms.Resize(resize_size),
        transforms.CenterCrop(crop_size_onnx),
        transforms.ToTensor(),
        transforms.Lambda(_make_3d_tensor),
        transforms.Normalize([0.485, 0.456, 0.406], [0.229, 0.224, 0.225])])

    img_data = transform(image)
    img_data = img_data.numpy()
    img_data = np.expand_dims(img_data, axis=0)

    return img_data

# following code loads only batch_size number of images for demonstrating ONNX inference
# make sure that the data directory has at least batch_size number of images

test_images_path = "automl_models_multi_label/test_images_dir/*"  # replace with path to images
# Select batch size needed
batch_size = 8
# you can modify resize_size based on your trained model
resize_size = 256
# height and width will be the same for classification
crop_size_onnx = height_onnx_crop_size

image_files = glob.glob(test_images_path)
img_processed_list = []
for i in range(batch_size):
    img = Image.open(image_files[i])
    img_processed_list.append(preprocess(img, resize_size, crop_size_onnx))

if len(img_processed_list) > 1:
    img_data = np.concatenate(img_processed_list)
elif len(img_processed_list) == 1:
    img_data = img_processed_list[0]
else:
    img_data = None

assert batch_size == img_data.shape[0]
Faster R-CNN アーキテクチャを使用する物体検出の場合は、画像のトリミングを除き、画像分類と同じ前処理手順に従います。 高さ 600 と幅 800 を使用してイメージのサイズを変更できます。 次のコードを使用して、予想される入力の高さと幅を取得できます。
batch, channel, height_onnx, width_onnx = session.get_inputs()[0].shape
batch, channel, height_onnx, width_onnx
次に、前処理手順を実行します。
import glob
import numpy as np
from PIL import Image

def preprocess(image, height_onnx, width_onnx):
    """Perform pre-processing on raw input image

    :param image: raw input image
    :type image: PIL image
    :param height_onnx: expected height of an input image in onnx model
    :type height_onnx: Int
    :param width_onnx: expected width of an input image in onnx model
    :type width_onnx: Int
    :return: pre-processed image in numpy format
    :rtype: ndarray 1xCxHxW
    """

    image = image.convert('RGB')
    image = image.resize((width_onnx, height_onnx))
    np_image = np.array(image)
    # HWC -> CHW
    np_image = np_image.transpose(2, 0, 1) # CxHxW
    # normalize the image
    mean_vec = np.array([0.485, 0.456, 0.406])
    std_vec = np.array([0.229, 0.224, 0.225])
    norm_img_data = np.zeros(np_image.shape).astype('float32')
    for i in range(np_image.shape[0]):
        norm_img_data[i,:,:] = (np_image[i,:,:] / 255 - mean_vec[i]) / std_vec[i]
    np_image = np.expand_dims(norm_img_data, axis=0) # 1xCxHxW
    return np_image

# following code loads only batch_size number of images for demonstrating ONNX inference
# make sure that the data directory has at least batch_size number of images

test_images_path = "automl_models_od/test_images_dir/*" # replace with path to images
image_files = glob.glob(test_images_path)
img_processed_list = []
for i in range(batch_size):
    img = Image.open(image_files[i])
    img_processed_list.append(preprocess(img, height_onnx, width_onnx))

if len(img_processed_list) > 1:
    img_data = np.concatenate(img_processed_list)
elif len(img_processed_list) == 1:
    img_data = img_processed_list[0]
else:
    img_data = None

assert batch_size == img_data.shape[0]
YOLO アーキテクチャを使用する物体検出の場合は、画像のトリミングを除き、画像分類と同じ前処理手順に従います。 次のコードを使用して、画像のサイズを高さ 600、幅 800 に変更し、期待される入力の高さと幅にすることができます。
batch, channel, height_onnx, width_onnx = session.get_inputs()[0].shape
batch, channel, height_onnx, width_onnx
YOLO で必要な前処理については、yolo_onnx_preprocessing_utils.py を参照してください。
import glob
import numpy as np
from yolo_onnx_preprocessing_utils import preprocess

# use height and width based on the generated model
test_images_path = "automl_models_od_yolo/test_images_dir/*" # replace with path to images
image_files = glob.glob(test_images_path)
img_processed_list = []
pad_list = []
for i in range(batch_size):
    img_processed, pad = preprocess(image_files[i])
    img_processed_list.append(img_processed)
    pad_list.append(pad)

if len(img_processed_list) > 1:
    img_data = np.concatenate(img_processed_list)
elif len(img_processed_list) == 1:
    img_data = img_processed_list[0]
else:
    img_data = None

assert batch_size == img_data.shape[0]
重要
インスタンス セグメント化タスクでは、Mask R-CNN のみがサポートされています。 前処理の手順は、Mask R-CNN にのみ基づいています。
ONNX モデルの推論のために、次の前処理手順を実行します。
- 画像を RGB に変換します。
- 画像のサイズを変更します。
HxWxC を CxHxW に変更します。- float 型に変換します。
- ImageNet の
mean = [0.485, 0.456, 0.406] および std = [0.229, 0.224, 0.225] を使用して正規化します。
resize_height と resize_width については、トレーニング中に使用した値を使用することもできます。これは、Mask R-CNN の min_size と max_sizeハイパーパラメーターによって制限されています。
import glob
import numpy as np
from PIL import Image

def preprocess(image, resize_height, resize_width):
    """Perform pre-processing on raw input image

    :param image: raw input image
    :type image: PIL image
    :param resize_height: resize height of an input image
    :type resize_height: Int
    :param resize_width: resize width of an input image
    :type resize_width: Int
    :return: pre-processed image in numpy format
    :rtype: ndarray of shape 1xCxHxW
    """

    image = image.convert('RGB')
    image = image.resize((resize_width, resize_height))
    np_image = np.array(image)
    # HWC -> CHW
    np_image = np_image.transpose(2, 0, 1)  # CxHxW
    # normalize the image
    mean_vec = np.array([0.485, 0.456, 0.406])
    std_vec = np.array([0.229, 0.224, 0.225])
    norm_img_data = np.zeros(np_image.shape).astype('float32')
    for i in range(np_image.shape[0]):
        norm_img_data[i,:,:] = (np_image[i,:,:]/255 - mean_vec[i])/std_vec[i]
    np_image = np.expand_dims(norm_img_data, axis=0)  # 1xCxHxW
    return np_image

# following code loads only batch_size number of images for demonstrating ONNX inference
# make sure that the data directory has at least batch_size number of images
# use height and width based on the trained model
# use height and width based on the generated model
test_images_path = "automl_models_is/test_images_dir/*" # replace with path to images
image_files = glob.glob(test_images_path)
img_processed_list = []
for i in range(batch_size):
    img = Image.open(image_files[i])
    img_processed_list.append(preprocess(img, height_onnx, width_onnx))

if len(img_processed_list) > 1:
    img_data = np.concatenate(img_processed_list)
elif len(img_processed_list) == 1:
    img_data = img_processed_list[0]
else:
    img_data = None

assert batch_size == img_data.shape[0]
ONNX Runtime を使用した推論
ONNX Runtime を使用した推論は、コンピューター ビジョン タスクごとに異なります。
def get_predictions_from_ONNX(onnx_session, img_data):
    """Perform predictions with ONNX runtime

    :param onnx_session: onnx model session
    :type onnx_session: class InferenceSession
    :param img_data: pre-processed numpy image
    :type img_data: ndarray with shape 1xCxHxW
    :return: scores with shapes
            (1, No. of classes in training dataset)
    :rtype: numpy array
    """

    sess_input = onnx_session.get_inputs()
    sess_output = onnx_session.get_outputs()
    print(f"No. of inputs : {len(sess_input)}, No. of outputs : {len(sess_output)}")
    # predict with ONNX Runtime
    output_names = [ output.name for output in sess_output]
    scores = onnx_session.run(output_names=output_names,\
                                               input_feed={sess_input[0].name: img_data})

    return scores[0]

scores = get_predictions_from_ONNX(session, img_data)
def get_predictions_from_ONNX(onnx_session,img_data):
    """Perform predictions with ONNX runtime

    :param onnx_session: onnx model session
    :type onnx_session: class InferenceSession
    :param img_data: pre-processed numpy image
    :type img_data: ndarray with shape 1xCxHxW
    :return: scores with shapes
            (1, No. of classes in training dataset)
    :rtype: numpy array
    """

    sess_input = onnx_session.get_inputs()
    sess_output = onnx_session.get_outputs()
    print(f"No. of inputs : {len(sess_input)}, No. of outputs : {len(sess_output)}")
    # predict with ONNX Runtime
    output_names = [ output.name for output in sess_output]
    scores = onnx_session.run(output_names=output_names,\
                                               input_feed={sess_input[0].name: img_data})

    return scores[0]

scores = get_predictions_from_ONNX(session, img_data)
def get_predictions_from_ONNX(onnx_session, img_data):
    """perform predictions with ONNX runtime

    :param onnx_session: onnx model session
    :type onnx_session: class InferenceSession
    :param img_data: pre-processed numpy image
    :type img_data: ndarray with shape 1xCxHxW
    :return: boxes, labels , scores
            (No. of boxes, 4) (No. of boxes,) (No. of boxes,)
    :rtype: tuple
    """

    sess_input = onnx_session.get_inputs()
    sess_output = onnx_session.get_outputs()

    # predict with ONNX Runtime
    output_names = [output.name for output in sess_output]
    predictions = onnx_session.run(output_names=output_names,\
                                               input_feed={sess_input[0].name: img_data})

    return output_names, predictions

output_names, predictions = get_predictions_from_ONNX(session, img_data)
def get_predictions_from_ONNX(onnx_session,img_data):
    """perform predictions with ONNX Runtime

    :param onnx_session: onnx model session
    :type onnx_session: class InferenceSession
    :param img_data: pre-processed numpy image
    :type img_data: ndarray with shape 1xCxHxW
    :return: boxes, labels , scores
    :rtype: list
    """
    sess_input = onnx_session.get_inputs()
    sess_output = onnx_session.get_outputs()
    # predict with ONNX Runtime
    output_names = [ output.name for output in sess_output]
    pred = onnx_session.run(output_names=output_names,\
                                               input_feed={sess_input[0].name: img_data})
    return pred[0]

result = get_predictions_from_ONNX(session, img_data)
インスタンス セグメント化モデルでは、矩形、ラベル、スコア、およびマスクが予測されます。 ONNX によって、インスタンスごとに予測されたマスクと、対応する境界ボックスおよびクラス信頼度スコアが出力されます。 必要に応じて、バイナリ マスクから多角形に変換する必要がある場合があります。
def get_predictions_from_ONNX(onnx_session, img_data):
    """Perform predictions with ONNX runtime

    :param onnx_session: onnx model session
    :type onnx_session: class InferenceSession
    :param img_data: pre-processed numpy image
    :type img_data: ndarray with shape 1xCxHxW
    :return: boxes, labels , scores , masks with shapes
            (No. of instances, 4) (No. of instances,) (No. of instances,)
            (No. of instances, 1, HEIGHT, WIDTH))
    :rtype: tuple
    """

    sess_input = onnx_session.get_inputs()
    sess_output = onnx_session.get_outputs()
    # predict with ONNX Runtime
    output_names = [ output.name for output in sess_output]
    predictions = onnx_session.run(output_names=output_names,\
                                               input_feed={sess_input[0].name: img_data})
    return output_names, predictions

output_names, predictions = get_predictions_from_ONNX(session, img_data)
後処理
予測値に softmax() を適用して、各クラスの分類信頼度スコア (確率) を取得します。 その後、予測は確率が最も高いクラスになります。
PyTorch を使用しない
def softmax(x):
    e_x = np.exp(x - np.max(x, axis=1, keepdims=True))
    return e_x / np.sum(e_x, axis=1, keepdims=True)

conf_scores = softmax(scores)
class_preds = np.argmax(conf_scores, axis=1)
print("predicted classes:", ([(class_idx, classes[class_idx]) for class_idx in class_preds]))
PyTorch を使用する
conf_scores = torch.nn.functional.softmax(torch.from_numpy(scores), dim=1)
class_preds = torch.argmax(conf_scores, dim=1)
print("predicted classes:", ([(class_idx.item(), classes[class_idx]) for class_idx in class_preds]))
この手順は、複数クラスの分類とは異なります。 複数ラベルの画像分類の信頼度スコアを取得するには、ロジット (ONNX 出力) に sigmoid を適用する必要があります。
PyTorch を使用しない
def sigmoid(x):
    return 1 / (1 + np.exp(-x))

# we apply a threshold of 0.5 on confidence scores
score_threshold = 0.5
conf_scores = sigmoid(scores)
image_wise_preds = np.where(conf_scores > score_threshold)
for image_idx, class_idx in zip(image_wise_preds[0], image_wise_preds[1]):
    print('image: {}, class_index: {}, class_name: {}'.format(image_files[image_idx], class_idx, classes[class_idx]))
PyTorch を使用する
# we apply a threshold of 0.5 on confidence scores
score_threshold = 0.5
conf_scores = torch.sigmoid(torch.from_numpy(scores))
image_wise_preds = torch.where(conf_scores > score_threshold)
for image_idx, class_idx in zip(image_wise_preds[0], image_wise_preds[1]):
    print('image: {}, class_index: {}, class_name: {}'.format(image_files[image_idx], class_idx, classes[class_idx]))
複数クラスおよび複数ラベルの分類の場合は、AutoML でサポートされているすべてのモデル アーキテクチャについて、前の説明と同じ手順に従うことができます。
物体検出の場合、予測は height_onnx および width_onnx のスケールに自動的に設定されます。 予測されたボックスの座標を元のディメンションに変換するには、次の計算を実装します。
- Xmin * original_width/width_onnx
- Ymin * original_height/height_onnx
- Xmax * original_width/width_onnx
- Ymax * original_height/height_onnx
もう 1 つの方法として、次のコードを使用して、[0, 1] の範囲内になるようにボックスのディメンションをスケーリングすることもできます。 これにより、「予測の視覚化」セクションで説明されているように、ボックスの座標に元イメージの高さと幅をそれぞれの座標で乗算することができ、元イメージのディメンションのボックスを取得できます。
def _get_box_dims(image_shape, box):
    box_keys = ['topX', 'topY', 'bottomX', 'bottomY']
    height, width = image_shape[0], image_shape[1]

    box_dims = dict(zip(box_keys, [coordinate.item() for coordinate in box]))

    box_dims['topX'] = box_dims['topX'] * 1.0 / width
    box_dims['bottomX'] = box_dims['bottomX'] * 1.0 / width
    box_dims['topY'] = box_dims['topY'] * 1.0 / height
    box_dims['bottomY'] = box_dims['bottomY'] * 1.0 / height

    return box_dims

def _get_prediction(boxes, labels, scores, image_shape, classes):
    bounding_boxes = []
    for box, label_index, score in zip(boxes, labels, scores):
        box_dims = _get_box_dims(image_shape, box)

        box_record = {'box': box_dims,
                      'label': classes[label_index],
                      'score': score.item()}

        bounding_boxes.append(box_record)

    return bounding_boxes

# Filter the results with threshold.
# Please replace the threshold for your test scenario.
score_threshold = 0.8
filtered_boxes_batch = []
for batch_sample in range(0, batch_size*3, 3):
    # in case of retinanet change the order of boxes, labels, scores to boxes, scores, labels
    # confirm the same from order of boxes, labels, scores output_names
    boxes, labels, scores = predictions[batch_sample], predictions[batch_sample + 1], predictions[batch_sample + 2]
    bounding_boxes = _get_prediction(boxes, labels, scores, (height_onnx, width_onnx), classes)
    filtered_bounding_boxes = [box for box in bounding_boxes if box['score'] >= score_threshold]
    filtered_boxes_batch.append(filtered_bounding_boxes)
次のコードでは、矩形、ラベル、およびスコアが作成されます。 これらの境界ボックスの詳細を使用して、Faster R-CNN モデルに対して行ったのと同じ後処理手順を実行します。
from yolo_onnx_preprocessing_utils import non_max_suppression, _convert_to_rcnn_output

result_final = non_max_suppression(
    torch.from_numpy(result),
    conf_thres=0.1,
    iou_thres=0.5)

def _get_box_dims(image_shape, box):
    box_keys = ['topX', 'topY', 'bottomX', 'bottomY']
    height, width = image_shape[0], image_shape[1]

    box_dims = dict(zip(box_keys, [coordinate.item() for coordinate in box]))

    box_dims['topX'] = box_dims['topX'] * 1.0 / width
    box_dims['bottomX'] = box_dims['bottomX'] * 1.0 / width
    box_dims['topY'] = box_dims['topY'] * 1.0 / height
    box_dims['bottomY'] = box_dims['bottomY'] * 1.0 / height

    return box_dims

def _get_prediction(label, image_shape, classes):

    boxes = np.array(label["boxes"])
    labels = np.array(label["labels"])
    labels = [label[0] for label in labels]
    scores = np.array(label["scores"])
    scores = [score[0] for score in scores]

    bounding_boxes = []
    for box, label_index, score in zip(boxes, labels, scores):
        box_dims = _get_box_dims(image_shape, box)

        box_record = {'box': box_dims,
                      'label': classes[label_index],
                      'score': score.item()}

        bounding_boxes.append(box_record)

    return bounding_boxes

bounding_boxes_batch = []
for result_i, pad in zip(result_final, pad_list):
    label, image_shape = _convert_to_rcnn_output(result_i, height_onnx, width_onnx, pad)
    bounding_boxes_batch.append(_get_prediction(label, image_shape, classes))
print(json.dumps(bounding_boxes_batch, indent=1))
Faster R-CNN に関するステップ (Mask R-CNN の場合は、各サンプルに 4 つの要素ボックス、ラベル、スコア、マスクが含まれます) を使用するか、インスタンスのセグメント化の「予測の視覚化」セクションを参照します。
予測の視覚化
ラベル付きの入力イメージを視覚化します。
import matplotlib.image as mpimg
import matplotlib.pyplot as plt
%matplotlib inline

sample_image_index = 0 # change this for an image of interest from image_files list
IMAGE_SIZE = (18, 12)
plt.figure(figsize=IMAGE_SIZE)
img_np = mpimg.imread(image_files[sample_image_index])

img = Image.fromarray(img_np.astype('uint8'), 'RGB')
x, y = img.size

fig,ax = plt.subplots(1, figsize=(15, 15))
# Display the image
ax.imshow(img_np)

label = class_preds[sample_image_index]
if torch.is_tensor(label):
    label = label.item()

conf_score = conf_scores[sample_image_index]
if torch.is_tensor(conf_score):
    conf_score = np.max(conf_score.tolist())
else:
    conf_score = np.max(conf_score)

display_text = '{} ({})'.format(label, round(conf_score, 3))
print(display_text)

color = 'red'
plt.text(30, 30, display_text, color=color, fontsize=30)

plt.show()
ラベル付きの入力イメージを視覚化します。
import matplotlib.image as mpimg
import matplotlib.pyplot as plt
%matplotlib inline

sample_image_index = 0 # change this for an image of interest from image_files list
IMAGE_SIZE = (18, 12)
plt.figure(figsize=IMAGE_SIZE)
img_np = mpimg.imread(image_files[sample_image_index])
img = Image.fromarray(img_np.astype('uint8'), 'RGB')
x, y = img.size

fig,ax = plt.subplots(1, figsize=(15, 15))
# Display the image
ax.imshow(img_np)
# we apply a threshold of 0.5 on confidence scores
score_threshold = 0.5
label_offset_x = 30
label_offset_y = 30
if torch.is_tensor(conf_scores):
    sample_image_scores = conf_scores[sample_image_index].tolist()
else:
    sample_image_scores = conf_scores[sample_image_index]

for index, score in enumerate(sample_image_scores):
    if score > score_threshold:
        label = classes[index]
        display_text = '{} ({})'.format(label, round(score, 3))
        print(display_text)

        color = 'red'
        plt.text(label_offset_x, label_offset_y, display_text, color=color, fontsize=30)
        label_offset_y += 30

plt.show()
ボックスとラベルを含む入力イメージを視覚化します。
import matplotlib.image as mpimg
import matplotlib.patches as patches
import matplotlib.pyplot as plt
%matplotlib inline

img_np = mpimg.imread(image_files[1])  # replace with desired image index
image_boxes = filtered_boxes_batch[1]  # replace with desired image index

IMAGE_SIZE = (18, 12)
plt.figure(figsize=IMAGE_SIZE)
img = Image.fromarray(img_np.astype('uint8'), 'RGB')
x, y = img.size
print(img.size)

fig,ax = plt.subplots(1)
# Display the image
ax.imshow(img_np)

# Draw box and label for each detection
for detect in image_boxes:
    label = detect['label']
    box = detect['box']
    ymin, xmin, ymax, xmax =  box['topY'], box['topX'], box['bottomY'], box['bottomX']
    topleft_x, topleft_y = x * xmin, y * ymin
    width, height = x * (xmax - xmin), y * (ymax - ymin)
    print('{}: {}, {}, {}, {}'.format(detect['label'], topleft_x, topleft_y, width, height))
    rect = patches.Rectangle((topleft_x, topleft_y), width, height,
                             linewidth=1, edgecolor='green', facecolor='none')

    ax.add_patch(rect)
    color = 'green'
    plt.text(topleft_x, topleft_y, label, color=color)

plt.show()
ボックスとラベルを含む入力イメージを視覚化します。
import matplotlib.image as mpimg
import matplotlib.patches as patches
import matplotlib.pyplot as plt
%matplotlib inline

img_np = mpimg.imread(image_files[1])  # replace with desired image index
image_boxes = bounding_boxes_batch[1]  # replace with desired image index

IMAGE_SIZE = (18, 12)
plt.figure(figsize=IMAGE_SIZE)
img = Image.fromarray(img_np.astype('uint8'), 'RGB')
x, y = img.size
print(img.size)

fig,ax = plt.subplots(1)
# Display the image
ax.imshow(img_np)

# Draw box and label for each detection
for detect in image_boxes:
    label = detect['label']
    box = detect['box']
    ymin, xmin, ymax, xmax =  box['topY'], box['topX'], box['bottomY'], box['bottomX']
    topleft_x, topleft_y = x * xmin, y * ymin
    width, height = x * (xmax - xmin), y * (ymax - ymin)
    print('{}: {}, {}, {}, {}'.format(detect['label'], topleft_x, topleft_y, width, height))
    rect = patches.Rectangle((topleft_x, topleft_y), width, height,
                             linewidth=1, edgecolor='green', facecolor='none')

    ax.add_patch(rect)
    color = 'green'
    plt.text(topleft_x, topleft_y, label, color=color)

plt.show()
マスクとラベルを含むサンプル入力イメージを視覚化します。
import matplotlib.patches as patches
import matplotlib.pyplot as plt
%matplotlib inline

def display_detections(image, boxes, labels, scores, masks, resize_height,
                       resize_width, classes, score_threshold):
    """Visualize boxes and masks

    :param image: raw image
    :type image: PIL image
    :param boxes: box with shape (No. of instances, 4)
    :type boxes: ndarray
    :param labels: classes with shape (No. of instances,)
    :type labels: ndarray
    :param scores: scores with shape (No. of instances,)
    :type scores: ndarray
    :param masks: masks with shape (No. of instances, 1, HEIGHT, WIDTH)
    :type masks:  ndarray
    :param resize_height: expected height of an input image in onnx model
    :type resize_height: Int
    :param resize_width: expected width of an input image in onnx model
    :type resize_width: Int
    :param classes: classes with shape (No. of classes)
    :type classes:  list
    :param score_threshold: threshold on scores in the range of 0-1
    :type score_threshold: float
    :return: None
    """

    _, ax = plt.subplots(1, figsize=(12,9))

    image = np.array(image)
    original_height = image.shape[0]
    original_width = image.shape[1]

    for mask, box, label, score in zip(masks, boxes, labels, scores):
        if score <= score_threshold:
            continue
        mask = mask[0, :, :, None]
        # resize boxes to original raw input size
        box = [box[0]*original_width/resize_width,
               box[1]*original_height/resize_height,
               box[2]*original_width/resize_width,
               box[3]*original_height/resize_height]

        mask = cv2.resize(mask, (image.shape[1], image.shape[0]), 0, 0, interpolation = cv2.INTER_NEAREST)
        # mask is a matrix with values in the range of [0,1]
        # higher values indicate presence of object and vice versa
        # select threshold or cut-off value to get objects present
        mask = mask > score_threshold
        image_masked = image.copy()
        image_masked[mask] = (0, 255, 255)
        alpha = 0.5  # alpha blending with range 0 to 1
        cv2.addWeighted(image_masked, alpha, image, 1 - alpha,0, image)
        rect = patches.Rectangle((box[0], box[1]), box[2] - box[0], box[3] - box[1],\
                                 linewidth=1, edgecolor='b', facecolor='none')
        ax.annotate(classes[label] + ':' + str(np.round(score, 2)), (box[0], box[1]),\
                    color='w', fontsize=12)
        ax.add_patch(rect)

    ax.imshow(image)
    plt.show()

score_threshold = 0.5
img = Image.open(image_files[1])  # replace with desired image index
image_boxes = filtered_boxes_batch[1]  # replace with desired image index
boxes, labels, scores, masks = predictions[4:8]  # replace with desired image index
display_detections(img, boxes.copy(), labels, scores, masks.copy(),
                   height_onnx, width_onnx, classes, score_threshold)
次のステップ