チュートリアル:Notification Hubs と Google Firebase Cloud Messaging を使用して特定のデバイスに通知を送信する
概要
重要
2024 年 6 月の時点で、FCM レガシ API はサポートされなくなり、廃止される予定です。 プッシュ通知サービスの中断を回避するには、できるだけ早く FCM v1 プロトコルに移行する必要があります。
このチュートリアルでは、Azure Notification Hubs を使用して Android アプリにニュース速報通知をブロードキャストする方法を示します。 完了すると、興味のあるニュース速報カテゴリに登録し、それらのカテゴリのプッシュ通知だけを受信できるようになります。 このシナリオは、以前に関心があることを宣言しているユーザーのグループに通知を送信する必要のある多くのアプリ (RSS リーダーや、音楽ファン向けのアプリなど) にとって一般的なパターンです。
ブロードキャスト シナリオは、通知ハブでの登録の作成時に 1 つ以上の "タグ" を追加することで有効にします。 通知がタグに送信されると、タグに登録されたすべてのデバイスが通知を受信します。 タグは文字列にすぎないため、事前にプロビジョニングする必要はありません。 タグの詳細については、「Notification Hubs のルーティングとタグ式」を参照してください。
このチュートリアルでは、次のアクションを実行します。
- モバイル アプリにカテゴリ選択を追加します。
- タグを使用して通知に登録します。
- タグ付けされた通知を送信します。
- アプリケーションをテストする
前提条件
このチュートリアルは、「チュートリアル: Azure Notification Hubs と Google Firebase Cloud Messaging を使用して Android デバイスにプッシュ通知を送信する」を完了しておきます。 このチュートリアルを開始する前に、「チュートリアル: Azure Notification Hubs と Google Firebase Cloud Messaging を使用して Android デバイスにプッシュ通知を送信する」を完了しておきます。
アプリケーションにカテゴリ選択を追加する
最初の手順として、既存のメイン アクティビティに UI 要素を追加して、ユーザーが登録するカテゴリを選択できるようにします。 ユーザーにより選択されるカテゴリは、デバイスに格納されます。 アプリが起動すると、通知ハブにデバイス登録が作成され、選択されたカテゴリがタグとして追加されます。
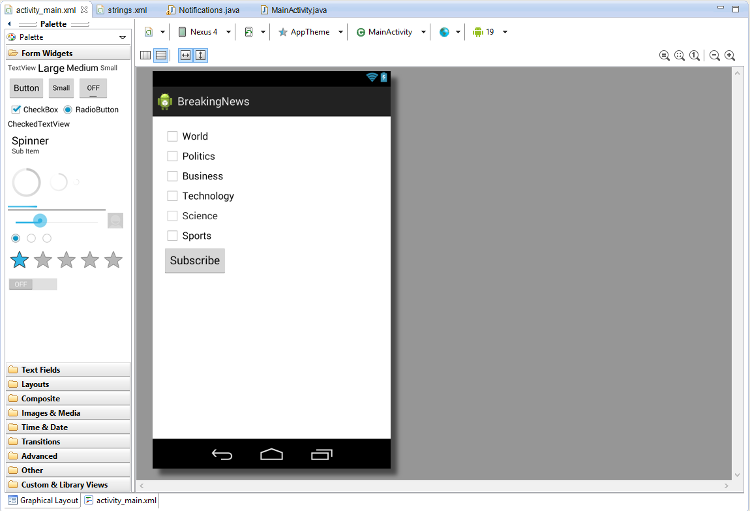
res/layout/activity_main.xml fileを開いて、次の内容に置き換えます。<LinearLayout xmlns:android="http://schemas.android.com/apk/res/android" xmlns:tools="http://schemas.android.com/tools" android:layout_width="match_parent" android:layout_height="match_parent" tools:context="com.example.breakingnews.MainActivity" android:orientation="vertical"> <CheckBox android:id="@+id/worldBox" android:layout_width="wrap_content" android:layout_height="wrap_content" android:text="@string/label_world" /> <CheckBox android:id="@+id/politicsBox" android:layout_width="wrap_content" android:layout_height="wrap_content" android:text="@string/label_politics" /> <CheckBox android:id="@+id/businessBox" android:layout_width="wrap_content" android:layout_height="wrap_content" android:text="@string/label_business" /> <CheckBox android:id="@+id/technologyBox" android:layout_width="wrap_content" android:layout_height="wrap_content" android:text="@string/label_technology" /> <CheckBox android:id="@+id/scienceBox" android:layout_width="wrap_content" android:layout_height="wrap_content" android:text="@string/label_science" /> <CheckBox android:id="@+id/sportsBox" android:layout_width="wrap_content" android:layout_height="wrap_content" android:text="@string/label_sports" /> <Button android:layout_width="wrap_content" android:layout_height="wrap_content" android:onClick="subscribe" android:text="@string/button_subscribe" /> <TextView android:layout_width="wrap_content" android:layout_height="wrap_content" android:text="Hello World!" android:id="@+id/text_hello" /> </LinearLayout>res/values/strings.xmlファイルを開いて、次の行を追加します。<string name="button_subscribe">Subscribe</string> <string name="label_world">World</string> <string name="label_politics">Politics</string> <string name="label_business">Business</string> <string name="label_technology">Technology</string> <string name="label_science">Science</string> <string name="label_sports">Sports</string>main_activity.xmlのグラフィカル レイアウトは次の図のようになります。
MainActivityクラスと同じパッケージ内にクラスNotificationsを作成します。import java.util.HashSet; import java.util.Set; import java.util.concurrent.TimeUnit; import android.content.Context; import android.content.SharedPreferences; import android.os.AsyncTask; import android.util.Log; import android.widget.Toast; import com.google.android.gms.tasks.OnSuccessListener; import com.google.firebase.iid.FirebaseInstanceId; import com.google.firebase.iid.InstanceIdResult; import com.microsoft.windowsazure.messaging.NotificationHub; public class Notifications { private static final String PREFS_NAME = "BreakingNewsCategories"; private FirebaseInstanceId fcm; private NotificationHub hub; private Context context; private String senderId; public static String FCM_token = ""; private static final String TAG = "Notifications"; public Notifications(Context context, String hubName, String listenConnectionString) { this.context = context; this.senderId = senderId; fcm = FirebaseInstanceId.getInstance(); hub = new NotificationHub(hubName, listenConnectionString, context); } public void storeCategoriesAndSubscribe(Set<String> categories) { SharedPreferences settings = context.getSharedPreferences(PREFS_NAME, 0); settings.edit().putStringSet("categories", categories).commit(); subscribeToCategories(categories); } public Set<String> retrieveCategories() { SharedPreferences settings = context.getSharedPreferences(PREFS_NAME, 0); return settings.getStringSet("categories", new HashSet<String>()); } public void subscribeToCategories(final Set<String> categories) { new AsyncTask<Object, Object, Object>() { @Override protected Object doInBackground(Object... params) { try { FirebaseInstanceId.getInstance().getInstanceId().addOnSuccessListener(new OnSuccessListener<InstanceIdResult>() { @Override public void onSuccess(InstanceIdResult instanceIdResult) { FCM_token = instanceIdResult.getToken(); Log.d(TAG, "FCM Registration Token: " + FCM_token); } }); TimeUnit.SECONDS.sleep(1); String templateBodyFCM = "{\"data\":{\"message\":\"$(messageParam)\"}}"; hub.registerTemplate(FCM_token,"simpleFCMTemplate", templateBodyFCM, categories.toArray(new String[categories.size()])); } catch (Exception e) { Log.e("MainActivity", "Failed to register - " + e.getMessage()); return e; } return null; } protected void onPostExecute(Object result) { String message = "Subscribed for categories: " + categories.toString(); Toast.makeText(context, message, Toast.LENGTH_LONG).show(); } }.execute(null, null, null); } }このクラスは、このデバイスが受信するニュースのカテゴリを格納するためにローカル ストレージを使用します。 ローカル ストレージには、これらのカテゴリを登録するメソッドも格納されます。
MainActivityクラスにNotifications用のフィールドを追加します。private Notifications notifications;onCreateメソッドを次のコードに示すように更新します。 Notifications クラスの subscribeToCategories メソッドで、Notification Hubs への登録を行います。@Override protected void onCreate(Bundle savedInstanceState) { super.onCreate(savedInstanceState); setContentView(R.layout.activity_main); mainActivity = this; FirebaseService.createChannelAndHandleNotifications(getApplicationContext()); notifications = new Notifications(this, NotificationSettings.HubName, NotificationSettings.HubListenConnectionString); notifications.subscribeToCategories(notifications.retrieveCategories()); }NotificationSettings クラスでハブ名と接続文字列が正しく設定されていることを確認します。
Note
クライアント アプリケーションを使用して配布される資格情報は一般にセキュリティで保護されないため、クライアント アプリケーションではリッスン アクセス用のキーだけを配布してください。 リッスン アクセスにより、アプリケーションが通知を登録できるようになりますが、既存の登録を変更することはできないため、通知を送信できません。 通知を送信して既存の登録を変更するセキュリティで保護されたバックエンド サービスでは、フル アクセス キーが使用されます。
次に、次のインポートを追加します。
import android.widget.CheckBox;
import java.util.HashSet;
import java.util.Set;
import android.view.View;
サブスクライブ ボタンのクリック イベントを処理する次の
subscribeメソッドを追加します。public void subscribe(View sender) { final Set<String> categories = new HashSet<String>(); CheckBox world = (CheckBox) findViewById(R.id.worldBox); if (world.isChecked()) categories.add("world"); CheckBox politics = (CheckBox) findViewById(R.id.politicsBox); if (politics.isChecked()) categories.add("politics"); CheckBox business = (CheckBox) findViewById(R.id.businessBox); if (business.isChecked()) categories.add("business"); CheckBox technology = (CheckBox) findViewById(R.id.technologyBox); if (technology.isChecked()) categories.add("technology"); CheckBox science = (CheckBox) findViewById(R.id.scienceBox); if (science.isChecked()) categories.add("science"); CheckBox sports = (CheckBox) findViewById(R.id.sportsBox); if (sports.isChecked()) categories.add("sports"); notifications.storeCategoriesAndSubscribe(categories); }このメソッドは、カテゴリのリストを作成し、
Notificationsクラスを使用してそのリストをローカル ストレージに格納し、対応するタグを通知ハブに登録します。 カテゴリが変更されると、新しいカテゴリで登録が再作成されます。
これで、アプリケーションがデバイス上のローカル ストレージに一連のカテゴリを格納したり、ユーザーがカテゴリの選択を変更したときに通知ハブに登録できるようになりました。
通知を登録する
この手順では、ローカル ストレージに格納されたカテゴリを使用して、起動時に通知ハブに通知します。
MainActivityクラスのonCreateメソッドの末尾に次のコードがあることを確認します。notifications.subscribeToCategories(notifications.retrieveCategories());このコードは、アプリが確実に、起動するたびにローカル ストレージからカテゴリを取得し、これらのカテゴリへの登録を要求するようにします。
次に、
MainActivityクラスのonStart()メソッドを次のように更新します。@Override protected void onStart() { super.onStart(); isVisible = true; Set<String> categories = notifications.retrieveCategories(); CheckBox world = (CheckBox) findViewById(R.id.worldBox); world.setChecked(categories.contains("world")); CheckBox politics = (CheckBox) findViewById(R.id.politicsBox); politics.setChecked(categories.contains("politics")); CheckBox business = (CheckBox) findViewById(R.id.businessBox); business.setChecked(categories.contains("business")); CheckBox technology = (CheckBox) findViewById(R.id.technologyBox); technology.setChecked(categories.contains("technology")); CheckBox science = (CheckBox) findViewById(R.id.scienceBox); science.setChecked(categories.contains("science")); CheckBox sports = (CheckBox) findViewById(R.id.sportsBox); sports.setChecked(categories.contains("sports")); }このコードは、以前に保存されたカテゴリの状態に基づいてメイン アクティビティを更新します。
これで、アプリケーションが完成し、デバイスのローカル ストレージに一連のカテゴリを格納できるようになりました。ローカル ストレージは、ユーザーがカテゴリの選択を変更したときに通知ハブに登録するために使用されます。 次に、このアプリにカテゴリ通知を送信できるバックエンドを定義します。
タグ付けされた通知を送信する
このセクションでは、.NET コンソール アプリから、タグ付けされたテンプレート通知としてニュース速報を送信します。
Visual Studio で、Visual C# の新しいコンソール アプリケーションを作成します。
- メニューで、 [ファイル]>[新規作成]>[プロジェクト] を選択します。
- [新しいプロジェクトの作成] で、テンプレートのリストで C# の [コンソール アプリ (.NET Framework)] を選択し、[次へ] を選択します。
- アプリの名前を入力します。
- [ソリューション] で、[ソリューションに追加] を選択し、[作成] を選択してプロジェクトを作成します。
[ツール]>[NuGet Package Manager]>[パッケージ マネージャー コンソール] の順に選択してから、コンソール ウィンドウで次のコマンドを実行します。
Install-Package Microsoft.Azure.NotificationHubsこの操作によって、Microsoft.Azure.NotificationHubs パッケージを使用して Azure Notification Hubs SDK への参照が追加されます。
Program.cs ファイルを開き、次の
usingステートメントを追加します。using Microsoft.Azure.NotificationHubs;Programクラス内で、次のメソッドを追加するか、既にメソッドが指定されている場合は置き換えます。private static async void SendTemplateNotificationAsync() { // Define the notification hub. NotificationHubClient hub = NotificationHubClient.CreateClientFromConnectionString("<connection string with full access>", "<hub name>"); // Apple requires the apns-push-type header for all requests var headers = new Dictionary<string, string> {{"apns-push-type", "alert"}}; // Create an array of breaking news categories. var categories = new string[] { "World", "Politics", "Business", "Technology", "Science", "Sports"}; // Send the notification as a template notification. All template registrations that contain // "messageParam" and the proper tags will receive the notifications. // This includes APNS, GCM/FCM, WNS, and MPNS template registrations. Dictionary<string, string> templateParams = new Dictionary<string, string>(); foreach (var category in categories) { templateParams["messageParam"] = "Breaking " + category + " News!"; await hub.SendTemplateNotificationAsync(templateParams, category); } }このコードでは、文字列の配列の 6 つのタグのそれぞれに対するテンプレート通知が送信されます。 タグを使用することで、デバイスは登録されているカテゴリに関する通知のみを確実に受信できます。
上記のコードでは、プレースホルダー
<hub name>と<connection string with full access>を、通知ハブの名前と通知ハブのダッシュボードから得た DefaultFullSharedAccessSignature の接続文字列に置き換えます。Main()メソッド内に、次の行を追加します。SendTemplateNotificationAsync(); Console.ReadLine();コンソール アプリケーションをビルドします。
アプリケーションをテストする
Android Studio で、Android デバイスまたはエミュレーター上でアプリを実行します。 アプリの UI には、購読するカテゴリを選択できる一連の切り替えボタンが表示されます。
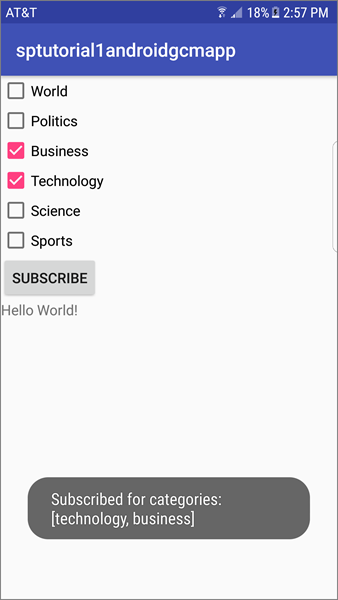
1 つ以上のカテゴリ切り替えボタンを有効にし、 [Subscribe] をクリックします。 アプリケーションにより、選択されたカテゴリがタグに変換され、選択されたタグの新しいデバイス登録が通知ハブから要求されます。 登録されたカテゴリが返され、トースト通知に表示されます。

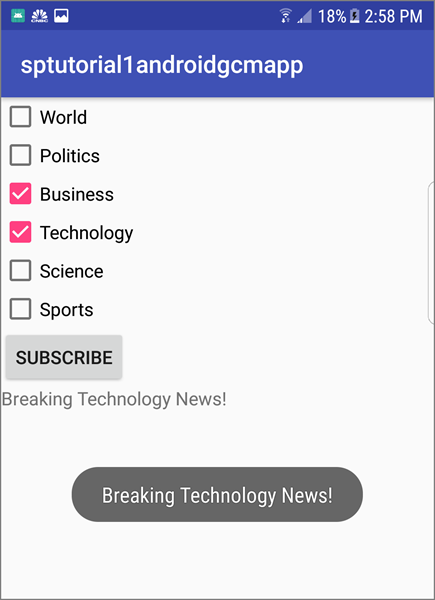
カテゴリごとの通知を送信する .NET コンソール アプリを実行します。 選択されたカテゴリの通知がトースト通知として表示されます。

次のステップ
このチュートリアルでは、カテゴリに登録している特定の Android デバイスにブロードキャスト通知を送信しました。 特定のユーザーにプッシュ通知を送信する方法を学習するには、次のチュートリアルに進んでください。