概要
このチュートリアルでは、Azure Notification Hubs を使用して iOS アプリにニュース速報通知をブロードキャストする方法を示します。 完了すると、関心のあるニュース速報カテゴリに登録し、それらのカテゴリのプッシュ通知のみを受信できます。 このシナリオは、以前に関心があることを宣言しているユーザーのグループに通知を送信する必要のある多くのアプリ (RSS リーダーや、音楽ファン向けのアプリなど) にとって一般的なパターンです。
ブロードキャスト シナリオは、通知ハブでの登録の作成時に 1 つ以上の "タグ" を追加することで有効にします。 通知がタグに送信されると、そのタグに登録しているデバイスが通知を受信します。 タグは文字列にすぎないため、事前にプロビジョニングする必要はありません。 タグの詳細については、「Notification Hubs のルーティングとタグ式」を参照してください。
このチュートリアルでは、次の手順を実行します。
- アプリにカテゴリ選択を追加する
- タグ付けされた通知を送信する
- デバイスから通知を送信する
- アプリケーションを実行して通知を生成する
前提条件
このトピックは、「チュートリアル: Azure Notification Hubs を使用して iOS アプリにプッシュ通知を送信する」で作成したアプリに基づいて構築されています。 このチュートリアルを開始する前に、「チュートリアル: Azure Notification Hubs を使用して iOS アプリにプッシュ通知を送信する」を既に完了している必要があります。
アプリケーションにカテゴリ選択を追加する
最初の手順として、既存のストーリーボードに UI 要素を追加して、ユーザーが登録するカテゴリを選択できるようにします。 ユーザーにより選択されるカテゴリは、デバイスに格納されます。 アプリが起動すると、通知ハブにデバイス登録が作成され、選択されたカテゴリがタグとして追加されます。
MainStoryboard_iPhone.storyboard で、オブジェクト ライブラリから次のコンポーネントを追加します。
"Breaking News" というテキストが付いたラベル
"World"、"Politics"、"Business"、"Technology"、"Science"、"Sports" というカテゴリ テキストが付いたラベル
6 つのスイッチ (カテゴリごとに 1 つ)。各スイッチの [状態] は、既定で [Off] に設定されます。
[Subscribe] というラベルが付いた 1 個のボタン
ストーリーボードは次のようになります。

アシスタント エディターで、すべてのスイッチのアウトレットを作成し、"WorldSwitch"、"PoliticsSwitch"、"BusinessSwitch"、"TechnologySwitch"、"ScienceSwitch"、"SportsSwitch" という名前にします。
subscribeという名前のボタンのアクションを作成します。ViewController.hには次のコードを含める必要があります。@property (weak, nonatomic) IBOutlet UISwitch *WorldSwitch; @property (weak, nonatomic) IBOutlet UISwitch *PoliticsSwitch; @property (weak, nonatomic) IBOutlet UISwitch *BusinessSwitch; @property (weak, nonatomic) IBOutlet UISwitch *TechnologySwitch; @property (weak, nonatomic) IBOutlet UISwitch *ScienceSwitch; @property (weak, nonatomic) IBOutlet UISwitch *SportsSwitch; - (IBAction)subscribe:(id)sender;新しい
Notificationsという名前の Cocoa Touch クラスを作成します。 Notifications.h の interface セクションに次のコードをコピーします。@property NSData* deviceToken; - (id)initWithConnectionString:(NSString*)listenConnectionString HubName:(NSString*)hubName; - (void)storeCategoriesAndSubscribeWithCategories:(NSArray*)categories completion:(void (^)(NSError* error))completion; - (NSSet*)retrieveCategories; - (void)subscribeWithCategories:(NSSet*)categories completion:(void (^)(NSError *))completion;次の import ディレクティブを Notifications.m に追加します。
#import <WindowsAzureMessaging/WindowsAzureMessaging.h>Notifications.m の implementation セクションに次のコードをコピーします。
SBNotificationHub* hub;

- (id)initWithConnectionString:(NSString*)listenConnectionString HubName:(NSString*)hubName{

    hub = [[SBNotificationHub alloc] initWithConnectionString:listenConnectionString
                                notificationHubPath:hubName];

    return self;
}

- (void)storeCategoriesAndSubscribeWithCategories:(NSSet *)categories completion:(void (^)(NSError *))completion {
    NSUserDefaults* defaults = [NSUserDefaults standardUserDefaults];
    [defaults setValue:[categories allObjects] forKey:@"BreakingNewsCategories"];

    [self subscribeWithCategories:categories completion:completion];
}

- (NSSet*)retrieveCategories {
    NSUserDefaults* defaults = [NSUserDefaults standardUserDefaults];

    NSArray* categories = [defaults stringArrayForKey:@"BreakingNewsCategories"];

    if (!categories) return [[NSSet alloc] init];
    return [[NSSet alloc] initWithArray:categories];
}

- (void)subscribeWithCategories:(NSSet *)categories completion:(void (^)(NSError *))completion
{
    NSString* templateBodyAPNS = @"{\"aps\":{\"alert\":\"$(messageParam)\"}}";

    [hub registerTemplateWithDeviceToken:self.deviceToken name:@"simpleAPNSTemplate"
        jsonBodyTemplate:templateBodyAPNS expiryTemplate:@"0" tags:categories completion:completion];
}
このクラスは、このデバイスが受信するニュースのカテゴリを格納したり、取得したりするためにローカル ストレージを使用します。 ローカル ストレージには、 テンプレート 登録を使用してこれらのカテゴリを登録するメソッドも格納されます。
AppDelegate.hファイルで、Notifications.hのインポート ステートメントを追加し、Notificationsクラスのインスタンスのプロパティを追加します。#import "Notifications.h" @property (nonatomic) Notifications* notifications;AppDelegate.mのdidFinishLaunchingWithOptionsメソッドで、通知インスタンスを初期化するコードをメソッドの先頭に追加します。
HUBNAMEとHUBLISTENACCESS(hubinfo.hに定義されます) は、通知ハブの名前と取得済みの DefaultListenSharedAccessSignature の接続文字列によって置き換えが行われる<hub name>プレースホルダーと<connection string with listen access>プレースホルダーによって既に設定されています。self.notifications = [[Notifications alloc] initWithConnectionString:HUBLISTENACCESS HubName:HUBNAME];Note
クライアント アプリケーションを使用して配布される資格情報は一般にセキュリティで保護されないため、クライアント アプリケーションではリッスン アクセス用のキーだけを配布してください。 リッスン アクセスにより、アプリケーションが通知を登録できるようになりますが、既存の登録を変更することはできないため、通知を送信できません。 通知を送信して既存の登録を変更するセキュリティで保護されたバックエンド サービスでは、フル アクセス キーが使用されます。
AppDelegate.mのdidRegisterForRemoteNotificationsWithDeviceTokenメソッドで、メソッドのコードを次のコードに置き換えて、デバイス トークンをnotificationsクラスに渡します。notificationsクラスでは、カテゴリを使用した通知への登録を実行します。 ユーザーがカテゴリ選択を変更した場合は、それらを更新するために、subscribe ボタンに応答してsubscribeWithCategoriesメソッドを呼び出します。Note
Apple Push Notification Service (APNS) によって割り当てられたデバイス トークンはいつでも変更される可能性があるので、通知エラーを回避するために通知を頻繁に登録してください。 この例では、アプリケーションが起動するたびに通知を登録します。 頻繁に実行されるアプリケーションの場合 (1 日に複数回など)、帯域幅を節約するため、前回の登録から 1 日経過していない場合は登録をスキップできます。
self.notifications.deviceToken = deviceToken;

// Retrieves the categories from local storage and requests a registration for these categories
// each time the app starts and performs a registration.

NSSet* categories = [self.notifications retrieveCategories];
[self.notifications subscribeWithCategories:categories completion:^(NSError* error) {
    if (error != nil) {
        NSLog(@"Error registering for notifications: %@", error);
    }
}];
この時点では、
didRegisterForRemoteNotificationsWithDeviceTokenメソッドに他のコードは存在しません。Notification Hubs の使用の開始に関するチュートリアルを完了していれば、次のメソッドが既に
AppDelegate.mに含まれています。 ない場合は、それらを追加します。- (void)MessageBox:(NSString *)title message:(NSString *)messageText { UIAlertView *alert = [[UIAlertView alloc] initWithTitle:title message:messageText delegate:self cancelButtonTitle:@"OK" otherButtonTitles: nil]; [alert show]; } - (void)application:(UIApplication *)application didReceiveRemoteNotification: (NSDictionary *)userInfo { NSLog(@"%@", userInfo); [self MessageBox:@"Notification" message:[[userInfo objectForKey:@"aps"] valueForKey:@"alert"]]; }このメソッドにより、簡単な UIAlertを表示することでアプリケーションの実行中に受信した通知が処理されます。
ViewController.mで、AppDelegate.hのimportステートメントを追加し、XCode で生成されたsubscribeメソッドに次のコードをコピーします。 このコードは、ユーザーがユーザー インターフェイスで選択した新しいカテゴリ タグを使用するように通知の登録を更新します。#import "Notifications.h" NSMutableArray* categories = [[NSMutableArray alloc] init]; if (self.WorldSwitch.isOn) [categories addObject:@"World"]; if (self.PoliticsSwitch.isOn) [categories addObject:@"Politics"]; if (self.BusinessSwitch.isOn) [categories addObject:@"Business"]; if (self.TechnologySwitch.isOn) [categories addObject:@"Technology"]; if (self.ScienceSwitch.isOn) [categories addObject:@"Science"]; if (self.SportsSwitch.isOn) [categories addObject:@"Sports"]; Notifications* notifications = [(AppDelegate*)[[UIApplication sharedApplication]delegate] notifications]; [notifications storeCategoriesAndSubscribeWithCategories:categories completion: ^(NSError* error) { if (!error) { UIAlertView *alert = [[UIAlertView alloc] initWithTitle:"Notification" message:"Subscribed" delegate:self cancelButtonTitle:@"OK" otherButtonTitles: nil]; [alert show]; } else { NSLog(@"Error subscribing: %@", error); } }];このメソッドでは、カテゴリの
NSMutableArrayを作成し、Notificationsクラスを使用してそのリストをローカル ストレージに格納し、対応するタグを通知ハブに登録します。 カテゴリが変更されると、新しいカテゴリで登録が再作成されます。ViewController.mに、保存済みのカテゴリに基づいてユーザー インターフェイスを設定する次のコードをviewDidLoadメソッドに追加します。// This updates the UI on startup based on the status of previously saved categories. Notifications* notifications = [(AppDelegate*)[[UIApplication sharedApplication]delegate] notifications]; NSSet* categories = [notifications retrieveCategories]; if ([categories containsObject:@"World"]) self.WorldSwitch.on = true; if ([categories containsObject:@"Politics"]) self.PoliticsSwitch.on = true; if ([categories containsObject:@"Business"]) self.BusinessSwitch.on = true; if ([categories containsObject:@"Technology"]) self.TechnologySwitch.on = true; if ([categories containsObject:@"Science"]) self.ScienceSwitch.on = true; if ([categories containsObject:@"Sports"]) self.SportsSwitch.on = true;
これで、アプリは、毎回の起動時に、通知ハブに登録するために使用されるカテゴリ セットをデバイスのローカル ストレージに格納できるようになりました。 ユーザーは、実行時にカテゴリの選択を変更し、subscribe メソッドをクリックして、デバイスの登録を更新できます。 次に、アプリ自体で直接ニュース速報通知を送信するようにアプリを更新します。
(省略可能) タグ付けされた通知を送信する
Visual Studio にアクセスできない場合は、次のセクションをスキップし、アプリ自体から通知を送信できます。 Azure Portal で通知ハブの [デバッグ] タブを使用して、適切なテンプレート通知を送信することもできます。
このセクションでは、.NET コンソール アプリから、タグ付けされたテンプレート通知としてニュース速報を送信します。
Visual Studio で、Visual C# の新しいコンソール アプリケーションを作成します。
- メニューで、 [ファイル]>[新規作成]>[プロジェクト] を選択します。
- [新しいプロジェクトの作成] で、テンプレートのリストで C# の [コンソール アプリ (.NET Framework)] を選択し、[次へ] を選択します。
- アプリの名前を入力します。
- [ソリューション] で、[ソリューションに追加] を選択し、[作成] を選択してプロジェクトを作成します。
[ツール]>[NuGet Package Manager]>[パッケージ マネージャー コンソール] の順に選択してから、コンソール ウィンドウで次のコマンドを実行します。
Install-Package Microsoft.Azure.NotificationHubsこの操作によって、Microsoft.Azure.NotificationHubs パッケージを使用して Azure Notification Hubs SDK への参照が追加されます。
Program.cs ファイルを開き、次の
usingステートメントを追加します。using Microsoft.Azure.NotificationHubs;Programクラス内で、次のメソッドを追加するか、既にメソッドが指定されている場合は置き換えます。private static async void SendTemplateNotificationAsync() { // Define the notification hub. NotificationHubClient hub = NotificationHubClient.CreateClientFromConnectionString("<connection string with full access>", "<hub name>"); // Apple requires the apns-push-type header for all requests var headers = new Dictionary<string, string> {{"apns-push-type", "alert"}}; // Create an array of breaking news categories. var categories = new string[] { "World", "Politics", "Business", "Technology", "Science", "Sports"}; // Send the notification as a template notification. All template registrations that contain // "messageParam" and the proper tags will receive the notifications. // This includes APNS, GCM/FCM, WNS, and MPNS template registrations. Dictionary<string, string> templateParams = new Dictionary<string, string>(); foreach (var category in categories) { templateParams["messageParam"] = "Breaking " + category + " News!"; await hub.SendTemplateNotificationAsync(templateParams, category); } }このコードでは、文字列の配列の 6 つのタグのそれぞれに対するテンプレート通知が送信されます。 タグを使用することで、デバイスは登録されているカテゴリに関する通知のみを確実に受信できます。
上記のコードでは、プレースホルダー
<hub name>と<connection string with full access>を、通知ハブの名前と通知ハブのダッシュボードから得た DefaultFullSharedAccessSignature の接続文字列に置き換えます。Main()メソッド内に、次の行を追加します。SendTemplateNotificationAsync(); Console.ReadLine();コンソール アプリケーションをビルドします。
(省略可能) デバイスから通知を送信する
通常、通知はバックエンド サービスによって送信されますが、アプリからニュース速報通知を直接送信できます。 それを行うには、「Notification Hubs の使用」のチュートリアルで定義した SendNotificationRESTAPI メソッドを更新します。
ViewController.mで、次のようにSendNotificationRESTAPIメソッドを更新して、そのメソッドがカテゴリ タグのパラメーターを受け付け、正しいテンプレート通知を送信するようにします。- (void)SendNotificationRESTAPI:(NSString*)categoryTag { NSURLSession* session = [NSURLSession sessionWithConfiguration:[NSURLSessionConfiguration defaultSessionConfiguration] delegate:nil delegateQueue:nil]; NSString *json; // Construct the messages REST endpoint NSURL* url = [NSURL URLWithString:[NSString stringWithFormat:@"%@%@/messages/%@", HubEndpoint, HUBNAME, API_VERSION]]; // Generated the token to be used in the authorization header. NSString* authorizationToken = [self generateSasToken:[url absoluteString]]; //Create the request to add the template notification message to the hub NSMutableURLRequest *request = [NSMutableURLRequest requestWithURL:url]; [request setHTTPMethod:@"POST"]; // Add the category as a tag [request setValue:categoryTag forHTTPHeaderField:@"ServiceBusNotification-Tags"]; // Template notification json = [NSString stringWithFormat:@"{\"messageParam\":\"Breaking %@ News : %@\"}", categoryTag, self.notificationMessage.text]; // Signify template notification format [request setValue:@"template" forHTTPHeaderField:@"ServiceBusNotification-Format"]; // JSON Content-Type [request setValue:@"application/json;charset=utf-8" forHTTPHeaderField:@"Content-Type"]; //Authenticate the notification message POST request with the SaS token [request setValue:authorizationToken forHTTPHeaderField:@"Authorization"]; //Add the notification message body [request setHTTPBody:[json dataUsingEncoding:NSUTF8StringEncoding]]; // Send the REST request NSURLSessionDataTask* dataTask = [session dataTaskWithRequest:request completionHandler:^(NSData *data, NSURLResponse *response, NSError *error) { NSHTTPURLResponse* httpResponse = (NSHTTPURLResponse*) response; if (error || httpResponse.statusCode != 200) { NSLog(@"\nError status: %d\nError: %@", httpResponse.statusCode, error); } if (data != NULL) { //xmlParser = [[NSXMLParser alloc] initWithData:data]; //[xmlParser setDelegate:self]; //[xmlParser parse]; } }]; [dataTask resume]; }ViewController.mで、次のコードに示すようにSend Notificationアクションを更新します。 それにより、各タグを個別に使用して通知を送信したり、複数のプラットフォームに送信したりします。- (IBAction)SendNotificationMessage:(id)sender { self.sendResults.text = @""; NSArray* categories = [NSArray arrayWithObjects: @"World", @"Politics", @"Business", @"Technology", @"Science", @"Sports", nil]; // Lets send the message as breaking news for each category to WNS, FCM, and APNS // using a template. for(NSString* category in categories) { [self SendNotificationRESTAPI:category]; } }プロジェクトをリビルドし、ビルド エラーがないことを確認します。
アプリケーションを実行して通知を生成する
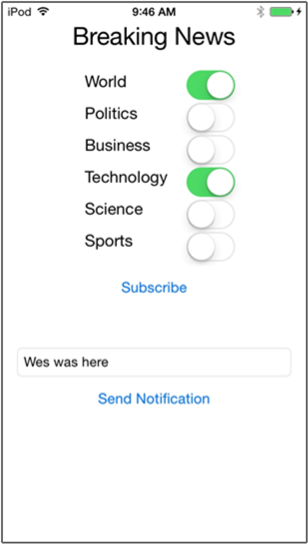
[実行] ボタンを押してプロジェクトをビルドし、アプリケーションを開始します。 購読するニュース速報のオプションを選択して、 [購読] ボタンをクリックします。 通知が購読されたことを示すダイアログが表示されます。

[購読]を選択すると、アプリケーションにより、選択されたカテゴリがタグに変換され、選択されたタグの新しいデバイス登録が通知ハブから要求されます。
ニュース速報として送信するメッセージを入力し、 [通知の送信] ボタンを押します。 または、通知を生成する .NET コンソール アプリケーションを実行します。

ニュース速報にサブスクライブしている各デバイスが、今送信したばかりのニュース速報通知を受信します。
次のステップ
このチュートリアルでは、カテゴリに登録している特定の iOS デバイスにブロードキャスト通知を送信しました。 ローカライズしたプッシュ通知を送信する方法を学習するには、次のチュートリアルに進んでください。