このチュートリアルは、シリーズの第 2 部です。 このチュートリアルでは、テンプレート ジェネレーター ツール (Yeoman) を使用して、Service Fabric アプリケーションの定義を作成します。 このアプリケーションを使用して、コンテナーを Service Fabric にデプロイすることもできます。 このチュートリアルで学習する内容は次のとおりです。
- Yeoman のインストール
- Yeoman を使用したアプリケーション パッケージの作成
- コンテナーで使用するアプリケーション パッケージの設定
- アプリケーションのビルド
- アプリケーションのデプロイと実行
- アプリケーションのクリーンアップ
前提条件
- このチュートリアル シリーズの第 1 部で作成した Azure Container Registry にプッシュされたコンテナー イメージを使用します。
- Linux 開発環境がセットアップされています。
Yeoman のインストール
Service Fabric には、ターミナルから Yeoman テンプレート ジェネレーターを使用してアプリケーションを作成できる、スキャフォールディング ツールが用意されています。 以下の手順に従って、Yeoman テンプレート ジェネレーターを使用します。
nodejs とノード パッケージ マネージャーをマシンにインストールします。 macOS X を使用する場合は、パッケージ マネージャー Homebrewを使用する必要があります。
curl -o- https://raw.githubusercontent.com/creationix/nvm/v0.33.0/install.sh | bash
nvm install node
ノード パッケージ マネージャーからマシンに Yeoman テンプレート ジェネレーターをインストールします。
npm install -g yoService Fabric Yeoman コンテナー ジェネレーターをインストールします
npm install -g generator-azuresfcontainer
Yeoman で Docker イメージ コンテナーをパッケージ化する
Service Fabric コンテナー アプリケーションを作成するには、複製されたリポジトリの container-tutorial ディレクトリで、次のコマンドを実行します。
yo azuresfcontainerアプリケーション名に「TestContainer」と入力してください。
アプリケーション サービス名に「azurevotefront」と入力してください。
フロントエンド リポジトリの ACR にコンテナー イメージ パスを指定します (例: "<acrName>.azurecr.io/azure-vote-front:v1")。 <acrName> フィールドは、前のチュートリアルで使用された値と同じ値にする必要があります。
Enter を押して、Commands セクションを空のままにします。
インスタンス数を 1 に指定します。
yo コマンドを実行するときの入力と出力を次に示します。
? Name your application TestContainer
? Name of the application service: azurevotefront
? Input the Image Name: <acrName>.azurecr.io/azure-vote-front:v1
? Commands:
? Number of instances of guest container application: 1
   create TestContainer/TestContainer/ApplicationManifest.xml
   create TestContainer/TestContainer/azurevotefrontPkg/ServiceManifest.xml
   create TestContainer/TestContainer/azurevotefrontPkg/config/Settings.xml
   create TestContainer/TestContainer/azurevotefrontPkg/code/Dummy.txt
   create TestContainer/install.sh
   create TestContainer/uninstall.sh
Yeoman を使用して作成したアプリケーションに別のコンテナー サービスを追加するには、次の手順を実行します。
- ./TestContainer のように、ディレクトリのレベルを TestContainer ディレクトリに変更します。
yo azuresfcontainer:AddServiceを実行します。- サービスに 'aazurevoteback'a という名前を付けます。
- Redis のコンテナー イメージ パス ("redis:alpine") を指定します。
- Enter を押して、Commands セクションを空のままにします。
- インスタンス数を "1" に指定します。
使用しているサービスを追加するためのエントリがすべて表示されます。
? Name of the application service: azurevoteback
? Input the Image Name: redis:alpine
? Commands:
? Number of instances of guest container application: 1
   create TestContainer/azurevotebackPkg/ServiceManifest.xml
   create TestContainer/azurevotebackPkg/config/Settings.xml
   create TestContainer/azurevotebackPkg/code/Dummy.txt
このチュートリアルの後の手順で、TestContainer ディレクトリを使用します。 たとえば、 ./TestContainer/TestContainer です。 このディレクトリの内容は、次のようになります。
$ ls
ApplicationManifest.xml azurevotefrontPkg azurevotebackPkg
Azure Container Registry の資格情報を使用してアプリケーション マニフェストを構成する
Service Fabric が Azure Container Registry からコンテナー イメージをプルするには、ApplicationManifest.xml に資格情報を入力する必要があります。
ACR インスタンスにサインインします。 az acr login コマンドを使用して、操作を完了します。 コンテナー レジストリの作成時に割り当てられた一意名を入力します。
az acr login --name <acrName>
このコマンドは、完了すると "Login Succeeded (ログインに成功しました)" というメッセージを返します。
次に、以下のコマンドを実行して、コンテナー レジストリのパスワードを取得します。 このパスワードは、Service Fabric が ACR で認証を行い、コンテナー イメージをプルするために使用します。
az acr credential show -n <acrName> --query passwords[0].value
ApplicationManifest.xml 内の、フロント エンド サービスの ServiceManifestImport 要素の下にコード スニペットを追加します。 AccountName フィールドに acrName を挿入すると、前のコマンドから返されたパスワードが Password フィールドで使用されます。 ApplicationManifest.xml の完全なサンプル ファイルは、このドキュメントの最後にあります。
<Policies>
  <ContainerHostPolicies CodePackageRef="Code">
    <RepositoryCredentials AccountName="<acrName>" Password="<password>" PasswordEncrypted="false"/>
  </ContainerHostPolicies>
</Policies>
通信/コンテナー ポートからホスト ポートへのマッピングを構成する
通信ポートを構成する
クライアントがサービスと通信できるように HTTP エンドポイントを構成しましょう。 ./TestContainer/azurevotefrontPkg/ServiceManifest.xml ファイルを開いて、ServiceManifest 要素にエンドポイント リソースを宣言します。 プロトコル、ポート、名前を追加します。 このチュートリアルでは、サービスがポート 80 でリッスンします。 次のスニペットが、リソース内の ServiceManifest タグ下に配置されています。
<Resources>
  <Endpoints>
    <!-- This endpoint is used by the communication listener to obtain the port on which to
            listen. Please note that if your service is partitioned, this port is shared with
            replicas of different partitions that are placed in your code. -->
    <Endpoint Name="azurevotefrontTypeEndpoint" UriScheme="http" Port="80" Protocol="http"/>
  </Endpoints>
</Resources>
同様に、バックエンド サービスのサービス マニフェストを変更します。 ./TestContainer/azurevotebackPkg/ServiceManifest.xml を開いて、ServiceManifest 要素にエンドポイント リソースを宣言します。 このチュートリアルでは、Redis の既定値である 6379 を使用します。 次のスニペットが、リソース内の ServiceManifest タグ下に配置されています。
<Resources>
  <Endpoints>
    <!-- This endpoint is used by the communication listener to obtain the port on which to
            listen. Please note that if your service is partitioned, this port is shared with
            replicas of different partitions that are placed in your code. -->
    <Endpoint Name="azurevotebackTypeEndpoint" Port="6379" Protocol="tcp"/>
  </Endpoints>
</Resources>
UriScheme を指定すると、Service Fabric ネーム サービスを使用したコンテナー エンドポイントが自動的に登録され、検出可能性が確保されます。 バックエンド サービスの ServiceManifest.xml の完全なサンプル ファイルは、この記事の最後に示されています。
サービスにコンテナー ポートをマップする
クラスター内のコンテナーを公開するには applicationmanifest.xml にポートのバインドも作成する必要があります。 PortBinding ポリシーは、ServiceManifest.xml で定義したエンドポイントを参照します。 これらのエンドポイントへの受信要求は、ここで開いてバインドされたコンテナー ポートにマップされます。 ApplicationManifest.xml ファイルに次のコードを追加して、ポート 80 およびポート 6379 をエンドポイントにバインドします。 ApplicationManifest.xml の完全なサンプル ファイルは、このドキュメントの最後にあります。
<ContainerHostPolicies CodePackageRef="Code">
    <PortBinding ContainerPort="80" EndpointRef="azurevotefrontTypeEndpoint"/>
</ContainerHostPolicies>
<ContainerHostPolicies CodePackageRef="Code">
    <PortBinding ContainerPort="6379" EndpointRef="azurevotebackTypeEndpoint"/>
</ContainerHostPolicies>
バックエンド サービスに DNS 名を追加する
Service Fabric がこの DNS 名をバックエンド サービスに割り当てるには、ApplicationManifest.xml に名前を指定する必要があります。 次のように ServiceDnsName 属性をサービス要素に追加します。
<Service Name="azurevoteback" ServiceDnsName="redisbackend.testapp">
  <StatelessService ServiceTypeName="azurevotebackType" InstanceCount="1">
    <SingletonPartition/>
  </StatelessService>
</Service>
フロントエンド サービスは環境変数を読み取り、Redis インスタンスの DNS 名を認識します。 この環境変数は、Docker イメージの生成に使用された Dockerfile で既に定義されており、ここでは操作を実行する必要はありません。
ENV REDIS redisbackend.testapp
次のコード スニペットは、Dockerfile で説明されている環境変数がフロント エンドの Python コードで取得される方法を示しています。 ここでは、操作を実行する必要はありません。
# Get DNS Name
redis_server = os.environ['REDIS']

# Connect to the Redis store
r = redis.StrictRedis(host=redis_server, port=6379, db=0)
この時点で、サービス パッケージ アプリケーションのテンプレートをクラスターにデプロイすることができます。 次のチュートリアルでは、このアプリケーションをデプロイし、Service Fabric クラスターで実行します。
Service Fabric クラスターの作成
Azure にアプリケーションをデプロイするには、アプリケーションを実行する Service Fabric クラスターが必要です。 次のコマンドは、5 ノードのクラスターを Azure に作成します。 また、自己署名証明書を作成してキー コンテナーに追加し、証明書を PEM ファイルとしてローカルにダウンロードします。 新しい証明書は、デプロイ時にクラスターをセキュリティで保護す目的で使用されるほか、クライアントの認証にも使用されます。
#!/bin/bash

# Variables
ResourceGroupName="containertestcluster"
ClusterName="containertestcluster"
Location="eastus"
Password="q6D7nN%6ck@6"
Subject="containertestcluster.eastus.cloudapp.azure.com"
VaultName="containertestvault"
VmPassword="Mypa$$word!321"
VmUserName="sfadminuser"

# Login to Azure and set the subscription
az login

az account set --subscription <mySubscriptionID>

# Create resource group
az group create --name $ResourceGroupName --location $Location

# Create secure five node Linux cluster. Creates a key vault in a resource group
# and creates a certficate in the key vault. The certificate's subject name must match
# the domain that you use to access the Service Fabric cluster.
# The certificate is downloaded locally as a PEM file.
az sf cluster create --resource-group $ResourceGroupName --location $Location \
--certificate-output-folder . --certificate-password $Password --certificate-subject-name $Subject \
--cluster-name $ClusterName --cluster-size 5 --os UbuntuServer1804 --vault-name $VaultName \
--vault-resource-group $ResourceGroupName --vm-password $VmPassword --vm-user-name $VmUserName
Note
Web フロントエンド サービスは、ポート 80 で受信トラフィックをリッスンする構成になっています。 クラスターの VM および Azure Load Balancer では、ポート 80 が既定で開放されています。
独自のクラスターの作成について詳しくは、Azure での Service Fabric クラスターの作成に関するページを参照してください。
アプリケーションをクラスターにビルドおよびデプロイする
Service Fabric CLI を使用して、アプリケーションを Azure クラスターにデプロイできます。 Service Fabric CLI がマシンにインストールされていない場合は、こちらの指示に従ってインストールしてください。
Azure の Service Fabric クラスターに接続します。 サンプルのエンドポイントは独自のエンドポイントに置き換えてください。 エンドポイントは、次のような完全な URL にする必要があります。 この PEM ファイルは、前もって作成しておいた自己署名証明書です。
sfctl cluster select --endpoint https://containertestcluster.eastus.cloudapp.azure.com:19080 --pem containertestcluster22019013100.pem --no-verify
TestContainer ディレクトリに用意されているインストール スクリプトを使用してクラスターのイメージ ストアにアプリケーション パッケージをコピーし、アプリケーションの種類を登録して、アプリケーションのインスタンスを作成します。
./install.sh
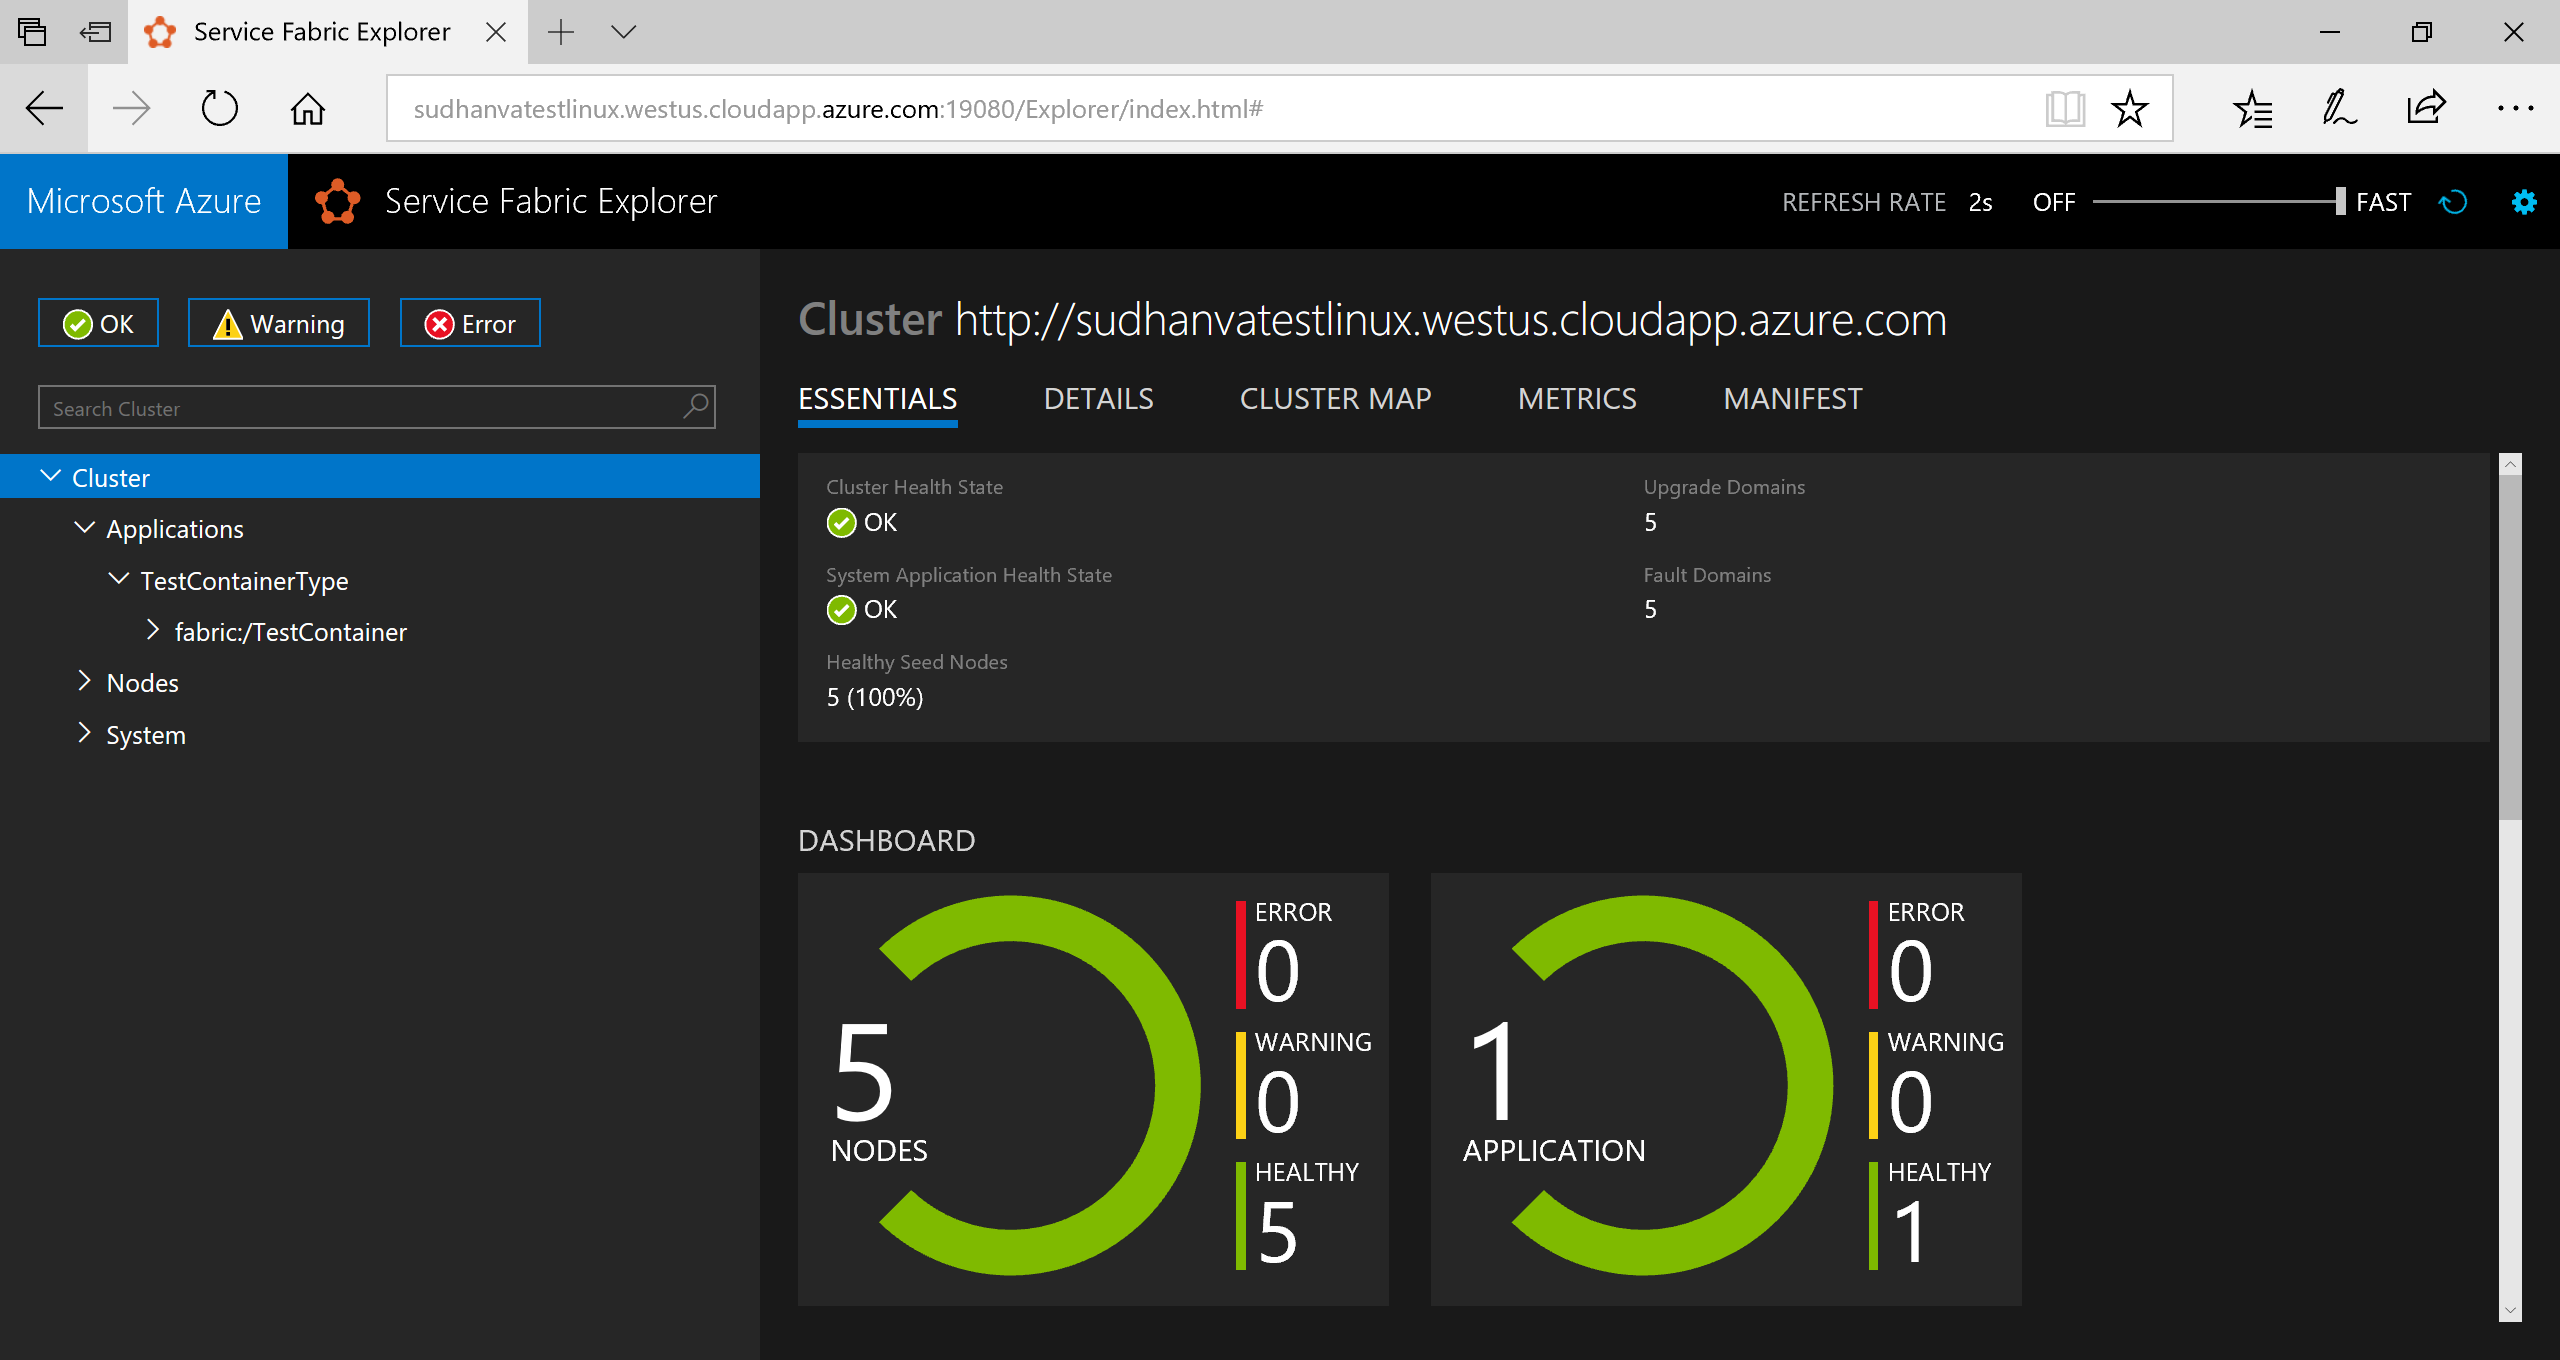
ブラウザーを開いて、Service Fabric Explorer (https://containertestcluster.eastus.cloudapp.azure.com:19080/Explorer.) に移動します。 アプリケーション ノードを展開し、アプリケーションの種類のエントリとインスタンスのエントリがあることを確認します。
実行中のアプリケーションに接続するには、Web ブラウザーを開いてクラスターの URL に移動します (例: http://containertestcluster.eastus.cloudapp.azure.com:80.)。 Web UI に Voting アプリケーションが表示されます。
![[Cats]、[Dogs]、[Reset] のボタンと合計値を含んだ Azure Voting アプリを示すスクリーンショット。](media/service-fabric-tutorial-deploy-run-containers/votingapp.png)
クリーンアップ
クラスターからアプリケーション インスタンスを削除し、その種類のアプリケーションの登録を解除するには、テンプレートに指定されているアンインストール スクリプトを使用します。 このコマンドは、インスタンスをクリーンアップするのに時間がかかるため、このスクリプトの直後に install.sh コマンドを実行することはできません。
./uninstall.sh
完了したマニフェストの例
ApplicationManifest.xml
<?xml version="1.0" encoding="UTF-8" standalone="yes"?>
<ApplicationManifest ApplicationTypeName="TestContainerType" ApplicationTypeVersion="1.0.0" xmlns="http://schemas.microsoft.com/2011/01/fabric" xmlns:xsd="https://www.w3.org/2001/XMLSchema" xmlns:xsi="https://www.w3.org/2001/XMLSchema-instance">
  <ServiceManifestImport>
    <ServiceManifestRef ServiceManifestName="azurevotefrontPkg" ServiceManifestVersion="1.0.0"/>
    <Policies>
    <ContainerHostPolicies CodePackageRef="Code">
        <RepositoryCredentials AccountName="myaccountname" Password="<password>" PasswordEncrypted="false"/>
        <PortBinding ContainerPort="80" EndpointRef="azurevotefrontTypeEndpoint"/>
    </ContainerHostPolicies>
        </Policies>
  </ServiceManifestImport>
  <ServiceManifestImport>
    <ServiceManifestRef ServiceManifestName="azurevotebackPkg" ServiceManifestVersion="1.0.0"/>
      <Policies>
        <ContainerHostPolicies CodePackageRef="Code">
          <PortBinding ContainerPort="6379" EndpointRef="azurevotebackTypeEndpoint"/>
        </ContainerHostPolicies>
      </Policies>
  </ServiceManifestImport>
  <DefaultServices>
    <Service Name="azurevotefront">
      <StatelessService ServiceTypeName="azurevotefrontType" InstanceCount="1">
        <SingletonPartition/>
      </StatelessService>
    </Service>
    <Service Name="azurevoteback" ServiceDnsName="redisbackend.testapp">
      <StatelessService ServiceTypeName="azurevotebackType" InstanceCount="1">
        <SingletonPartition/>
      </StatelessService>
    </Service>
  </DefaultServices>
</ApplicationManifest>
Front-end ServiceManifest.xml
<?xml version="1.0" encoding="utf-8"?>
<ServiceManifest Name="azurevotefrontPkg" Version="1.0.0"
                 xmlns="http://schemas.microsoft.com/2011/01/fabric" xmlns:xsd="https://www.w3.org/2001/XMLSchema" xmlns:xsi="https://www.w3.org/2001/XMLSchema-instance" >

   <ServiceTypes>
      <StatelessServiceType ServiceTypeName="azurevotefrontType" UseImplicitHost="true">
   </StatelessServiceType>
   </ServiceTypes>

   <CodePackage Name="code" Version="1.0.0">
      <EntryPoint>
         <ContainerHost>
            <ImageName>acrName.azurecr.io/azure-vote-front:v1</ImageName>
            <Commands></Commands>
         </ContainerHost>
      </EntryPoint>
      <EnvironmentVariables>
      </EnvironmentVariables>
   </CodePackage>

  <Resources>
    <Endpoints>
      <!-- This endpoint is used by the communication listener to obtain the port on which to
           listen. Please note that if your service is partitioned, this port is shared with
           replicas of different partitions that are placed in your code. -->
      <Endpoint Name="azurevotefrontTypeEndpoint" UriScheme="http" Port="80" Protocol="http"/>
    </Endpoints>
  </Resources>

 </ServiceManifest>
ServiceManifest.xml
<?xml version="1.0" encoding="utf-8"?>
<ServiceManifest Name="azurevotebackPkg" Version="1.0.0"
                 xmlns="http://schemas.microsoft.com/2011/01/fabric" xmlns:xsd="https://www.w3.org/2001/XMLSchema" xmlns:xsi="https://www.w3.org/2001/XMLSchema-instance" >

   <ServiceTypes>
      <StatelessServiceType ServiceTypeName="azurevotebackType" UseImplicitHost="true">
   </StatelessServiceType>
   </ServiceTypes>

   <CodePackage Name="code" Version="1.0.0">
      <EntryPoint>
         <ContainerHost>
            <Commands></Commands>
         </ContainerHost>
      </EntryPoint>
      <EnvironmentVariables>
      </EnvironmentVariables>
   </CodePackage>
     <Resources>
    <Endpoints>
      <!-- This endpoint is used by the communication listener to obtain the port on which to
           listen. Please note that if your service is partitioned, this port is shared with
           replicas of different partitions that are placed in your code. -->
      <Endpoint Name="azurevotebackTypeEndpoint" Port="6379" Protocol="tcp"/>
    </Endpoints>
  </Resources>
 </ServiceManifest>
次のステップ
このチュートリアルでは、Yeoman を使用して、複数のコンテナーを Service Fabric アプリケーションにパッケージ化しました。 その後、アプリケーションがデプロイされ、Service Fabric クラスターで実行されました。 次の手順を完了しました。
- Yeoman のインストール
- Yeoman を使用したアプリケーション パッケージの作成
- コンテナーで使用するアプリケーション パッケージの設定
- アプリケーションのビルド
- アプリケーションのデプロイと実行
- アプリケーションのクリーンアップ
次のチュートリアルでは、Service Fabric のアプリケーションのフェールオーバーおよびスケーリングについて学習します。