アプリケーションでは多くの場合、複数の Azure サービス間にセキュリティで保護された接続が同時に必要になります。 たとえば、エンタープライズ Azure App Service インスタンスで、複数の異なるストレージ アカウント、Azure SQL データベース インスタンス、Service Bus などに接続する場合があります。
マネージド ID は、Azure リソース間の安全なパスワードレス接続に推奨されている認証オプションです。 マネージド ID では、開発者がさまざまなシークレットを手動で追跡して管理する必要はありません。これらのタスクのほとんどは Azure によって内部で処理されるためです。 このチュートリアルでは、マネージド ID と Azure ID クライアント ライブラリを使用して複数のサービス間の接続を管理する方法について説明します。
マネージド ID の種類を比較する
Azure には、次の種類のマネージド ID が用意されています。
-
システム割り当てマネージド ID は、1 つの Azure リソースに直接関連付けられます。 サービスでシステム割り当てマネージド ID を有効にすると、Azure によってリンクされた ID が作成され、その ID の管理タスクが内部で処理されます。 Azure リソースが削除されると、ID も削除されます。
-
ユーザー割り当てマネージド ID は、管理者によって作成され、1 つ以上の Azure リソースに関連付けることができる独立した ID です。 ID のライフサイクルは、それらのリソースから独立しています。
ベスト プラクティスと、システム割り当ておよびユーザー割り当てマネージド ID をそれぞれどのようなときに使用するかについての詳細は、マネージド ID のベスト プラクティスの推奨事項を参照してください。
DefaultAzureCredential について
マネージド ID は、Azure ID クライアント ライブラリの DefaultAzureCredential というクラスを使用して、アプリケーション コードに最も簡単に実装されます。
DefaultAzureCredential は複数の認証メカニズムをサポートしています。どれが実行時に使用されるかは自動的に決定されます。
DefaultAzureCredential の詳細については、次のエコシステムを確認してください。
Azure でホストされているアプリを複数の Azure サービスに接続する
パスワードレス接続を使用して、既存のアプリを複数の Azure サービスとデータベースに接続する作業をしているとします。 このアプリケーションは Azure App Service でホストされている ASP.NET Core Web API ですが、以下の手順は、Azure Spring Apps、Virtual Machines、Container Apps、AKS などの他の Azure ホスティング環境にも適用されます。
このチュートリアルは次のアーキテクチャに適用されますが、最小限の構成変更で、他の多くのシナリオにも適応できます。
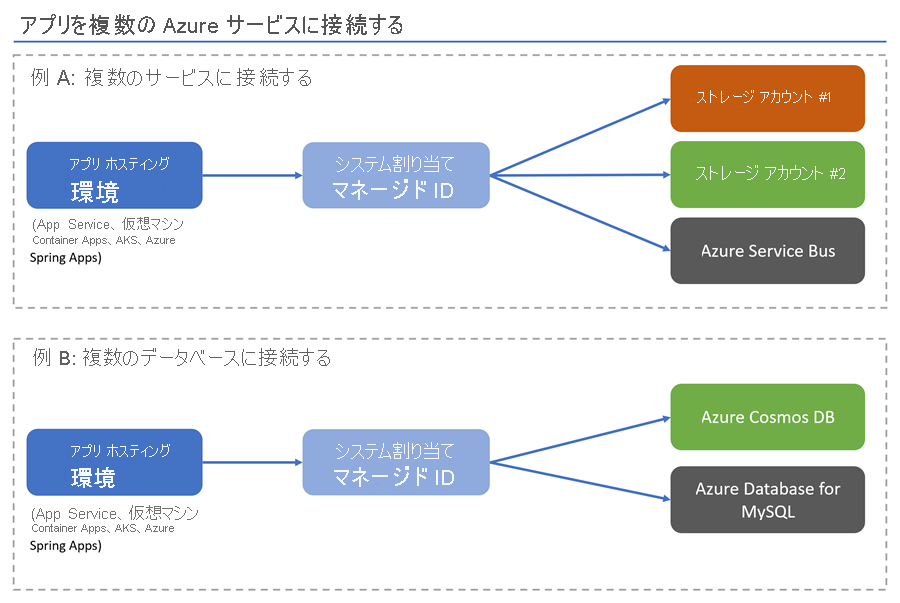
次の手順では、システム割り当てマネージド ID とローカル開発アカウントを使用して複数の Azure サービスに接続するように、アプリを構成する方法を示します。
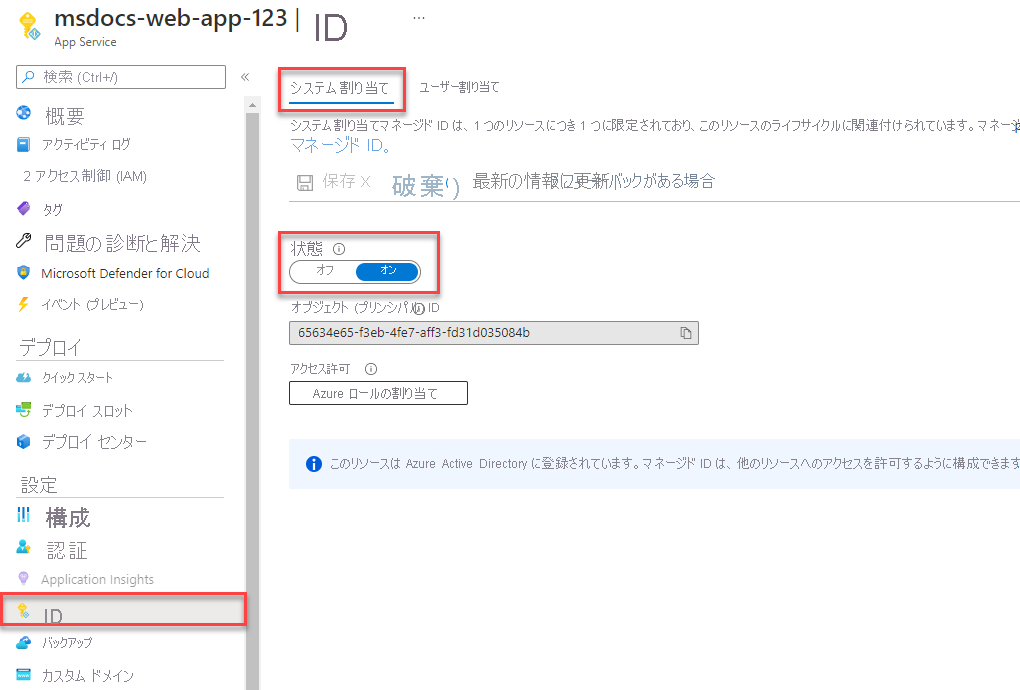
システム割り当てマネージド ID を作成する
Azure portal で、他のサービスに接続する、ホストされたアプリケーションに移動します。
サービスの概要ページで、[ID] を選択します。
[状態] の設定を [オン] に切り替えて、サービスのシステム割り当てマネージド ID を有効にします。
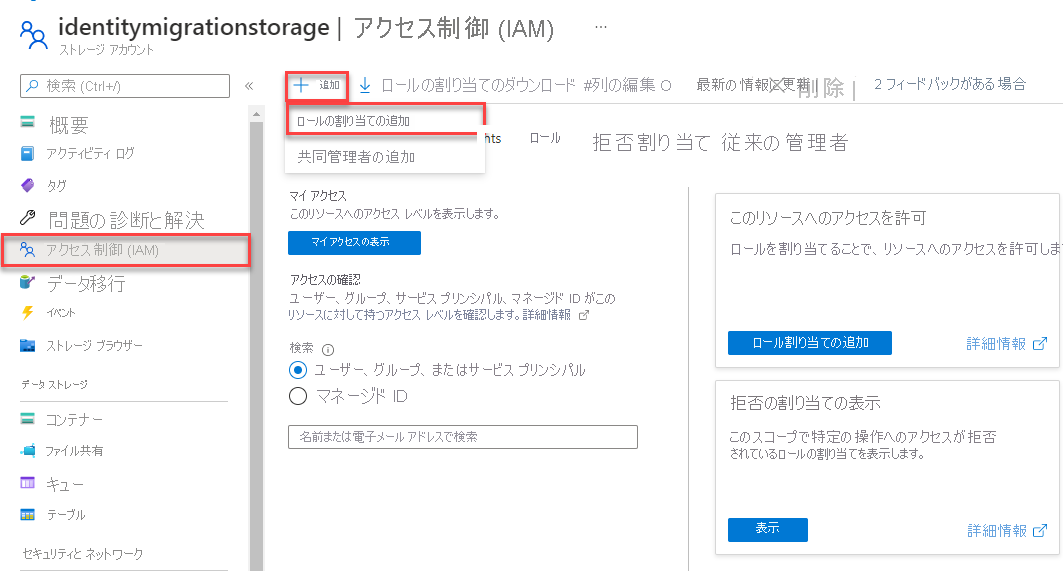
接続されている各サービスのマネージド ID にロールを割り当てる
お使いの ID にアクセスを許可するストレージ アカウントの概要ページに移動します。
ストレージ アカウントのナビゲーションから [アクセス制御 (IAM)] を選択します。
[+ 追加]、[ロールの割り当ての追加] の順に選択します。
[ロール] 検索ボックスで、[ストレージ BLOB データ共同作成者] を検索します。これは、BLOB データに対する読み取りと書き込みの操作を実行するためのアクセス許可を付与します。 ユース ケースに合った適切なロールであれば何でも割り当てることができます。 一覧から [ストレージ BLOB データ共同作成者] を選択し、[次へ] を選択します。
[ロールの割り当てを追加] 画面の [アクセスの割り当て先] オプションで [マネージド ID] を選択します。 次に、[+ メンバーの選択] を選択します。
ポップアップで、App Service の名前を入力して、作成したマネージド ID を検索します。 システム割り当て ID を選択し、[選択] を選択してポップアップ メニューを閉じます。
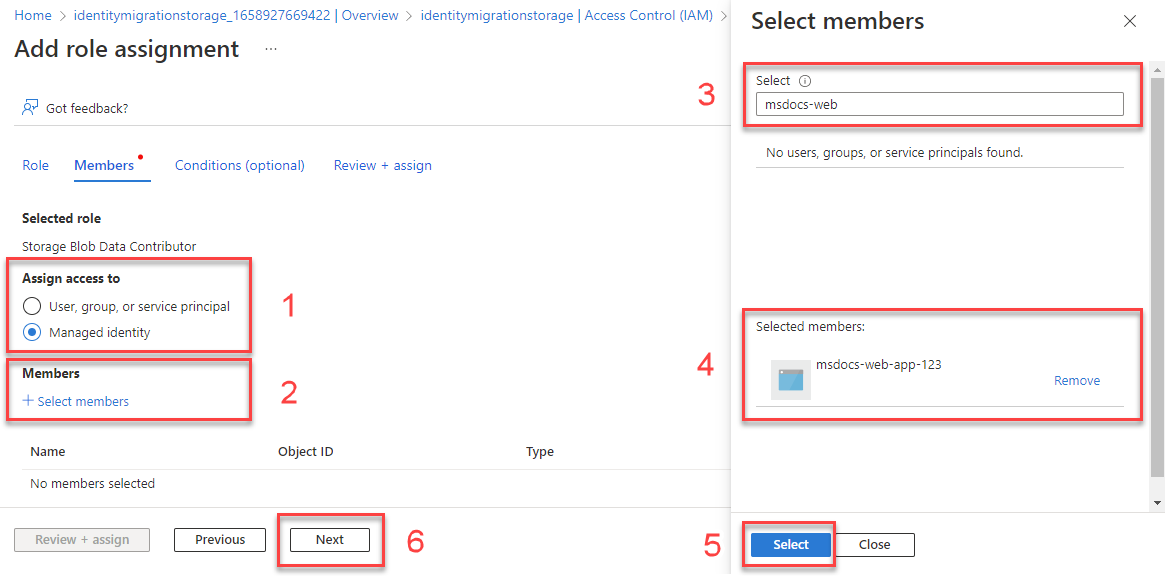
[次へ] を何度か選択して [レビューと割り当て] を選択すれば、ロールの割り当ては完了です。
接続する他のサービスでこのプロセスを繰り返します。
ローカル開発の考慮事項
また、マネージド ID にロールを割り当てたときと同じ方法でユーザー アカウントにロールを割り当て、ローカル開発用の Azure リソースにアクセスできるようにすることもできます。
マネージド ID に [ストレージ BLOB データ共同作成者] ロールを割り当てたら、[アクセスの割り当て先] で、今度は [User, group or service principal] (ユーザー、グループ、またはサービス プリンシパル) を選択します。
[+ メンバーを選択する] を選択してポップアップ メニューをもう一度開きます。
メール アドレスまたは名前でアクセス権を付与する user@domain アカウントまたは Microsoft Entra セキュリティ グループを検索し、それを選択します。 これは、Visual Studio や Azure CLI などの、ローカル開発ツールへのサインインに使用するアカウントと同じであることが必要です。
Note
複数の開発者がいるチームで作業している場合は、これらのロールを Microsoft Entra セキュリティ グループに割り当てることもできます。 そのうえで、アプリをローカルで開発するアクセス権が必要な開発者を、そのグループに入れることができます。
アプリケーション コードを実装する
プロジェクトで Azure.Identity パッケージをインストールします。 このライブラリには DefaultAzureCredential があります。 また、アプリに関連する他の Azure ライブラリも追加できます。 この例では、Azure.Storage.Blobs および Azure.Messaging.ServiceBus パッケージがそれぞれ、Blob Storage と Service Bus に接続するために追加されています。
dotnet add package Azure.Identity
dotnet add package Azure.Messaging.ServiceBus
dotnet add package Azure.Storage.Blobs
アプリが接続する必要がある Azure サービスのサービス クライアントのインスタンスを作成します。 次のサンプル コードでは、対応するサービス クライアントを使用して、Blob Storage と Service Bus を操作します。
using Azure.Identity;
using Azure.Messaging.ServiceBus;
using Azure.Storage.Blobs;

// Create DefaultAzureCredential instance that uses system-assigned managed identity
// in the underlying ManagedIdentityCredential.
DefaultAzureCredential credential = new();

BlobServiceClient blobServiceClient = new(
    new Uri("https://<your-storage-account>.blob.core.windows.net"),
    credential);

ServiceBusClient serviceBusClient = new("<your-namespace>", credential);
ServiceBusSender sender = serviceBusClient.CreateSender("producttracking");
プロジェクトで、azure-identity 依存関係を pom.xml ファイルに追加します。 このライブラリには DefaultAzureCredential があります。 また、アプリに関連する他の Azure 依存関係も追加できます。 この例では、azure-storage-blob および azure-messaging-servicebus 依存関係が、Blob Storage と Service Bus とやり取りするために追加されています。
<dependencyManagement>
  <dependencies>
    <dependency>
      <groupId>com.azure</groupId>
      <artifactId>azure-sdk-bom</artifactId>
      <version>1.2.5</version>
      <type>pom</type>
      <scope>import</scope>
    </dependency>
  </dependencies>
</dependencyManagement>
<dependencies>
  <dependency>
    <groupId>com.azure</groupId>
    <artifactId>azure-identity</artifactId>
  </dependency>
  <dependency>
    <groupId>com.azure</groupId>
    <artifactId>azure-storage-blob</artifactId>
  </dependency>
  <dependency>
    <groupId>com.azure</groupId>
    <artifactId>azure-messaging-servicebus</artifactId>
  </dependency>
</dependencies>
アプリが接続する必要がある Azure サービスのサービス クライアントのインスタンスを作成します。 次のサンプル コードでは、対応するサービス クライアントを使用して、Blob Storage と Service Bus を操作します。
class Demo {
    public static void main(String[] args) {
        // Create DefaultAzureCredential instance that uses system-assigned managed identity
        // in the underlying ManagedIdentityCredential.
        DefaultAzureCredential credential = new DefaultAzureCredentialBuilder()
            .build();

        BlobServiceClient blobServiceClient = new BlobServiceClientBuilder()
            .endpoint("https://<your-storage-account>.blob.core.windows.net")
            .credential(credential)
            .buildClient();

        ServiceBusClientBuilder clientBuilder = new ServiceBusClientBuilder()
            .credential(credential);
        ServiceBusSenderClient serviceBusSenderClient = clientBuilder.sender()
            .queueName("producttracking")
            .buildClient();
    }
}
プロジェクトでは、使用するサービスの依存関係を追加するだけでかまいません。 この例では、spring-cloud-azure-starter-storage-blob および spring-cloud-azure-starter-servicebus 依存関係が、Blob Storage と Service Bus に接続する目的で追加されています。
<dependencyManagement>
  <dependencies>
    <dependency>
      <groupId>com.azure.spring</groupId>
      <artifactId>spring-cloud-azure-dependencies</artifactId>
      <version>4.5.0</version>
      <type>pom</type>
      <scope>import</scope>
    </dependency>
  </dependencies>
</dependencyManagement>
<dependencies>
  <dependency>
    <groupId>com.azure.spring</groupId>
    <artifactId>spring-cloud-azure-starter-storage-blob</artifactId>
  </dependency>
  <dependency>
    <groupId>com.azure.spring</groupId>
    <artifactId>spring-cloud-azure-starter-servicebus</artifactId>
  </dependency>
</dependencies>
アプリが接続する必要がある Azure サービスのサービス クライアントのインスタンスを作成します。 次の例では、Blob Storage と Service Bus に、対応するサービス クライアントを使用して接続します。
spring:
  cloud:
    azure:
      servicebus:
        namespace: <service-bus-name>
        entity-name: <service-bus-entity-name>
        entity-type: <service-bus-entity-type>
      storage:
        blob:
          account-name: <storage-account-name>
@Service
public class ExampleService {
    @Autowired
    private BlobServiceClient blobServiceClient;

    @Autowired
    private ServiceBusSenderClient serviceBusSenderClient;
}
プロジェクトで @azure/identity パッケージをインストールします。 このライブラリには DefaultAzureCredential があります。 この例では、@azure/storage-blob および @azure/service-bus パッケージが、Blob Storage と Service Bus とやり取りするためにインストールされています。
npm install --save @azure/identity @azure/storage-blob @azure/service-bus
アプリが接続する必要がある Azure サービスのサービス クライアントのインスタンスを作成します。 次のサンプル コードでは、対応するサービス クライアントを使用して、Blob Storage と Service Bus を操作します。
import { DefaultAzureCredential } from "@azure/identity";
import { BlobServiceClient } from "@azure/storage-blob";
import { ServiceBusClient } from "@azure/service-bus";

// Azure resource names
const storageAccount = process.env.AZURE_STORAGE_ACCOUNT_NAME;
const serviceBusNamespace = process.env.AZURE_SERVICE_BUS_NAMESPACE;

// Create DefaultAzureCredential instance that uses system-assigned managed identity
// in the underlying ManagedIdentityCredential.
const credential = new DefaultAzureCredential();

// Create client for Blob Storage
const blobServiceClient = new BlobServiceClient(
  `https://${storageAccount}.blob.core.windows.net`,
  credential
);

// Create client for Service Bus
const serviceBusClient = new ServiceBusClient(
  `https://${serviceBusNamespace}.servicebus.windows.net`,
  credential
);
プロジェクトで、azure-identity パッケージへの参照を追加します。 このライブラリには DefaultAzureCredential があります。 また、アプリに関連する他の Azure ライブラリも追加できます。 この例では、azure-storage-blob および azure-service-bus パッケージがそれぞれ、Blob Storage と Service Bus に接続するために追加されています。
pip install azure-identity azure-servicebus azure-storage-blob
アプリが接続する必要がある Azure サービスのサービス クライアントのインスタンスを作成します。 次のサンプル コードでは、対応するサービス クライアントを使用して、Blob Storage と Service Bus を操作します。
from azure.identity import DefaultAzureCredential
from azure.servicebus import ServiceBusClient, ServiceBusMessage
from azure.storage.blob import BlobServiceClient
import os

# Create DefaultAzureCredential instance that uses system-assigned managed identity
# in the underlying ManagedIdentityCredential.
credential = DefaultAzureCredential()

blob_service_client = BlobServiceClient(
    account_url="https://<my-storage-account-name>.blob.core.windows.net/",
    credential=credential
)

fully_qualified_namespace = os.environ['SERVICEBUS_FULLY_QUALIFIED_NAMESPACE']
queue_name = os.environ['SERVICE_BUS_QUEUE_NAME']

with ServiceBusClient(fully_qualified_namespace, credential) as service_bus_client:
    with service_bus_client.get_queue_sender(queue_name) as sender:
        # Sending a single message
        single_message = ServiceBusMessage("Single message")
        sender.send_messages(single_message)
このコードがローカルで実行されると、DefaultAzureCredential ではその資格情報チェーンを検索し、最初に使用可能な資格情報を見つけます。
Managed_Identity_Client_ID 環境変数がローカルで null 値の場合は、ローカルにインストールされた開発者ツールに対応する資格情報が使用されます。 たとえば、Azure CLI や Visual Studio です。 このプロセスの詳細については、「DefaultAzureCredential について」を参照してください。
アプリケーションが Azure にデプロイされると、DefaultAzureCredential によって App Service 環境から自動的に Managed_Identity_Client_ID 変数が取得されます。 この値は、マネージド ID がアプリに関連付けられると使用できるようになります。
この全体的なプロセスにより、コード変更を行わなくても、アプリをローカルおよび Azure で安全に実行できます。
複数のマネージド ID を使用して複数のアプリを接続する
前の例のアプリでは同じサービス アクセス要件を共有していましたが、たいていの場合、実際の環境はそれぞれ微妙に異なります。 複数のアプリが同じストレージ アカウントに接続していますが、アプリのうち 2 つは異なるサービスまたはデータベースにもアクセスするというシナリオについて考えます。
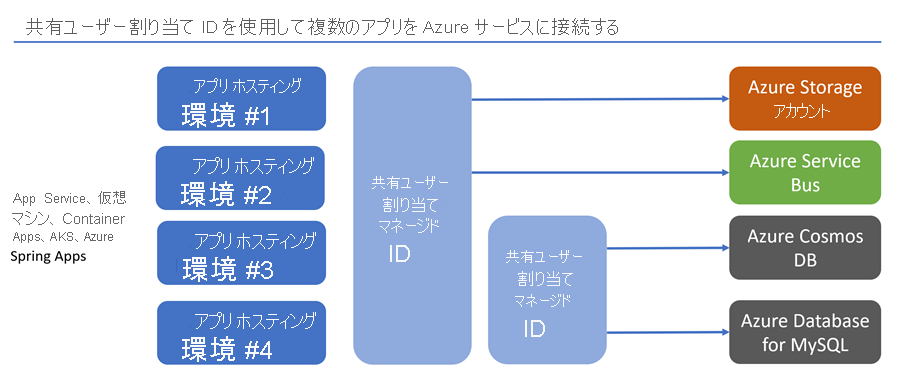
コードでこのセットアップを構成するには、アプリケーションで、それぞれのストレージ アカウントまたはデータベースに接続するために個別のサービス クライアントを登録する必要があります。
DefaultAzureCredential を構成するときは、各サービスの正しいマネージド ID クライアント ID を参照します。 次のサンプル コードでは、これらの Azure サービス接続を構成します。
- 共有ユーザー割り当てマネージド ID を使用した個別のストレージ アカウントへの 2 つの接続
- 2 つ目のユーザー割り当てマネージド ID を使用した Azure Cosmos DB と Azure SQL サービスへの接続。 このマネージド ID は、Azure SQL クライアント ドライバーで許可されている場合に共有されます。 詳細については、コードのコメントを参照してください。
プロジェクトで、必要なパッケージをインストールします。 Azure ID ライブラリには DefaultAzureCredential があります。
dotnet add package Azure.Identity
dotnet add package Azure.Storage.Blobs
dotnet add package Microsoft.Azure.Cosmos
dotnet add package Microsoft.Data.SqlClient
コードに次の内容を追加します。
using Azure.Core;
using Azure.Identity;
using Azure.Storage.Blobs;
using Microsoft.Azure.Cosmos;
using Microsoft.Data.SqlClient;

string clientIdStorage =
    Environment.GetEnvironmentVariable("Managed_Identity_Client_ID_Storage")!;

// Create a DefaultAzureCredential instance that configures the underlying
// ManagedIdentityCredential to use a user-assigned managed identity.
DefaultAzureCredential credentialStorage = new(
    new DefaultAzureCredentialOptions
    {
        ManagedIdentityClientId = clientIdStorage,
    });

// First Blob Storage client
BlobServiceClient blobServiceClient1 = new(
    new Uri("https://<receipt-storage-account>.blob.core.windows.net"),
    credentialStorage);

// Second Blob Storage client
BlobServiceClient blobServiceClient2 = new(
    new Uri("https://<contract-storage-account>.blob.core.windows.net"),
    credentialStorage);

string clientIdDatabases =
    Environment.GetEnvironmentVariable("Managed_Identity_Client_ID_Databases")!;

// Create a DefaultAzureCredential instance that configures the underlying
// ManagedIdentityCredential to use a user-assigned managed identity.
DefaultAzureCredential credentialDatabases = new(
    new DefaultAzureCredentialOptions
    {
        ManagedIdentityClientId = clientIdDatabases,
    });

// Create an Azure Cosmos DB client
CosmosClient cosmosClient = new(
    Environment.GetEnvironmentVariable("COSMOS_ENDPOINT", EnvironmentVariableTarget.Process),
    credentialDatabases);

// Open a connection to Azure SQL
string connectionString =
    $"Server=<azure-sql-hostname>.database.windows.net;User Id={clientIdDatabases};Authentication=Active Directory Default;Database=<database-name>";

using (SqlConnection connection = new(connectionString)
{
    AccessTokenCallback = async (authParams, cancellationToken) =>
    {
        const string defaultScopeSuffix = "/.default";
        string scope = authParams.Resource.EndsWith(defaultScopeSuffix)
            ? authParams.Resource
            : $"{authParams.Resource}{defaultScopeSuffix}";
        AccessToken token = await credentialDatabases.GetTokenAsync(
            new TokenRequestContext([scope]),
            cancellationToken);

        return new SqlAuthenticationToken(token.Token, token.ExpiresOn);
    }
})
{
    connection.Open();
}
pom.xml ファイルに次のコードを追加します。
<dependencyManagement>
  <dependencies>
    <dependency>
      <groupId>com.azure</groupId>
      <artifactId>azure-sdk-bom</artifactId>
      <version>1.2.5</version>
      <type>pom</type>
      <scope>import</scope>
    </dependency>
  </dependencies>
</dependencyManagement>
<dependencies>
  <dependency>
    <groupId>com.azure</groupId>
    <artifactId>azure-identity</artifactId>
  </dependency>
  <dependency>
    <groupId>com.azure</groupId>
    <artifactId>azure-storage-blob</artifactId>
  </dependency>
  <dependency>
    <groupId>com.azure</groupId>
    <artifactId>azure-cosmos</artifactId>
  </dependency>
  <dependency>
    <groupId>com.microsoft.sqlserver</groupId>
    <artifactId>mssql-jdbc</artifactId>
    <version>11.2.1.jre17</version>
  </dependency>
</dependencies>
コードに次の内容を追加します。
class Demo {
    public static void main(String[] args) {
        String clientIdStorage = System.getenv("Managed_Identity_Client_ID_Storage");

        // Create a DefaultAzureCredential instance that configures the underlying
        // ManagedIdentityCredential to use a user-assigned managed identity.
        DefaultAzureCredential credentialStorage = new DefaultAzureCredentialBuilder()
            .managedIdentityClientId(clientIdStorage)
            .build();

        // First Blob Storage client
        BlobServiceClient blobServiceClient1 = new BlobServiceClientBuilder()
            .endpoint("https://<receipt-storage-account>.blob.core.windows.net")
            .credential(credentialStorage)
            .buildClient();

        // Second Blob Storage client
        BlobServiceClient blobServiceClient2 = new BlobServiceClientBuilder()
            .endpoint("https://<contract-storage-account>.blob.core.windows.net")
            .credential(credentialStorage)
            .buildClient();

        String clientIdDatabases = System.getenv("Managed_Identity_Client_ID_Databases");

        // Create a DefaultAzureCredential instance that configures the underlying
        // ManagedIdentityCredential to use a user-assigned managed identity.
        DefaultAzureCredential credentialDatabases = new DefaultAzureCredentialBuilder()
            .managedIdentityClientId(clientIdDatabases)
            .build()

        // Create an Azure Cosmos DB client
        CosmosClient cosmosClient = new CosmosClientBuilder()
            .endpoint("https://<cosmos-db-account>.documents.azure.com:443/")
            .credential(credentialDatabases)
            .buildClient();

        // Open a connection to Azure SQL using a managed identity.
        // The DefaultAzureCredential instance stored in the credentialDatabases variable can't be
        // used here, so sharing isn't possible between Cosmos DB and Azure SQL.
        String connectionUrl = "jdbc:sqlserver://<azure-sql-hostname>.database.windows.net:1433;"
            + "database=<database-name>;encrypt=true;trustServerCertificate=false;hostNameInCertificate=*.database"
            + ".windows.net;loginTimeout=30;Authentication=ActiveDirectoryMSI;";
        try {
            Connection connection = DriverManager.getConnection(connectionUrl);
            Statement statement = connection.createStatement();
        } catch (SQLException e) {
            e.printStackTrace();
        }
    }
}
pom.xml ファイルに次のコードを追加します。
<dependencyManagement>
  <dependencies>
    <dependency>
      <groupId>com.azure.spring</groupId>
      <artifactId>spring-cloud-azure-dependencies</artifactId>
      <version>4.5.0</version>
      <type>pom</type>
      <scope>import</scope>
    </dependency>
  </dependencies>
</dependencyManagement>
<dependencies>
  <dependency>
    <groupId>com.azure.spring</groupId>
    <artifactId>spring-cloud-azure-starter-storage-blob</artifactId>
  </dependency>
  <dependency>
    <groupId>com.azure.spring</groupId>
    <artifactId>spring-cloud-azure-starter-cosmos</artifactId>
  </dependency>
  <dependency>
    <groupId>com.microsoft.sqlserver</groupId>
    <artifactId>mssql-jdbc</artifactId>
  </dependency>
  <dependency>
    <groupId>org.springframework.boot</groupId>
    <artifactId>spring-boot-starter-jdbc</artifactId>
  </dependency>
</dependencies>
application.yml ファイルに次のコードを追加します。
spring:
  cloud:
    azure:
      cosmos:
        endpoint: https://<cosmos-db-account>.documents.azure.com:443/
        credential:
          client-id: <Managed_Identity_Client_ID_Databases>
          managed-identity-enabled: true
      storage:
        blob:
          endpoint: https://<contract-storage-account>.blob.core.windows.net
          credential:
            client-id: <Managed_Identity_Client_ID_Storage>
            managed-identity-enabled: true
  datasource:
    url: jdbc:sqlserver://<azure-sql-hostname>.database.windows.net:1433;database=<database-name>;encrypt=true;trustServerCertificate=false;hostNameInCertificate=*.database.windows.net;loginTimeout=30;Authentication=ActiveDirectoryMSI;
コードに次の内容を追加します。
Note
Spring Cloud Azure では、同じサービスのクライアントを複数構成することはサポートされていません。次のサンプル コードは、このような状況のために複数の Bean を作成するものです。
@Configuration
public class AzureStorageConfiguration {
    @Bean("secondBlobServiceClient")
    public BlobServiceClient secondBlobServiceClient(BlobServiceClientBuilder builder) {
        return builder.endpoint("https://<receipt-storage-account>.blob.core.windows.net")
            .buildClient();
    }

    @Bean("firstBlobServiceClient")
    public BlobServiceClient firstBlobServiceClient(BlobServiceClientBuilder builder) {
        return builder.buildClient();
    }
}
@Service
public class ExampleService {
    @Autowired
    @Qualifier("firstBlobServiceClient")
    private BlobServiceClient blobServiceClient1;

    @Autowired
    @Qualifier("secondBlobServiceClient")
    private BlobServiceClient blobServiceClient2;

    @Autowired
    private CosmosClient cosmosClient;

    @Autowired
    private JdbcTemplate jdbcTemplate;
}
プロジェクトで、必要なパッケージをインストールします。 Azure ID ライブラリには DefaultAzureCredential があります。
npm install --save @azure/identity @azure/storage-blob @azure/cosmos tedious
コードに次の内容を追加します。
import { DefaultAzureCredential } from "@azure/identity";
import { BlobServiceClient } from "@azure/storage-blob";
import { CosmosClient } from "@azure/cosmos";
import { Connection } from "tedious";

// Create a DefaultAzureCredential instance that configures the underlying
// ManagedIdentityCredential to use a user-assigned managed identity.
const credentialStorage = new DefaultAzureCredential({
  managedIdentityClientId: process.env.MANAGED_IDENTITY_CLIENT_ID_STORAGE
});

// First Blob Storage client
const blobServiceClient1 = new BlobServiceClient(
  `https://${process.env.AZURE_STORAGE_ACCOUNT_NAME_1}.blob.core.windows.net`,
  credentialStorage
);

// Second Blob Storage client
const blobServiceClient2 = new BlobServiceClient(
  `https://${process.env.AZURE_STORAGE_ACCOUNT_NAME_2}.blob.core.windows.net`,
  credentialStorage
);

// Create a DefaultAzureCredential instance that configures the underlying
// ManagedIdentityCredential to use a user-assigned managed identity.
const credentialDatabases = new DefaultAzureCredential({
  managedIdentityClientId: process.env.MANAGED_IDENTITY_CLIENT_ID_DATABASES
});

// Create an Azure Cosmos DB client
const cosmosClient = new CosmosClient({
  endpoint: process.env.COSMOS_ENDPOINT,
  credential: credentialDatabases
});

// Configure connection and connect to Azure SQL
const config = {
  server: process.env.AZURE_SQL_SERVER,
  authentication: {
    type: 'azure-active-directory-access-token',
    options: {
      token: credentialDatabases.getToken("https://database.windows.net//.default").token
    }
  },
  options: {
    database: process.env.AZURE_SQL_DATABASE,
    encrypt: true
  }
};

const connection = new Connection(config);
connection.connect();
プロジェクトで、必要なパッケージをインストールします。 Azure ID ライブラリには DefaultAzureCredential があります。
pip install azure-identity azure-storage-blob azure-cosmos pyodbc
コードに次の内容を追加します。
from azure.cosmos import CosmosClient
from azure.identity import DefaultAzureCredential
from azure.storage.blob import BlobServiceClient
import os, pyodbc, struct

# Create a DefaultAzureCredential instance that configures the underlying
# ManagedIdentityCredential to use a user-assigned managed identity.
credential_storage = DefaultAzureCredential(
    managed_identity_client_id=os.environ['Managed_Identity_Client_ID_Storage']
)

# First Blob Storage client
blob_service_client_1 = BlobServiceClient(
    account_url="https://<receipt-storage-account>.blob.core.windows.net/",
    credential=credential_storage
)

# Second Blob Storage client
blob_service_client_2 = BlobServiceClient(
    account_url="https://<contract-storage-account>.blob.core.windows.net/",
    credential=credential_storage
)

# Create a DefaultAzureCredential instance that configures the underlying
# ManagedIdentityCredential to use a user-assigned managed identity.
credential_databases = DefaultAzureCredential(
    managed_identity_client_id=os.environ['Managed_Identity_Client_ID_Databases']
)

# Create an Azure Cosmos DB client
cosmos_client = CosmosClient(
    os.environ['COSMOS_ENDPOINT'],
    credential=credential_databases
)

# Connect to Azure SQL
token_bytes = credential_databases.get_token("https://database.windows.net/.default").token.encode("UTF-16-LE")
token_struct = struct.pack(f'<I{len(token_bytes)}s', len(token_bytes), token_bytes)
SQL_COPT_SS_ACCESS_TOKEN = 1256  # This connection option is defined by microsoft in msodbcsql.h
conn = pyodbc.connect(connection_string, attrs_before={SQL_COPT_SS_ACCESS_TOKEN: token_struct})
ユーザー割り当てマネージド ID とシステム割り当てマネージド ID を同時にリソースに関連付けることもできます。 これは、すべてのアプリで同じ共有サービスにアクセスする必要がありますが、アプリの 1 つが追加のサービスへの固有の依存関係を持っているというシナリオで役立ちます。 システム割り当てマネージド ID を使用すると、アプリが削除されたときに、その特定のアプリに関連付けられている ID も削除されます。これによって環境がクリーンに保たれます。
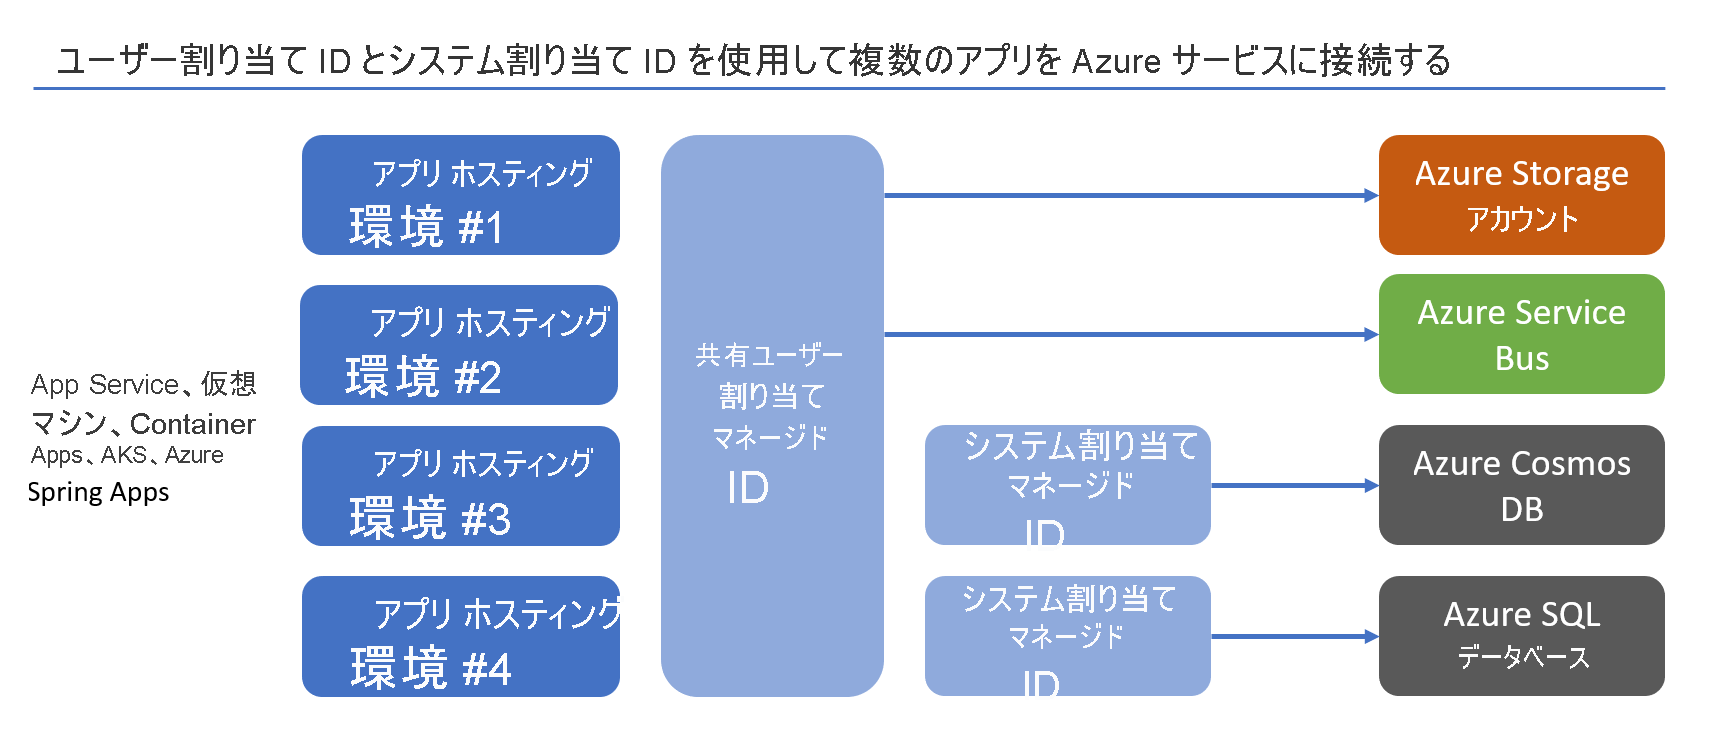
これらの種類のシナリオの詳細については、「マネージド ID のベスト プラクティスに関する推奨事項」を参照してください。
次のステップ
このチュートリアルでは、アプリケーションをパスワードレス接続に移行する方法について説明しました。 この記事で説明されている概念の詳細については、次のリソースを参照してください。


