BizTalk Server の Office 365 Outlook 予定表アダプターを使用して、Office 365 Outlook 予定表から予定表イベントを作成および受信します。
送信ポートを使用してイベントを作成する
BizTalk Server 管理コンソールで、[ 送信ポート] を右クリックし、[ 新規] を選択して、[ 静的一方向送信ポート] を選択します。
送信ポートを作成すると、 いくつかのガイダンスが提供されます。
名前を入力します。 トランスポートで、種類を Office 365 Outlook 予定表に設定し、[構成] を選択します。
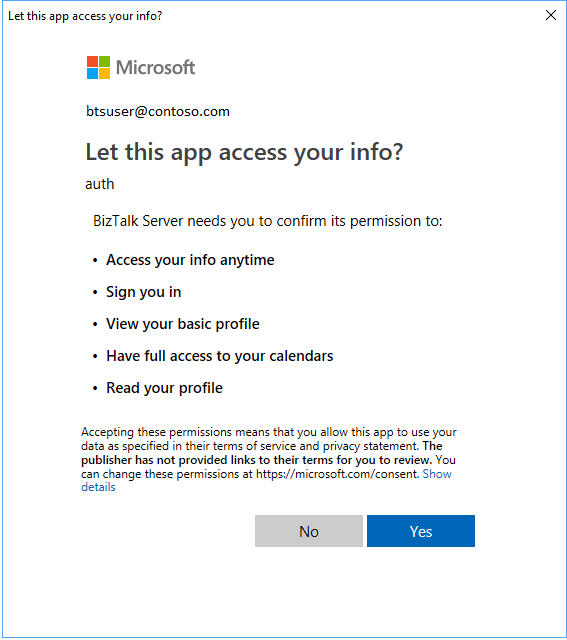
[サインイン...] を選択し、Office 365 アカウントにサインインします。 アカウントには、メール アドレスが自動的に入力されます。
BizTalk Server によるアクセス許可の承認を許可します。
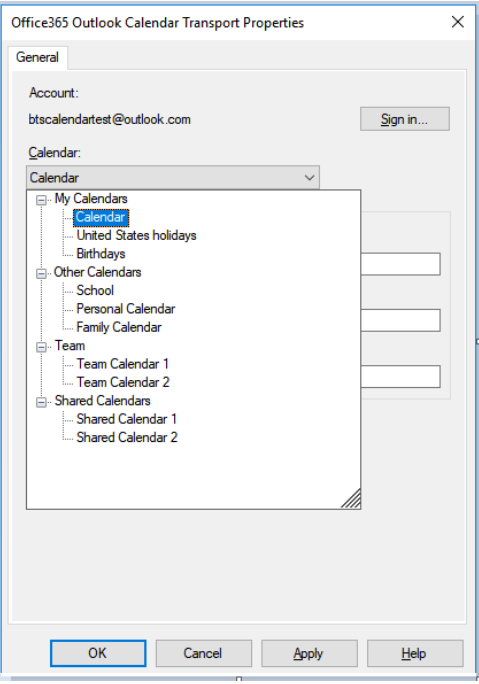
Office365 Outlook 予定表の既定のプロパティを構成します。
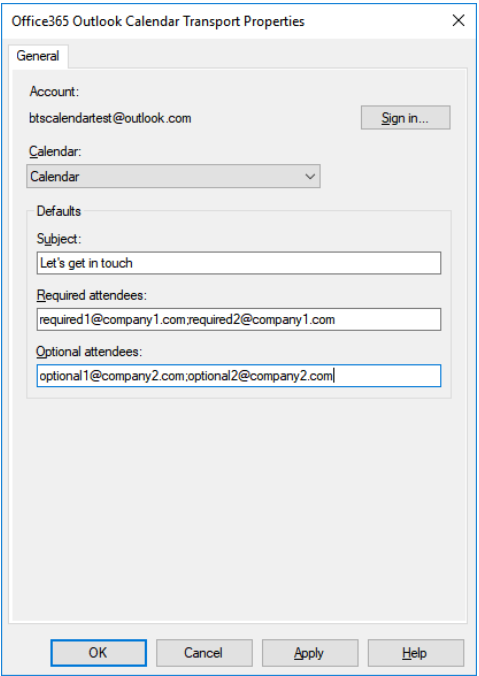
これを使用する 目的 暦 イベントを作成するカレンダーを選択します。 件名 作成されたイベントの既定の件名を設定します。 (最大 256 文字) 必須出席者 既定の必須出席者のメール アドレスを ";" で区切って入力します。 (最大 256 文字) 任意出席者 既定の省略可能な出席者のメール アドレスを ";" で区切って入力します。 (最大 256 文字) 予定表を選択します。
完了すると、プロパティはこのような見た目になります。
[ OK] を 選択して変更を保存します。
送信ポートをテストする
単純なファイル受信ポートと場所を使用して、Office 365 Outlook 予定表でイベントを作成できます。
ファイル アダプターを使用して受信ポートを作成します。 受信場所内で、 受信フォルダー を C:\Temp\In\ に設定し、ファイル マスクを *.xmlに設定します。
Office 365 Outlook カレンダー アダプターの送信ポートのプロパティで、[ フィルター] を [
BTS.ReceivePortName == <Receive Port Name>に設定します。次をテキスト エディターに貼り付け、ファイルを Office365Calendar.xmlとして保存します。 これがサンプル メッセージです。
<Event xmlns="http://schemas.microsoft.com/BizTalk/Office365OutlookCalendar/Send"> <subject>Test event 1</subject> <body> <contentType>html</contentType> <content><html> <head> <meta http-equiv="Content-Type" content="text/html; charset=utf-8"> <meta content="text/html; charset=us-ascii"> </head> <body> Test body for event Test event 1 </body> </html> </content> </body> </Event>XML スキーマは、 < BizTalk Installation Folder\SDK\Schemas 内の SDK の一部として提供されます >
ファイルの受信場所と Office 365 Outlook 予定表アダプターの送信ポートを開始します。
サンプル メッセージ Office365Calendar.xml 受信フォルダー (C:\Temp\In) にコピーします。 送信ポートは、xml に基づいて Office 365 Outlook 予定表にイベントを作成します。
受信ポートを使用してイベントを受信する
BizTalk Server 管理コンソールで、[ 受信ポート] を右クリックし、[ 新規] を選択して、 受信ポートOne-Way 選択します。
受信ポートを作成すると、 いくつかのガイダンスが提供されます。
名前を入力し、[ 受信場所] を選択します。
[ 新規] を選択し、受信場所に 名前を付 けます。 トランスポートで、[種類] ドロップダウン リストから [Office 365 Outlook 予定表] を選択し、[構成] を選択します。
[ サインイン...] を選択し、Office 365 アカウントにサインインします。 アカウントには、メール アドレスが自動的に入力されます。
BizTalk Server によるアクセス許可の承認を許可します。
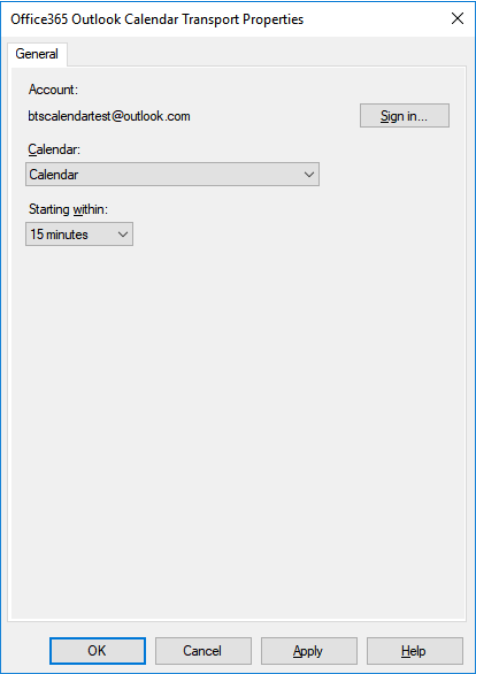
エンドポイントのプロパティを構成します。
これを使用する 目的 暦 イベントの取得元となるカレンダーを選択します。 開始中 BizTalk で受信するためにカレンダー イベントを開始する時間間隔を選択します (既定値は 15 分)。 予定表の選択:
完了すると、プロパティはこのような見た目になります。
[ OK] を 選択して変更を保存します。
受信設定をテストする
単純なファイル送信ポートを使用して、Office 365 Outlook 予定表からメッセージを受信できます。
- ファイル アダプターを使用して送信ポートを作成します。 送信ポートのプロパティ内で、 宛先フォルダー を C:\Temp\Out\ に設定し、 ファイル名 を %MessageID%.xmlに設定します。
- ファイル送信ポートのプロパティで、[ フィルター] を
BTS.ReceivePortName == <Receive Port Name>に設定します。 - Office 365 Outlook 予定表の受信場所とファイル送信ポートを起動します。
- 宛先フォルダー (c:\temp\out) 内のメッセージを探します。
XML スキーマは、
\Program Files (x86)\Microsoft BizTalk Server <your version>\SDK\Schemasの SDK に含まれています。
受信した予定表イベント xml の例
<ns0:Event xmlns:ns0="http://schemas.microsoft.com/BizTalk/Office365OutlookCalendar/Receive">
<reminderMinutesBeforeStart>20160</reminderMinutesBeforeStart>
<importance>normal</importance>
<subject>Let's meet</subject>
<id>AQMkADAwATNiZmYAZC0xMQBlOC0yODQ1LTA</id>
<body>
<contentType>html</contentType>
<content><html>
<head>
<meta http-equiv="Content-Type" content="text/html; charset=utf-8">
<meta content="text/html; charset=us-ascii">
<meta name="ProgId" content="Word.Document">
<meta name="Generator" content="Microsoft Word 15">
<meta name="Originator" content="Microsoft Word 15">
<link rel="File-List" href="cid:filelist.xml@01D40724.27036CE0"><style>
<!--
@font-face
{font-family:"Cambria Math"}
@font-face
{font-family:Calibri}
p.MsoNormal, li.MsoNormal, div.MsoNormal
{margin:0in;
margin-bottom:.0001pt;
font-size:11.0pt;
font-family:"Calibri",sans-serif}
a:link, span.MsoHyperlink
{color:#0563C1;
text-decoration:underline}
a:visited, span.MsoHyperlinkFollowed
{color:#954F72;
text-decoration:underline}
span.EmailStyle17
{font-family:"Calibri",sans-serif;
color:windowtext}
.MsoChpDefault
{font-family:"Calibri",sans-serif}
@page WordSection1
{margin:1.0in 1.0in 1.0in 1.0in}
div.WordSection1
{}
-->
</style>
</head>
<body lang="EN-US" link="#0563C1" vlink="#954F72" style="">
<div class="WordSection1">
<p class="MsoNormal">Let’s sync up.</p>
</div>
</body>
</html>
</content>
</body>
<bodyPreview>Let’s sync up.</bodyPreview>
<attendees>
<type>required</type>
<status>
<response>none</response>
<time>0001-01-01T00:00:00Z</time>
</status>
<emailAddress>
<name>someone@contoso.com</name>
<address>someone@contoso.com</address>
</emailAddress>
</attendees>
<start>
<dateTime>2018-06-25T17:00:00</dateTime>
<timeZone>UTC</timeZone>
</start>
<end>
<dateTime>2018-06-25T17:30:00</dateTime>
<timeZone>UTC</timeZone>
</end>
<location>
<displayName>Your office</displayName>
<locationType>default</locationType>
<uniqueId>Your office</uniqueId>
<uniqueIdType>private</uniqueIdType>
</location>
<responseRequested>true</responseRequested>
<seriesMasterId />
<isCancelled>false</isCancelled>
<isOrganizer>true</isOrganizer>
<createdDateTime>2018-06-18T23:48:35.0164728Z</createdDateTime>
<lastModifiedDateTime>2018-06-18T23:48:22.178Z</lastModifiedDateTime>
<hasAttachments>false</hasAttachments>
<responseStatus>
<response>none</response>
<time>0001-01-01T00:00:00Z</time>
</responseStatus>
<changeKey>SFa3sLJfdiDEIpfwAAIAU=</changeKey>
<originalStartTimeZone>Pacific Standard Time</originalStartTimeZone>
<originalEndTimeZone>Pacific Standard Time</originalEndTimeZone>
<isReminderOn>false</isReminderOn>
<sensitivity>normal</sensitivity>
<isAllDay>false</isAllDay>
<showAs>busy</showAs>
<type>singleInstance</type>
<onlineMeetingUrl />
<recurrence />
<locations>
<displayName>Your office</displayName>
<locationType>default</locationType>
<uniqueId>Your office</uniqueId>
<uniqueIdType>private</uniqueIdType>
</locations>
<organizer>
<emailAddress>
<name>someone@contoso.com</name>
<address>/O=FIRST ORGANIZATION/OU=EXCHANGE ADMINISTRATIVE GROUP(FYDIBOH3SPDLT)/CN=RECIPIENTS/CN=0003B11E8245</address>
</emailAddress>
</organizer>
</ns0:Event>