この記事では、Intune管理ツールを使用してプロファイルを適切に管理するために従う手順について説明します。
Intune
システム拡張機能ポリシーのIntune
システム拡張機能を承認するには:
Intuneで、[デバイス構成>管理] を選択し、[プロファイルの作成] > [> プロファイルの管理] を選択します。
プロファイルの名前を選択します。 [Platform=macOS] を [プロファイルの種類] =[拡張機能] に変更し、[作成] を選択します。
[ 基本 ] タブで、この新しいプロファイルに名前を付けます。
[ 構成設定 ] タブの [ 許可されたシステム拡張機能 ] セクションに次のエントリを追加します。
バンドル識別子 チーム識別子 com.microsoft.wdav.epsext UBF8T346G9 com.microsoft.wdav.netext UBF8T346G9 ![[構成設定] タブでのエントリの追加。](media/entries-in-configuration-settings-tab.png)
[ 割り当て ] タブで、このプロファイルを [すべてのユーザー] & [すべてのデバイス] に割り当てます。
この構成プロファイルを確認して作成します。
![[構成設定] タブでのエントリの追加。](media/entries-in-configuration-settings-tab.png#lightbox)
カスタム構成プロファイルを作成する
カスタム構成プロファイルを使用すると、ネットワーク拡張機能が有効になり、Endpoint Security システム拡張機能へのフル ディスク アクセスが許可されます。
次の内容をsysext.xmlという名前 のファイルに 保存します。
<?xml version="1.0" encoding="UTF-8"?><!DOCTYPE plist PUBLIC "-//Apple//DTD PLIST 1.0//EN" "http://www.apple.com/DTDs/PropertyList-1.0.dtd"> <plist version="1"> <dict> <key>PayloadUUID</key> <string>7E53AC50-B88D-4132-99B6-29F7974EAA3C</string> <key>PayloadType</key> <string>Configuration</string> <key>PayloadOrganization</key> <string>Microsoft Corporation</string> <key>PayloadIdentifier</key> <string>7E53AC50-B88D-4132-99B6-29F7974EAA3C</string> <key>PayloadDisplayName</key> <string>Microsoft Defender System Extensions</string> <key>PayloadDescription</key> <string/> <key>PayloadVersion</key> <integer>1</integer> <key>PayloadEnabled</key> <true/> <key>PayloadRemovalDisallowed</key> <true/> <key>PayloadScope</key> <string>System</string> <key>PayloadContent</key> <array> <dict> <key>PayloadUUID</key> <string>2BA070D9-2233-4827-AFC1-1F44C8C8E527</string> <key>PayloadType</key> <string>com.apple.webcontent-filter</string> <key>PayloadOrganization</key> <string>Microsoft Corporation</string> <key>PayloadIdentifier</key> <string>CEBF7A71-D9A1-48BD-8CCF-BD9D18EC155A</string> <key>PayloadDisplayName</key> <string>Approved Network Extension</string> <key>PayloadDescription</key> <string/> <key>PayloadVersion</key> <integer>1</integer> <key>PayloadEnabled</key> <true/> <key>FilterType</key> <string>Plugin</string> <key>UserDefinedName</key> <string>Microsoft Defender Network Extension</string> <key>PluginBundleID</key> <string>com.microsoft.wdav</string> <key>FilterSockets</key> <true/> <key>FilterDataProviderBundleIdentifier</key> <string>com.microsoft.wdav.netext</string> <key>FilterDataProviderDesignatedRequirement</key> <string>identifier "com.microsoft.wdav.netext" and anchor apple generic and certificate 1[field.1.2.840.113635.100.6.2.6] /* exists */ and certificate leaf[field.1.2.840.113635.100.6.1.13] /* exists */ and certificate leaf[subject.OU] = UBF8T346G9</string> </dict> <dict> <key>PayloadUUID</key> <string>56105E89-C7C8-4A95-AEE6-E11B8BEA0366</string> <key>PayloadType</key> <string>com.apple.TCC.configuration-profile-policy</string> <key>PayloadOrganization</key> <string>Microsoft Corporation</string> <key>PayloadIdentifier</key> <string>56105E89-C7C8-4A95-AEE6-E11B8BEA0366</string> <key>PayloadDisplayName</key> <string>Privacy Preferences Policy Control</string> <key>PayloadDescription</key> <string/> <key>PayloadVersion</key> <integer>1</integer> <key>PayloadEnabled</key> <true/> <key>Services</key> <dict> <key>SystemPolicyAllFiles</key> <array> <dict> <key>Identifier</key> <string>com.microsoft.wdav.epsext</string> <key>CodeRequirement</key> <string>identifier "com.microsoft.wdav.epsext" and anchor apple generic and certificate 1[field.1.2.840.113635.100.6.2.6] /* exists */ and certificate leaf[field.1.2.840.113635.100.6.1.13] /* exists */ and certificate leaf[subject.OU] = UBF8T346G9</string> <key>IdentifierType</key> <string>bundleID</string> <key>StaticCode</key> <integer>0</integer> <key>Allowed</key> <integer>1</integer> </dict> </array> </dict> </dict> </array> </dict> </plist>上記の内容がファイルに正しくコピーされたことを確認します。 ターミナルから次のコマンドを実行し、次の例に示すように結果に出力されることを確認します。
$ plutil -lint sysext.xml
sysext.xml: OK
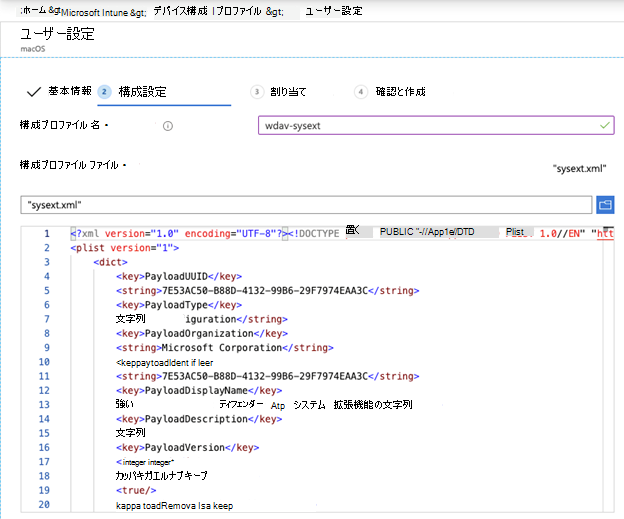
このカスタム構成プロファイルをデプロイする
Intuneで、[デバイス構成>管理] を選択し、[プロファイルの作成] > [> プロファイルの管理] を選択します。
プロファイルの名前を選択します。 [Platform]\(プラットフォーム\) 属性の場合は、値を macOS として設定し、[プロファイルの種類] 属性の値を [カスタム] に設定し、[構成] を選択します。 ファイルsysext.xml が作成されます。
構成プロファイルを開き、 sysext.xml ファイルをアップロードします。
[OK] を選択します。
[ 割り当て ] タブで、このプロファイルを [すべてのユーザー] & [すべてのデバイス] に割り当てます。
この構成プロファイルを確認して作成します。
