Windows Presentation Foundation (WPF) は、スレッド処理の困難から開発者を救うように設計されています。 そのため、ほとんどの WPF 開発者は、複数のスレッドを使用するインターフェイスを記述しません。 マルチスレッド プログラムは複雑でデバッグが困難であるため、シングル スレッド ソリューションが存在する場合は避ける必要があります。
ただし、どの程度適切に設計されても、あらゆる種類の問題に対してシングルスレッド ソリューションを提供できる UI フレームワークはありません。 WPF は近いですが、複数のスレッドによってユーザー インターフェイス (UI) の応答性やアプリケーションのパフォーマンスが向上する状況がまだあります。 いくつかの背景資料について説明した後、この記事では、これらの状況のいくつかについて説明した後、いくつかの下位レベルの詳細について説明します。
注
このトピックでは、非同期呼び出しに InvokeAsync メソッドを使用したスレッド処理について説明します。
InvokeAsync メソッドは、パラメーターとしてActionまたはFunc<TResult>を受け取り、DispatcherOperation プロパティを持つDispatcherOperation<TResult>またはTaskを返します。
await キーワードは、DispatcherOperationまたは関連するTaskと共に使用できます。
Task または DispatcherOperationによって返される DispatcherOperation<TResult> を同期的に待機する必要がある場合は、DispatcherOperationWait 拡張メソッドを呼び出します。
Task.Waitを呼び出すと、デッドロックが発生します。
Taskを使用して非同期操作を実行する方法の詳細については、「タスク ベースの非同期プログラミング」を参照してください。
同期呼び出しを行うには、 Invoke メソッドを使用します。このメソッドには、デリゲート、 Action、または Func<TResult> パラメーターを受け取るオーバーロードもあります。
概要とディスパッチャー
通常、WPF アプリケーションは 2 つのスレッドから始まります。1 つはレンダリングを処理し、もう 1 つは UI を管理するためのスレッドです。 レンダリング スレッドは、UI スレッドが入力を受け取り、イベントを処理し、画面を描画し、アプリケーション コードを実行している間、バックグラウンドで効果的に非表示に実行されます。 ほとんどのアプリケーションでは 1 つの UI スレッドを使用しますが、状況によっては複数の UI スレッドを使用することをお勧めしています。 これについては、後で例と共に説明します。
UI スレッドは、 Dispatcherと呼ばれるオブジェクト内の作業項目をキューに入れます。 Dispatcherは、優先順位に基づいて作業項目を選択し、それぞれを実行して完了します。 すべての UI スレッドには少なくとも 1 つの Dispatcherが必要であり、各 Dispatcher は 1 つのスレッドで作業項目を実行できます。
応答性が高く、使いやすいアプリケーションを構築するコツは、作業項目を小さくして Dispatcher スループットを最大化することです。 これにより、処理を待つために Dispatcher キューにあるアイテムが古くならずに済みます。 入力と応答の間の許容される遅延は、ユーザーを不満にさせる可能性があります。
WPF アプリケーションはどのようにして大規模な操作を処理する必要がありますか? コードに大きな計算が必要な場合や、リモート サーバー上のデータベースに対してクエリを実行する必要がある場合はどうなりますか? 通常、その答えは、大きな操作を別のスレッドで処理し、UI スレッドが Dispatcher キュー内の項目を処理する余地を残すことです。 大きな操作が完了すると、その結果を UI スレッドに報告して表示できます。
これまで、Windows では UI 要素にアクセスできるのは、UI 要素を作成したスレッドだけです。 つまり、実行時間の長いタスクを担当するバックグラウンド スレッドは、完了時にテキスト ボックスを更新できません。 Windows では、UI コンポーネントの整合性を確保するためにこれを行います。 リスト ボックスの内容が描画中にバックグラウンド スレッドによって更新された場合、リスト ボックスは奇妙に見える可能性があります。
WPF には、この調整を適用する相互除外メカニズムが組み込まれています。 WPF のほとんどのクラスは、 DispatcherObjectから派生します。 構築時に、 DispatcherObject は、現在実行中のスレッドにリンクされている Dispatcher への参照を格納します。 実際には、 DispatcherObject はそれを作成するスレッドに関連付けられます。 プログラムの実行中に、 DispatcherObject はパブリック VerifyAccess メソッドを呼び出すことができます。 VerifyAccess は、現在のスレッドに関連付けられている Dispatcher を調べ、構築中に格納された Dispatcher 参照と比較します。 一致しない場合には、VerifyAccessが例外をスローします。 VerifyAccess は、 DispatcherObjectに属するすべてのメソッドの先頭で呼び出されることを意図しています。
UI を変更できるスレッドが 1 つだけの場合、バックグラウンド スレッドはユーザーとどのように対話しますか? バックグラウンド スレッドは、UI スレッドに代わって操作を実行するように求めることができます。 これを行うには、UI スレッドの Dispatcher に作業項目を登録します。
Dispatcher クラスには、作業項目を登録するためのメソッド (Dispatcher.InvokeAsync、Dispatcher.BeginInvoke、およびDispatcher.Invoke) が用意されています。 これらのメソッドは、デリゲートの実行スケジュールを設定します。
Invoke は同期呼び出しです。つまり、UI スレッドが実際にデリゲートの実行を完了するまで戻りません。
InvokeAsync と BeginInvoke は非同期であり、すぐに返されます。
Dispatcherは、キュー内の要素を優先度順に並べ替えます。 Dispatcher キューに要素を追加するときに指定できるレベルは 10 個あります。 これらの優先順位は、 DispatcherPriority 列挙体で維持されます。
実行時間の長い計算を使用したシングル スレッド アプリ
ほとんどのグラフィカル ユーザー インターフェイス (GUI) は、ユーザーの操作に応答して生成されるイベントを待機している間、その時間の大部分をアイドル状態に費やします。 慎重にプログラミングすると、UI の応答性に影響を与えることなく、このアイドル時間を建設的に使用できます。 WPF スレッド モデルでは、UI スレッドで発生する操作を入力で中断することはできません。 つまり、保留中の入力イベントが古くなる前に、 Dispatcher に定期的に戻って処理する必要があります。
このセクションの概念を示すサンプル アプリは、 C# または Visual Basic の GitHub からダウンロードできます。
次の例を確認してください。
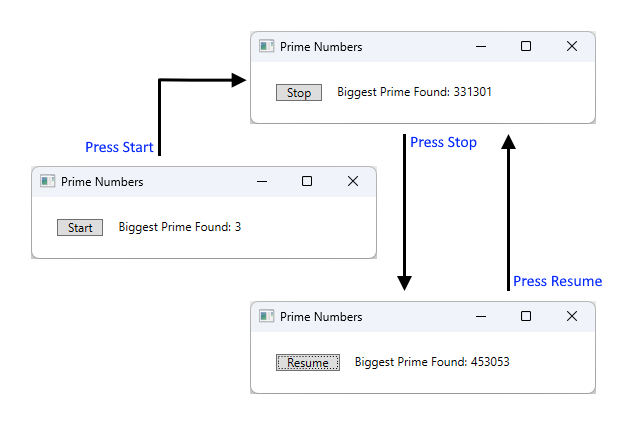
この単純なアプリケーションは、素数を検索して、3 つ以上をカウントします。 ユーザーが [スタート ] ボタンをクリックすると、検索が開始されます。 プログラムが素数を検出すると、その検出でユーザー インターフェイスが更新されます。 ユーザーはいつでも検索を停止できます。
十分に単純ですが、素数検索は永遠に続く可能性があり、いくつかの困難が生じます。 ボタンのクリック イベント ハンドラー内で検索全体を処理した場合、UI スレッドに他のイベントを処理する機会を与えることはありません。 UI は入力メッセージに応答することも、メッセージを処理することもできません。 それは決して再描画し、ボタンのクリックに応答することはありません。
素数検索は別のスレッドで行うことができますが、同期の問題に対処する必要があります。 シングル スレッドアプローチでは、見つかった最大の素数を一覧表示するラベルを直接更新できます。
計算タスクを管理可能なチャンクに分割すると、定期的に Dispatcher に戻り、イベントを処理できます。 WPF に、入力を再描画して処理する機会を与えることができます。
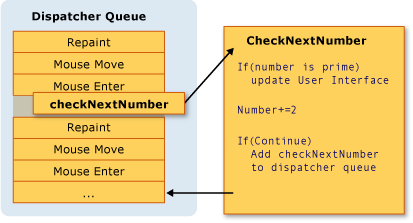
計算とイベント処理の間で処理時間を分割する最善の方法は、 Dispatcherから計算を管理することです。 InvokeAsyncメソッドを使用すると、UI イベントが描画されるのと同じキューで素数チェックをスケジュールできます。 この例では、一度に 1 つの素数チェックのみをスケジュールします。 素数チェックが完了したら、すぐに次のチェックをスケジュールします。 このチェックは、保留中の UI イベントが処理された後にのみ続行されます。
Microsoft Word では、このメカニズムを使用してスペル チェックを実行します。 スペル チェックは、UI スレッドのアイドル時間を使用してバックグラウンドで行われます。 コードを見てみましょう。
次の例は、ユーザー インターフェイスを作成する XAML を示しています。
重要
この記事に示す XAML は、C# プロジェクトの XAML です。 Visual Basic XAML は、XAML のバッキング クラスを宣言するときに若干異なります。
<Window x:Class="SDKSamples.PrimeNumber"
        xmlns="http://schemas.microsoft.com/winfx/2006/xaml/presentation"
        xmlns:x="http://schemas.microsoft.com/winfx/2006/xaml"
        Title="Prime Numbers" Width="360" Height="100">
    <StackPanel Orientation="Horizontal" VerticalAlignment="Center" Margin="20" >
        <Button Content="Start"
                Click="StartStopButton_Click"
                Name="StartStopButton"
                Margin="5,0,5,0" Padding="10,0" />

        <TextBlock Margin="10,0,0,0">Biggest Prime Found:</TextBlock>
        <TextBlock Name="bigPrime" Margin="4,0,0,0">3</TextBlock>
    </StackPanel>
</Window>
次の例は、コードビハインドを示しています。
using System;
using System.Windows;
using System.Windows.Threading;

namespace SDKSamples
{
    public partial class PrimeNumber : Window
    {
        // Current number to check
        private long _num = 3;
        private bool _runCalculation = false;

        public PrimeNumber() =>
            InitializeComponent();

        private void StartStopButton_Click(object sender, RoutedEventArgs e)
        {
            _runCalculation = !_runCalculation;

            if (_runCalculation)
            {
                StartStopButton.Content = "Stop";
                StartStopButton.Dispatcher.InvokeAsync(CheckNextNumber, DispatcherPriority.SystemIdle);
            }
            else
                StartStopButton.Content = "Resume";
        }

        public void CheckNextNumber()
        {
            // Reset flag.
            _isPrime = true;

            for (long i = 3; i <= Math.Sqrt(_num); i++)
            {
                if (_num % i == 0)
                {
                    // Set not a prime flag to true.
                    _isPrime = false;
                    break;
                }
            }

            // If a prime number, update the UI text
            if (_isPrime)
                bigPrime.Text = _num.ToString();

            _num += 2;

            // Requeue this method on the dispatcher
            if (_runCalculation)
                StartStopButton.Dispatcher.InvokeAsync(CheckNextNumber, DispatcherPriority.SystemIdle);
        }

        private bool _isPrime = false;
    }
}
Imports System.Windows.Threading

Public Class PrimeNumber
    ' Current number to check
    Private _num As Long = 3
    Private _runCalculation As Boolean = False

    Private Sub StartStopButton_Click(sender As Object, e As RoutedEventArgs)
        _runCalculation = Not _runCalculation

        If _runCalculation Then
            StartStopButton.Content = "Stop"
            StartStopButton.Dispatcher.InvokeAsync(AddressOf CheckNextNumber, DispatcherPriority.SystemIdle)
        Else
            StartStopButton.Content = "Resume"
        End If

    End Sub

    Public Sub CheckNextNumber()
        ' Reset flag.
        _isPrime = True

        For i As Long = 3 To Math.Sqrt(_num)
            If (_num Mod i = 0) Then

                ' Set Not a prime flag to true.
                _isPrime = False
                Exit For
            End If
        Next

        ' If a prime number, update the UI text
        If _isPrime Then
            bigPrime.Text = _num.ToString()
        End If

        _num += 2

        ' Requeue this method on the dispatcher
        If (_runCalculation) Then
            StartStopButton.Dispatcher.InvokeAsync(AddressOf CheckNextNumber, DispatcherPriority.SystemIdle)
        End If
    End Sub

    Private _isPrime As Boolean
End Class
Buttonのテキストを更新するだけでなく、StartStopButton_Click ハンドラーは、Dispatcher キューにデリゲートを追加して最初の素数チェックをスケジュールする役割を担います。 このイベント ハンドラーの処理が完了すると、 Dispatcher は実行するデリゲートを選択します。
前に説明したように、 InvokeAsync は、デリゲートの実行スケジュールを設定するために使用される Dispatcher メンバーです。 この場合は、 SystemIdle 優先度を選択します。 Dispatcherは、処理する重要なイベントがない場合にのみ、このデリゲートを実行します。 UI の応答性は、数値チェックよりも重要です。 また、数値チェック ルーチンを表す新しいデリゲートも渡します。
public void CheckNextNumber()
{
    // Reset flag.
    _isPrime = true;

    for (long i = 3; i <= Math.Sqrt(_num); i++)
    {
        if (_num % i == 0)
        {
            // Set not a prime flag to true.
            _isPrime = false;
            break;
        }
    }

    // If a prime number, update the UI text
    if (_isPrime)
        bigPrime.Text = _num.ToString();

    _num += 2;

    // Requeue this method on the dispatcher
    if (_runCalculation)
        StartStopButton.Dispatcher.InvokeAsync(CheckNextNumber, DispatcherPriority.SystemIdle);
}

private bool _isPrime = false;
Public Sub CheckNextNumber()
    ' Reset flag.
    _isPrime = True

    For i As Long = 3 To Math.Sqrt(_num)
        If (_num Mod i = 0) Then

            ' Set Not a prime flag to true.
            _isPrime = False
            Exit For
        End If
    Next

    ' If a prime number, update the UI text
    If _isPrime Then
        bigPrime.Text = _num.ToString()
    End If

    _num += 2

    ' Requeue this method on the dispatcher
    If (_runCalculation) Then
        StartStopButton.Dispatcher.InvokeAsync(AddressOf CheckNextNumber, DispatcherPriority.SystemIdle)
    End If
End Sub

Private _isPrime As Boolean
このメソッドは、次の奇数が素数であるかどうかをチェックします。 素数の場合、メソッドは検出を反映するように bigPrimeTextBlock を直接更新します。 これは、コントロールの作成に使用されたのと同じスレッドで計算が行われるためです。 計算に別のスレッドを使用することを選択した場合は、より複雑な同期メカニズムを使用し、UI スレッドで更新を実行する必要があります。 この状況を次に示します。
複数のウィンドウ、複数のスレッド
一部の WPF アプリケーションでは、複数の最上位ウィンドウが必要です。 1 つのスレッド/ディスパッチャーの組み合わせで複数のウィンドウを管理することは完全に許容されますが、複数のスレッドの方が適切なジョブを実行する場合があります。 これは、ウィンドウの 1 つがスレッドを独占する可能性がある場合に特に当てはまります。
Windows エクスプローラーは、この方法で動作します。 新しいエクスプローラー ウィンドウはそれぞれ元のプロセスに属していますが、独立したスレッドの制御下に作成されます。 ネットワーク リソースを探す場合など、Explorer が応答しなくなると、他のエクスプローラー ウィンドウは引き続き応答性が高く使用可能になります。
この概念は、次の例で示すことができます。
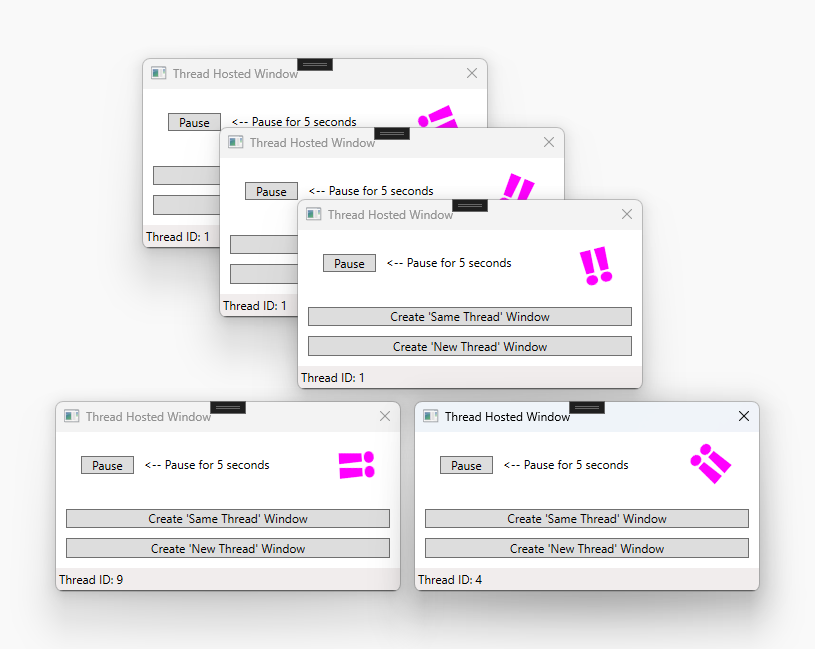
このイメージの上位 3 つのウィンドウは、同じスレッド識別子 1 を共有します。 他の 2 つのウィンドウには、9 と 4 という異なるスレッド識別子があります。 各ウィンドウの右上にマゼンタ色の回転 ! !️ グリフがあります。
この例には、回転 ‼️ グリフを含むウィンドウ、 一時停止 ボタン、および現在のスレッドまたは新しいスレッドの下に新しいウィンドウを作成する他の 2 つのボタンが含まれています。
‼️ グリフは、一時停止ボタンが押されるまで常に回転し、スレッドを 5 秒間一時停止します。 ウィンドウの下部に、スレッド識別子が表示されます。
[一時停止] ボタンを押すと、同じスレッドの下にあるすべてのウィンドウが応答しなくなります。 別のスレッドの下にあるウィンドウは引き続き正常に動作します。
次の例は、ウィンドウへの XAML です。
<Window x:Class="SDKSamples.MultiWindow"
        xmlns="http://schemas.microsoft.com/winfx/2006/xaml/presentation"
        xmlns:x="http://schemas.microsoft.com/winfx/2006/xaml"
        Title="Thread Hosted Window" Width="360" Height="180" SizeToContent="Height" ResizeMode="NoResize" Loaded="Window_Loaded">
    <Grid>
        <Grid.RowDefinitions>
            <RowDefinition Height="*" />
            <RowDefinition Height="Auto" />
            <RowDefinition Height="Auto" />
        </Grid.RowDefinitions>

        <TextBlock HorizontalAlignment="Right" Margin="30,0" Text="‼️" FontSize="50" FontWeight="ExtraBold"
                   Foreground="Magenta" RenderTransformOrigin="0.5,0.5" Name="RotatedTextBlock">
            <TextBlock.RenderTransform>
                <RotateTransform Angle="0" />
            </TextBlock.RenderTransform>
            <TextBlock.Triggers>
                <EventTrigger RoutedEvent="Loaded">
                    <BeginStoryboard>
                        <Storyboard>
                            <DoubleAnimation Storyboard.TargetName="RotatedTextBlock"
                                Storyboard.TargetProperty="(UIElement.RenderTransform).(RotateTransform.Angle)"
                                From="0" To="360" Duration="0:0:5" RepeatBehavior="Forever" />
                        </Storyboard>
                    </BeginStoryboard>
                </EventTrigger>
            </TextBlock.Triggers>
        </TextBlock>

        <StackPanel Orientation="Horizontal" VerticalAlignment="Center" Margin="20" >
            <Button Content="Pause" Click="PauseButton_Click" Margin="5,0" Padding="10,0" />
            <TextBlock Margin="5,0,0,0" Text="<-- Pause for 5 seconds" />
        </StackPanel>

        <StackPanel Grid.Row="1" Margin="10">
            <Button Content="Create 'Same Thread' Window" Click="SameThreadWindow_Click" />
            <Button Content="Create 'New Thread' Window" Click="NewThreadWindow_Click" Margin="0,10,0,0" />
        </StackPanel>

        <StatusBar Grid.Row="2" VerticalAlignment="Bottom">
            <StatusBarItem Content="Thread ID" Name="ThreadStatusItem" />
        </StatusBar>

    </Grid>
</Window>
次の例は、コードビハインドを示しています。
using System;
using System.Threading;
using System.Threading.Tasks;
using System.Windows;

namespace SDKSamples
{
    public partial class MultiWindow : Window
    {
        public MultiWindow() =>
            InitializeComponent();

        private void Window_Loaded(object sender, RoutedEventArgs e) =>
            ThreadStatusItem.Content = $"Thread ID: {Thread.CurrentThread.ManagedThreadId}";

        private void PauseButton_Click(object sender, RoutedEventArgs e) =>
            Task.Delay(TimeSpan.FromSeconds(5)).Wait();

        private void SameThreadWindow_Click(object sender, RoutedEventArgs e) =>
            new MultiWindow().Show();

        private void NewThreadWindow_Click(object sender, RoutedEventArgs e)
        {
            Thread newWindowThread = new Thread(ThreadStartingPoint);
            newWindowThread.SetApartmentState(ApartmentState.STA);
            newWindowThread.IsBackground = true;
            newWindowThread.Start();
        }

        private void ThreadStartingPoint()
        {
            new MultiWindow().Show();

            System.Windows.Threading.Dispatcher.Run();
        }
    }
}
Imports System.Threading

Public Class MultiWindow
    Private Sub Window_Loaded(sender As Object, e As RoutedEventArgs)
        ThreadStatusItem.Content = $"Thread ID: {Thread.CurrentThread.ManagedThreadId}"
    End Sub

    Private Sub PauseButton_Click(sender As Object, e As RoutedEventArgs)
        Task.Delay(TimeSpan.FromSeconds(5)).Wait()
    End Sub

    Private Sub SameThreadWindow_Click(sender As Object, e As RoutedEventArgs)
        Dim window As New MultiWindow()
        window.Show()
    End Sub

    Private Sub NewThreadWindow_Click(sender As Object, e As RoutedEventArgs)
        Dim newWindowThread = New Thread(AddressOf ThreadStartingPoint)
        newWindowThread.SetApartmentState(ApartmentState.STA)
        newWindowThread.IsBackground = True
        newWindowThread.Start()
    End Sub

    Private Sub ThreadStartingPoint()
        Dim window As New MultiWindow()
        window.Show()

        System.Windows.Threading.Dispatcher.Run()
    End Sub
End Class
注意すべき詳細の一部を次に示します。
Task.Delay(TimeSpan) タスクは、[一時停止] ボタンが押されたときに現在のスレッドを 5 秒間一時停止するために使用されます。
private void PauseButton_Click(object sender, RoutedEventArgs e) =>
    Task.Delay(TimeSpan.FromSeconds(5)).Wait();
Private Sub PauseButton_Click(sender As Object, e As RoutedEventArgs) Task.Delay(TimeSpan.FromSeconds(5)).Wait() End SubSameThreadWindow_Clickイベント ハンドラーは、現在のスレッドの下に新しいウィンドウを表示します。NewThreadWindow_Clickイベント ハンドラーは、ThreadStartingPointメソッドの実行を開始する新しいスレッドを作成します。次の箇条書きで説明するように、新しいウィンドウが表示されます。private void SameThreadWindow_Click(object sender, RoutedEventArgs e) => new MultiWindow().Show(); private void NewThreadWindow_Click(object sender, RoutedEventArgs e) { Thread newWindowThread = new Thread(ThreadStartingPoint); newWindowThread.SetApartmentState(ApartmentState.STA); newWindowThread.IsBackground = true; newWindowThread.Start(); }Private Sub SameThreadWindow_Click(sender As Object, e As RoutedEventArgs) Dim window As New MultiWindow() window.Show() End Sub Private Sub NewThreadWindow_Click(sender As Object, e As RoutedEventArgs) Dim newWindowThread = New Thread(AddressOf ThreadStartingPoint) newWindowThread.SetApartmentState(ApartmentState.STA) newWindowThread.IsBackground = True newWindowThread.Start() End SubThreadStartingPointメソッドは、新しいスレッドの開始点です。 このスレッドの制御下に新しいウィンドウが作成されます。 WPF は、新しいスレッドを管理するための新しい System.Windows.Threading.Dispatcher を自動的に作成します。 ウィンドウを機能させるために必要なのは、 System.Windows.Threading.Dispatcherを開始する必要があります。private void ThreadStartingPoint() { new MultiWindow().Show(); System.Windows.Threading.Dispatcher.Run(); }Private Sub ThreadStartingPoint() Dim window As New MultiWindow() window.Show() System.Windows.Threading.Dispatcher.Run() End Sub
このセクションの概念を示すサンプル アプリは、 C# または Visual Basic の GitHub からダウンロードできます。
Task.Run を使用してブロック操作を処理する
グラフィカル アプリケーションでのブロック操作の処理は困難な場合があります。 アプリケーションがフリーズしているように見えるため、イベント ハンドラーからブロッキング メソッドを呼び出す必要はありません。 前の例では、独自のスレッドに新しいウィンドウを作成し、各ウィンドウが互いに独立して実行されるようにしました。 System.Windows.Threading.Dispatcherを使用して新しいスレッドを作成できますが、作業が完了した後、新しいスレッドをメイン UI スレッドと同期することが困難になります。 新しいスレッドは UI を直接変更できないため、UI スレッドのDispatcher.InvokeAsyncにデリゲートを挿入するには、Dispatcher.BeginInvoke、Dispatcher.Invoke、またはDispatcherを使用する必要があります。 最終的に、これらのデリゲートは UI 要素を変更するアクセス許可を持って実行されます。
結果 ( タスク ベースの非同期パターン (TAP) を同期しながら、新しいスレッドでコードを実行する簡単な方法があります。 これは、非同期操作を表すために使用されるTask名前空間のTask<TResult>型とSystem.Threading.Tasks型に基づいています。 TAP では、1 つのメソッドを使用して、非同期操作の開始と完了を表します。 このパターンにはいくつかの利点があります。
-
Taskの呼び出し元は、コードを非同期または同期的に実行することを選択できます。 - 進行状況は、
Taskから報告できます。 - 呼び出し元のコードは、実行を中断し、操作の結果を待機できます。
Task.Run の例
この例では、天気予報を取得するリモート プロシージャ コールを模倣します。 ボタンがクリックされると、UI が更新され、データ フェッチが進行中であることを示します。一方、タスクは天気予報のフェッチを模倣するように開始されます。 タスクが開始されると、ボタン イベント ハンドラー コードはタスクが完了するまで中断されます。 タスクが完了すると、イベント ハンドラー コードは引き続き実行されます。 コードは中断され、UI スレッドの残りの部分はブロックされません。 WPF の同期コンテキストは、コードの中断を処理します。これにより、WPF を引き続き実行できます。
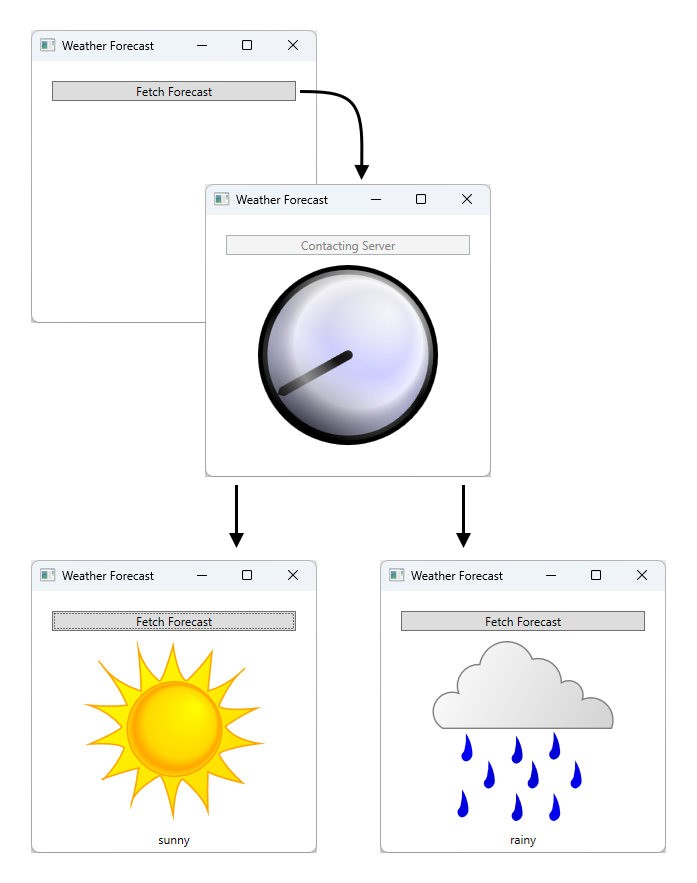
サンプル アプリのワークフローを示す図。 アプリには「予報を取得」というテキストの書かれた1つのボタンがあります。 ボタンを押した後のアプリの次のフェーズを指す矢印があります。これは、アプリがデータのフェッチ中であることを示す時計の画像です。 しばらくすると、データの結果に応じて、太陽または雨雲の画像でアプリが返されます。
このセクションの概念を示すサンプル アプリは、 C# または Visual Basic の GitHub からダウンロードできます。 この例の XAML は非常に大きく、この記事では提供されていません。 前の GitHub リンクを使用して XAML を参照します。 XAML のコードでは、1 つのボタンを使用して天気を取得します。
XAML に対するコードビハインドについて考えてみましょう。
using System;
using System.Windows;
using System.Windows.Media;
using System.Windows.Media.Animation;
using System.Threading.Tasks;

namespace SDKSamples
{
    public partial class Weather : Window
    {
        public Weather() =>
            InitializeComponent();

        private async void FetchButton_Click(object sender, RoutedEventArgs e)
        {
            // Change the status image and start the rotation animation.
            fetchButton.IsEnabled = false;
            fetchButton.Content = "Contacting Server";
            weatherText.Text = "";
            ((Storyboard)Resources["HideWeatherImageStoryboard"]).Begin(this);

            // Asynchronously fetch the weather forecast on a different thread and pause this code.
            string weather = await Task.Run(FetchWeatherFromServerAsync);

            // After async data returns, process it...
            // Set the weather image
            if (weather == "sunny")
                weatherIndicatorImage.Source = (ImageSource)Resources["SunnyImageSource"];

            else if (weather == "rainy")
                weatherIndicatorImage.Source = (ImageSource)Resources["RainingImageSource"];

            //Stop clock animation
            ((Storyboard)Resources["ShowClockFaceStoryboard"]).Stop(ClockImage);
            ((Storyboard)Resources["HideClockFaceStoryboard"]).Begin(ClockImage);

            //Update UI text
            fetchButton.IsEnabled = true;
            fetchButton.Content = "Fetch Forecast";
            weatherText.Text = weather;
        }

        private async Task<string> FetchWeatherFromServerAsync()
        {
            // Simulate the delay from network access
            await Task.Delay(TimeSpan.FromSeconds(4));

            // Tried and true method for weather forecasting - random numbers
            Random rand = new Random();

            if (rand.Next(2) == 0)
                return "rainy";

            else
                return "sunny";
        }

        private void HideClockFaceStoryboard_Completed(object sender, EventArgs args) =>
            ((Storyboard)Resources["ShowWeatherImageStoryboard"]).Begin(ClockImage);

        private void HideWeatherImageStoryboard_Completed(object sender, EventArgs args) =>
            ((Storyboard)Resources["ShowClockFaceStoryboard"]).Begin(ClockImage, true);
    }
}
Imports System.Windows.Media.Animation

Public Class Weather

    Private Async Sub FetchButton_Click(sender As Object, e As RoutedEventArgs)

        ' Change the status image and start the rotation animation.
        fetchButton.IsEnabled = False
        fetchButton.Content = "Contacting Server"
        weatherText.Text = ""
        DirectCast(Resources("HideWeatherImageStoryboard"), Storyboard).Begin(Me)

        ' Asynchronously fetch the weather forecast on a different thread and pause this code.
        Dim weatherType As String = Await Task.Run(AddressOf FetchWeatherFromServerAsync)

        ' After async data returns, process it...
        ' Set the weather image
        If weatherType = "sunny" Then
            weatherIndicatorImage.Source = DirectCast(Resources("SunnyImageSource"), ImageSource)

        ElseIf weatherType = "rainy" Then
            weatherIndicatorImage.Source = DirectCast(Resources("RainingImageSource"), ImageSource)

        End If

        ' Stop clock animation
        DirectCast(Resources("ShowClockFaceStoryboard"), Storyboard).Stop(ClockImage)
        DirectCast(Resources("HideClockFaceStoryboard"), Storyboard).Begin(ClockImage)

        ' Update UI text
        fetchButton.IsEnabled = True
        fetchButton.Content = "Fetch Forecast"
        weatherText.Text = weatherType
    End Sub

    Private Async Function FetchWeatherFromServerAsync() As Task(Of String)

        ' Simulate the delay from network access
        Await Task.Delay(TimeSpan.FromSeconds(4))

        ' Tried and true method for weather forecasting - random numbers
        Dim rand As New Random()

        If rand.Next(2) = 0 Then
            Return "rainy"
        Else
            Return "sunny"
        End If

    End Function

    Private Sub HideClockFaceStoryboard_Completed(sender As Object, e As EventArgs)
        DirectCast(Resources("ShowWeatherImageStoryboard"), Storyboard).Begin(ClockImage)
    End Sub

    Private Sub HideWeatherImageStoryboard_Completed(sender As Object, e As EventArgs)
        DirectCast(Resources("ShowClockFaceStoryboard"), Storyboard).Begin(ClockImage, True)
    End Sub
End Class
注意すべき詳細の一部を次に示します。
ボタン イベント ハンドラー
private async void FetchButton_Click(object sender, RoutedEventArgs e)
{
    // Change the status image and start the rotation animation.
    fetchButton.IsEnabled = false;
    fetchButton.Content = "Contacting Server";
    weatherText.Text = "";
    ((Storyboard)Resources["HideWeatherImageStoryboard"]).Begin(this);

    // Asynchronously fetch the weather forecast on a different thread and pause this code.
    string weather = await Task.Run(FetchWeatherFromServerAsync);

    // After async data returns, process it...
    // Set the weather image
    if (weather == "sunny")
        weatherIndicatorImage.Source = (ImageSource)Resources["SunnyImageSource"];

    else if (weather == "rainy")
        weatherIndicatorImage.Source = (ImageSource)Resources["RainingImageSource"];

    //Stop clock animation
    ((Storyboard)Resources["ShowClockFaceStoryboard"]).Stop(ClockImage);
    ((Storyboard)Resources["HideClockFaceStoryboard"]).Begin(ClockImage);

    //Update UI text
    fetchButton.IsEnabled = true;
    fetchButton.Content = "Fetch Forecast";
    weatherText.Text = weather;
}
Private Async Sub FetchButton_Click(sender As Object, e As RoutedEventArgs) ' Change the status image and start the rotation animation. fetchButton.IsEnabled = False fetchButton.Content = "Contacting Server" weatherText.Text = "" DirectCast(Resources("HideWeatherImageStoryboard"), Storyboard).Begin(Me) ' Asynchronously fetch the weather forecast on a different thread and pause this code. Dim weatherType As String = Await Task.Run(AddressOf FetchWeatherFromServerAsync) ' After async data returns, process it... ' Set the weather image If weatherType = "sunny" Then weatherIndicatorImage.Source = DirectCast(Resources("SunnyImageSource"), ImageSource) ElseIf weatherType = "rainy" Then weatherIndicatorImage.Source = DirectCast(Resources("RainingImageSource"), ImageSource) End If ' Stop clock animation DirectCast(Resources("ShowClockFaceStoryboard"), Storyboard).Stop(ClockImage) DirectCast(Resources("HideClockFaceStoryboard"), Storyboard).Begin(ClockImage) ' Update UI text fetchButton.IsEnabled = True fetchButton.Content = "Fetch Forecast" weatherText.Text = weatherType End Subイベント ハンドラーが
async(または Visual Basic でAsync) で宣言されていることに注意してください。 "async" メソッドを使用すると、待機中のメソッド (FetchWeatherFromServerAsyncなど) が呼び出されたときにコードを中断できます。 これは、await(または Visual Basic でAwait) キーワードによって指定されます。FetchWeatherFromServerAsyncが完了するまで、ボタンのハンドラー コードが中断され、制御が呼び出し元に返されます。 これは同期メソッドに似ていますが、同期メソッドはメソッド内のすべての操作が完了するまで待機し、その後、制御が呼び出し元に返されることを除いてです。待機中のメソッドは、現在のメソッドのスレッド コンテキストを利用します。ボタン ハンドラーは UI スレッドです。 つまり、
await FetchWeatherFromServerAsync();(または Visual Basic でAwait FetchWeatherFromServerAsync()) を呼び出すと、FetchWeatherFromServerAsync内のコードが UI スレッドで実行されますが、ディスパッチャーでは実行されません。これは、実行時間の長い計算例を含む シングル スレッド アプリ の動作と同様です。 ただし、await Task.Runが使用されていることに注意してください。 これにより、現在のスレッドではなく、指定されたタスクのスレッド プールに新しいスレッドが作成されます。 そのため、FetchWeatherFromServerAsyncは独自のスレッドで実行されます。天気情報の取得
private async Task<string> FetchWeatherFromServerAsync()
{
    // Simulate the delay from network access
    await Task.Delay(TimeSpan.FromSeconds(4));

    // Tried and true method for weather forecasting - random numbers
    Random rand = new Random();

    if (rand.Next(2) == 0)
        return "rainy";

    else
        return "sunny";
}
Private Async Function FetchWeatherFromServerAsync() As Task(Of String) ' Simulate the delay from network access Await Task.Delay(TimeSpan.FromSeconds(4)) ' Tried and true method for weather forecasting - random numbers Dim rand As New Random() If rand.Next(2) = 0 Then Return "rainy" Else Return "sunny" End If End Function簡単にするために、この例では実際にはネットワーク コードはありません。 代わりに、新しいスレッドを 4 秒間スリープ状態にすることで、ネットワーク アクセスの遅延をシミュレートします。 現時点では、ボタンのイベント ハンドラーが新しいスレッドが完了するまで一時停止している間、元の UI スレッドは引き続き実行され、UI イベントに応答します。 これを示すために、アニメーションを実行したままにして、ウィンドウのサイズを変更できます。 UI スレッドが一時停止または遅延した場合、アニメーションは表示されないため、ウィンドウを操作できませんでした。
Task.Delayが完了し、天気予報をランダムに選択すると、天気予報が呼び出し元に返されます。UI の更新
private async void FetchButton_Click(object sender, RoutedEventArgs e)
{
    // Change the status image and start the rotation animation.
    fetchButton.IsEnabled = false;
    fetchButton.Content = "Contacting Server";
    weatherText.Text = "";
    ((Storyboard)Resources["HideWeatherImageStoryboard"]).Begin(this);

    // Asynchronously fetch the weather forecast on a different thread and pause this code.
    string weather = await Task.Run(FetchWeatherFromServerAsync);

    // After async data returns, process it...
    // Set the weather image
    if (weather == "sunny")
        weatherIndicatorImage.Source = (ImageSource)Resources["SunnyImageSource"];

    else if (weather == "rainy")
        weatherIndicatorImage.Source = (ImageSource)Resources["RainingImageSource"];

    //Stop clock animation
    ((Storyboard)Resources["ShowClockFaceStoryboard"]).Stop(ClockImage);
    ((Storyboard)Resources["HideClockFaceStoryboard"]).Begin(ClockImage);

    //Update UI text
    fetchButton.IsEnabled = true;
    fetchButton.Content = "Fetch Forecast";
    weatherText.Text = weather;
}
Private Async Sub FetchButton_Click(sender As Object, e As RoutedEventArgs) ' Change the status image and start the rotation animation. fetchButton.IsEnabled = False fetchButton.Content = "Contacting Server" weatherText.Text = "" DirectCast(Resources("HideWeatherImageStoryboard"), Storyboard).Begin(Me) ' Asynchronously fetch the weather forecast on a different thread and pause this code. Dim weatherType As String = Await Task.Run(AddressOf FetchWeatherFromServerAsync) ' After async data returns, process it... ' Set the weather image If weatherType = "sunny" Then weatherIndicatorImage.Source = DirectCast(Resources("SunnyImageSource"), ImageSource) ElseIf weatherType = "rainy" Then weatherIndicatorImage.Source = DirectCast(Resources("RainingImageSource"), ImageSource) End If ' Stop clock animation DirectCast(Resources("ShowClockFaceStoryboard"), Storyboard).Stop(ClockImage) DirectCast(Resources("HideClockFaceStoryboard"), Storyboard).Begin(ClockImage) ' Update UI text fetchButton.IsEnabled = True fetchButton.Content = "Fetch Forecast" weatherText.Text = weatherType End Subタスクが完了し、UI スレッドに時間が設定されると、ボタンのイベント ハンドラーである
Task.Runの呼び出し元が再開されます。 メソッドの残りの部分では、クロック アニメーションを停止し、天気を説明する画像を選択します。 この画像を表示し、「予報を取得」ボタンが有効になります。
このセクションの概念を示すサンプル アプリは、 C# または Visual Basic の GitHub からダウンロードできます。
技術的な詳細とつまずくポイント
次のセクションでは、マルチスレッドで遭遇する可能性があるいくつかの詳細とつまずきについて説明します。
入れ子になったポンプ
UI スレッドを完全にロックすることが不可能な場合があります。 Show クラスのMessageBox メソッドについて考えてみましょう。 Show は、ユーザーが [OK] ボタンをクリックするまで戻りません。 ただし、対話型にするにはメッセージ ループが必要なウィンドウが作成されます。 ユーザーが [OK] をクリックするのを待っている間、元のアプリケーション ウィンドウはユーザー入力に応答しません。 ただし、描画メッセージは引き続き処理されます。 元のウィンドウは、カバーされて表示されると再描画されます。
![[OK] ボタンを含む MessageBox を示すスクリーンショット](media/threading-model/threading-message-loop.png)
一部のスレッドは、メッセージ ボックス ウィンドウを担当する必要があります。 WPF はメッセージ ボックス ウィンドウ専用の新しいスレッドを作成できますが、このスレッドは元のウィンドウで無効な要素を描画できません (相互除外の前述の説明を思い出してください)。 代わりに、WPF は入れ子になったメッセージ処理システムを使用します。 Dispatcher クラスには、アプリケーションの現在の実行ポイントを格納し、新しいメッセージ ループを開始する、PushFrameという特殊なメソッドが含まれています。 入れ子になったメッセージ ループが終了すると、元の PushFrame 呼び出しの後に実行が再開されます。
この場合、 PushFrame は MessageBox.Showの呼び出しでプログラム コンテキストを維持し、新しいメッセージ ループを開始してバックグラウンド ウィンドウを再描画し、メッセージ ボックス ウィンドウへの入力を処理します。 ユーザーが [OK] をクリックしてポップアップ ウィンドウをクリアすると、入れ子になったループが終了し、 Showの呼び出し後に制御が再開されます。
古いルーティングのイベント
WPF のルーティング イベント システムは、イベントが発生したときにツリー全体に通知します。
<Canvas MouseLeftButtonDown="handler1"
        Width="100"
        Height="100"
        >
  <Ellipse Width="50"
            Height="50"
            Fill="Blue"
            Canvas.Left="30"
            Canvas.Top="50"
            MouseLeftButtonDown="handler2"
            />
</Canvas>
マウスの左ボタンを省略記号の上に押すと、 handler2 が実行されます。
handler2が完了すると、イベントは Canvas オブジェクトに渡され、handler1を使用して処理されます。 これは、 handler2 がイベント オブジェクトを明示的に処理済みとしてマークしない場合にのみ発生します。
handler2がこのイベントの処理に多大な時間がかかる可能性があります。
handler2 は、 PushFrame を使用して、数時間戻らない入れ子になったメッセージ ループを開始する場合があります。
handler2このメッセージ ループが完了したときにイベントが処理済みとしてマークされない場合、イベントは非常に古い場合でもツリーに渡されます。
再入とロック
共通言語ランタイム (CLR) のロック メカニズムは、想像どおりに動作しません。ロックを要求するときにスレッドが操作を完全に停止することが予想される場合があります。 実際には、スレッドは引き続き優先度の高いメッセージを受信して処理します。 これはデッドロックを防ぎ、インターフェイスの応答性を最小限に抑えるのに役立ちますが、微妙なバグの可能性が生じます。 ほとんどの場合、このことについて何も知る必要はありませんが、まれな状況 (通常は Win32 ウィンドウ メッセージまたは COM STA コンポーネントを含む) では、これは知る価値があります。
ほとんどのインターフェイスはスレッド セーフを念頭に置いて構築されていません。これは、開発者が複数のスレッドによって UI にアクセスされないという前提で動作するためです。 この場合、その 1 つのスレッドが予期しないタイミングで環境に変更を加え、 DispatcherObject 相互排他メカニズムが解決するはずの悪影響を引き起こす可能性があります。 次の擬似コードについて考えてみましょう。
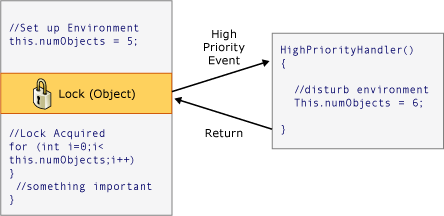
ほとんどの場合、それは正しいことですが、WPFではこのような予期しない再入が本当に問題を引き起こすことがあります。 そのため、特定のキー時に WPF は DisableProcessingを呼び出します。この呼び出しにより、通常の CLR ロックではなく、WPF の再入不要のロックを使用するようにそのスレッドのロック命令が変更されます。
では、CLR チームがこの動作を選択したのはなぜですか? これは、COM STA オブジェクトと最終処理スレッドと関係がありました。 オブジェクトがガベージ コレクションされると、その Finalize メソッドは UI スレッドではなく専用のファイナライザー スレッドで実行されます。 また、UI スレッドで作成された COM STA オブジェクトは UI スレッドでのみ破棄できるため、問題があります。 CLR は、(この場合は Win32 のBeginInvokeを使用して) SendMessageと同等の処理を行います。 ただし、UI スレッドがビジー状態の場合、ファイナライザー スレッドはストールし、COM STA オブジェクトを破棄できないため、重大なメモリ リークが発生します。 そのため、CLR チームは、ロックが現在のように機能するようにするため、困難な決断を下しました。
WPF のタスクは、メモリ リークを再導入せずに予期しない再入を回避することです。そのため、すべての場所で再入をブロックしません。
こちらも参照ください
GitHub で Microsoft と共同作業する
このコンテンツのソースは GitHub にあります。そこで、issue や pull request を作成および確認することもできます。 詳細については、共同作成者ガイドを参照してください。
.NET Desktop feedback