適用対象:  従業員テナント 外部テナント (詳細はこちら)
このチュートリアルでは、Node/Express Web アプリにサインインとサインアウトのロジックを追加します。 このコードを使用すると、外部テナントまたは従業員テナントの従業員で、顧客向けアプリにユーザーをサインインさせることができます。
このチュートリアルは、3 部構成のチュートリアル シリーズのパート 2 です。
このチュートリアルでは、次の操作を行います。
- サインインとサインアウトのロジックを追加する
- ID トークン要求を表示する
- アプリを実行し、サインインとサインアウトのエクスペリエンスをテストします。
前提条件
MSAL 構成オブジェクトを作成する
コード エディターでファイル authConfig.js 開き、次のコードを追加します。
require('dotenv').config();

const TENANT_SUBDOMAIN = process.env.TENANT_SUBDOMAIN || 'Enter_the_Tenant_Subdomain_Here';
const REDIRECT_URI = process.env.REDIRECT_URI || 'http://localhost:3000/auth/redirect';
const POST_LOGOUT_REDIRECT_URI = process.env.POST_LOGOUT_REDIRECT_URI || 'http://localhost:3000';
const GRAPH_ME_ENDPOINT = process.env.GRAPH_API_ENDPOINT + "v1.0/me" || 'Enter_the_Graph_Endpoint_Here';

/**
 * Configuration object to be passed to MSAL instance on creation.
 * For a full list of MSAL Node configuration parameters, visit:
 * https://github.com/AzureAD/microsoft-authentication-library-for-js/blob/dev/lib/msal-node/docs/configuration.md
 */
const msalConfig = {
    auth: {
        clientId: process.env.CLIENT_ID || 'Enter_the_Application_Id_Here', // 'Application (client) ID' of app registration in Azure portal - this value is a GUID
        //For external tenant
        authority: process.env.AUTHORITY || `https://${TENANT_SUBDOMAIN}.ciamlogin.com/`, // replace "Enter_the_Tenant_Subdomain_Here" with your tenant name
        //For workforce tenant
        //authority: process.env.CLOUD_INSTANCE + process.env.TENANT_ID
        clientSecret: process.env.CLIENT_SECRET || 'Enter_the_Client_Secret_Here', // Client secret generated from the app registration in Azure portal
    },
    system: {
        loggerOptions: {
            loggerCallback(loglevel, message, containsPii) {
                console.log(message);
            },
            piiLoggingEnabled: false,
            logLevel: 'Info',
        },
    },
};

module.exports = {
    msalConfig,
    REDIRECT_URI,
    POST_LOGOUT_REDIRECT_URI,
    TENANT_SUBDOMAIN,
    GRAPH_ME_ENDPOINT
};
msalConfig オブジェクトには、認証フローの動作をカスタマイズするために使用する一連の構成オプションが含まれています。
authConfig.js ファイルで、次の値を置き換えます。
Enter_the_Application_Id_Hereを、前に登録したアプリのアプリケーション (クライアント) ID に置き換えます。Enter_the_Tenant_Subdomain_Here外部ディレクトリ (テナント) サブドメインに置き換えます。 たとえば、テナントのプライマリ ドメインがcontoso.onmicrosoft.comの場合は、contosoを使用します。 テナント名がない場合は、テナントの詳細を読み取る方法を確認してください。 この値は、外部テナントにのみ必要です。Enter_the_Client_Secret_Hereを、前にコピーしたアプリ シークレットの値に置き換えます。Enter_the_Graph_Endpoint_Hereアプリが呼び出す Microsoft Graph API クラウド インスタンスを使用します。https://graph.microsoft.com/値を使用する (末尾のスラッシュを含む)
.env ファイルを使用して構成情報を格納する場合:
コード エディターで .env ファイルを開き、次のコードを追加します。
    CLIENT_ID=Enter_the_Application_Id_Here
    TENANT_SUBDOMAIN=Enter_the_Tenant_Subdomain_Here
    CLOUD_INSTANCE="Enter_the_Cloud_Instance_Id_Here" # cloud instance string should end with a trailing slash
    TENANT_ID=Enter_the_Tenant_ID_here
    CLIENT_SECRET=Enter_the_Client_Secret_Here
    REDIRECT_URI=http://localhost:3000/auth/redirect
    POST_LOGOUT_REDIRECT_URI=http://localhost:3000
    GRAPH_API_ENDPOINT=Enter_the_Graph_Endpoint_Here # graph api endpoint string should end with a trailing slash
    EXPRESS_SESSION_SECRET=Enter_the_Express_Session_Secret_Here # express session secret, just any random text
プレースホルダーを置き換えてください。
Enter_the_Application_Id_Here、Enter_the_Tenant_Subdomain_Here、およびEnter_the_Client_Secret_Here前に説明しました。Enter_the_Cloud_Instance_Id_Hereアプリケーションが登録されている Azure クラウド インスタンスを使用します。https://login.microsoftonline.com/を値として使用します (末尾のスラッシュを含めます)。 この値は、従業員テナントにのみ必要です。Enter_the_Tenant_ID_hereワークフォース テナント ID またはプライマリ ドメイン ( aaaabbbb-0000-cccc-1111-dddd2222eeee 、 contoso.microsoft.com など) を使用します。 この値は、従業員テナントにのみ必要です。
authConfig.jsファイル内のmsalConfig、REDIRECT_URI、TENANT_SUBDOMAIN、GRAPH_ME_ENDPOINT、およびPOST_LOGOUT_REDIRECT_URI変数をエクスポートして、他のファイルでアクセスできるようにします。
アプリの権限 URL
外部テナントと従業員テナントのアプリケーション権限は異なります。 次のようにビルドします。
//Authority for workforce tenant
authority: process.env.CLOUD_INSTANCE + process.env.TENANT_ID
カスタム URL ドメインを使用する (省略可能)
Express Route を追加する
Express ルートは、サインイン、サインアウト、ID トークン要求の表示などの操作を実行できるエンドポイントを提供します。
アプリケーションの開始地点
コード エディターで "routes/index.js" ファイルを開き、次のコードを追加します。
const express = require('express');
const router = express.Router();

router.get('/', function (req, res, next) {
    res.render('index', {
        title: 'MSAL Node & Express Web App',
        isAuthenticated: req.session.isAuthenticated,
        username: req.session.account?.username !== '' ? req.session.account?.username : req.session.account?.name,
    });
});
module.exports = router;
/ ルートは、アプリケーションへのエントリ ポイントです。 ビルド アプリ UI コンポーネントで前に作成した views/index.hbs ビューがレンダリングされます。 isAuthenticated は、ビューに表示される内容を決定するブール変数です。
サインインとサインアウト
コード エディターで 、routes/auth.js ファイルを開き、次のコードを追加します。
const express = require('express');
const authController = require('../controller/authController');
const router = express.Router();

router.get('/signin', authController.signIn);
router.get('/signout', authController.signOut);
router.post('/redirect', authController.handleRedirect);

module.exports = router;
コード エディターで コントローラー/authController.jsファイルを 開き、次のコードを追加します。
const authProvider = require('../auth/AuthProvider');

exports.signIn = async (req, res, next) => {
    return authProvider.login(req, res, next);
};

exports.handleRedirect = async (req, res, next) => {
    return authProvider.handleRedirect(req, res, next);
}

exports.signOut = async (req, res, next) => {
    return authProvider.logout(req, res, next);
};
コード エディターで 、auth/AuthProvider.jsファイルを 開き、次のコードを追加します。
const msal = require('@azure/msal-node'); const axios = require('axios'); const { msalConfig, TENANT_SUBDOMAIN, REDIRECT_URI, POST_LOGOUT_REDIRECT_URI, GRAPH_ME_ENDPOINT} = require('../authConfig'); class AuthProvider { config; cryptoProvider; constructor(config) { this.config = config; this.cryptoProvider = new msal.CryptoProvider(); } getMsalInstance(msalConfig) { return new msal.ConfidentialClientApplication(msalConfig); } async login(req, res, next, options = {}) { // create a GUID for crsf req.session.csrfToken = this.cryptoProvider.createNewGuid(); /** * The MSAL Node library allows you to pass your custom state as state parameter in the Request object. * The state parameter can also be used to encode information of the app's state before redirect. * You can pass the user's state in the app, such as the page or view they were on, as input to this parameter. */ const state = this.cryptoProvider.base64Encode( JSON.stringify({ csrfToken: req.session.csrfToken, redirectTo: '/', }) ); const authCodeUrlRequestParams = { state: state, /** * By default, MSAL Node will add OIDC scopes to the auth code url request. For more information, visit: * https://docs.microsoft.com/azure/active-directory/develop/v2-permissions-and-consent#openid-connect-scopes */ scopes: [], }; const authCodeRequestParams = { state: state, /** * By default, MSAL Node will add OIDC scopes to the auth code request. For more information, visit: * https://docs.microsoft.com/azure/active-directory/develop/v2-permissions-and-consent#openid-connect-scopes */ scopes: [], }; /** * If the current msal configuration does not have cloudDiscoveryMetadata or authorityMetadata, we will * make a request to the relevant endpoints to retrieve the metadata. This allows MSAL to avoid making * metadata discovery calls, thereby improving performance of token acquisition process. */ if (!this.config.msalConfig.auth.authorityMetadata) { const authorityMetadata = await this.getAuthorityMetadata(); this.config.msalConfig.auth.authorityMetadata = JSON.stringify(authorityMetadata); } const msalInstance = this.getMsalInstance(this.config.msalConfig); // trigger the first leg of auth code flow return this.redirectToAuthCodeUrl( req, res, next, authCodeUrlRequestParams, authCodeRequestParams, msalInstance ); } async handleRedirect(req, res, next) { const authCodeRequest = { ...req.session.authCodeRequest, code: req.body.code, // authZ code codeVerifier: req.session.pkceCodes.verifier, // PKCE Code Verifier }; try { const msalInstance = this.getMsalInstance(this.config.msalConfig); msalInstance.getTokenCache().deserialize(req.session.tokenCache); const tokenResponse = await msalInstance.acquireTokenByCode(authCodeRequest, req.body); req.session.tokenCache = msalInstance.getTokenCache().serialize(); req.session.idToken = tokenResponse.idToken; req.session.account = tokenResponse.account; req.session.isAuthenticated = true; const state = JSON.parse(this.cryptoProvider.base64Decode(req.body.state)); res.redirect(state.redirectTo); } catch (error) { next(error); } } async logout(req, res, next) { /** * Construct a logout URI and redirect the user to end the * session with Microsoft Entra ID. For more information, visit: * https://docs.microsoft.com/azure/active-directory/develop/v2-protocols-oidc#send-a-sign-out-request */ //For external tenant //const logoutUri = `${this.config.msalConfig.auth.authority}${TENANT_SUBDOMAIN}.onmicrosoft.com/oauth2/v2.0/logout?post_logout_redirect_uri=${this.config.postLogoutRedirectUri}`; //For workforce tenant let logoutUri = `${this.config.msalConfig.auth.authority}/oauth2/v2.0/logout?post_logout_redirect_uri=${this.config.postLogoutRedirectUri}`; req.session.destroy(() => { res.redirect(logoutUri); }); } /** * Prepares the auth code request parameters and initiates the first leg of auth code flow * @param req: Express request object * @param res: Express response object * @param next: Express next function * @param authCodeUrlRequestParams: parameters for requesting an auth code url * @param authCodeRequestParams: parameters for requesting tokens using auth code */ async redirectToAuthCodeUrl(req, res, next, authCodeUrlRequestParams, authCodeRequestParams, msalInstance) { // Generate PKCE Codes before starting the authorization flow const { verifier, challenge } = await this.cryptoProvider.generatePkceCodes(); // Set generated PKCE codes and method as session vars req.session.pkceCodes = { challengeMethod: 'S256', verifier: verifier, challenge: challenge, }; /** * By manipulating the request objects below before each request, we can obtain * auth artifacts with desired claims. For more information, visit: * https://azuread.github.io/microsoft-authentication-library-for-js/ref/modules/_azure_msal_node.html#authorizationurlrequest * https://azuread.github.io/microsoft-authentication-library-for-js/ref/modules/_azure_msal_node.html#authorizationcoderequest **/ req.session.authCodeUrlRequest = { ...authCodeUrlRequestParams, redirectUri: this.config.redirectUri, responseMode: 'form_post', // recommended for confidential clients codeChallenge: req.session.pkceCodes.challenge, codeChallengeMethod: req.session.pkceCodes.challengeMethod, }; req.session.authCodeRequest = { ...authCodeRequestParams, redirectUri: this.config.redirectUri, code: '', }; try { const authCodeUrlResponse = await msalInstance.getAuthCodeUrl(req.session.authCodeUrlRequest); res.redirect(authCodeUrlResponse); } catch (error) { next(error); } } /** * Retrieves oidc metadata from the openid endpoint * @returns */ async getAuthorityMetadata() { // For external tenant //const endpoint = `${this.config.msalConfig.auth.authority}${TENANT_SUBDOMAIN}.onmicrosoft.com/v2.0/.well-known/openid-configuration`; // For workforce tenant const endpoint = `${this.config.msalConfig.auth.authority}/v2.0/.well-known/openid-configuration`; try { const response = await axios.get(endpoint); return await response.data; } catch (error) { console.log(error); } } } const authProvider = new AuthProvider({ msalConfig: msalConfig, redirectUri: REDIRECT_URI, postLogoutRedirectUri: POST_LOGOUT_REDIRECT_URI, }); module.exports = authProvider;/signin、/signout、および/redirectルートはルート/auth.js ファイルで定義されますが、そのロジックは認証/AuthProvider.js クラスに実装します。
loginメソッドは、次のように/signinルートを処理します。認証コード フローの第 1 段階をトリガーして、サインイン フローを開始します。
前に作成した MSAL 構成オブジェクト () を使用して、
msalConfigインスタンスを初期化します。const msalInstance = this.getMsalInstance(this.config.msalConfig);getMsalInstanceメソッドは次のように定義されます。getMsalInstance(msalConfig) { return new msal.ConfidentialClientApplication(msalConfig); }認証コード フローの最初の区間が、認証コード要求 URL を生成し、その URL にリダイレクトして、承認コードを取得します。 この第 1 段階は、
redirectToAuthCodeUrlメソッドで実装されます。 MSAL の getAuthCodeUrl メソッドを使用して承認コード URL を生成する方法に注目してください。//... const authCodeUrlResponse = await msalInstance.getAuthCodeUrl(req.session.authCodeUrlRequest); //...次に、承認コード URL 自体にリダイレクトします。
//...
res.redirect(authCodeUrlResponse);
//...
handleRedirectメソッドは、次のように/redirectルートを処理します。この URL は、「クイック スタート: サンプル Web アプリでユーザーをサインインさせる」の Microsoft Entra 管理センター で、Web アプリのリダイレクト URI として設定しました。
このエンドポイントは、認証コード フローで使用する 2 番めの区間を実装します。 これは、認証コードを使用し、MSAL の acquireTokenByCode メソッドを使用して ID トークンを要求します。
//...
const tokenResponse = await msalInstance.acquireTokenByCode(authCodeRequest, req.body);
//...
応答を受け取ったら、Express セッションを作成し、必要な任意の情報をそこに格納できます。
isAuthenticatedを含め、それをtrueに設定する必要があります。//... req.session.idToken = tokenResponse.idToken; req.session.account = tokenResponse.account; req.session.isAuthenticated = true; //...
logoutメソッドは、次のように/signoutルートを処理します。async logout(req, res, next) { /** * Construct a logout URI and redirect the user to end the * session with Azure AD. For more information, visit: * https://docs.microsoft.com/azure/active-directory/develop/v2-protocols-oidc#send-a-sign-out-request */ const logoutUri = `${this.config.msalConfig.auth.authority}${TENANT_SUBDOMAIN}.onmicrosoft.com/oauth2/v2.0/logout?post_logout_redirect_uri=${this.config.postLogoutRedirectUri}`; req.session.destroy(() => { res.redirect(logoutUri); }); }サインアウト要求を開始します。
ユーザーをアプリケーションからサインアウトさせるときに、ユーザーのセッションを終了させるだけでは処理不足です。 ユーザーを logoutUri にリダイレクトする必要があります。 そうしないと、そのユーザーが、資格情報を再入力せずに、アプリケーションに対する再認証を行うことができる可能性があります。 テナントの名前が contoso の場合、 logoutUri は
https://contoso.ciamlogin.com/contoso.onmicrosoft.com/oauth2/v2.0/logout?post_logout_redirect_uri=http://localhost:3000のようになります。
アプリのログアウト URI と認証メタデータ エンドポイント
外部テナントおよび従業員テナントのアプリのログアウトURI logoutUri と機関メタデータエンドポイント endpoint は異なるように見えます。 次のようにビルドします。
//Logout URI for workforce tenant
const logoutUri = `${this.config.msalConfig.auth.authority}/oauth2/v2.0/logout?post_logout_redirect_uri=${this.config.postLogoutRedirectUri}`;

//authority metadata endpoint for workforce tenant
const endpoint = `${this.config.msalConfig.auth.authority}/v2.0/.well-known/openid-configuration`;
ID トークン要求を表示する
コード エディターで "routes/users.js" ファイルを開き、次のコードを追加します。
const express = require('express');
const router = express.Router();

// custom middleware to check auth state
function isAuthenticated(req, res, next) {
    if (!req.session.isAuthenticated) {
        return res.redirect('/auth/signin'); // redirect to sign-in route
    }

    next();
};

router.get('/id',
    isAuthenticated, // check if user is authenticated
    async function (req, res, next) {
        res.render('id', { idTokenClaims: req.session.account.idTokenClaims });
    }
);
module.exports = router;
ユーザーが認証されると、/idルートではviews/id.hbsビューを使用してIDトークンのクレームを表示します。 このビューは、前に「アプリ UI コンポーネントをビルドする」で追加しました。
特定の ID トークン クレーム ("指定された名前" など) を抽出するには、次のようにします。
const givenName = req.session.account.idTokenClaims.given_name
Web アプリの最終処理
コード エディターでファイル app.js 開き、 app.js からコードを追加します。
コード エディターでファイル server.js 開き、 server.js からコードを追加します。
コード エディターでファイル package.json 開き、
scriptsプロパティを次の内容に更新します。"scripts": { "start": "node server.js" }
Node/Express.js Web アプリを実行してテストする
この時点で、ノード Web アプリをテストできます。
「 新しいユーザーの作成 」の手順に従って、ワークフォース テナントにテスト ユーザーを作成します。 テナントにアクセスできない場合は、テナント管理者にユーザーの作成を依頼してください。
サーバーを起動するには、プロジェクト ディレクトリ内から次のコマンドを実行します。
npm startブラウザーを開き、
http://localhost:3000に移動します。 以下のスクリーンショットのようなページが表示されます。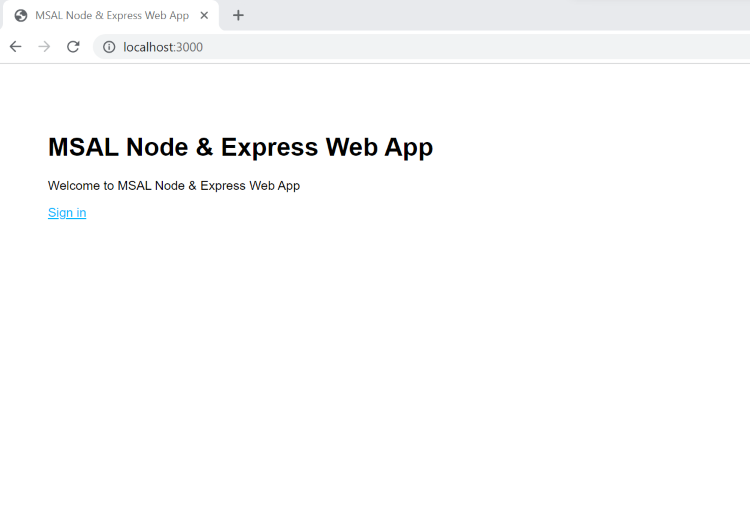
サインインを選択して、サインイン プロセスを開始します。 初めてサインインすると、次のスクリーンショットに示すように、アプリケーションによるサインインとプロファイルへのアクセスを許可するための同意を求められます。
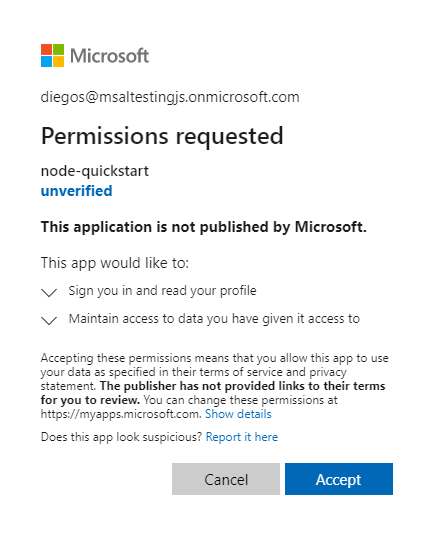
正常にサインインすると、アプリケーションのホーム ページにリダイレクトされます。
