Microsoft Entra ID 保護は、ID ベースのリスクと、これらのリスクを調査して自動的に修復する方法に関する分析情報を組織に提供します。 このチュートリアルでは、ID Protection API を使用してリスクを特定し、侵害を確認したり修復を有効にするためのワークフローを設定したりする方法について説明します。
このチュートリアルでは、ID Protection API を使用して次の操作を行う方法について説明します。
- 危険なサインインを生成します。
- 危険なサインインを持つユーザーが、多要素認証 (MFA) を必要とする条件付きアクセス ポリシーを使用してリスクの状態を修復できるようにします。
- 条件付きアクセス ポリシーを使用してユーザーがサインインできないようにブロックします。
- ユーザー リスクを無視します。
前提条件
このチュートリアルを完了するには、次のことを確認します。
- Microsoft Entra ID P1 または P2 ライセンスを持つMicrosoft Entra テナント。
-
条件付きアクセス管理者ロールを持つアカウントでサインインした Graph エクスプローラーなどの API クライアントへのアクセス。
- 委任されたアクセス許可: IdentityRiskEvent.Read.All、 IdentityRiskyUser.ReadWrite.All、 Policy.Read.All、 Policy.ReadWrite.ConditionalAccess、 User.ReadWrite.All。
- リスク検出をトリガーするために匿名セッションにサインインするテスト ユーザー アカウント。 プライベート閲覧セッションまたは Tor ブラウザーを使用します。 このチュートリアルでは、テスト ユーザーメールのニックネームを
MyTestUser1。
手順 1: リスク検出をトリガーする
匿名ブラウザー セッションで、MyTestUser1としてMicrosoft Entra管理センターにサインインします。
手順 2: リスク検出を一覧表示する
MyTestUser1 が匿名ブラウザーを使用してMicrosoft Entra 管理センターにサインインすると、anonymizedIPAddress リスク イベントが検出されました。
$filter クエリ パラメーターを使用して、MyTestUser1 ユーザー アカウントに関連付けられているリスク検出のみを取得できます。 イベントが返されるまでに数分かかる場合があります。
要求
GET https://graph.microsoft.com/v1.0/identityProtection/riskDetections?$filter=userDisplayName eq 'MyTestUser1'
// Code snippets are only available for the latest version. Current version is 5.x

// To initialize your graphClient, see https://learn.microsoft.com/en-us/graph/sdks/create-client?from=snippets&tabs=csharp
var result = await graphClient.IdentityProtection.RiskDetections.GetAsync((requestConfiguration) =>
{
	requestConfiguration.QueryParameters.Filter = "userDisplayName eq 'MyTestUser1'";
});
プロジェクトに SDK を追加し、authProvider インスタンスを作成する方法の詳細については、SDK のドキュメントを参照してください。
// Code snippets are only available for the latest major version. Current major version is $v1.*

// Dependencies
import (
	  "context"
	  msgraphsdk "github.com/microsoftgraph/msgraph-sdk-go"
	  graphidentityprotection "github.com/microsoftgraph/msgraph-sdk-go/identityprotection"
	  //other-imports
)


requestFilter := "userDisplayName eq 'MyTestUser1'"

requestParameters := &graphidentityprotection.IdentityProtectionRiskDetectionsRequestBuilderGetQueryParameters{
	Filter: &requestFilter,
}
configuration := &graphidentityprotection.IdentityProtectionRiskDetectionsRequestBuilderGetRequestConfiguration{
	QueryParameters: requestParameters,
}

// To initialize your graphClient, see https://learn.microsoft.com/en-us/graph/sdks/create-client?from=snippets&tabs=go
riskDetections, err := graphClient.IdentityProtection().RiskDetections().Get(context.Background(), configuration)
プロジェクトに SDK を追加し、authProvider インスタンスを作成する方法の詳細については、SDK のドキュメントを参照してください。
// Code snippets are only available for the latest version. Current version is 6.x

GraphServiceClient graphClient = new GraphServiceClient(requestAdapter);

RiskDetectionCollectionResponse result = graphClient.identityProtection().riskDetections().get(requestConfiguration -> {
	requestConfiguration.queryParameters.filter = "userDisplayName eq 'MyTestUser1'";
});
プロジェクトに SDK を追加し、authProvider インスタンスを作成する方法の詳細については、SDK のドキュメントを参照してください。
const options = {
	authProvider,
};

const client = Client.init(options);

let riskDetections = await client.api('/identityProtection/riskDetections')
	.filter('userDisplayName eq \'MyTestUser1\'')
	.get();
プロジェクトに SDK を追加し、authProvider インスタンスを作成する方法の詳細については、SDK のドキュメントを参照してください。
<?php
use Microsoft\Graph\GraphServiceClient;
use Microsoft\Graph\Generated\IdentityProtection\RiskDetections\RiskDetectionsRequestBuilderGetRequestConfiguration;


$graphServiceClient = new GraphServiceClient($tokenRequestContext, $scopes);

$requestConfiguration = new RiskDetectionsRequestBuilderGetRequestConfiguration();
$queryParameters = RiskDetectionsRequestBuilderGetRequestConfiguration::createQueryParameters();
$queryParameters->filter = "userDisplayName eq 'MyTestUser1'";
$requestConfiguration->queryParameters = $queryParameters;


$result = $graphServiceClient->identityProtection()->riskDetections()->get($requestConfiguration)->wait();
プロジェクトに SDK を追加し、authProvider インスタンスを作成する方法の詳細については、SDK のドキュメントを参照してください。
# Code snippets are only available for the latest version. Current version is 1.x
from msgraph import GraphServiceClient
from msgraph.generated.identity_protection.risk_detections.risk_detections_request_builder import RiskDetectionsRequestBuilder
from kiota_abstractions.base_request_configuration import RequestConfiguration
# To initialize your graph_client, see https://learn.microsoft.com/en-us/graph/sdks/create-client?from=snippets&tabs=python
query_params = RiskDetectionsRequestBuilder.RiskDetectionsRequestBuilderGetQueryParameters(
		filter = "userDisplayName eq 'MyTestUser1'",
)

request_configuration = RequestConfiguration(
query_parameters = query_params,
)

result = await graph_client.identity_protection.risk_detections.get(request_configuration = request_configuration)
プロジェクトに SDK を追加し、authProvider インスタンスを作成する方法の詳細については、SDK のドキュメントを参照してください。
応答
HTTP/1.1 20O OK
Content-type: application/json

{
  "@odata.context": "https://graph.microsoft.com/v1.0/$metadata#riskDetections",
  "value": [
    {
      "id": "d52a631815aaa527bf642b196715da5cf0f35b6879204ea5b5c99b21bd4c16f4",
      "requestId": "06f7fd18-b8f1-407d-86a3-f6cbe3a4be00",
      "correlationId": "2a38abff-5701-4073-a81e-fd3aac09cba3",
      "riskType": "anonymizedIPAddress",
      "riskEventType": "anonymizedIPAddress",
      "riskState": "atRisk",
      "riskLevel": "medium",
      "riskDetail": "none",
      "source": "IdentityProtection",
      "detectionTimingType": "realtime",
      "activity": "signin",
      "tokenIssuerType": "AzureAD",
      "ipAddress": "178.17.170.23",
      "activityDateTime": "2020-11-03T20:51:34.6245276Z",
      "detectedDateTime": "2020-11-03T20:51:34.6245276Z",
      "lastUpdatedDateTime": "2020-11-03T20:53:12.1984203Z",
      "userId": "4628e7df-dff3-407c-a08f-75f08c0806dc",
      "userDisplayName": "MyTestUser1",
      "userPrincipalName": "MyTestUser1@contoso.com",
      "additionalInfo": "[{\"Key\":\"userAgent\",\"Value\":\"Mozilla/5.0 (Windows NT 10.0; rv:78.0) Gecko/20100101 Firefox/78.0\"}]",
      "location": {
        "city": "Chisinau",
        "state": "Chisinau",
        "countryOrRegion": "MD",
        "geoCoordinates": {
          "latitude": 47.0269,
          "longitude": 28.8416
        }
      }
    }
  ]
}
手順 3: 条件付きアクセス ポリシーを作成する
条件付きアクセス ポリシーを使用すると、ユーザーはリスクが検出されたときに自己修復でき、ポリシー プロンプトが完了した後にリソースに安全にアクセスできるようになります。 この手順では、中または高リスクの検出が発生した場合にユーザーが MFA を使用してサインインすることを要求する条件付きアクセス ポリシーを作成します。
多要素認証を設定する
MFA のアカウントを設定する場合は、状況に最適な認証方法を選択します。
-
MyTestUser1アカウントを使用してアカウントのセキュリティ保護を維持するサイトにサインインします。
- Microsoft Authenticator アプリの使用など、状況に応じた適切な方法を使用して MFA のセットアップ手順を完了します。
条件付きアクセス ポリシーを作成する
条件付きアクセス ポリシーを使用すると、サインイン リスク レベルを識別する条件を設定できます。 リスク レベルは、 low、 medium、 high、または noneできます。 次の例は、中リスクレベルと高リスク レベルのサインインに MFA を要求する方法を示しています。
要求
POST https://graph.microsoft.com/v1.0/identity/conditionalAccess/policies
Content-type: application/json

{
  "displayName": "Policy for risky sign-in",
  "state": "enabled",
  "conditions": {
    "signInRiskLevels": [
      "high",
      "medium"
    ],
    "applications": {
      "includeApplications": ["All"]
    },
    "users": {
      "includeUsers": [
        "4628e7df-dff3-407c-a08f-75f08c0806dc"
      ]
    }
  },
  "grantControls": {
    "operator": "OR",
    "builtInControls": [
      "mfa"
    ]
  }
}
// Code snippets are only available for the latest version. Current version is 5.x

// Dependencies
using Microsoft.Graph.Models;

var requestBody = new ConditionalAccessPolicy
{
	DisplayName = "Policy for risky sign-in",
	State = ConditionalAccessPolicyState.Enabled,
	Conditions = new ConditionalAccessConditionSet
	{
		SignInRiskLevels = new List<RiskLevel?>
		{
			RiskLevel.High,
			RiskLevel.Medium,
		},
		Applications = new ConditionalAccessApplications
		{
			IncludeApplications = new List<string>
			{
				"All",
			},
		},
		Users = new ConditionalAccessUsers
		{
			IncludeUsers = new List<string>
			{
				"4628e7df-dff3-407c-a08f-75f08c0806dc",
			},
		},
	},
	GrantControls = new ConditionalAccessGrantControls
	{
		Operator = "OR",
		BuiltInControls = new List<ConditionalAccessGrantControl?>
		{
			ConditionalAccessGrantControl.Mfa,
		},
	},
};

// To initialize your graphClient, see https://learn.microsoft.com/en-us/graph/sdks/create-client?from=snippets&tabs=csharp
var result = await graphClient.Identity.ConditionalAccess.Policies.PostAsync(requestBody);
プロジェクトに SDK を追加し、authProvider インスタンスを作成する方法の詳細については、SDK のドキュメントを参照してください。
// Code snippets are only available for the latest major version. Current major version is $v1.*

// Dependencies
import (
	  "context"
	  msgraphsdk "github.com/microsoftgraph/msgraph-sdk-go"
	  graphmodels "github.com/microsoftgraph/msgraph-sdk-go/models"
	  //other-imports
)

requestBody := graphmodels.NewConditionalAccessPolicy()
displayName := "Policy for risky sign-in"
requestBody.SetDisplayName(&displayName)
state := graphmodels.ENABLED_CONDITIONALACCESSPOLICYSTATE
requestBody.SetState(&state)
conditions := graphmodels.NewConditionalAccessConditionSet()
signInRiskLevels := []graphmodels.RiskLevelable {
	riskLevel := graphmodels.HIGH_RISKLEVEL
	conditions.SetRiskLevel(&riskLevel)
	riskLevel := graphmodels.MEDIUM_RISKLEVEL
	conditions.SetRiskLevel(&riskLevel)
}
conditions.SetSignInRiskLevels(signInRiskLevels)
applications := graphmodels.NewConditionalAccessApplications()
includeApplications := []string {
	"All",
}
applications.SetIncludeApplications(includeApplications)
conditions.SetApplications(applications)
users := graphmodels.NewConditionalAccessUsers()
includeUsers := []string {
	"4628e7df-dff3-407c-a08f-75f08c0806dc",
}
users.SetIncludeUsers(includeUsers)
conditions.SetUsers(users)
requestBody.SetConditions(conditions)
grantControls := graphmodels.NewConditionalAccessGrantControls()
operator := "OR"
grantControls.SetOperator(&operator)
builtInControls := []graphmodels.ConditionalAccessGrantControlable {
	conditionalAccessGrantControl := graphmodels.MFA_CONDITIONALACCESSGRANTCONTROL
	grantControls.SetConditionalAccessGrantControl(&conditionalAccessGrantControl)
}
grantControls.SetBuiltInControls(builtInControls)
requestBody.SetGrantControls(grantControls)

// To initialize your graphClient, see https://learn.microsoft.com/en-us/graph/sdks/create-client?from=snippets&tabs=go
policies, err := graphClient.Identity().ConditionalAccess().Policies().Post(context.Background(), requestBody, nil)
プロジェクトに SDK を追加し、authProvider インスタンスを作成する方法の詳細については、SDK のドキュメントを参照してください。
// Code snippets are only available for the latest version. Current version is 6.x

GraphServiceClient graphClient = new GraphServiceClient(requestAdapter);

ConditionalAccessPolicy conditionalAccessPolicy = new ConditionalAccessPolicy();
conditionalAccessPolicy.setDisplayName("Policy for risky sign-in");
conditionalAccessPolicy.setState(ConditionalAccessPolicyState.Enabled);
ConditionalAccessConditionSet conditions = new ConditionalAccessConditionSet();
LinkedList<RiskLevel> signInRiskLevels = new LinkedList<RiskLevel>();
signInRiskLevels.add(RiskLevel.High);
signInRiskLevels.add(RiskLevel.Medium);
conditions.setSignInRiskLevels(signInRiskLevels);
ConditionalAccessApplications applications = new ConditionalAccessApplications();
LinkedList<String> includeApplications = new LinkedList<String>();
includeApplications.add("All");
applications.setIncludeApplications(includeApplications);
conditions.setApplications(applications);
ConditionalAccessUsers users = new ConditionalAccessUsers();
LinkedList<String> includeUsers = new LinkedList<String>();
includeUsers.add("4628e7df-dff3-407c-a08f-75f08c0806dc");
users.setIncludeUsers(includeUsers);
conditions.setUsers(users);
conditionalAccessPolicy.setConditions(conditions);
ConditionalAccessGrantControls grantControls = new ConditionalAccessGrantControls();
grantControls.setOperator("OR");
LinkedList<ConditionalAccessGrantControl> builtInControls = new LinkedList<ConditionalAccessGrantControl>();
builtInControls.add(ConditionalAccessGrantControl.Mfa);
grantControls.setBuiltInControls(builtInControls);
conditionalAccessPolicy.setGrantControls(grantControls);
ConditionalAccessPolicy result = graphClient.identity().conditionalAccess().policies().post(conditionalAccessPolicy);
プロジェクトに SDK を追加し、authProvider インスタンスを作成する方法の詳細については、SDK のドキュメントを参照してください。
const options = {
	authProvider,
};

const client = Client.init(options);

const conditionalAccessPolicy = {
  displayName: 'Policy for risky sign-in',
  state: 'enabled',
  conditions: {
    signInRiskLevels: [
      'high',
      'medium'
    ],
    applications: {
      includeApplications: ['All']
    },
    users: {
      includeUsers: [
        '4628e7df-dff3-407c-a08f-75f08c0806dc'
      ]
    }
  },
  grantControls: {
    operator: 'OR',
    builtInControls: [
      'mfa'
    ]
  }
};

await client.api('/identity/conditionalAccess/policies')
	.post(conditionalAccessPolicy);
プロジェクトに SDK を追加し、authProvider インスタンスを作成する方法の詳細については、SDK のドキュメントを参照してください。
<?php
use Microsoft\Graph\GraphServiceClient;
use Microsoft\Graph\Generated\Models\ConditionalAccessPolicy;
use Microsoft\Graph\Generated\Models\ConditionalAccessPolicyState;
use Microsoft\Graph\Generated\Models\ConditionalAccessConditionSet;
use Microsoft\Graph\Generated\Models\RiskLevel;
use Microsoft\Graph\Generated\Models\ConditionalAccessApplications;
use Microsoft\Graph\Generated\Models\ConditionalAccessUsers;
use Microsoft\Graph\Generated\Models\ConditionalAccessGrantControls;
use Microsoft\Graph\Generated\Models\ConditionalAccessGrantControl;


$graphServiceClient = new GraphServiceClient($tokenRequestContext, $scopes);

$requestBody = new ConditionalAccessPolicy();
$requestBody->setDisplayName('Policy for risky sign-in');
$requestBody->setState(new ConditionalAccessPolicyState('enabled'));
$conditions = new ConditionalAccessConditionSet();
$conditions->setSignInRiskLevels([new RiskLevel('high'),new RiskLevel('medium'),	]);
$conditionsApplications = new ConditionalAccessApplications();
$conditionsApplications->setIncludeApplications(['All', 	]);
$conditions->setApplications($conditionsApplications);
$conditionsUsers = new ConditionalAccessUsers();
$conditionsUsers->setIncludeUsers(['4628e7df-dff3-407c-a08f-75f08c0806dc', 	]);
$conditions->setUsers($conditionsUsers);
$requestBody->setConditions($conditions);
$grantControls = new ConditionalAccessGrantControls();
$grantControls->setOperator('OR');
$grantControls->setBuiltInControls([new ConditionalAccessGrantControl('mfa'),	]);
$requestBody->setGrantControls($grantControls);

$result = $graphServiceClient->identity()->conditionalAccess()->policies()->post($requestBody)->wait();
プロジェクトに SDK を追加し、authProvider インスタンスを作成する方法の詳細については、SDK のドキュメントを参照してください。
Import-Module Microsoft.Graph.Identity.SignIns

$params = @{
	displayName = "Policy for risky sign-in"
	state = "enabled"
	conditions = @{
		signInRiskLevels = @(
		"high"
	"medium"
)
applications = @{
	includeApplications = @(
	"All"
)
}
users = @{
includeUsers = @(
"4628e7df-dff3-407c-a08f-75f08c0806dc"
)
}
}
grantControls = @{
operator = "OR"
builtInControls = @(
"mfa"
)
}
}

New-MgIdentityConditionalAccessPolicy -BodyParameter $params
プロジェクトに SDK を追加し、authProvider インスタンスを作成する方法の詳細については、SDK のドキュメントを参照してください。
# Code snippets are only available for the latest version. Current version is 1.x
from msgraph import GraphServiceClient
from msgraph.generated.models.conditional_access_policy import ConditionalAccessPolicy
from msgraph.generated.models.conditional_access_policy_state import ConditionalAccessPolicyState
from msgraph.generated.models.conditional_access_condition_set import ConditionalAccessConditionSet
from msgraph.generated.models.risk_level import RiskLevel
from msgraph.generated.models.conditional_access_applications import ConditionalAccessApplications
from msgraph.generated.models.conditional_access_users import ConditionalAccessUsers
from msgraph.generated.models.conditional_access_grant_controls import ConditionalAccessGrantControls
from msgraph.generated.models.conditional_access_grant_control import ConditionalAccessGrantControl
# To initialize your graph_client, see https://learn.microsoft.com/en-us/graph/sdks/create-client?from=snippets&tabs=python
request_body = ConditionalAccessPolicy(
	display_name = "Policy for risky sign-in",
	state = ConditionalAccessPolicyState.Enabled,
	conditions = ConditionalAccessConditionSet(
		sign_in_risk_levels = [
			RiskLevel.High,
			RiskLevel.Medium,
		],
		applications = ConditionalAccessApplications(
			include_applications = [
				"All",
			],
		),
		users = ConditionalAccessUsers(
			include_users = [
				"4628e7df-dff3-407c-a08f-75f08c0806dc",
			],
		),
	),
	grant_controls = ConditionalAccessGrantControls(
		operator = "OR",
		built_in_controls = [
			ConditionalAccessGrantControl.Mfa,
		],
	),
)

result = await graph_client.identity.conditional_access.policies.post(request_body)
プロジェクトに SDK を追加し、authProvider インスタンスを作成する方法の詳細については、SDK のドキュメントを参照してください。
応答
HTTP/1.1 201 Created
Content-type: application/json

{
  "@odata.context": "https://graph.microsoft.com/v1.0/$metadata#identity/conditionalAccess/policies/$entity",
  "id": "9ad78153-b1f8-4714-adc1-1445727678a8",
  "displayName": "Policy for risky sign-in",
  "createdDateTime": "2020-11-03T20:56:38.6210843Z",
  "modifiedDateTime": null,
  "state": "enabled",
  "sessionControls": null,
  "conditions": {
    "signInRiskLevels": [
      "high",
      "medium"
    ],
    "clientAppTypes": [
      "all"
    ],
    "platforms": null,
    "locations": null,
    "applications": {
      "includeApplications": [
        "All"
      ],
      "excludeApplications": [],
      "includeUserActions": []
    },
    "users": {
      "includeUsers": [
        "4628e7df-dff3-407c-a08f-75f08c0806dc"
      ],
      "excludeUsers": [],
      "includeGroups": [],
      "excludeGroups": [],
      "includeRoles": [],
      "excludeRoles": []
    }
  },
  "grantControls": {
    "operator": "OR",
    "builtInControls": [
      "mfa"
    ],
    "customAuthenticationFactors": [],
    "termsOfUse": []
  }
}
手順 4: 別の危険なサインインをトリガーするが、多要素認証を完了する
匿名ブラウザーにサインインすると、リスクが検出されますが、MFA を完了して修復します。
MyTestUser1 アカウントを使用して entra.microsoft.com にサインインし、MFA プロセスを完了します。
手順 5: リスク検出を一覧表示する
手順 2 で要求を再実行して、 MyTestUser1 ユーザー アカウントの最新のリスク検出を取得します。 手順 4 で MFA が完了したため、この最新のサインイン イベントの riskState が remediatedになりました。
[省略可能]ユーザーのサインインをブロックする
自己修復を許可するのではなく、危険なサインインに関連付けられているユーザーをブロックする場合は、新しい条件付きアクセス ポリシーを作成します。 このポリシーは、中または高リスクの検出が発生した場合に、ユーザーのサインインをブロックします。 手順 3 のポリシーとの主な違いは、 builtInControls が block に設定されていることです。
要求
POST https://graph.microsoft.com/v1.0/identity/conditionalAccess/policies
Content-type: application/json

{
  "displayName": "Policy for risky sign-in block access",
  "state": "enabled",
  "conditions": {
    "signInRiskLevels": [
      "high",
      "medium"
    ],
    "applications": {
      "includeApplications": ["All"]
    },
    "users": {
      "includeUsers": [
        "4628e7df-dff3-407c-a08f-75f08c0806dc"
      ]
    }
  },
  "grantControls": {
    "operator": "OR",
    "builtInControls": [
      "block"
    ]
  }
}
// Code snippets are only available for the latest version. Current version is 5.x

// Dependencies
using Microsoft.Graph.Models;

var requestBody = new ConditionalAccessPolicy
{
	DisplayName = "Policy for risky sign-in block access",
	State = ConditionalAccessPolicyState.Enabled,
	Conditions = new ConditionalAccessConditionSet
	{
		SignInRiskLevels = new List<RiskLevel?>
		{
			RiskLevel.High,
			RiskLevel.Medium,
		},
		Applications = new ConditionalAccessApplications
		{
			IncludeApplications = new List<string>
			{
				"All",
			},
		},
		Users = new ConditionalAccessUsers
		{
			IncludeUsers = new List<string>
			{
				"4628e7df-dff3-407c-a08f-75f08c0806dc",
			},
		},
	},
	GrantControls = new ConditionalAccessGrantControls
	{
		Operator = "OR",
		BuiltInControls = new List<ConditionalAccessGrantControl?>
		{
			ConditionalAccessGrantControl.Block,
		},
	},
};

// To initialize your graphClient, see https://learn.microsoft.com/en-us/graph/sdks/create-client?from=snippets&tabs=csharp
var result = await graphClient.Identity.ConditionalAccess.Policies.PostAsync(requestBody);
プロジェクトに SDK を追加し、authProvider インスタンスを作成する方法の詳細については、SDK のドキュメントを参照してください。
// Code snippets are only available for the latest major version. Current major version is $v1.*

// Dependencies
import (
	  "context"
	  msgraphsdk "github.com/microsoftgraph/msgraph-sdk-go"
	  graphmodels "github.com/microsoftgraph/msgraph-sdk-go/models"
	  //other-imports
)

requestBody := graphmodels.NewConditionalAccessPolicy()
displayName := "Policy for risky sign-in block access"
requestBody.SetDisplayName(&displayName)
state := graphmodels.ENABLED_CONDITIONALACCESSPOLICYSTATE
requestBody.SetState(&state)
conditions := graphmodels.NewConditionalAccessConditionSet()
signInRiskLevels := []graphmodels.RiskLevelable {
	riskLevel := graphmodels.HIGH_RISKLEVEL
	conditions.SetRiskLevel(&riskLevel)
	riskLevel := graphmodels.MEDIUM_RISKLEVEL
	conditions.SetRiskLevel(&riskLevel)
}
conditions.SetSignInRiskLevels(signInRiskLevels)
applications := graphmodels.NewConditionalAccessApplications()
includeApplications := []string {
	"All",
}
applications.SetIncludeApplications(includeApplications)
conditions.SetApplications(applications)
users := graphmodels.NewConditionalAccessUsers()
includeUsers := []string {
	"4628e7df-dff3-407c-a08f-75f08c0806dc",
}
users.SetIncludeUsers(includeUsers)
conditions.SetUsers(users)
requestBody.SetConditions(conditions)
grantControls := graphmodels.NewConditionalAccessGrantControls()
operator := "OR"
grantControls.SetOperator(&operator)
builtInControls := []graphmodels.ConditionalAccessGrantControlable {
	conditionalAccessGrantControl := graphmodels.BLOCK_CONDITIONALACCESSGRANTCONTROL
	grantControls.SetConditionalAccessGrantControl(&conditionalAccessGrantControl)
}
grantControls.SetBuiltInControls(builtInControls)
requestBody.SetGrantControls(grantControls)

// To initialize your graphClient, see https://learn.microsoft.com/en-us/graph/sdks/create-client?from=snippets&tabs=go
policies, err := graphClient.Identity().ConditionalAccess().Policies().Post(context.Background(), requestBody, nil)
プロジェクトに SDK を追加し、authProvider インスタンスを作成する方法の詳細については、SDK のドキュメントを参照してください。
// Code snippets are only available for the latest version. Current version is 6.x

GraphServiceClient graphClient = new GraphServiceClient(requestAdapter);

ConditionalAccessPolicy conditionalAccessPolicy = new ConditionalAccessPolicy();
conditionalAccessPolicy.setDisplayName("Policy for risky sign-in block access");
conditionalAccessPolicy.setState(ConditionalAccessPolicyState.Enabled);
ConditionalAccessConditionSet conditions = new ConditionalAccessConditionSet();
LinkedList<RiskLevel> signInRiskLevels = new LinkedList<RiskLevel>();
signInRiskLevels.add(RiskLevel.High);
signInRiskLevels.add(RiskLevel.Medium);
conditions.setSignInRiskLevels(signInRiskLevels);
ConditionalAccessApplications applications = new ConditionalAccessApplications();
LinkedList<String> includeApplications = new LinkedList<String>();
includeApplications.add("All");
applications.setIncludeApplications(includeApplications);
conditions.setApplications(applications);
ConditionalAccessUsers users = new ConditionalAccessUsers();
LinkedList<String> includeUsers = new LinkedList<String>();
includeUsers.add("4628e7df-dff3-407c-a08f-75f08c0806dc");
users.setIncludeUsers(includeUsers);
conditions.setUsers(users);
conditionalAccessPolicy.setConditions(conditions);
ConditionalAccessGrantControls grantControls = new ConditionalAccessGrantControls();
grantControls.setOperator("OR");
LinkedList<ConditionalAccessGrantControl> builtInControls = new LinkedList<ConditionalAccessGrantControl>();
builtInControls.add(ConditionalAccessGrantControl.Block);
grantControls.setBuiltInControls(builtInControls);
conditionalAccessPolicy.setGrantControls(grantControls);
ConditionalAccessPolicy result = graphClient.identity().conditionalAccess().policies().post(conditionalAccessPolicy);
プロジェクトに SDK を追加し、authProvider インスタンスを作成する方法の詳細については、SDK のドキュメントを参照してください。
const options = {
	authProvider,
};

const client = Client.init(options);

const conditionalAccessPolicy = {
  displayName: 'Policy for risky sign-in block access',
  state: 'enabled',
  conditions: {
    signInRiskLevels: [
      'high',
      'medium'
    ],
    applications: {
      includeApplications: ['All']
    },
    users: {
      includeUsers: [
        '4628e7df-dff3-407c-a08f-75f08c0806dc'
      ]
    }
  },
  grantControls: {
    operator: 'OR',
    builtInControls: [
      'block'
    ]
  }
};

await client.api('/identity/conditionalAccess/policies')
	.post(conditionalAccessPolicy);
プロジェクトに SDK を追加し、authProvider インスタンスを作成する方法の詳細については、SDK のドキュメントを参照してください。
<?php
use Microsoft\Graph\GraphServiceClient;
use Microsoft\Graph\Generated\Models\ConditionalAccessPolicy;
use Microsoft\Graph\Generated\Models\ConditionalAccessPolicyState;
use Microsoft\Graph\Generated\Models\ConditionalAccessConditionSet;
use Microsoft\Graph\Generated\Models\RiskLevel;
use Microsoft\Graph\Generated\Models\ConditionalAccessApplications;
use Microsoft\Graph\Generated\Models\ConditionalAccessUsers;
use Microsoft\Graph\Generated\Models\ConditionalAccessGrantControls;
use Microsoft\Graph\Generated\Models\ConditionalAccessGrantControl;


$graphServiceClient = new GraphServiceClient($tokenRequestContext, $scopes);

$requestBody = new ConditionalAccessPolicy();
$requestBody->setDisplayName('Policy for risky sign-in block access');
$requestBody->setState(new ConditionalAccessPolicyState('enabled'));
$conditions = new ConditionalAccessConditionSet();
$conditions->setSignInRiskLevels([new RiskLevel('high'),new RiskLevel('medium'),	]);
$conditionsApplications = new ConditionalAccessApplications();
$conditionsApplications->setIncludeApplications(['All', 	]);
$conditions->setApplications($conditionsApplications);
$conditionsUsers = new ConditionalAccessUsers();
$conditionsUsers->setIncludeUsers(['4628e7df-dff3-407c-a08f-75f08c0806dc', 	]);
$conditions->setUsers($conditionsUsers);
$requestBody->setConditions($conditions);
$grantControls = new ConditionalAccessGrantControls();
$grantControls->setOperator('OR');
$grantControls->setBuiltInControls([new ConditionalAccessGrantControl('block'),	]);
$requestBody->setGrantControls($grantControls);

$result = $graphServiceClient->identity()->conditionalAccess()->policies()->post($requestBody)->wait();
プロジェクトに SDK を追加し、authProvider インスタンスを作成する方法の詳細については、SDK のドキュメントを参照してください。
Import-Module Microsoft.Graph.Identity.SignIns

$params = @{
	displayName = "Policy for risky sign-in block access"
	state = "enabled"
	conditions = @{
		signInRiskLevels = @(
		"high"
	"medium"
)
applications = @{
	includeApplications = @(
	"All"
)
}
users = @{
includeUsers = @(
"4628e7df-dff3-407c-a08f-75f08c0806dc"
)
}
}
grantControls = @{
operator = "OR"
builtInControls = @(
"block"
)
}
}

New-MgIdentityConditionalAccessPolicy -BodyParameter $params
プロジェクトに SDK を追加し、authProvider インスタンスを作成する方法の詳細については、SDK のドキュメントを参照してください。
# Code snippets are only available for the latest version. Current version is 1.x
from msgraph import GraphServiceClient
from msgraph.generated.models.conditional_access_policy import ConditionalAccessPolicy
from msgraph.generated.models.conditional_access_policy_state import ConditionalAccessPolicyState
from msgraph.generated.models.conditional_access_condition_set import ConditionalAccessConditionSet
from msgraph.generated.models.risk_level import RiskLevel
from msgraph.generated.models.conditional_access_applications import ConditionalAccessApplications
from msgraph.generated.models.conditional_access_users import ConditionalAccessUsers
from msgraph.generated.models.conditional_access_grant_controls import ConditionalAccessGrantControls
from msgraph.generated.models.conditional_access_grant_control import ConditionalAccessGrantControl
# To initialize your graph_client, see https://learn.microsoft.com/en-us/graph/sdks/create-client?from=snippets&tabs=python
request_body = ConditionalAccessPolicy(
	display_name = "Policy for risky sign-in block access",
	state = ConditionalAccessPolicyState.Enabled,
	conditions = ConditionalAccessConditionSet(
		sign_in_risk_levels = [
			RiskLevel.High,
			RiskLevel.Medium,
		],
		applications = ConditionalAccessApplications(
			include_applications = [
				"All",
			],
		),
		users = ConditionalAccessUsers(
			include_users = [
				"4628e7df-dff3-407c-a08f-75f08c0806dc",
			],
		),
	),
	grant_controls = ConditionalAccessGrantControls(
		operator = "OR",
		built_in_controls = [
			ConditionalAccessGrantControl.Block,
		],
	),
)

result = await graph_client.identity.conditional_access.policies.post(request_body)
プロジェクトに SDK を追加し、authProvider インスタンスを作成する方法の詳細については、SDK のドキュメントを参照してください。
応答
HTTP/1.1 201 Created
Content-type: application/json

{
  "@odata.context": "https://graph.microsoft.com/v1.0/$metadata#identity/conditionalAccess/policies/$entity",
  "id": "9ad78153-b1f8-4714-adc1-1445727678a8",
  "displayName": "Policy for risky sign-in block access",
  "createdDateTime": "2020-11-03T20:56:38.6210843Z",
  "modifiedDateTime": null,
  "state": "enabled",
  "sessionControls": null,
  "conditions": {
    "signInRiskLevels": [
      "high",
      "medium"
    ],
    "clientAppTypes": [
      "all"
    ],
    "platforms": null,
    "locations": null,
    "applications": {
      "includeApplications": [
        "All"
      ],
      "excludeApplications": [],
      "includeUserActions": []
    },
    "users": {
      "includeUsers": [
        "4628e7df-dff3-407c-a08f-75f08c0806dc"
      ],
      "excludeUsers": [],
      "includeGroups": [],
      "excludeGroups": [],
      "includeRoles": [],
      "excludeRoles": []
    }
  },
  "grantControls": {
    "operator": "OR",
    "builtInControls": [
      "block"
    ],
    "customAuthenticationFactors": [],
    "termsOfUse": []
  }
}
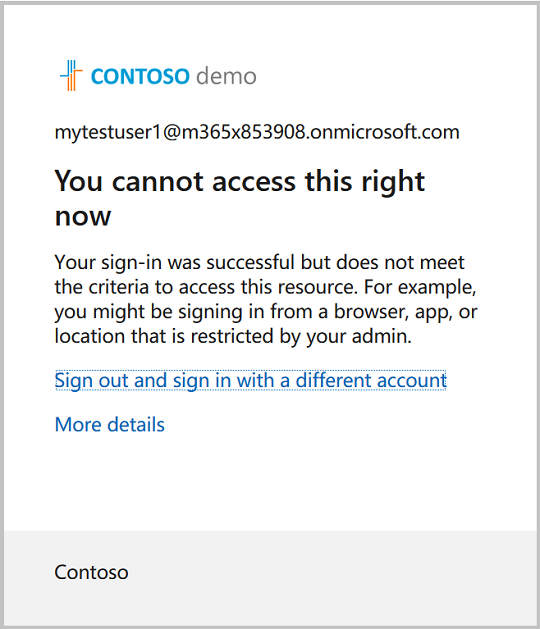
この条件付きアクセス ポリシーを設定すると、 MyTestUser1 アカウントは、中または高のサインイン リスク レベルのためにサインインがブロックされるようになりました。
手順 6: 危険なユーザーを無視する
ユーザーが危険にさらされていないと考え、条件付きアクセス ポリシーを適用したくない場合は、次の要求に示すように、危険なユーザーを手動で無視します。 要求は、 204 No Content 応答を返します。
要求
POST https://graph.microsoft.com/v1.0/identityProtection/riskyUsers/dismiss
Content-Type: application/json

{
  "userIds": [
    "4628e7df-dff3-407c-a08f-75f08c0806dc"
  ]
}
// Code snippets are only available for the latest version. Current version is 5.x

// Dependencies
using Microsoft.Graph.IdentityProtection.RiskyUsers.Dismiss;

var requestBody = new DismissPostRequestBody
{
	UserIds = new List<string>
	{
		"4628e7df-dff3-407c-a08f-75f08c0806dc",
	},
};

// To initialize your graphClient, see https://learn.microsoft.com/en-us/graph/sdks/create-client?from=snippets&tabs=csharp
await graphClient.IdentityProtection.RiskyUsers.Dismiss.PostAsync(requestBody);
プロジェクトに SDK を追加し、authProvider インスタンスを作成する方法の詳細については、SDK のドキュメントを参照してください。
// Code snippets are only available for the latest major version. Current major version is $v1.*

// Dependencies
import (
	  "context"
	  msgraphsdk "github.com/microsoftgraph/msgraph-sdk-go"
	  graphidentityprotection "github.com/microsoftgraph/msgraph-sdk-go/identityprotection"
	  //other-imports
)

requestBody := graphidentityprotection.NewDismissPostRequestBody()
userIds := []string {
	"4628e7df-dff3-407c-a08f-75f08c0806dc",
}
requestBody.SetUserIds(userIds)

// To initialize your graphClient, see https://learn.microsoft.com/en-us/graph/sdks/create-client?from=snippets&tabs=go
graphClient.IdentityProtection().RiskyUsers().Dismiss().Post(context.Background(), requestBody, nil)
プロジェクトに SDK を追加し、authProvider インスタンスを作成する方法の詳細については、SDK のドキュメントを参照してください。
// Code snippets are only available for the latest version. Current version is 6.x

GraphServiceClient graphClient = new GraphServiceClient(requestAdapter);

com.microsoft.graph.identityprotection.riskyusers.dismiss.DismissPostRequestBody dismissPostRequestBody = new com.microsoft.graph.identityprotection.riskyusers.dismiss.DismissPostRequestBody();
LinkedList<String> userIds = new LinkedList<String>();
userIds.add("4628e7df-dff3-407c-a08f-75f08c0806dc");
dismissPostRequestBody.setUserIds(userIds);
graphClient.identityProtection().riskyUsers().dismiss().post(dismissPostRequestBody);
プロジェクトに SDK を追加し、authProvider インスタンスを作成する方法の詳細については、SDK のドキュメントを参照してください。
const options = {
	authProvider,
};

const client = Client.init(options);

const dismiss = {
  userIds: [
    '4628e7df-dff3-407c-a08f-75f08c0806dc'
  ]
};

await client.api('/identityProtection/riskyUsers/dismiss')
	.post(dismiss);
プロジェクトに SDK を追加し、authProvider インスタンスを作成する方法の詳細については、SDK のドキュメントを参照してください。
<?php
use Microsoft\Graph\GraphServiceClient;
use Microsoft\Graph\Generated\IdentityProtection\RiskyUsers\Dismiss\DismissPostRequestBody;


$graphServiceClient = new GraphServiceClient($tokenRequestContext, $scopes);

$requestBody = new DismissPostRequestBody();
$requestBody->setUserIds(['4628e7df-dff3-407c-a08f-75f08c0806dc', 	]);

$graphServiceClient->identityProtection()->riskyUsers()->dismiss()->post($requestBody)->wait();
プロジェクトに SDK を追加し、authProvider インスタンスを作成する方法の詳細については、SDK のドキュメントを参照してください。
Import-Module Microsoft.Graph.Identity.SignIns

$params = @{
	userIds = @(
	"4628e7df-dff3-407c-a08f-75f08c0806dc"
)
}

Invoke-MgDismissRiskyUser -BodyParameter $params
プロジェクトに SDK を追加し、authProvider インスタンスを作成する方法の詳細については、SDK のドキュメントを参照してください。
# Code snippets are only available for the latest version. Current version is 1.x
from msgraph import GraphServiceClient
from msgraph.generated.identityprotection.riskyusers.dismiss.dismiss_post_request_body import DismissPostRequestBody
# To initialize your graph_client, see https://learn.microsoft.com/en-us/graph/sdks/create-client?from=snippets&tabs=python
request_body = DismissPostRequestBody(
	user_ids = [
		"4628e7df-dff3-407c-a08f-75f08c0806dc",
	],
)

await graph_client.identity_protection.risky_users.dismiss.post(request_body)
プロジェクトに SDK を追加し、authProvider インスタンスを作成する方法の詳細については、SDK のドキュメントを参照してください。
リスク ユーザーを無視した後、手順 2 で要求を再実行すると、 MyTestUser1 ユーザー アカウントにリスク レベルの none と riskState の dismissedが表示されます。
手順 7: リソースをクリーンアップする
この手順では、作成した 2 つの条件付きアクセス ポリシーを削除します。 要求は、 204 No Content 応答を返します。
DELETE https://graph.microsoft.com/v1.0/identity/conditionalAccess/policies/9ad78153-b1f8-4714-adc1-1445727678a8
// Code snippets are only available for the latest version. Current version is 5.x

// To initialize your graphClient, see https://learn.microsoft.com/en-us/graph/sdks/create-client?from=snippets&tabs=csharp
await graphClient.Identity.ConditionalAccess.Policies["{conditionalAccessPolicy-id}"].DeleteAsync();
プロジェクトに SDK を追加し、authProvider インスタンスを作成する方法の詳細については、SDK のドキュメントを参照してください。
// Code snippets are only available for the latest major version. Current major version is $v1.*

// Dependencies
import (
	  "context"
	  msgraphsdk "github.com/microsoftgraph/msgraph-sdk-go"
	  //other-imports
)


// To initialize your graphClient, see https://learn.microsoft.com/en-us/graph/sdks/create-client?from=snippets&tabs=go
graphClient.Identity().ConditionalAccess().Policies().ByConditionalAccessPolicyId("conditionalAccessPolicy-id").Delete(context.Background(), nil)
プロジェクトに SDK を追加し、authProvider インスタンスを作成する方法の詳細については、SDK のドキュメントを参照してください。
// Code snippets are only available for the latest version. Current version is 6.x

GraphServiceClient graphClient = new GraphServiceClient(requestAdapter);

graphClient.identity().conditionalAccess().policies().byConditionalAccessPolicyId("{conditionalAccessPolicy-id}").delete();
プロジェクトに SDK を追加し、authProvider インスタンスを作成する方法の詳細については、SDK のドキュメントを参照してください。
const options = {
	authProvider,
};

const client = Client.init(options);

await client.api('/identity/conditionalAccess/policies/9ad78153-b1f8-4714-adc1-1445727678a8')
	.delete();
プロジェクトに SDK を追加し、authProvider インスタンスを作成する方法の詳細については、SDK のドキュメントを参照してください。
<?php
use Microsoft\Graph\GraphServiceClient;


$graphServiceClient = new GraphServiceClient($tokenRequestContext, $scopes);


$graphServiceClient->identity()->conditionalAccess()->policies()->byConditionalAccessPolicyId('conditionalAccessPolicy-id')->delete()->wait();
プロジェクトに SDK を追加し、authProvider インスタンスを作成する方法の詳細については、SDK のドキュメントを参照してください。
Import-Module Microsoft.Graph.Identity.SignIns

Remove-MgIdentityConditionalAccessPolicy -ConditionalAccessPolicyId $conditionalAccessPolicyId
プロジェクトに SDK を追加し、authProvider インスタンスを作成する方法の詳細については、SDK のドキュメントを参照してください。
# Code snippets are only available for the latest version. Current version is 1.x
from msgraph import GraphServiceClient
# To initialize your graph_client, see https://learn.microsoft.com/en-us/graph/sdks/create-client?from=snippets&tabs=python

await graph_client.identity.conditional_access.policies.by_conditional_access_policy_id('conditionalAccessPolicy-id').delete()
プロジェクトに SDK を追加し、authProvider インスタンスを作成する方法の詳細については、SDK のドキュメントを参照してください。
関連コンテンツ