Microsoft Graph を使って React の単一ページ アプリを構築する
このチュートリアルでは、Microsoft React API を使用してユーザーの予定表情報を取得する Graph ページ アプリを作成する方法について説明します。
ヒント
完了したチュートリアルをダウンロードする場合は、リポジトリをダウンロードまたは複製GitHubできます。
前提条件
このチュートリアルを開始する前に、開発Node.jsにインストールされている必要があります。 ファイルまたは Yarn がNode.jsダウンロード オプションについては、前のリンクを参照してください。
また、Outlook.com 上のメールボックスを持つ個人用 Microsoft アカウント、または Microsoft の仕事用または学校用のアカウントを持っている必要があります。 Microsoft アカウントをお持ちでない場合は、無料アカウントを取得するためのオプションが 2 つご利用できます。
- 新しい 個人用 Microsoft アカウントにサインアップできます。
- 開発者プログラムにサインアップして、Microsoft 365サブスクリプションをMicrosoft 365できます。
注意
このチュートリアルは、ノード バージョン 14.15.0 と Yarn バージョン 1.22.10 で記述されています。 このガイドの手順は、他のバージョンでも動作しますが、テストされていない場合があります。
フィードバック
このチュートリアルに関するフィードバックは、リポジトリのGitHubしてください。
React の単一ページ アプリを作成する
このセクションでは、新しいアプリを作成Reactします。
コマンド ライン インターフェイス (CLI) を開き、ファイルを作成する権限を持つディレクトリに移動し、次のコマンドを実行して新しいアプリReactします。
yarn create react-app graph-tutorial --template typescriptコマンドが終了したら、CLI の graph-tutorial'** ディレクトリに変更し、次のコマンドを実行してローカル Web サーバーを起動します。
yarn start注意
Yarn が インストールされていない場合 は、代わりに
npm start使用できます。
既定のブラウザーが開 https://localhost:3000/ き、既定のページReactされます。 ブラウザーが開かない場合は、ブラウザーを開いて参照して、新しいアプリ https://localhost:3000/ が動作するを確認します。
ノード パッケージの追加
次に進む前に、後で使用する追加のパッケージをインストールします。
- react-router-domを使用して、アプリ内での宣言型ルーティングReactします。
- スタイル設定 と一般的なコンポーネントのブートストラップ。
- ブートストラップに基づくReactの react-bootstrap。
- 日付と時刻を書式設定する date-fns。
- windows-ianaを使用して、Windowsを IANA 形式に変換します。
- msal-reactを使用して、アクセス トークンAzure Active Directory取得します。
- microsoft-graph-client for making calls to Microsoft Graph.
CLI で次のコマンドを実行します。
yarn add react-router-dom@5.2.0 bootstrap@5.0.1 react-bootstrap@2.0.0-beta.4 windows-iana@5.0.2
yarn add date-fns@2.22.1 date-fns-tz@1.1.4 @azure/msal-react@1.0.1 @azure/msal-browser@2.16.1 @microsoft/microsoft-graph-client@3.0.0
yarn add -D @types/react-router-dom@5.1.8 @types/microsoft-graph
アプリを設計する
まず、アプリの コンテキストを 作成します。
AppContext.tsx という名前の ./src ディレクトリに新しいファイルを作成し、次のステートメントを
import追加します。import React, { useContext, createContext, useState, MouseEventHandler, useEffect} from 'react'; import { AuthCodeMSALBrowserAuthenticationProvider } from '@microsoft/microsoft-graph-client/authProviders/authCodeMsalBrowser'; import { InteractionType, PublicClientApplication } from '@azure/msal-browser'; import { useMsal } from '@azure/msal-react';次のコードを追加します。
./src/AppContext.tsx の末尾に次の関数を追加します。
function useProvideAppContext() {
  const [user, setUser] = useState<AppUser | undefined>(undefined);
  const [error, setError] = useState<AppError | undefined>(undefined);

  const displayError = (message: string, debug?: string) => {
    setError({message, debug});
  }

  const clearError = () => {
    setError(undefined);
  }

  const authProvider = undefined;

  const signIn = async () => {
    // TODO
  };

  const signOut = async () => {
    // TODO
  };

  return {
    user,
    error,
    signIn,
    signOut,
    displayError,
    clearError,
    authProvider
  };
}
このコンテキストの実装は、後のセクションで完了します。
アプリのナビゲーション バーを作成します。 という名前のディレクトリに新しい
./srcファイルを作成NavBar.tsxし、次のコードを追加します。import React from 'react'; import { NavLink as RouterNavLink } from 'react-router-dom'; import { Button, Collapse, Container, Navbar, NavbarToggler, NavbarBrand, Nav, NavItem, NavLink, UncontrolledDropdown, DropdownToggle, DropdownMenu, DropdownItem } from 'reactstrap'; import '@fortawesome/fontawesome-free/css/all.css'; interface NavBarProps { isAuthenticated: boolean; authButtonMethod: any; user: any; } interface NavBarState { isOpen: boolean; } function UserAvatar(props: any) { // If a user avatar is available, return an img tag with the pic if (props.user.avatar) { return <img src={props.user.avatar} alt="user" className="rounded-circle align-self-center mr-2" style={{ width: '32px' }}></img>; } // No avatar available, return a default icon return <i className="far fa-user-circle fa-lg rounded-circle align-self-center mr-2" style={{ width: '32px' }}></i>; } function AuthNavItem(props: NavBarProps) { // If authenticated, return a dropdown with the user's info and a // sign out button if (props.isAuthenticated) { return ( <UncontrolledDropdown> <DropdownToggle nav caret> <UserAvatar user={props.user} /> </DropdownToggle> <DropdownMenu right> <h5 className="dropdown-item-text mb-0">{props.user.displayName}</h5> <p className="dropdown-item-text text-muted mb-0">{props.user.email}</p> <DropdownItem divider /> <DropdownItem onClick={props.authButtonMethod}>Sign Out</DropdownItem> </DropdownMenu> </UncontrolledDropdown> ); } // Not authenticated, return a sign in link return ( <NavItem> <Button onClick={props.authButtonMethod} className="btn-link nav-link border-0" color="link">Sign In</Button> </NavItem> ); } export default class NavBar extends React.Component<NavBarProps, NavBarState> { constructor(props: NavBarProps) { super(props); this.toggle = this.toggle.bind(this); this.state = { isOpen: false }; } toggle() { this.setState({ isOpen: !this.state.isOpen }); } render() { // Only show calendar nav item if logged in let calendarLink = null; if (this.props.isAuthenticated) { calendarLink = ( <NavItem> <RouterNavLink to="/calendar" className="nav-link" exact>Calendar</RouterNavLink> </NavItem> ); } return ( <div> <Navbar color="dark" dark expand="md" fixed="top"> <Container> <NavbarBrand href="/">React Graph Tutorial</NavbarBrand> <NavbarToggler onClick={this.toggle} /> <Collapse isOpen={this.state.isOpen} navbar> <Nav className="mr-auto" navbar> <NavItem> <RouterNavLink to="/" className="nav-link" exact>Home</RouterNavLink> </NavItem> {calendarLink} </Nav> <Nav className="justify-content-end" navbar> <NavItem> <NavLink href="https://developer.microsoft.com/graph/docs/concepts/overview" target="_blank"> <i className="fas fa-external-link-alt mr-1"></i> Docs </NavLink> </NavItem> <AuthNavItem isAuthenticated={this.props.isAuthenticated} authButtonMethod={this.props.authButtonMethod} user={this.props.user} /> </Nav> </Collapse> </Container> </Navbar> </div> ); } }アプリのホーム ページを作成します。 という名前のディレクトリに新しい
./srcファイルを作成Welcome.tsxし、次のコードを追加します。import React from 'react'; import { Button, Jumbotron } from 'reactstrap'; interface WelcomeProps { isAuthenticated: boolean; authButtonMethod: any; user: any; } interface WelcomeState { isOpen: boolean; } function WelcomeContent(props: WelcomeProps) { // If authenticated, greet the user if (props.isAuthenticated) { return ( <div> <h4>Welcome {props.user.displayName}!</h4> <p>Use the navigation bar at the top of the page to get started.</p> </div> ); } // Not authenticated, present a sign in button return <Button color="primary" onClick={props.authButtonMethod}>Click here to sign in</Button>; } export default class Welcome extends React.Component<WelcomeProps, WelcomeState> { render() { return ( <Jumbotron> <h1>React Graph Tutorial</h1> <p className="lead"> This sample app shows how to use the Microsoft Graph API to access Outlook and OneDrive data from React </p> <WelcomeContent isAuthenticated={this.props.isAuthenticated} user={this.props.user} authButtonMethod={this.props.authButtonMethod} /> </Jumbotron> ); } }ユーザーにメッセージを表示するエラー メッセージ表示を作成します。 という名前のディレクトリに新しい
./srcファイルを作成ErrorMessage.tsxし、次のコードを追加します。import React from 'react'; import { Alert } from 'reactstrap'; interface ErrorMessageProps { debug: string; message: string; } export default class ErrorMessage extends React.Component<ErrorMessageProps> { render() { let debug = null; if (this.props.debug) { debug = <pre className="alert-pre border bg-light p-2"><code>{this.props.debug}</code></pre>; } return ( <Alert color="danger"> <p className="mb-3">{this.props.message}</p> {debug} </Alert> ); } }./src/index.cssファイルを開き、そのコンテンツ全体を次のように置き換えます。body { padding-top: 4.5rem; } .alert-pre { word-wrap: break-word; word-break: break-all; white-space: pre-wrap; }コンテンツ
./src/App.tsx全体を開き、次の内容に置き換えてください。import { BrowserRouter as Router, Route } from 'react-router-dom'; import { Container } from 'react-bootstrap'; import { MsalProvider } from '@azure/msal-react' import { IPublicClientApplication } from '@azure/msal-browser'; import ProvideAppContext from './AppContext'; import ErrorMessage from './ErrorMessage'; import NavBar from './NavBar'; import Welcome from './Welcome'; import 'bootstrap/dist/css/bootstrap.css'; export default function App() { return( <ProvideAppContext> <Router> <NavBar /> <Container> <ErrorMessage /> <Route exact path="/" render={(props) => <Welcome {...props} /> } /> </Container> </Router> </ProvideAppContext> ); }./public/images ディレクトリに、選択 no-profile-photo.png 名前のイメージ ファイルを追加します。 この画像は、ユーザーが Microsoft サーバーで写真を持ってない場合に、ユーザーの写真Graph。
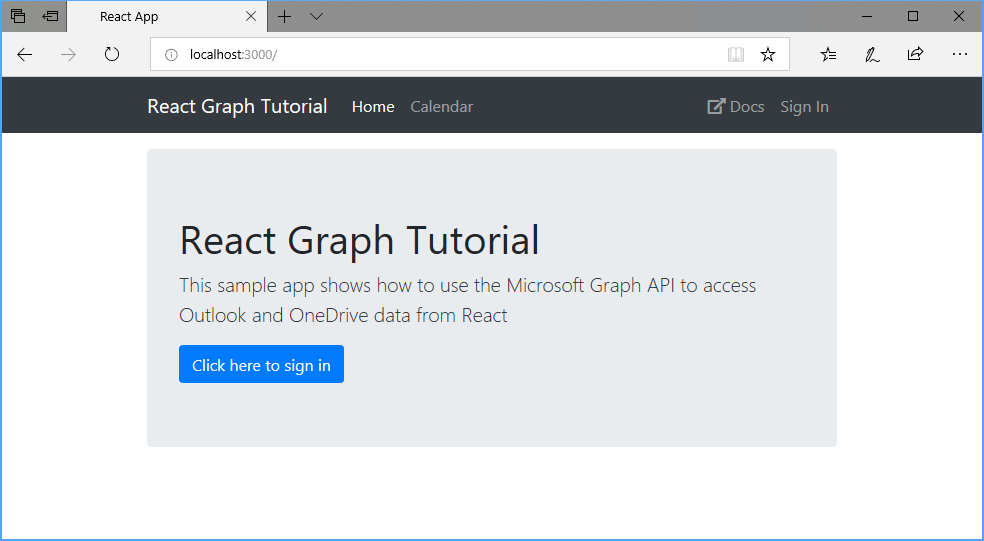
変更内容をすべて保存し、アプリを再起動します。 これで、アプリは非常に異なって見える必要があります。
ポータルでアプリを登録する
この演習では、管理者センターを使用して新AD Azure Azure Active Directory作成します。
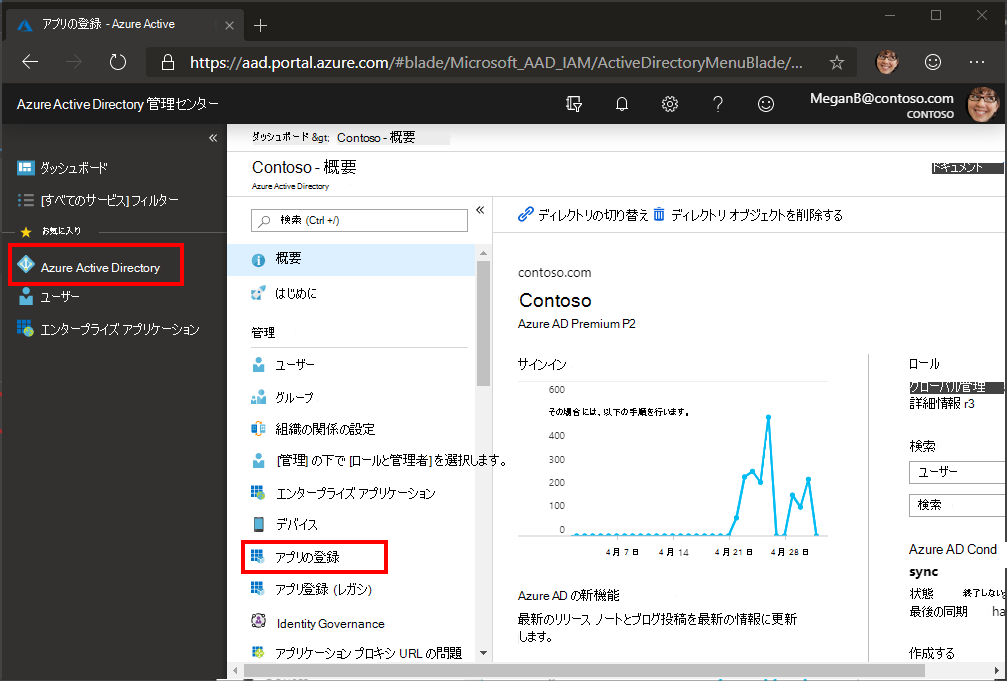
ブラウザーを開き、Azure Active Directory 管理センターへ移動します。 個人用アカウント (別名: Microsoft アカウント)、または 職場/学校アカウント を使用してログインします。
左側のナビゲーションで [Azure Active Directory] を選択し、それから [管理] で [アプリの登録] を選択します。
注意
Azure AD B2C ユーザーは、アプリ登録 (従来) のみを表示できます。 この場合は、 に直接移動してください https://aka.ms/appregistrations 。
[新規登録] を選択します。 [アプリケーションを登録] ページで、次のように値を設定します。
React Graph Tutorialに [名前] を設定します。- [サポートされているアカウントの種類] を [任意の組織のディレクトリ内のアカウントと個人用の Microsoft アカウント] に設定します。
- [リダイレクト URI] で、最初のドロップダウン リストを
Single-page application (SPA)に設定し、それからhttp://localhost:3000に値を設定します。
![[アプリケーションを登録する] ページのスクリーンショット](react/tutorial/images/aad-register-an-app.png)
[登録] を選択します。 [チュートリアル React Graph] ページで、アプリケーション (クライアント) ID の値をコピーして保存します。次の手順で必要になります。

Azure AD 認証を追加する
この演習では、前の演習からアプリケーションを拡張して、Azure サーバーでの認証をサポートAD。 これは、Microsoft サーバーを呼び出す必要がある OAuth アクセス トークンを取得するために必要Graph。 この手順では 、Microsoft 認証 ライブラリ ライブラリをアプリケーションに統合します。
Config.ts という 名前の ./src ディレクトリに新しいファイルを作成し、次のコードを追加します。
export const config = {
  appId: 'YOUR_APP_ID_HERE',
  redirectUri: 'http://localhost:3000',
  scopes: [
    'user.read',
    'mailboxsettings.read',
    'calendars.readwrite'
  ]
};
アプリケーション
YOUR_APP_ID_HERE登録ポータルのアプリケーション ID に置き換える。重要
git などのソース管理を使用している場合は、誤ってアプリ ID が漏洩しないように、ソース管理からファイルを除外する良
Config.tsい時期です。
サインインの実装
このセクションでは、認証プロバイダー、サインイン、およびサインアウトを実装します。
./src/index.tsx を開き、ファイルの上部に次
importのステートメントを追加します。import { PublicClientApplication, EventType, EventMessage, AuthenticationResult } from '@azure/msal-browser'; import config from './Config';行の前に次のコードを
ReactDOM.render追加します。このコードは、MSAL ライブラリのオブジェクトのインスタンスを作成し、キャッシュされたアカウントをチェックし、ログインが成功した後にアクティブ なアカウントを設定するコールバック
PublicClientApplicationを登録します。という名前
AppのプロパティでReactDOM.render渡す呼び出しmsalInstanceの要素を更新しますpca。./src/App.tsx を開き、最後のステートメントの後に次のコードを追加
importします。既存の
App関数を、以下の関数で置き換えます。export default function App({ pca }: AppProps) { return( <MsalProvider instance={ pca }> <ProvideAppContext> <Router> <div> <NavBar /> <Container> <ErrorMessage /> <Route exact path="/" render={(props) => <Welcome {...props} /> } /> </Container> </div> </Router> </ProvideAppContext> </MsalProvider> ); }これにより、他のすべての要素を要素でラップ
MsalProviderし、認証状態とトークン取得を利用できます。./src/AppContext.tsx を開き、ファイルの上部に
import次のステートメントを追加します。import config from './Config';関数の上部に次の行を追加
useProvideAppContextします。const msal = useMsal();行を
const authProvider = undefined;次に置き換える。既存の
signIn関数を、以下の関数で置き換えます。const signIn = async () => { const result = await msal.instance.loginPopup({ scopes: config.scopes, prompt: 'select_account' }); // TEMPORARY: Show the access token displayError('Access token retrieved', result.accessToken); };変更を保存し、ブラウザーを更新します。 [サインイン] ボタンをクリックすると、読み込まれるポップアップ ウィンドウが表示されます
https://login.microsoftonline.com。 Microsoft アカウントでログインし、要求されたアクセス許可に同意します。 アプリ ページが更新され、トークンが表示されます。
ユーザーの詳細情報を取得する
このセクションでは、関数を変更して、Microsoft サーバーからユーザーの詳細を取得 signIn Graph。
GraphService.ts という名前の ./src ディレクトリに新しいファイルを作成し、次のコードを追加します。
この関数は、指定された microsoft Graphクライアントを初期化し
getUser、AuthProviderユーザーのプロファイルを取得する関数を実装します。./src/AppContext.tsx を開き、ファイルの上部に
import次のステートメントを追加します。import { getUser } from './GraphService';既存の
signIn関数を、以下のコードで置換します。既存の
signOut関数を、以下の関数で置き換えます。内部に次の
useEffect呼び出しを追加しますuseProvideAppContext。変更を保存し、サインイン後にアプリを起動すると、ホーム ページに戻りますが、サインイン済みかどうかを示す UI が変更される必要があります。
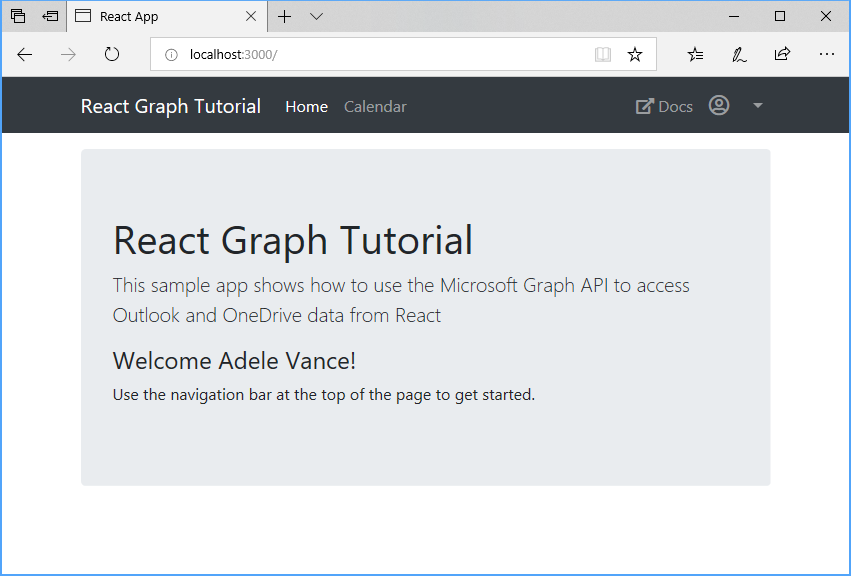
右上隅にあるユーザー アバターをクリックして、[サインアウト] リンクにアクセス します。 [サインアウト] をクリックすると、セッションがリセットされ、ホーム ページに戻ります。
![[サインアウト] リンクのドロップダウン メニューのスクリーンショット](react/tutorial/images/add-aad-auth-02.png)
トークンの保存と更新
この時点で、アプリケーションはアクセス トークンを持ち、API 呼び出しの Authorization ヘッダーに送信されます。 これは、アプリがユーザーの代わりに Microsoft Graphアクセスできるトークンです。
ただし、このトークンは一時的なものです。 トークンは発行後 1 時間で期限切れになります。 ここで、更新トークンが役に立ちます。 更新トークンを使用すると、ユーザーが再度サインインしなくても、アプリは新しいアクセス トークンを要求できます。
アプリは MSAL ライブラリを使用していますので、トークンストレージや更新ロジックを実装する必要は一切ない。 ブラウザー PublicClientApplication セッションにトークンをキャッシュします。 メソッド acquireTokenSilent は、最初にキャッシュされたトークンをチェックし、有効期限が切れていない場合は、それを返します。 有効期限が切れている場合は、キャッシュされた更新トークンを使用して新しい更新トークンを取得します。 このメソッドは、次のモジュールでさらに使用します。
予定表ビューを取得する
この演習では、アプリケーションに Microsoft Graphを組み込む必要があります。 このアプリケーションの場合は、microsoft-graph-client ライブラリを使用して Microsoft Graph。
Outlook からカレンダー イベントを取得する
./src/GraphService.ts を 開き、次の関数を追加します。
export async function getUserWeekCalendar(accessToken: string, timeZone: string, startDate: Moment): Promise<Event[]> {
  const client = getAuthenticatedClient(accessToken);

  // Generate startDateTime and endDateTime query params
  // to display a 7-day window
  var startDateTime = startDate.format();
  var endDateTime = moment(startDate).add(7, 'day').format();

  // GET /me/calendarview?startDateTime=''&endDateTime=''
  // &$select=subject,organizer,start,end
  // &$orderby=start/dateTime
  // &$top=50
  var response: PageCollection = await client
    .api('/me/calendarview')
    .header('Prefer', `outlook.timezone="${timeZone}"`)
    .query({ startDateTime: startDateTime, endDateTime: endDateTime })
    .select('subject,organizer,start,end')
    .orderby('start/dateTime')
    .top(25)
    .get();

  if (response["@odata.nextLink"]) {
    // Presence of the nextLink property indicates more results are available
    // Use a page iterator to get all results
    var events: Event[] = [];

    // Must include the time zone header in page
    // requests too
    var options: GraphRequestOptions = {
      headers: { 'Prefer': `outlook.timezone="${timeZone}"` }
    };

    var pageIterator = new PageIterator(client, response, (event) => {
      events.push(event);
      return true;
    }, options);

    await pageIterator.iterate();

    return events;
  } else {

    return response.value;
  }
}
このコードの実行内容を考えましょう。
- 呼び出される URL は
/me/calendarviewです。 - この
headerメソッドは、Prefer: outlook.timezone=""要求にヘッダーを追加し、応答の時間がユーザーの優先タイム ゾーンに入る原因です。 - メソッド
queryは、カレンダー ビューstartDateTimeのendDateTime時間ウィンドウを定義するパラメーターとパラメーターを追加します。 - メソッド
selectは、各イベントに返されるフィールドを、ビューが実際に使用するフィールドに制限します。 - この
orderbyメソッドは、作成された日付と時刻で結果を並べ替え、最新のアイテムを最初に並べ替える。 - この
topメソッドは、1 ページの結果を 25 イベントに制限します。 - 応答に値が
@odata.nextLink``PageIterator含まれている場合は、使用可能な結果が多くあることを示すオブジェクトを使用して、コレクションをページ移動してすべての結果を取得します。
- 呼び出される URL は
呼び出React結果を表示するコンポーネントを作成します。 Calendar.tsx という名前の ./src ディレクトリに新しいファイルを作成し、次のコードを追加します。
import { useEffect, useState } from 'react';
import { NavLink as RouterNavLink, RouteComponentProps } from 'react-router-dom';
import { Table } from 'react-bootstrap';
import { findIana } from "windows-iana";
import { Event } from 'microsoft-graph';
import { getUserWeekCalendar } from './GraphService';
import { useAppContext } from './AppContext';
import { AuthenticatedTemplate } from '@azure/msal-react';
import { add, format, getDay, parseISO } from 'date-fns';
import { endOfWeek, startOfWeek } from 'date-fns/esm';

export default function Calendar(props: RouteComponentProps) {
  const app = useAppContext();

  const [events, setEvents] = useState<Event[]>();

  useEffect(() => {
    const loadEvents = async() => {
      if (app.user && !events) {
        try {
          const ianaTimeZones = findIana(app.user?.timeZone!);
          const events = await getUserWeekCalendar(app.authProvider!, ianaTimeZones[0].valueOf());
          setEvents(events);
        } catch (err) {
          app.displayError!(err.message);
        }
      }
    };

    loadEvents();
  });

  return (
    <AuthenticatedTemplate>
      <pre><code>{JSON.stringify(events, null, 2)}</code></pre>
    </AuthenticatedTemplate>
  );
}
今のところ、これはページ上の JSON でイベントの配列をレンダリングします。
この新しいコンポーネントをアプリに追加します。 次
./src/App.tsxのステートメントを開きimport、ファイルの上部に追加します。import Calendar from './Calendar';既存のコンポーネントの直後に次のコンポーネントを追加します
<Route>。<Route exact path="/calendar" render={(props) => <Calendar {...props} /> } />変更内容を保存し、アプリを再起動します。 サインインして、ナビゲーション バー の [予定表 ] リンクをクリックします。 すべてが正常に機能していれば、ユーザーのカレンダーにイベントの JSON ダンプが表示されます。
結果の表示
これで、コンポーネントを更新して Calendar 、よりユーザーフレンドリーな方法でイベントを表示できます。
という名前のディレクトリに新しいファイル
./srcを作成しCalendar.css、次のコードを追加します。.calendar-view-date-cell { width: 150px; } .calendar-view-date { width: 40px; font-size: 36px; line-height: 36px; margin-right: 10px; } .calendar-view-month { font-size: 0.75em; } .calendar-view-timespan { width: 200px; } .calendar-view-subject { font-size: 1.25em; } .calendar-view-organizer { font-size: .75em; }1 日Reactテーブル行としてレンダリングするイベント コンポーネントを作成します。 という名前のディレクトリに新しいファイル
./srcを作成しCalendarDayRow.tsx、次のコードを追加します。import React from 'react'; import moment, { Moment } from 'moment'; import { Event } from 'microsoft-graph'; interface CalendarDayRowProps { date: Moment | undefined; timeFormat: string; events: Event[]; } interface FormatMap { [key: string] : string; } // moment.js format strings are slightly // different than the ones returned by Graph const formatMap: FormatMap = { "h:mm tt": "h:mm A", "hh:mm tt": "hh:mm A" }; // Helper function to format Graph date/time in the user's // preferred format function formatDateTime(dateTime: string | undefined, format: string) { if (dateTime !== undefined) { return moment(dateTime).format(formatMap[format] || format); } } export default class CalendarDayRow extends React.Component<CalendarDayRowProps> { render() { var today = moment(); var rowClass = today.day() === this.props.date?.day() ? 'table-warning' : ''; var timeFormat = this.props.timeFormat; var dateCell = ( <td className='calendar-view-date-cell' rowSpan={this.props.events.length <= 0 ? 1 : this.props.events.length}> <div className='calendar-view-date float-left text-right'>{this.props.date?.format('DD')}</div> <div className='calendar-view-day'>{this.props.date?.format('dddd')}</div> <div className='calendar-view-month text-muted'>{this.props.date?.format('MMMM, YYYY')}</div> </td> ); if (this.props.events.length <= 0) { // Render an empty row for the day return ( <tr className={rowClass}> {dateCell} <td></td> <td></td> </tr> ); } return ( <React.Fragment> {this.props.events.map( function(event: Event, index: Number) { return ( <tr className={rowClass} key={event.id}> { index === 0 && dateCell } <td className="calendar-view-timespan"> <div>{formatDateTime(event.start?.dateTime, timeFormat)} - {formatDateTime(event.end?.dateTime, timeFormat)}</div> </td> <td> <div className="calendar-view-subject">{event.subject}</div> <div className="calendar-view-organizer">{event.organizer?.emailAddress?.name}</div> </td> </tr> ) } )} </React.Fragment> ) } }importCalendar.tsx の上部に次のステートメントを追加します。import CalendarDayRow from './CalendarDayRow'; import './Calendar.css';既存のステートメントを次
returnのコードに置き換えます。これにより、イベントがそれぞれの日に分割され、各日のテーブル セクションがレンダリングされます。
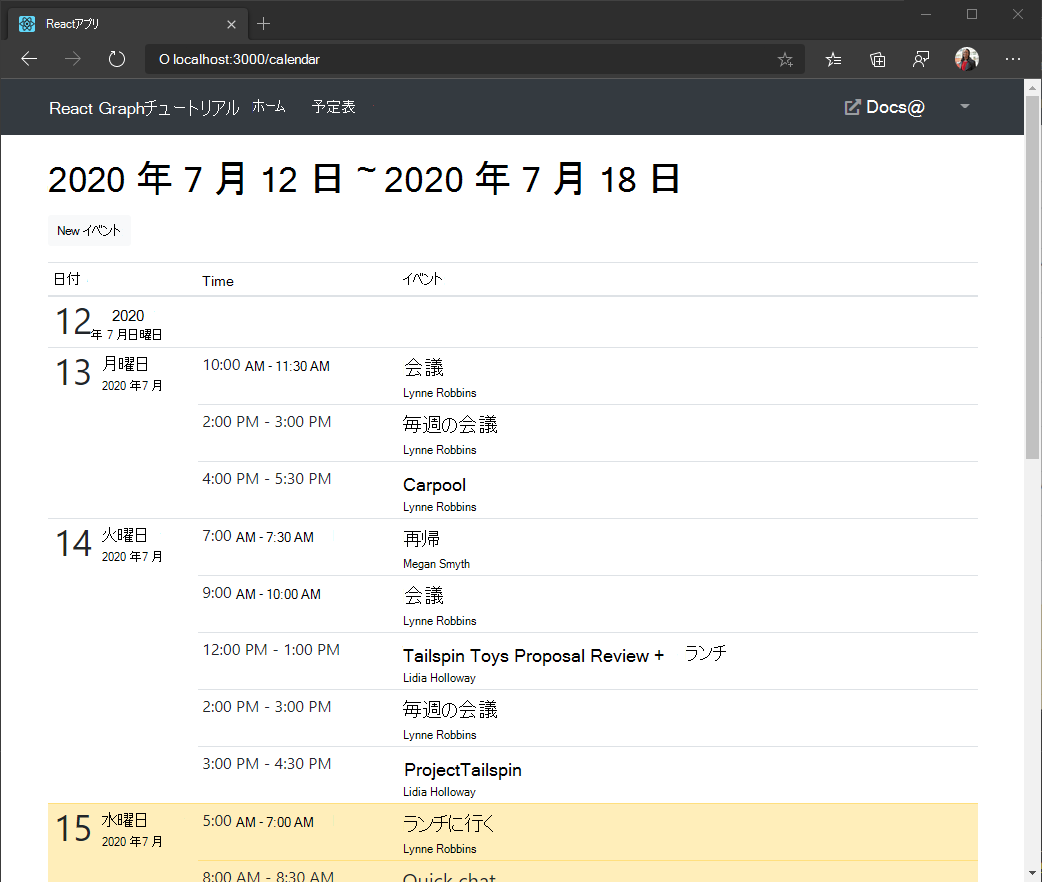
変更を保存し、アプリを再起動します。 [予定表] リンクをクリック すると、アプリはイベントのテーブルを表示する必要があります。
新しいイベントを作成する
このセクションでは、ユーザーの予定表にイベントを作成する機能を追加します。
GraphService にメソッドを追加する
./src/GraphService.ts を開き、次の関数を追加して新しいイベントを作成します。
export async function createEvent(accessToken: string, newEvent: Event): Promise<Event> {
  const client = getAuthenticatedClient(accessToken);

  // POST /me/events
  // JSON representation of the new event is sent in the
  // request body
  return await client
    .api('/me/events')
    .post(newEvent);
}
新しいイベント フォームの作成
NewEvent.tsx という名前の ./src ディレクトリに新しいファイルを作成し、次のコードを追加します。
import React from 'react';
import { NavLink as RouterNavLink, Redirect } from 'react-router-dom';
import { Button, Col, Form, FormGroup, Label, Input, Row } from 'reactstrap';
import { Attendee, Event } from 'microsoft-graph';
import { config } from './Config';
import withAuthProvider, { AuthComponentProps } from './AuthProvider';
import { createEvent } from './GraphService';

interface NewEventState {
  subject: string;
  attendees: string;
  start: string;
  end: string;
  body: string;
  disableCreate: boolean;
  redirect: boolean;
}

class NewEvent extends React.Component<AuthComponentProps, NewEventState> {

  constructor(props: any) {
    super(props);

    this.state = {
      subject: '',
      attendees: '',
      start: '',
      end: '',
      body: '',
      disableCreate: true,
      redirect: false
    }

    this.handleUpdate = this.handleUpdate.bind(this);
    this.isFormDisabled = this.isFormDisabled.bind(this);
    this.createEvent = this.createEvent.bind(this);
  }

  // Called whenever an input is changed
  handleUpdate(event: React.ChangeEvent<HTMLInputElement>) {
    // Set the state value that maps to the input
    var newState: any = {
      [event.target.name]: event.target.value
    };

    this.setState(newState);
  }

  // Determines if form is ready to submit
  // Requires a subject, start, and end
  isFormDisabled(): boolean {
    return this.state.subject.length === 0 ||
           this.state.start.length === 0 ||
           this.state.end.length === 0;
  }

  // Creates the event when user clicks Create
  async createEvent() {
    // Get the value of attendees and split into an array
    var attendeeEmails = this.state.attendees.split(';');
    var attendees: Attendee[] = [];

    // Create an Attendee object for each email address
    attendeeEmails.forEach((email) => {
      if (email.length > 0) {
        attendees.push({
          emailAddress: {
            address: email
          }
        });
      }
    });

    // Create the Event object
    var newEvent: Event = {
      subject: this.state.subject,
      // Only add if there are attendees
      attendees: attendees.length > 0 ? attendees : undefined,
      // Specify the user's time zone so
      // the start and end are set correctly
      start: {
        dateTime: this.state.start,
        timeZone: this.props.user.timeZone
      },
      end: {
        dateTime: this.state.end,
        timeZone: this.props.user.timeZone
      },
      // Only add if a body was given
      body: this.state.body.length > 0 ? {
        contentType: "text",
        content: this.state.body
      } : undefined
    }

    try {
      // Get the user's access token
      var accessToken = await this.props.getAccessToken(config.scopes);

      // Create the event
      await createEvent(accessToken, newEvent);

      // Redirect to the calendar view
      this.setState({ redirect: true });
    }
    catch (err) {
      this.props.setError('ERROR', JSON.stringify(err));
    }
  }

  render() {
    if (this.state.redirect) {
      return <Redirect to="/calendar" />
    }

    return (
      <Form>
        <FormGroup>
          <Label for="subject">Subject</Label>
          <Input type="text"
            name="subject"
            id="subject"
            value={this.state.subject}
            onChange={this.handleUpdate} />
        </FormGroup>
        <FormGroup>
          <Label for="attendees">Attendees</Label>
          <Input type="text"
            name="attendees"
            id="attendees"
            placeholder="Enter a list of email addresses, seperated by a semi-colon"
            value={this.state.attendees}
            onChange={this.handleUpdate} />
        </FormGroup>
        <Row form>
          <Col>
            <FormGroup>
              <Label for="start">Start</Label>
              <Input type="datetime-local"
                name="start"
                id="start"
                value={this.state.start}
                onChange={this.handleUpdate} />
            </FormGroup>
          </Col>
          <Col>
            <FormGroup>
              <Label for="end">End</Label>
              <Input type="datetime-local"
                name="end"
                id="end"
                value={this.state.end}
                onChange={this.handleUpdate} />
            </FormGroup>
          </Col>
        </Row>
        <FormGroup>
          <Label for="body">Body</Label>
          <Input type="textarea"
            name="body"
            id="body"
            value={this.state.body}
            onChange={this.handleUpdate} />
        </FormGroup>
        <Button color="primary"
          className="mr-2"
          disabled={this.isFormDisabled()}
          onClick={this.createEvent}>Create</Button>
        <RouterNavLink to="/calendar" className="btn btn-secondary" exact>Cancel</RouterNavLink>
      </Form>
    )
  }
}

export default withAuthProvider(NewEvent);
./src/App.tsx を開き、ファイル
importの上部に次のステートメントを追加します。import NewEvent from './NewEvent';新しいイベント フォームに新しいルートを追加します。 他の要素の直後に次のコードを追加
Routeします。<Route exact path="/newevent" render={(props) => <NewEvent {...props} /> } />完全な
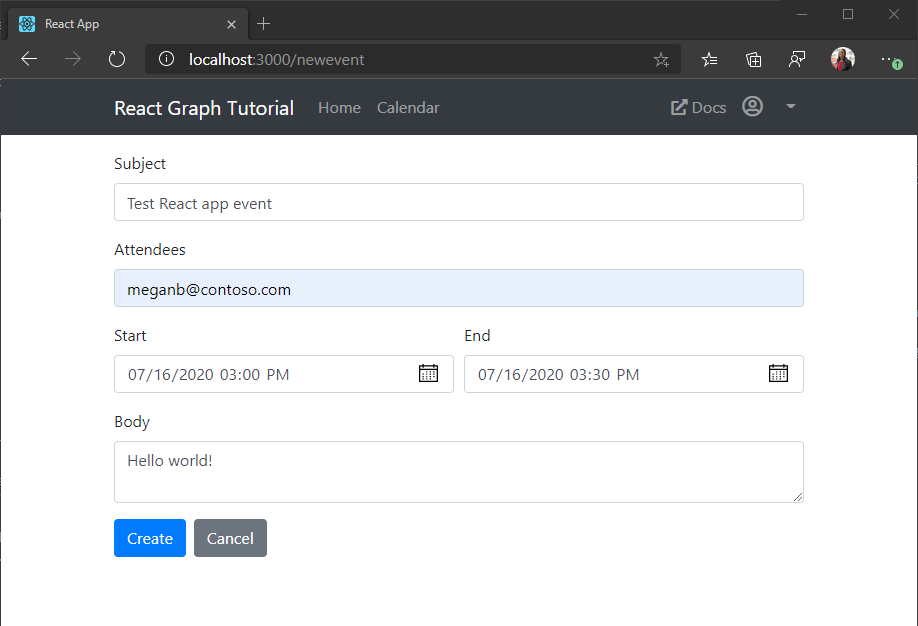
returnステートメントは次のように表示されます。アプリを更新し、予定表ビューを参照します。 [新しい イベント] ボタンをクリック します。 フィールドに入力し、[作成] を クリックします。
おめでとうございます。
Microsoft のチュートリアルのReact完了Graphしました。 Microsoft Graphを呼び出す作業アプリが作成されたので、新しい機能を試して追加できます。 Microsoft Graphの概要を参照して、Microsoft Graphでアクセスできるすべてのデータを確認Graph。
フィードバック
このチュートリアルに関するフィードバックは、GitHubしてください。
このセクションに問題がある場合 このセクションを改善できるよう、フィードバックをお送りください。