概要
<windowsAuthentication> 要素、インターネット インフォメーション サービス (IIS) 7 Windows 認証モジュールの構成設定を定義します。 IIS 7 サーバーが、Microsoft Active Directory サービス ドメイン ID またはその他の Windows アカウントを使用してユーザーを識別している企業ネットワーク上で実行されている場合は、Windows 認証を使用できます。 このため、サーバーが Active Directory ドメインのメンバーであるかどうかに関係なく、Windows 認証を使用できます。
Windows 認証 (旧称 NTLM で、Windows NT チャレンジ/応答認証とも呼ばれていた) は、ユーザー名とパスワードがネットワーク経由で送信される前にハッシュされるため、セキュリティで保護された認証形式です。 Windows 認証を有効にすると、クライアント ブラウザーは、Web サーバーとの暗号化されたやり取りで、厳密にハッシュされたバージョンのパスワードを送信します。
Windows 認証では、<providers> 要素で定義されている Kerberos と NTLM の 2 つの認証プロトコルがサポートされています。 IIS 7 に Windows 認証をインストールして有効にすると、既定のプロトコルは Kerberos になります。 <windowsAuthentication> 要素には、Windows Server 2008 の新機能であるカーネル モード認証機能を使用するかどうかを構成する useKernelMode 属性を含めることもできます。
Windows 認証は、次の理由からイントラネット環境に最適です。
- クライアント コンピューターと Web サーバーは同じドメイン内にあります。
- 管理者は、すべてのクライアント ブラウザーが Internet Explorer 2.0 以降であることを確認できます。
- NTLM でサポートされていない HTTP プロキシ接続は必要ありません。
- Kerberos バージョン 5 では、Active Directory への接続が必要です。これはインターネット環境では実現できません。
IIS 7.5 の新機能
<extendedProtection> 要素は IIS 7.5 で導入されました。これにより、Windows 認証に統合された新しい拡張保護機能の設定を構成できます。
互換性
| バージョン | メモ |
|---|---|
| IIS 10.0 | <windowsAuthentication> 要素は、IIS 10.0 では変更されませんでした。 |
| IIS 8.5 | <windowsAuthentication> 要素は、IIS 8.5 では変更されませんでした。 |
| IIS 8.0 | <windowsAuthentication> 要素は IIS 8.0 では変更されませんでした。 |
| IIS 7.5 | <extendedProtection> 要素が IIS 7.5 で追加されました。 |
| IIS 7.0 | <windowsAuthentication> 要素が IIS 7.0 で導入されました。 |
| IIS 6.0 | <windowsAuthentication> 要素は、IIS 6.0 AuthType および AuthFlags メタベース プロパティの一部を置き換えます。 |
段取り
IIS 7 以降の既定のインストールには、Windows 認証の役割サービスは含まれません。 IIS で Windows 認証を使用するには、役割サービスをインストールし、Web サイトまたはアプリケーションの匿名認証を無効にしてから、サイトまたはアプリケーションの Windows 認証を有効にする必要があります。
Note
役割サービスをインストールすると、IIS 7 は ApplicationHost.config ファイルに次の構成設定をコミットします。
<windowsAuthentication enabled="false" />
Windows Server 2012 または Windows Server 2012 R2
- タスク バーで [サーバー マネージャー]をクリックします。
- [サーバー マネージャー] で、[管理] メニューを選択し、[役割と機能の追加] を選択します。
- [役割と機能の追加] ウィザードで、[次へ] をクリックします。 インストールの種類を選択し、[次へ] をクリックします。 対象サーバーを選択し、[次へ] を選択します。
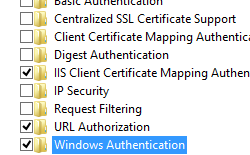
- [サーバーの役割] ページで [Web サーバー (IIS)] を展開し、[Web サーバー]、[セキュリティ]、[Windows 認証] の順に展開します。 次へ をクリックします。
![[Windows 認証] オプションが強調表示されている [サーバーロール] ページのスクリーンショット。](index/_static/image2.png) .
. - [機能の選択] ページで、[次へ] をクリックします。
- [インストール オプションの確認] ページで、[インストール] をクリックします。
- [結果] ページで、 [閉じる]をクリックします。
![[Windows 認証] オプションが強調表示されている [サーバーロール] ページのスクリーンショット。](index/_static/image1.png)
Windows 8 または Windows 8.1
- [スタート] 画面で、ポインターを左下隅まで移動し、[スタート] ボタンを右クリックし、[コントロール パネル] をクリックします。
- [コントロール パネル] で [プログラムと機能] を選択し、[Windows の機能の有効化または無効化] を選択します。
- [インターネット インフォメーション サービス] を展開し、[World Wide Web サービス] を展開し、[セキュリティ] を展開して、[Windows 認証] を選択します。
- OK をクリックします。
- 閉じるをクリックします。

Windows Server 2008 または Windows Server 2008 R2
- タスク バーで [スタート] をクリックし、[管理ツール] をポイントして、[サーバー マネージャ] をクリックします。
- [サーバー マネージャ] 階層ウィンドウで [役割] を展開し、[Web サーバー (IIS)] をクリックします。
- [Web サーバー (IIS)] ウィンドウで、[役割サービス] セクションまでスクロールし、[役割サービスの追加] を選択します。
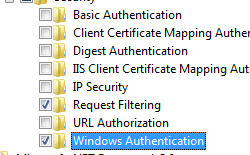
- 役割サービスの追加ウィザードの [役割サービスの選択] ページで、[Windows 認証] を選択し、[次へ] を選択します。
![Windows 認証オプションが強調表示されている [役割サービスの選択] ページのスクリーンショット。](index/_static/image6.png)
- [インストール オプションの確認] ページで、[インストール] をクリックします。
- [結果] ページで、 [閉じる]をクリックします。
![Windows 認証オプションが強調表示されている [役割サービスの選択] ページのスクリーンショット。](index/_static/image5.png)
Windows Vista または Windows 7
- タスク バーで、[スタート]、[コントロール パネル] の順にクリックします。
- [コントロール パネル] で [プログラムと機能] を選択し、[Windows の機能の有効化または無効化] を選択します。
- [インターネット インフォメーション サービス]、[World Wide Web サービス]、[セキュリティ] の順に展開します。
- [Windows 認証] を選択し、[OK] を選択します。

操作方法
Web サイト、Web アプリケーション、または Web サービスに対して Windows 認証を有効にする方法
インターネット インフォメーション サービス (IIS) マネージャーを開きます。
Windows Server 2012 または Windows Server 2012 R2 を使用している場合:
- タスク バーで、[サーバー マネージャー] をクリックし、[ツール]、[インターネット インフォメーション サービス (IIS) マネージャー] の順にクリックします。
Windows 8 または Windows 8.1 を使用している場合:
- Windows キーを押しながら文字 X を押し、[コントロール パネル] をクリックします。
- [管理ツール] をクリックし、[インターネット インフォメーション サービス (IIS) マネージャー] をダブルクリックします。
Windows Server 2008 または Windows Server 2008 R2 を使用している場合:
- タスク バーで、[スタート] ボタンをクリックし、[管理ツール]、[インターネット インフォメーション サービス (IIS) マネージャー] の順にクリックします。
Windows Vista または Windows 7 を使用している場合:
- タスク バーで、[スタート]、[コントロール パネル] の順にクリックします。
- [管理ツール] をダブルクリックし、[インターネット インフォメーション サービス (IIS) マネージャー] をダブルクリックします。
[接続] ウィンドウで、サーバー名を展開し、[サイト] を展開し、Windows 認証を有効にするサイト、アプリケーション、または Web サービスを選択します。
[ホーム] ウィンドウの [セキュリティ] セクションまでスクロールし、[認証] をダブルクリックします。
[認証] ウィンドウで [Windows 認証] を選択し、[操作] ウィンドウで [有効化] を選択します。
![[名前] フィールドと [状態] フィールドが含まれる [認証] ウィンドウのスクリーンショット。](index/_static/image10.png)
![[名前] フィールドと [状態] フィールドが含まれる [認証] ウィンドウのスクリーンショット。](index/_static/image9.png)
Windows 認証の拡張保護を有効にする方法
インターネット インフォメーション サービス (IIS) マネージャーを開きます。
Windows Server 2012 または Windows Server 2012 R2 を使用している場合:
- タスク バーで、[サーバー マネージャー] をクリックし、[ツール]、[インターネット インフォメーション サービス (IIS) マネージャー] の順にクリックします。
Windows 8 または Windows 8.1 を使用している場合:
- Windows キーを押しながら文字 X を押し、[コントロール パネル] をクリックします。
- [管理ツール] をクリックし、[インターネット インフォメーション サービス (IIS) マネージャー] をダブルクリックします。
Windows Server 2008 または Windows Server 2008 R2 を使用している場合:
- タスク バーで、[スタート] ボタンをクリックし、[管理ツール]、[インターネット インフォメーション サービス (IIS) マネージャー] の順にクリックします。
Windows Vista または Windows 7 を使用している場合:
- タスク バーで、[スタート]、[コントロール パネル] の順にクリックします。
- [管理ツール] をダブルクリックし、[インターネット インフォメーション サービス (IIS) マネージャー] をダブルクリックします。
[接続] ウィンドウで、サーバー名を展開し、[サイト] を展開し、Windows 認証の拡張保護を有効にするサイト、アプリケーション、または Web サービスを展開します。
[ホーム] ウィンドウの [セキュリティ] セクションまでスクロールし、[認証] をダブルクリックします。
[認証] ウィンドウで、[Windows 認証] を選択します。
[操作] ウィンドウで、[有効] をクリックします。
![[認証] ウィンドウとその [グループ化] フィールドのスクリーンショット。](index/_static/image12.png)
[操作] ウィンドウの [詳細設定] をクリックします。
[詳細設定] ダイアログ ボックスが表示されたら、[拡張保護] ドロップダウン メニューで次のいずれかのオプションを選択します。
- 拡張保護を有効にしながら、拡張保護をサポートしていないクライアントに対して下位レベルのサポートを提供する場合は、[同意する] を選択します。
- 下位レベルのサポートを提供せずに拡張保護を有効にする場合は、[必須] を選択します。
![[拡張保護] フィールドの [承諾] オプションが強調表示されている [詳細設定] ダイアログ ボックスのスクリーンショット。](index/_static/image14.png)
[OK] をクリックして [詳細設定] ダイアログ ボックスを閉じます。
![[認証] ウィンドウとその [グループ化] フィールドのスクリーンショット。](index/_static/image11.png)
![[拡張保護] フィールドの [承諾] オプションが強調表示されている [詳細設定] ダイアログ ボックスのスクリーンショット。](index/_static/image13.png)
構成
<windowsAuthentication> 要素は、ApplicationHost.config ファイル内のサイト、アプリケーション、または仮想ディレクトリ レベルで構成できます。
属性
| 属性 | 説明 |
|---|---|
authPersistNonNTLM |
省略可能で、 Boolean 型の属性。 IIS が NTLM 以外のすべての要求 (Kerberos など) を、同じ接続上の要求でも自動的に再認証するかどうかを指定します。 false を指定すると、同じ接続に対して複数の認証が有効になります。 注: true の設定は、クライアントが同じ接続で 1 回だけ認証されることを意味します。 IIS は、確立された状態を維持する TCP セッションのトークンまたはチケットをサーバーにキャッシュします。 既定値は、 false です。 |
authPersistSingleRequest |
省略可能で、 Boolean 型の属性。 このフラグを true に設定すると、接続上の 1 つの要求に対してのみ認証が保持されます。 IIS は各要求の最後に認証をリセットし、セッションの次の要求で強制的に再認証します。 既定値は false です。 |
enabled |
必須のブール型属性。 Windows 認証が有効かどうかを指定します。 既定値は false です。 |
useKernelMode |
省略可能で、 Boolean 型の属性。 Windows 認証をカーネル モードで実行するかどうかを指定します。 true は、Windows 認証がカーネル モードを使用することを指定します。 カーネル モード認証により、認証パフォーマンスが向上し、カスタム ID を使用するように構成されているアプリケーション プールでの認証エラーを防ぐことができます。 推奨する運用方法として、Kerberos 認証を使用し、アプリケーション プールにカスタム ID を設定する場合は、この設定を無効にしないでください。 既定では、 trueです。 |
子要素
| 要素 | 説明 |
|---|---|
extendedProtection |
省略可能な要素です。 Windows 認証の拡張保護オプションを指定します。 注: この要素は IIS 7.5 で追加されました。 |
providers |
省略可能な要素です。 Windows 認証に使用されるセキュリティ サポート プロバイダーを指定します。 |
構成サンプル
次の既定の <windowsAuthentication> 要素は、IIS 7.0 のルート ApplicationHost.config ファイルで構成され、既定で Windows 認証を無効にします。 また、IIS 7.0 用の 2 つの Windows 認証プロバイダーも定義します。
<windowsAuthentication enabled="false">
   <providers>
      <add value="Negotiate" />
      <add value="NTLM" />
   </providers>
</windowsAuthentication>
次の例では、Contoso という名前の Web サイトの Windows 認証を有効にし、匿名認証を無効にします。
<location path="Contoso">
   <system.webServer>
      <security>
         <authentication>
            <anonymousAuthentication enabled="false" />
            <windowsAuthentication enabled="true" />
         </authentication>
      </security>
   </system.webServer>
</location>
サンプル コード
次の例では、Contoso という名前のサイトの匿名認証を無効にしてから、サイトの Windows 認証を有効にします。
AppCmd.exe
appcmd.exe set config "Contoso" -section:system.webServer/security/authentication/anonymousAuthentication /enabled:"False" /commit:apphost

appcmd.exe set config "Contoso" -section:system.webServer/security/authentication/windowsAuthentication /enabled:"True" /commit:apphost
Note
AppCmd.exe を使用してこれらの設定を構成するときは、commit パラメーターを必ず apphost に設定する必要があります。 これで、ApplicationHost.config ファイルの適切な場所セクションに構成設定がコミットされます。
C#
using System;
using System.Text;
using Microsoft.Web.Administration;

internal static class Sample {

   private static void Main() {

      using(ServerManager serverManager = new ServerManager()) {
         Configuration config = serverManager.GetApplicationHostConfiguration();

         ConfigurationSection anonymousAuthenticationSection = config.GetSection("system.webServer/security/authentication/anonymousAuthentication", "Contoso");
         anonymousAuthenticationSection["enabled"] = false;

         ConfigurationSection windowsAuthenticationSection = config.GetSection("system.webServer/security/authentication/windowsAuthentication", "Contoso");
         windowsAuthenticationSection["enabled"] = true;

         serverManager.CommitChanges();
      }
   }
}
VB.NET
Imports System
Imports System.Text
Imports Microsoft.Web.Administration

Module Sample
   Sub Main()
      Dim serverManager As ServerManager = New ServerManager
      Dim config As Configuration = serverManager.GetApplicationHostConfiguration

      Dim anonymousAuthenticationSection As ConfigurationSection = config.GetSection("system.webServer/security/authentication/anonymousAuthentication", "Contoso")
      anonymousAuthenticationSection("enabled") = False

      Dim windowsAuthenticationSection As ConfigurationSection = config.GetSection("system.webServer/security/authentication/windowsAuthentication", "Contoso")
      windowsAuthenticationSection("enabled") = True

      serverManager.CommitChanges()
   End Sub
End Module
JavaScript
var adminManager = new ActiveXObject('Microsoft.ApplicationHost.WritableAdminManager');
adminManager.CommitPath = "MACHINE/WEBROOT/APPHOST";

var anonymousAuthenticationSection = adminManager.GetAdminSection("system.webServer/security/authentication/anonymousAuthentication", "MACHINE/WEBROOT/APPHOST/Contoso");
anonymousAuthenticationSection.Properties.Item("enabled").Value = false;

var windowsAuthenticationSection = adminManager.GetAdminSection("system.webServer/security/authentication/windowsAuthentication", "MACHINE/WEBROOT/APPHOST/Contoso");
windowsAuthenticationSection.Properties.Item("enabled").Value = true;

adminManager.CommitChanges();
VBScript
Set adminManager = CreateObject("Microsoft.ApplicationHost.WritableAdminManager")
adminManager.CommitPath = "MACHINE/WEBROOT/APPHOST"

Set anonymousAuthenticationSection = adminManager.GetAdminSection("system.webServer/security/authentication/anonymousAuthentication", "MACHINE/WEBROOT/APPHOST/Contoso")
anonymousAuthenticationSection.Properties.Item("enabled").Value = False

Set windowsAuthenticationSection = adminManager.GetAdminSection("system.webServer/security/authentication/windowsAuthentication", "MACHINE/WEBROOT/APPHOST/Contoso")
windowsAuthenticationSection.Properties.Item("enabled").Value = True

adminManager.CommitChanges()