このクイック スタートでは、MIP SDK .NET ラッパーが実行時に使用するクライアント初期化パターンを実装する方法について説明します。
注
MIP .NET ラッパーの Protection SDK を使用するすべてのクライアント アプリケーションには、このクイック スタートの手順が必要です。 アプリケーションの初期化と認証デリゲートクラスと同意デリゲート クラスの実装後に、これらのクイック スタートを順次実行します。
[前提条件]
まだ行っていない場合は、次の手順を実行してください。
- Microsoft Information Protection (MIP) SDK のセットアップと構成の手順を完了します。 この "保護プロファイルとエンジンのセットアップ" クイック スタートは、適切な SDK のセットアップと構成に依存します。
- 必要 に応じて:
- プロファイル オブジェクトとエンジン オブジェクトを確認します。 プロファイル オブジェクトとエンジン オブジェクトは、MIP ファイル/ポリシー/保護 SDK を使用するクライアントに必要なユニバーサル概念です。
- 認証の概念を確認して、SDK とクライアント アプリケーションによって認証と同意がどのように実装されるかを学習します。
Visual Studio ソリューションとプロジェクトを作成する
最初に、他のクイック スタートで構築されている初期Visual Studio ソリューションとプロジェクトを作成して構成します。
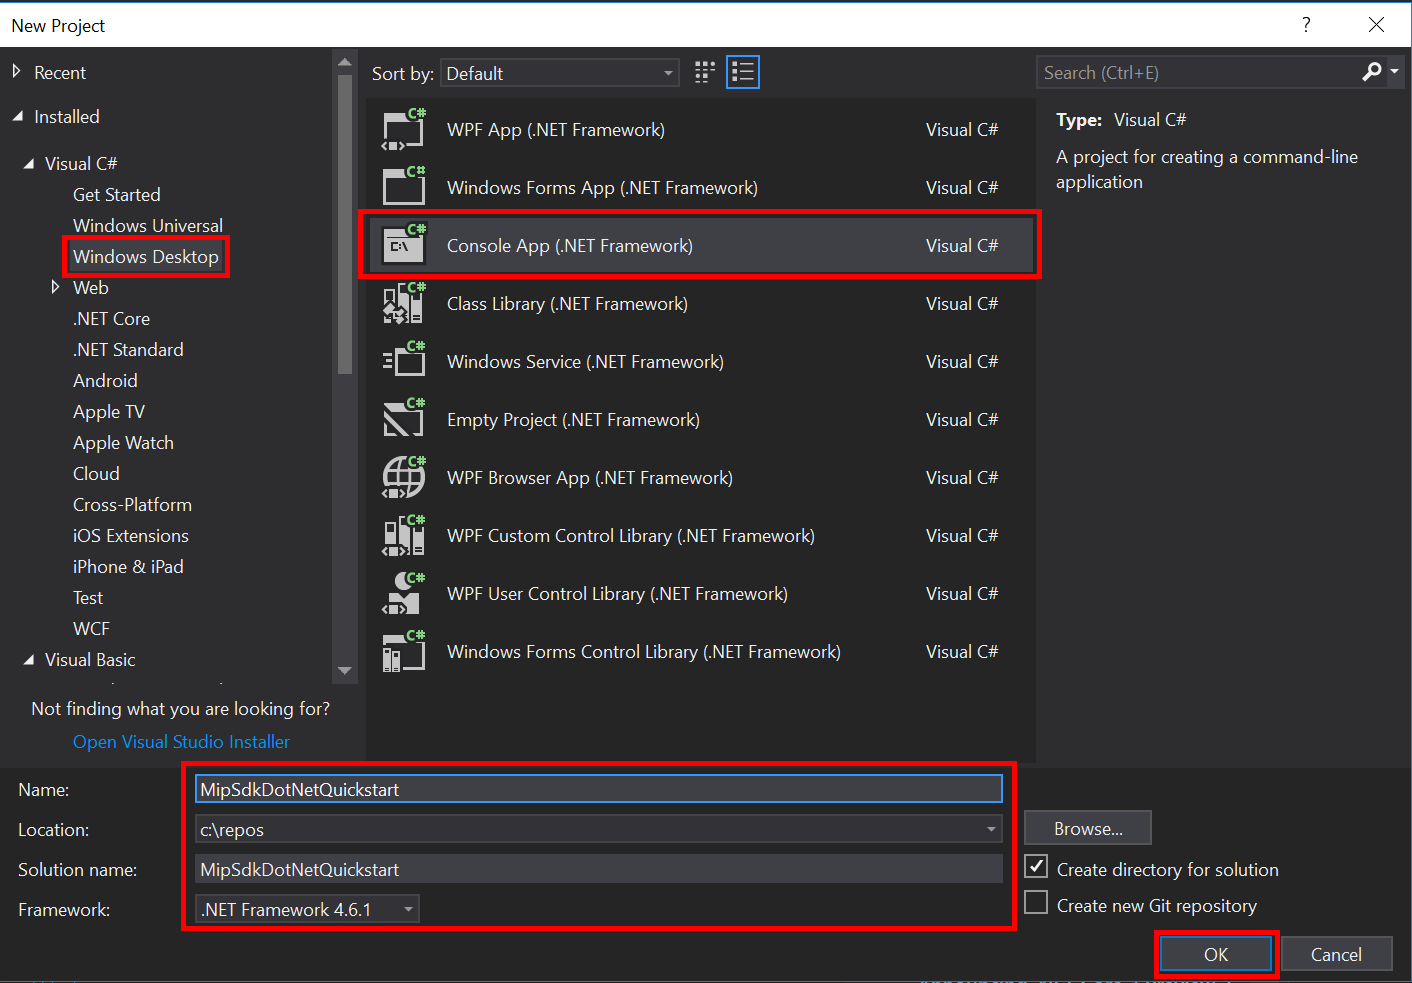
Visual Studio 2022 以降を開き、[ ファイル ] メニューの [ 新規作成]、[ プロジェクト] の順に選択します。 [ 新しいプロジェクト ] ダイアログで、次の手順を実行します。
左側のウィンドウの [ インストール済み、 Visual C#] で、[ Windows デスクトップ] を選択します。
中央のウィンドウで、コンソール アプリ (.NET Framework) を選択します。
下部のウィンドウで、プロジェクト 名、 場所、および含まれている ソリューション名 を適宜更新します。
完了したら、右下隅の [OK] を選択します 。
MIP Protection SDK の NuGet パッケージをプロジェクトに追加します。
- ソリューション エクスプローラーで、上部のソリューション ノードのすぐ下にあるプロジェクト ノードを右クリックし、[NuGet パッケージの管理]を選択します。..:
- [エディター グループ] タブ領域で [NuGet パッケージ マネージャー ] タブが開いたとき:
- を選択し、を参照します。
- 検索ボックスに、
Microsoft.InformationProtectionと入力します。 -
Microsoft.InformationProtection.Protectionパッケージを選択します。 - [インストール] を選択し、[プレビューの変更の確認] ダイアログが表示されたら [OK] を選択します。
前の手順を繰り返しますが、代わりに
Microsoft.Identity.Client(MSAL) をアプリケーションに追加します。
認証デリゲートと同意代理人を実装する
まだ実装されていない場合は、 File SDK アプリケーションの初期化 に記載されている手順に従って、認証と同意のデリゲートを実装します。
MIP SDK マネージド ラッパーを初期化する
ソリューション エクスプローラーで、
Main()メソッドの実装を含むプロジェクト内の.cs ファイルを開きます。 既定の名前は、それが含まれるプロジェクトと同じであり、プロジェクトの作成時に指定したものです。生成された
main()の実装を削除します。マネージド ラッパーには、初期化、
MipContextの作成、プロファイルの読み込み、リソースの解放のための静的クラスMicrosoft.InformationProtection.MIPが含まれています。 Protection SDK 操作のラッパーを初期化するには、MIP.Initialize()を呼び出し、MipComponent.Protection渡して保護操作に必要なライブラリを読み込みます。Program.csの
Main()で、次のコードを追加します。<application-id> は、前に作成したMicrosoft Entra アプリケーション登録の ID に置き換えます。
using System;
using System.Threading.Tasks;
using Microsoft.InformationProtection;
using Microsoft.InformationProtection.Exceptions;
using Microsoft.InformationProtection.Protection;

namespace mip_sdk_dotnet_quickstart
{
    class Program
    {
        private const string clientId = "<application-id>";
        private const string appName = "<friendly-name>";

        static void Main(string[] args)
        {
            //Initialize Wrapper for Protection SDK operations
            MIP.Initialize(MipComponent.Protection);
        }
    }
}
保護プロファイルとエンジンを構築する
前述のように、MIP API を使用する SDK クライアントにはプロファイル オブジェクトとエンジン オブジェクトが必要です。 ネイティブ DLL を読み込むコードを追加し、プロファイルとエンジン オブジェクトをインスタンス化して、このクイック スタートのコーディング部分を完了します。
using System;
using System.Threading.Tasks;
using Microsoft.InformationProtection;
using Microsoft.InformationProtection.Exceptions;
using Microsoft.InformationProtection.Protection;

namespace mip_sdk_dotnet_quickstart
{
     class Program
     {
          private const string clientId = "<application-id>";
          private const string appName = "<friendly-name>";

          static void Main(string[] args)
          {
               // Initialize Wrapper for Protection SDK operations.
               MIP.Initialize(MipComponent.Protection);

               // Create ApplicationInfo, setting the clientID from Azure AD App Registration as the ApplicationId.
               ApplicationInfo appInfo = new ApplicationInfo()
               {
                    ApplicationId = clientId,
                    ApplicationName = appName,
                    ApplicationVersion = "1.0.0"
               };

               // Instantiate the AuthDelegateImpl object, passing in AppInfo.
               AuthDelegateImplementation authDelegate = new AuthDelegateImplementation(appInfo);

               // Create MipConfiguration Object
               MipConfiguration mipConfiguration = new MipConfiguration(appInfo, "mip_data", LogLevel.Trace, false, CacheStorageType.OnDiskEncrypted);

               // Create MipContext using Configuration
               MipContext mipContext = MIP.CreateMipContext(mipConfiguration);

               // Initialize and instantiate the ProtectionProfile.
               // Create the ProtectionProfileSettings object.
               // Initialize protection profile settings to create/use local state.
               var profileSettings = new ProtectionProfileSettings(mipContext,
                                        CacheStorageType.OnDiskEncrypted,
                                        new ConsentDelegateImplementation());

               // Load the Profile async and wait for the result.
               var protectionProfile = Task.Run(async () => await MIP.LoadProtectionProfileAsync(profileSettings)).Result;

               // Create a ProtectionEngineSettings object, then use that to add an engine to the profile.
               var engineSettings = new ProtectionEngineSettings("user1@tenant.com", authDelegate, "", "en-US");
               engineSettings.Identity = new Identity("user1@tenant.com");
               var protectionEngine = Task.Run(async () => await protectionProfile.AddEngineAsync(engineSettings)).Result;

               // Application Shutdown
               // handler = null; // This will be used in later quick starts.
               protectionEngine = null;
               protectionProfile = null;
               mipContext = null;
          }
     }
}
次の値を使用して、貼り付けたソース コードのプレースホルダーの値を置き換えます。
プレースホルダー 価値 例 <application-id> "MIP SDK のセットアップと構成" に登録されているアプリケーションに割り当てられた Microsoft Entra アプリケーション ID (2 つのインスタンス)。 00001111-aaaa-2222-bbbb-3333cccc4444 <フレンドリーネーム> アプリケーションのユーザー定義のフレンドリ名。 アプリ初期化 次に、アプリケーションの最終的なビルドを行い、エラーを解決します。 コードが正常にビルドされます。
次のステップ
初期化コードが完了したら、次のクイック スタートに進み、MIP Protection SDK の使用を開始できます。
- GitHubの MIP Protection SDK .NET サンプルを確認します。