このクイック スタートでは、送信したメッセージで返信する カスタム エンジン エージェント を作成する手順について説明します。
前提条件
Python 3.9 以降。
- Python をインストールするには、 https://www.python.org/downloads/に移動し、オペレーティング システムの指示に従います。
- バージョンを確認するには、ターミナル ウィンドウで「
python --version」と入力します。
選択したコード エディター。 これらの手順では 、Visual Studio Code を使用します。
Visual Studio Code を使用する場合は、Python 拡張機能をインストールします
プロジェクトを初期化して SDK をインストールする
Python プロジェクトを作成し、必要な依存関係をインストールします。
ターミナルを開き、新しいフォルダーを作成する
mkdir echo
cd echo
次のコマンドを使用して、Visual Studio Code を使用してフォルダーを開きます。
code .任意の方法で仮想環境を作成し、Visual Studio Code またはターミナルでアクティブ化します。
Visual Studio Code を使用する場合は、 Python 拡張機能 がインストールされた状態で次の手順を使用できます。
F1 キーを押し、「
Python: Create environment」と入力し、Enter キーを押します。Venv を選択して、現在のワークスペースに
.venv仮想環境を作成します。仮想環境を作成する Python インストールを選択します。
値は次のようになります。
Python 1.13.6 ~\AppData\Local\Programs\Python\Python313\python.exe
Agents SDK をインストールする
pip を使用して、次のコマンドを使用して microsoft-agents-hosting-aiohttp パッケージをインストールします。
pip install microsoft-agents-hosting-aiohttp
サーバー アプリケーションを作成し、必要なライブラリをインポートする
start_server.pyという名前のファイルを作成し、次のコードをコピーして貼り付けます。# start_server.py from os import environ from microsoft_agents.hosting.core import AgentApplication, AgentAuthConfiguration from microsoft_agents.hosting.aiohttp import ( start_agent_process, jwt_authorization_middleware, CloudAdapter, ) from aiohttp.web import Request, Response, Application, run_app def start_server( agent_application: AgentApplication, auth_configuration: AgentAuthConfiguration ): async def entry_point(req: Request) -> Response: agent: AgentApplication = req.app["agent_app"] adapter: CloudAdapter = req.app["adapter"] return await start_agent_process( req, agent, adapter, ) APP = Application(middlewares=[jwt_authorization_middleware]) APP.router.add_post("/api/messages", entry_point) APP.router.add_get("/api/messages", lambda _: Response(status=200)) APP["agent_configuration"] = auth_configuration APP["agent_app"] = agent_application APP["adapter"] = agent_application.adapter try: run_app(APP, host="localhost", port=environ.get("PORT", 3978)) except Exception as error: raise errorこのコードでは、次のファイルで使用する
start_server関数を定義します。同じディレクトリに、次のコードを使用して
app.pyという名前のファイルを作成します。# app.py from microsoft_agents.hosting.core import ( AgentApplication, TurnState, TurnContext, MemoryStorage, ) from microsoft_agents.hosting.aiohttp import CloudAdapter from start_server import start_server
エージェントのインスタンスを AgentApplication として作成する
app.pyで、次のコードを追加して、AGENT_APPのインスタンスとしてAgentApplicationを作成し、3 つのイベントに応答する 3 つのルートを実装します。
- 会話の更新
- メッセージ
/help - その他のアクティビティ
AGENT_APP = AgentApplication[TurnState](
    storage=MemoryStorage(), adapter=CloudAdapter()
)

async def _help(context: TurnContext, _: TurnState):
    await context.send_activity(
        "Welcome to the Echo Agent sample 🚀. "
        "Type /help for help or send a message to see the echo feature in action."
    )

AGENT_APP.conversation_update("membersAdded")(_help)

AGENT_APP.message("/help")(_help)


@AGENT_APP.activity("message")
async def on_message(context: TurnContext, _):
    await context.send_activity(f"you said: {context.activity.text}")
localhost:3978 でリッスンするように Web サーバーを起動する
app.pyの最後に、start_serverを使用して Web サーバーを起動します。
if __name__ == "__main__":
    try:
        start_server(AGENT_APP, None)
    except Exception as error:
        raise error
匿名モードでエージェントをローカルで実行する
ターミナルから、次のコマンドを実行します。
python app.py
ターミナルは次を返す必要があります。
======== Running on http://localhost:3978 ========
(Press CTRL+C to quit)
エージェントをローカルでテストする
別のターミナルから (エージェントを実行し続けるために) 次のコマンドを 使用して、Microsoft 365 Agents Playground をインストールします。
npm install -g @microsoft/teams-app-test-toolNote
このコマンドでは npm が使用されます。 これは、pip を使用して Microsoft 365 Agents Playground を使用できないためです。
ターミナルは次のようなものを返す必要があります。
added 1 package, and audited 130 packages in 1s

19 packages are looking for funding
run `npm fund` for details

found 0 vulnerabilities
次のコマンドを使用して、テスト ツールを実行してエージェントと対話します。
teamsapptesterターミナルは次のようなものを返す必要があります。
Telemetry: agents-playground-cli/serverStart {"cleanProperties":{"options":"{\"configFileOptions\":{\"path\":\"<REDACTED: user-file-path>\"},\"appConfig\":{},\"port\":56150,\"disableTelemetry\":false}"}}

Telemetry: agents-playground-cli/cliStart {"cleanProperties":{"isExec":"false","argv":"<REDACTED: user-file-path>,<REDACTED: user-file-path>"}}

Listening on 56150
Microsoft 365 Agents Playground is being launched for you to debug the app: http://localhost:56150
started web socket client
started web socket client
Waiting for connection of endpoint: http://127.0.0.1:3978/api/messages
waiting for 1 resources: http://127.0.0.1:3978/api/messages
wait-on(37568) complete
Telemetry: agents-playground-server/getConfig {"cleanProperties":{"internalConfig":"{\"locale\":\"en-US\",\"localTimezone\":\"America/Los_Angeles\",\"channelId\":\"msteams\"}"}}

Telemetry: agents-playground-server/sendActivity {"cleanProperties":{"activityType":"installationUpdate","conversationId":"5305bb42-59c9-4a4c-a2b6-e7a8f4162ede","headers":"{\"x-ms-agents-playground\":\"true\"}"}}

Telemetry: agents-playground-server/sendActivity {"cleanProperties":{"activityType":"conversationUpdate","conversationId":"5305bb42-59c9-4a4c-a2b6-e7a8f4162ede","headers":"{\"x-ms-agents-playground\":\"true\"}"}}
teamsapptester コマンドを実行すると、既定のブラウザーが開き、エージェントに接続されます。
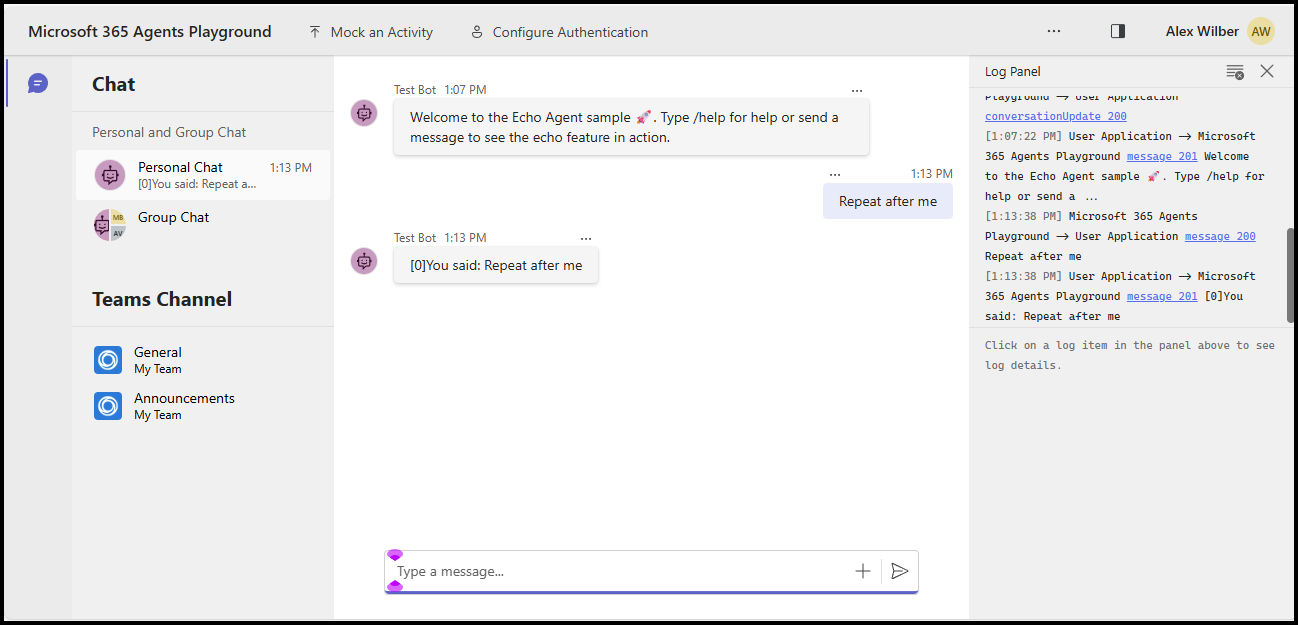
任意のメッセージを送信してエコー応答を表示したり、メッセージ /help を送信して、そのメッセージが _help ハンドラーにルーティングされる方法を確認したりできます。
このクイック スタートでは、送信したメッセージで返信する カスタム エンジン エージェント を作成する手順について説明します。
前提条件
v22 以降の Node.js
- Node.js インストールするには、 nodejs.org に移動し、オペレーティング システムの指示に従います。
- バージョンを確認するには、ターミナル ウィンドウで「
node --version」と入力します。
選択したコード エディター。 これらの手順では 、Visual Studio Code を使用します。
プロジェクトを初期化して SDK をインストールする
npmを使用して、package.json を作成し、必要な依存関係をインストールすることで、node.js プロジェクトを初期化します
ターミナルを開き、新しいフォルダーを作成する
mkdir echo
cd echo
node.js プロジェクトを初期化する
npm init -yAgents SDK をインストールする
npm install @microsoft/agents-hosting-express次のコマンドを使用して、Visual Studio Code を使用してフォルダーを開きます。
code .
必要なライブラリをインポートする
index.mjsファイルを作成し、次の NPM パッケージをアプリケーション コードにインポートします。
// index.mjs
import { startServer } from '@microsoft/agents-hosting-express'
import { AgentApplication, MemoryStorage } from '@microsoft/agents-hosting'
AgentApplication として EchoAgent を実装する
index.mjsで、次のコードを追加して EchoAgent を拡張するを作成し、3 つのイベントに応答する 3 つのルートを実装します。
- 会話の更新
- メッセージ
/help - その他のアクティビティ
class EchoAgent extends AgentApplication {
  constructor (storage) {
    super({ storage })

    this.onConversationUpdate('membersAdded', this._help)
    this.onMessage('/help', this._help)
    this.onActivity('message', this._echo)
  }

  _help = async context =>
    await context.sendActivity(`Welcome to the Echo Agent sample 🚀.
      Type /help for help or send a message to see the echo feature in action.`)

  _echo = async (context, state) => {
    let counter= state.getValue('conversation.counter') || 0
    await context.sendActivity(`[${counter++}]You said: ${context.activity.text}`)
    state.setValue('conversation.counter', counter)
  }
}
localhost:3978 でリッスンするように Web サーバーを起動する
index.mjs終了時に、ターン状態ストレージとして MemoryStorage を使用する Express に基づいて startServer を使用して Web サーバーを起動します。
startServer(new EchoAgent(new MemoryStorage()))
匿名モードでエージェントをローカルで実行する
ターミナルから、次のコマンドを実行します。
node index.mjs
ターミナルは次を返します。
Server listening to port 3978 on sdk 0.6.18 for appId undefined debug undefined
エージェントをローカルでテストする
別のターミナルから (エージェントを実行し続けるために) 次のコマンドを 使用して、Microsoft 365 Agents Playground をインストールします。
npm install -D @microsoft/teams-app-test-toolターミナルは次のようなものを返す必要があります。
added 1 package, and audited 130 packages in 1s

19 packages are looking for funding
run `npm fund` for details

found 0 vulnerabilities
次のコマンドを使用して、テスト ツールを実行してエージェントと対話します。
node_modules/.bin/teamsapptesterターミナルは次のようなものを返す必要があります。
Telemetry: agents-playground-cli/serverStart {"cleanProperties":{"options":"{\"configFileOptions\":{\"path\":\"<REDACTED: user-file-path>\"},\"appConfig\":{},\"port\":56150,\"disableTelemetry\":false}"}}

Telemetry: agents-playground-cli/cliStart {"cleanProperties":{"isExec":"false","argv":"<REDACTED: user-file-path>,<REDACTED: user-file-path>"}}

Listening on 56150
Microsoft 365 Agents Playground is being launched for you to debug the app: http://localhost:56150
started web socket client
started web socket client
Waiting for connection of endpoint: http://127.0.0.1:3978/api/messages
waiting for 1 resources: http://127.0.0.1:3978/api/messages
wait-on(37568) complete
Telemetry: agents-playground-server/getConfig {"cleanProperties":{"internalConfig":"{\"locale\":\"en-US\",\"localTimezone\":\"America/Los_Angeles\",\"channelId\":\"msteams\"}"}}

Telemetry: agents-playground-server/sendActivity {"cleanProperties":{"activityType":"installationUpdate","conversationId":"5305bb42-59c9-4a4c-a2b6-e7a8f4162ede","headers":"{\"x-ms-agents-playground\":\"true\"}"}}

Telemetry: agents-playground-server/sendActivity {"cleanProperties":{"activityType":"conversationUpdate","conversationId":"5305bb42-59c9-4a4c-a2b6-e7a8f4162ede","headers":"{\"x-ms-agents-playground\":\"true\"}"}}
teamsapptester コマンドを実行すると、既定のブラウザーが開き、エージェントに接続されます。
任意のメッセージを送信してエコー応答を表示したり、メッセージ /help を送信して、そのメッセージが _help ハンドラーにルーティングされる方法を確認したりできます。
このクイック スタートでは、送信したメッセージで返信する カスタム エンジン エージェント を作成する手順について説明します。
前提条件
.NET 8.0 SDK 以降
- .NET SDK をインストールするには、 dotnet.microsoft.com に移動し、オペレーティング システムの指示に従います。
- バージョンを確認するには、ターミナル ウィンドウで「
dotnet --version」と入力します。
選択したコード エディター。 これらの手順では 、Visual Studio Code を使用します。
プロジェクトを初期化して SDK をインストールする
dotnetを使用して新しい Web プロジェクトを作成し、必要な依存関係をインストールします。
ターミナルを開き、新しいフォルダーを作成する
mkdir echo
cd echo
.NET プロジェクトを初期化する
dotnet new webAgents SDK をインストールする
dotnet add package Microsoft.Agents.Hosting.AspNetCore次のコマンドを使用して、Visual Studio Code を使用してフォルダーを開きます。
code .
必要なライブラリをインポートする
Program.csで、既存のコンテンツを置き換え、次の using ステートメントを追加して、SDK パッケージをアプリケーション コードにインポートします。
// Program.cs
using Microsoft.Agents.Builder;
using Microsoft.Agents.Builder.App;
using Microsoft.Agents.Builder.State;
using Microsoft.Agents.Core.Models;
using Microsoft.Agents.Hosting.AspNetCore;
using Microsoft.Agents.Storage;
using Microsoft.AspNetCore.Builder;
AgentApplication として EchoAgent を実装する
Program.csでは、using ステートメントの後に、次のコードを追加して EchoAgent を拡張するを作成し、イベントに応答するルートを実装します。
- 会話の更新
- その他のアクティビティ
public class EchoAgent : AgentApplication
{
   public EchoAgent(AgentApplicationOptions options) : base(options)
   {
      OnConversationUpdate(ConversationUpdateEvents.MembersAdded, WelcomeMessageAsync);
      OnActivity(ActivityTypes.Message, OnMessageAsync, rank: RouteRank.Last);
   }

   private async Task WelcomeMessageAsync(ITurnContext turnContext, ITurnState turnState, CancellationToken cancellationToken)
   {
        foreach (ChannelAccount member in turnContext.Activity.MembersAdded)
        {
            if (member.Id != turnContext.Activity.Recipient.Id)
            {
                await turnContext.SendActivityAsync(MessageFactory.Text("Hello and Welcome!"), cancellationToken);
            }
        }
    }

   private async Task OnMessageAsync(ITurnContext turnContext, ITurnState turnState, CancellationToken cancellationToken)
   {
      await turnContext.SendActivityAsync($"You said: {turnContext.Activity.Text}", cancellationToken: cancellationToken);
   }
}
Web サーバーを設定し、エージェント アプリケーションを登録する
Program.csで、using ステートメントの後に、次のコードを追加して Web ホストを構成し、エージェントを登録し、/api/messages エンドポイントをマップします。
var builder = WebApplication.CreateBuilder(args);

builder.Services.AddHttpClient();
builder.AddAgentApplicationOptions();
builder.AddAgent<EchoAgent>();
builder.Services.AddSingleton<IStorage, MemoryStorage>();

var app = builder.Build();

app.MapPost("/api/messages", async (HttpRequest request, HttpResponse response, IAgentHttpAdapter adapter, IAgent agent, CancellationToken cancellationToken) =>
{
    await adapter.ProcessAsync(request, response, agent, cancellationToken);
});

app.Run();
localhost:3978 でリッスンするように Web サーバーを設定する
launchSettings.jsonで、アプリが正しいポートでリッスンするように、applicationURLをhttp://localhost:3978に更新します。
匿名モードでエージェントをローカルで実行する
ターミナルから、次のコマンドを実行します。
dotnet run
ターミナルは次のようなものを返す必要があります。
info: Microsoft.Hosting.Lifetime[14]
      Now listening on: http://localhost:3978
エージェントをローカルでテストする
別のターミナルから (エージェントを実行し続けるために) 次のコマンドを 使用して、Microsoft 365 Agents Playground をインストールします。
npm install -g @microsoft/teams-app-test-toolNote
Microsoft 365 Agents Playground は npm パッケージとして配布されるため、このコマンドでは npm が使用されます。
ターミナルは次のようなものを返す必要があります。
added 1 package, and audited 130 packages in 1s

19 packages are looking for funding
run `npm fund` for details

found 0 vulnerabilities
次のコマンドを使用して、テスト ツールを実行してエージェントと対話します。
teamsapptesterターミナルは次のようなものを返す必要があります。
Telemetry: agents-playground-cli/serverStart {"cleanProperties":{"options":"{\"configFileOptions\":{\"path\":\"<REDACTED: user-file-path>\"},\"appConfig\":{},\"port\":56150,\"disableTelemetry\":false}"}}

Telemetry: agents-playground-cli/cliStart {"cleanProperties":{"isExec":"false","argv":"<REDACTED: user-file-path>,<REDACTED: user-file-path>"}}

Listening on 56150
Microsoft 365 Agents Playground is being launched for you to debug the app: http://localhost:56150
started web socket client
started web socket client
Waiting for connection of endpoint: http://127.0.0.1:3978/api/messages
waiting for 1 resources: http://127.0.0.1:3978/api/messages
wait-on(37568) complete
Telemetry: agents-playground-server/getConfig {"cleanProperties":{"internalConfig":"{\"locale\":\"en-US\",\"localTimezone\":\"America/Los_Angeles\",\"channelId\":\"msteams\"}"}}

Telemetry: agents-playground-server/sendActivity {"cleanProperties":{"activityType":"installationUpdate","conversationId":"5305bb42-59c9-4a4c-a2b6-e7a8f4162ede","headers":"{\"x-ms-agents-playground\":\"true\"}"}}

Telemetry: agents-playground-server/sendActivity {"cleanProperties":{"activityType":"conversationUpdate","conversationId":"5305bb42-59c9-4a4c-a2b6-e7a8f4162ede","headers":"{\"x-ms-agents-playground\":\"true\"}"}}
teamsapptester コマンドを実行すると、既定のブラウザーが開き、エージェントに接続されます。
テキスト入力で、エコー応答を表示するメッセージを入力して送信します。
次のステップ
- GitHub で Agents SDK のサンプルを確認する
- アクティビティの詳細とアクティビティの操作
- クライアントから応答できる AgentApplication イベントを確認する
- クライアントに返送できる TurnContext イベントを確認する
- Agents SDK で使用する Azure Bot リソースをプロビジョニングする
- OAuth を使用するように .NET エージェントを構成する
Microsoft 365 Agents Toolkit を既に使用している場合、Agents Playground は既定で使用できます。 ツールキットの使用を開始する場合は、次のいずれかのガイドを使用できます。